How to connect BigCommerce with Quickbooks Online Integration?
Starting a business of your own is never an easy task, especially when it comes to financing. Many entrepreneurs get into trouble with taxes, revenue stream, cost structure.
Quickbooks Online is always available to help you. It is much easier to manage your business now with Quickbooks Online. Why? Because it saves time, effort, and errors by automating your bookkeeping.
Feel curious yet? Are you motivated to install the tool immediately?
If yes, let’s dive in and learn how to connect BigCommerce with Quickbooks Online integration.
What is Quickbooks?
Quickbooks was invented by Intuit in 1998, specifically by Scott Cook and Tom Proulx. It is an accounting software aimed at small and medium-sized companies. When first introduced, it came into some criticism from accountants that it lacked security, an audit trail, and robustness.
Later in 2000, Quickbooks was updated to include audit trials, double entries, and so on. Particular packages were also developed to meet the needs of specific companies like contracting, retail or not-for-profit.
Quickbook now allows you to manage all aspects of your business cost and revenue streams, including tax, sales, and expenses. Also, the tool offers readily available reports so that you can easily keep track of your business, thus making changes when and where necessary.
Quickbooks Online and Quickbooks Desktop are the two most popular products by Intuit. The critical difference is that Quickbooks Online uses cloud-based software while the desktop one is locally installed.
Quickbooks Online Features
When we talk of accounting software, the only two things that make one application worthy are time-saving and accuracy. With Quickbooks Online, there is no doubt about these two qualities. To be more specific, QBO allows users to:
- Creating estimates and invoices
- Monitoring sales and cash flow
- Supervising your customers and suppliers
- Monitoring your tax and facilitating tax return
- Understanding your company’s performance
- Planning ahead and budgeting
Obviously, Quickbooks Online is cloud-based, so there is no need to install it, which means you can easily get access from your internet browser. With the listed features above, your financial tasks will not be a burden anymore.
Another notable feature of Quickbooks Online is that it now offers Quickbooks Live Bookkeeping. This means that users now can acquire professional support from certified QBO accountants and Certified Public Accountants (CPAs). Of course, you will have to pay an additional fee. This is especially useful if you are new to both accounting and QBO as well.
How to integrate Quickbooks with BigCommerce
Before getting started, you need to accomplish quite a few requirements for each BigCommerce and Quickbooks Online.
With BigCommerce:
- Set up payment methods
- Set up taxes. Either manual or automatic taxes are supported.
- Unique SKUs (Stock keeping unit) for each product and variant.
- Precise customer data to avoid duplicate data among systems.
With Quickbooks Online:
- Set up taxes. Both manual and automated sales tax are supported.
- Set up your Chart of Accounts
- Enable Shipping and Discounts
- Enable Track Quantity on Hand
- Know how to integrate your payments in your accounting system using clearing accounts
Once you have made sure that all these requirements are met, you can now install Quickbooks Online.
Step 1: Connect Quickbooks with BigCommerce
-
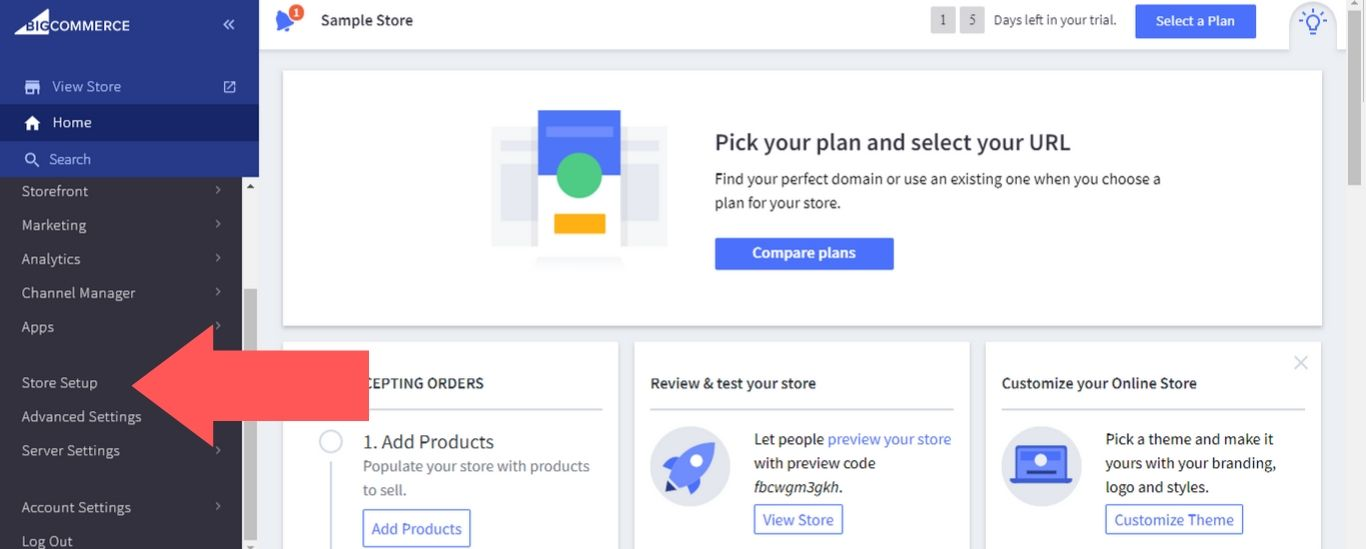
First, in the BigCommerce dashboard, click Store Setup.
-
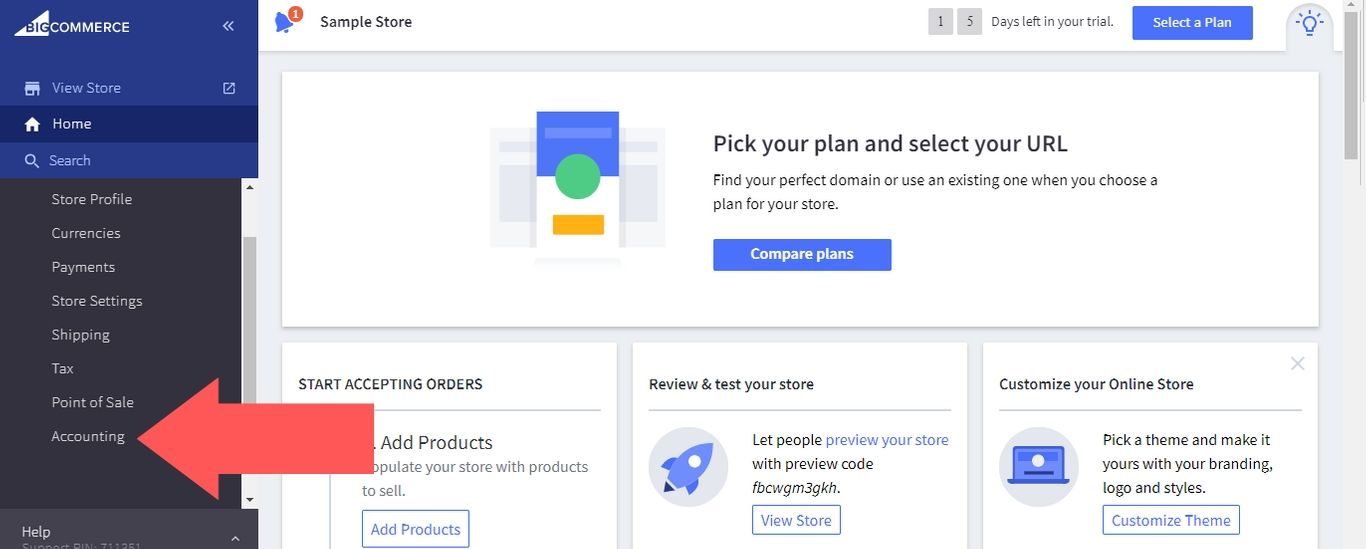
Choose Accounting
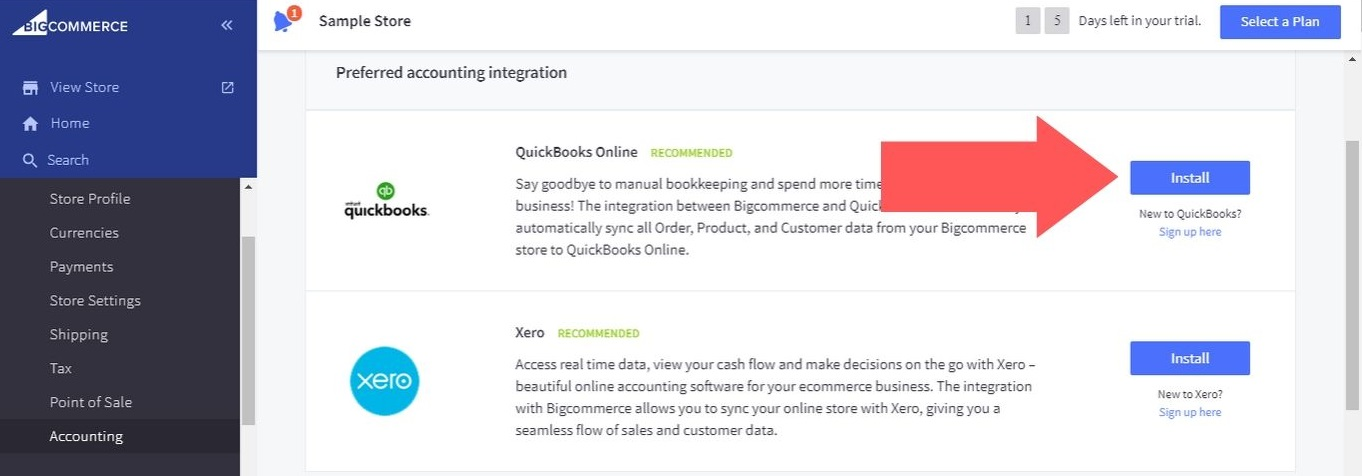
- Then, click the Install button next to Quickbooks Online icon.
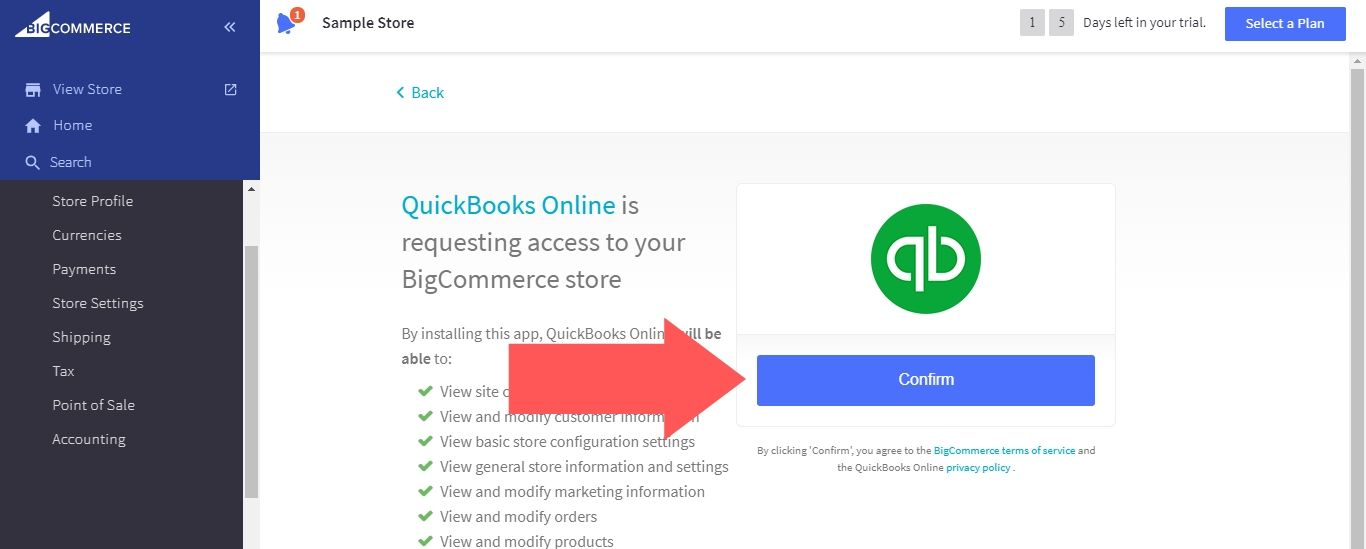
- Choose ‘Confirm’. Quickbooks Online now is allowed to access your BigCommerce store.
- Then, you will be asked to approve connectivity between the two platforms. Click Connect to grant access. If you haven’t had a Quickbooks account yet, you will be guided to create a trial.
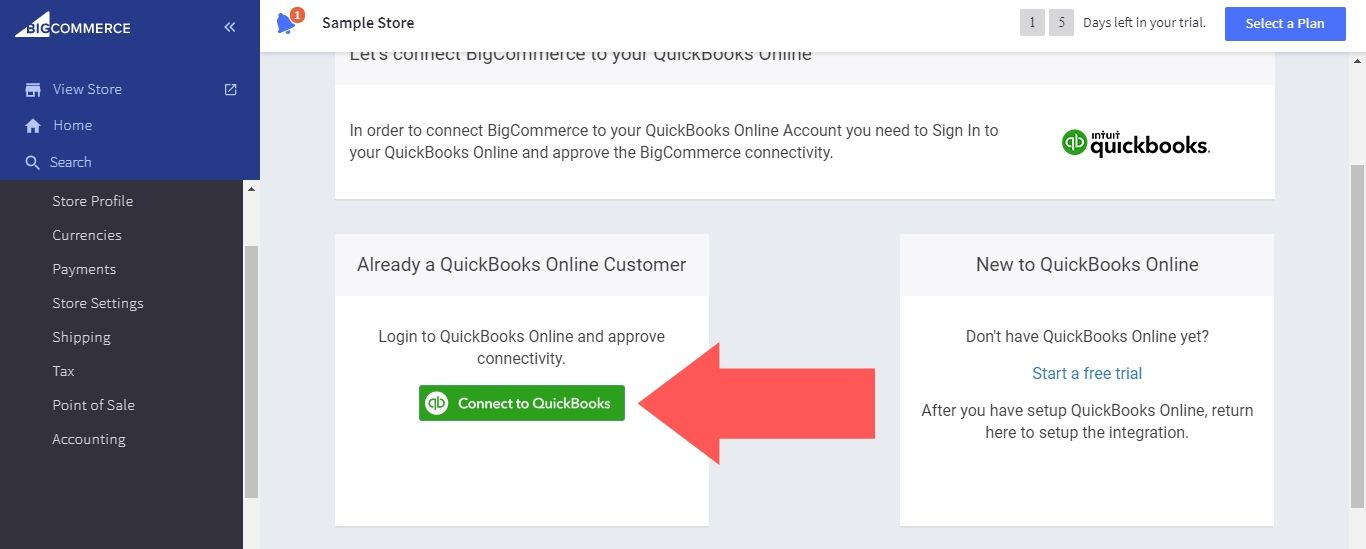
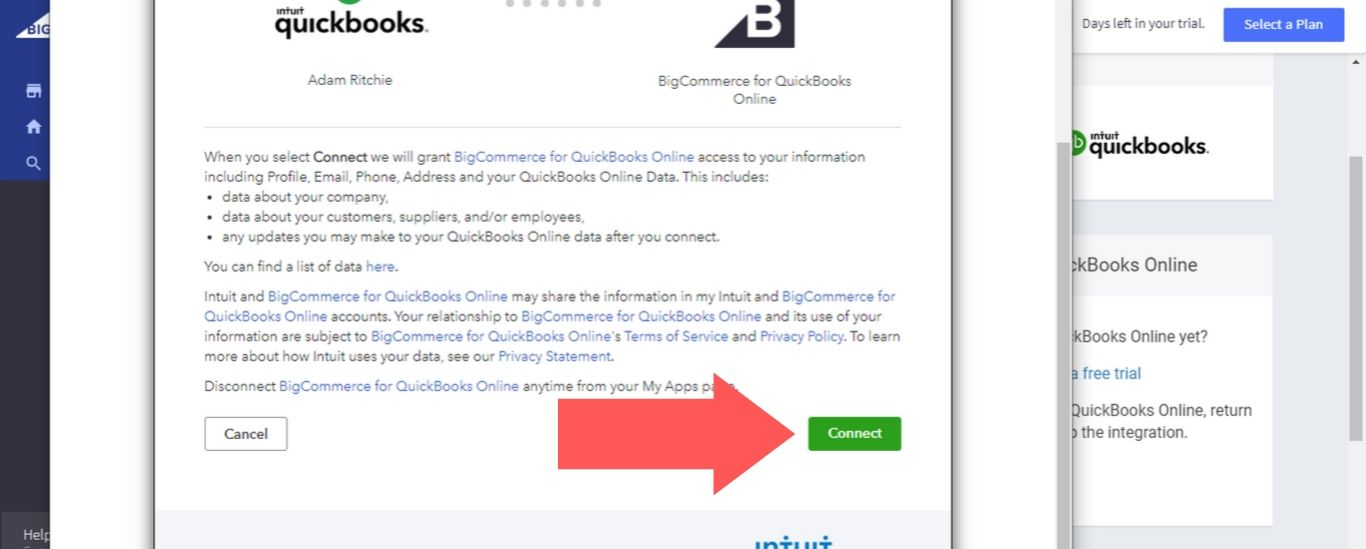
- Finally, select ‘Connect’ to finish the setup process.
If this is the first time you have logged into your BigCommerce from Quickbooks Online, you will be presented to two options for your workflow. See the picture below for details:
Now, let’s look deeper into each workflow.
Step 2: Import orders and Create an Invoice in Quickbooks Online
If you choose the first option, you will have to fill in the following :
Retrieve Orders from BigCommerce
You will need to determine the order statuses you would like to sync and how they would appear in Quickbooks Online. Some statuses include Awaiting Pickup, Shipped, Awaiting Payment, Awaiting Shipment.
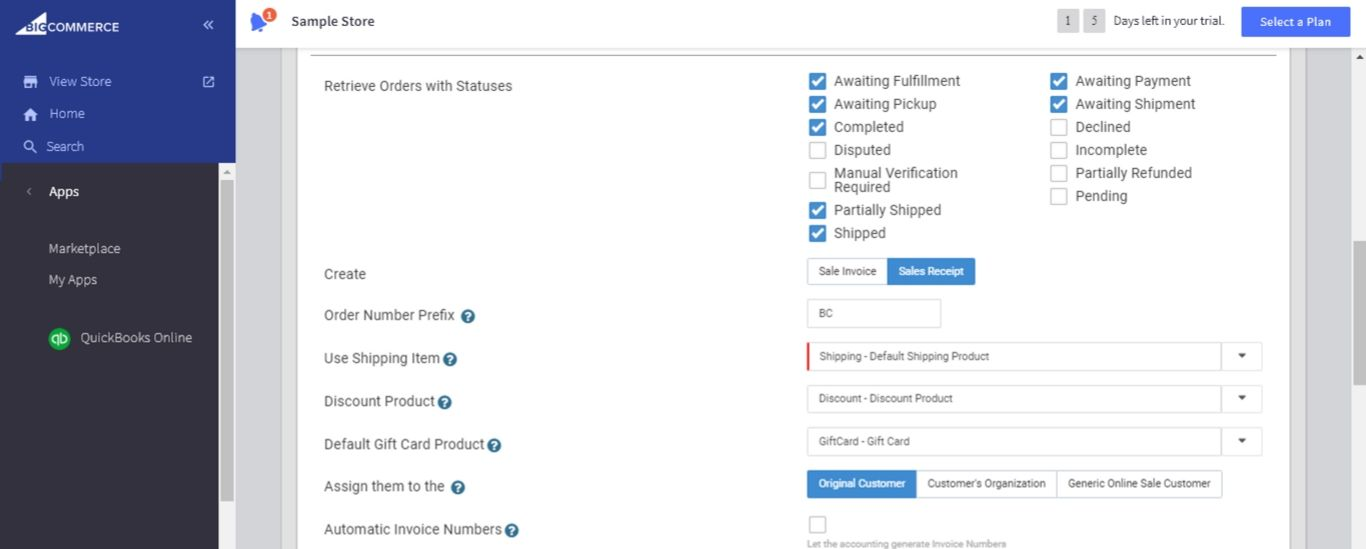
You will then notice there is a “Default Products and Advanced Options” button. This allows you to set a chosen order prefix as well as default goods for different product lines used in orders. Or invoice numbers can be generated once orders are delivered over to your BigCommerce store.
These options include:
- Order Number Prefix - to distinguish your BigCommerce orders from other orders
- Use Shipping Item - to specify a product to determine shipping charges
- Discount Product - to specify a discounted product to monitor your discounts
- Default Gift Card Product - to specify a gift card product to track your gift cards
- Assign them to the - to detect the nature of the customer record created in Quickbooks Online. The default option is ‘Original Customer’, in this case, Sale Invoices will be assigned to the people who placed the order. If a customer specifies a company and you would like to have that appear, you can choose ‘Customer’s Organization’, and the sale invoice will be sent to the company of the people who placed the order. Alternatively, you can opt for ‘Generic Online Sale Customer’ if you want no customer records.
- Automatic Invoice Numbers - to get rid of BigCommerce order numbers and head for sequential invoice numbers within Quickbooks Online.
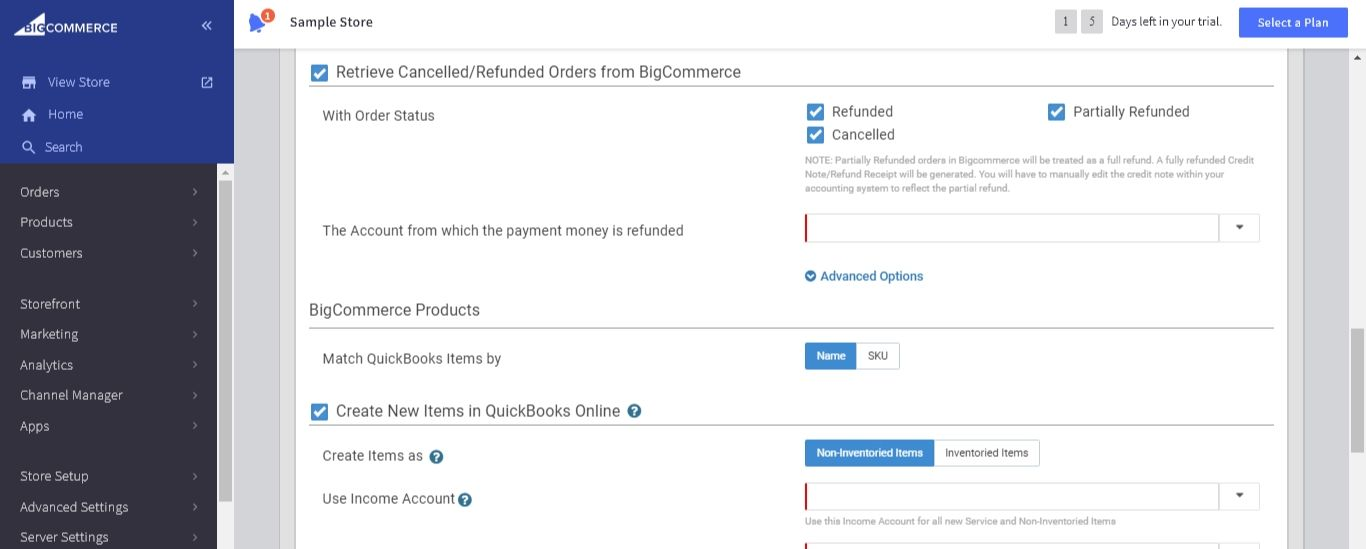
Retrieve Cancelled or Refunded Orders from BigCommerce
This tool allows you to determine whether refunds should be generated when orders are refunded or canceled in BigCommerce. Be alert that Partially Refunded orders will be treated as full refunds in BigCommerce. Therefore, you will need to modify it yourself.
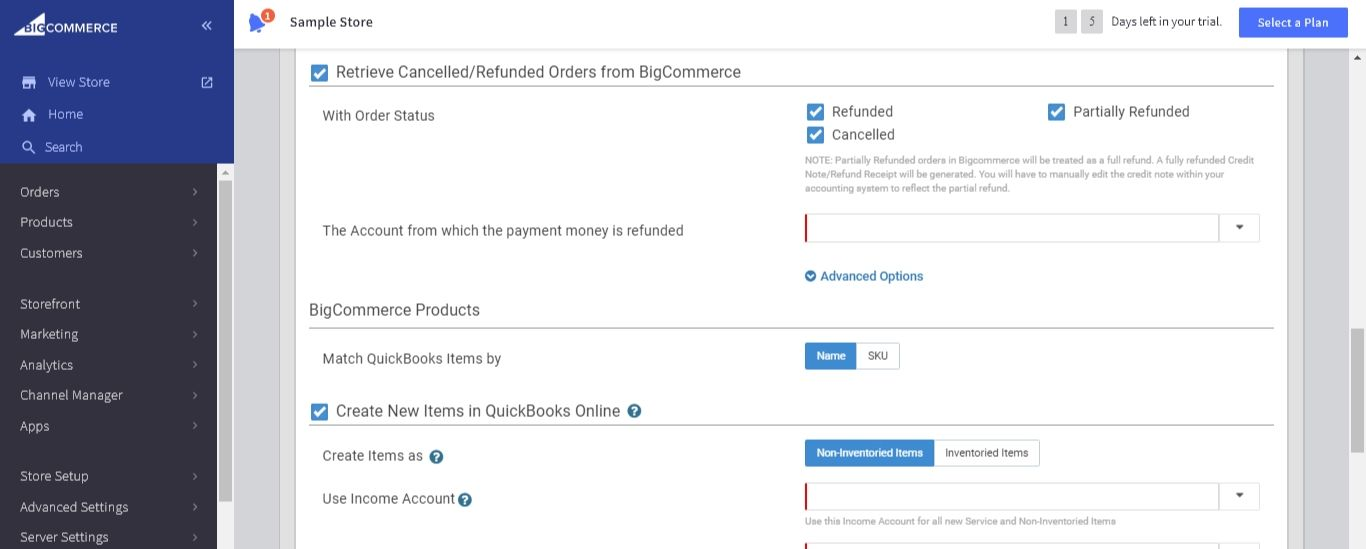
Or you can add a prefix to refunded orders retrieved from BigCommerce by clicking Advanced Options. This works no different from the ‘Default Products and Advanced Options’ above.
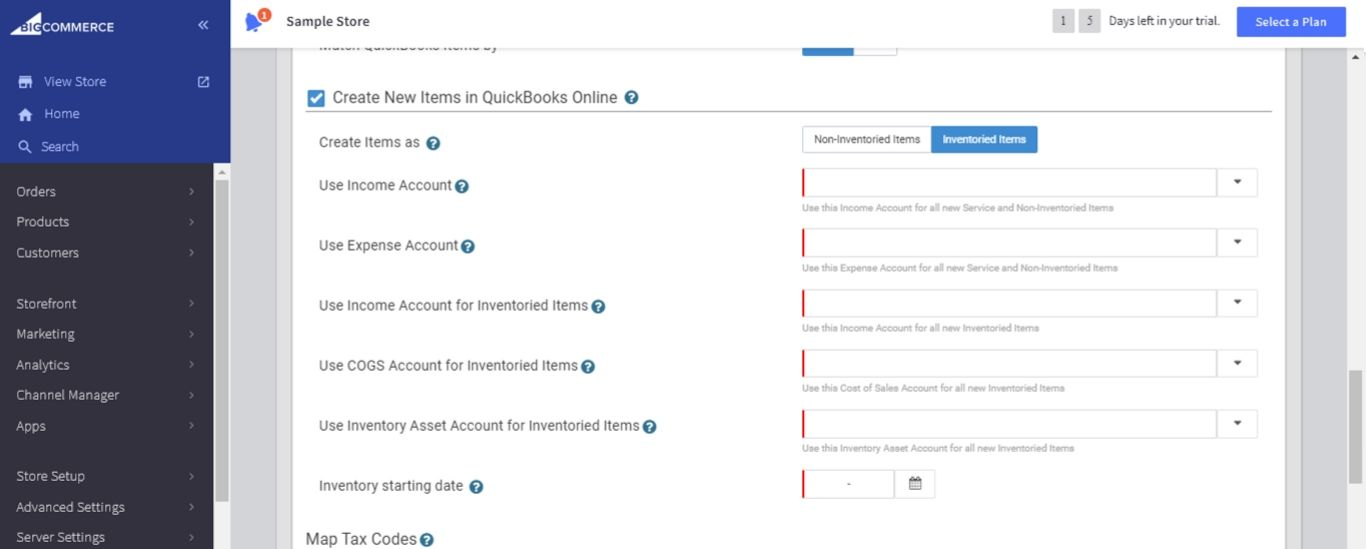
BigCommerce Products vs. Quickbooks Products
You can match the existing products in Quickbooks Online (if any) to your BigCommerce products by choosing either Quickbooks item name or SKU.
Create New Items in Quickbooks Online
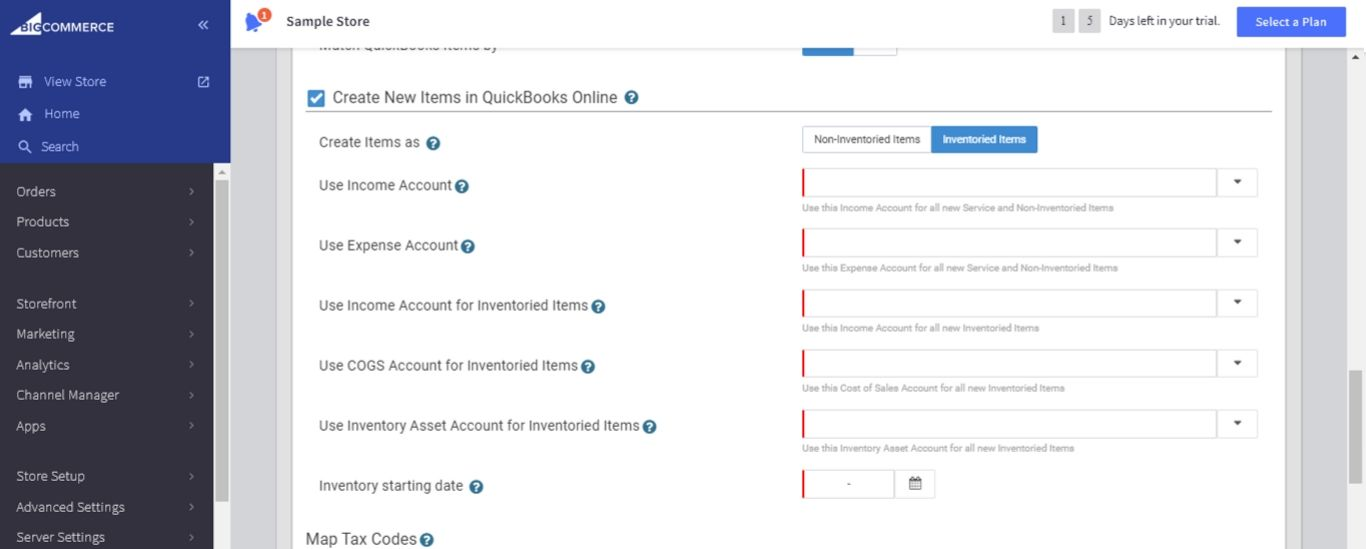
- If you want new items in BigCommerce to be automatically produced in Quickbooks, choose ‘Non-Inventoried Items’ or ‘Inventoried Items’, which assign or do not assign Income, COGS or Asset Accounts information, respectively.
- Income Account, Expense Account, COGS Account, Inventory Asset Account: The account chosen will be set as the default account for all items. If you want different accounts for different items, you will need to edit this after all items are created.
- Inventory Starting Date: You need to choose a starting date for tracking inventory if you choose to track inventory. Ensure that you set this at least one day earlier of the integration so that historical sales can be counted against items created by the integration.
Map Tax Codes
A tax code in BigCommerce is matched to another in Quickbooks Online, with BigCommerce one displayed on the left and QBO on the right. You need to choose the corresponding tax code in QBO from the drop-down menus.
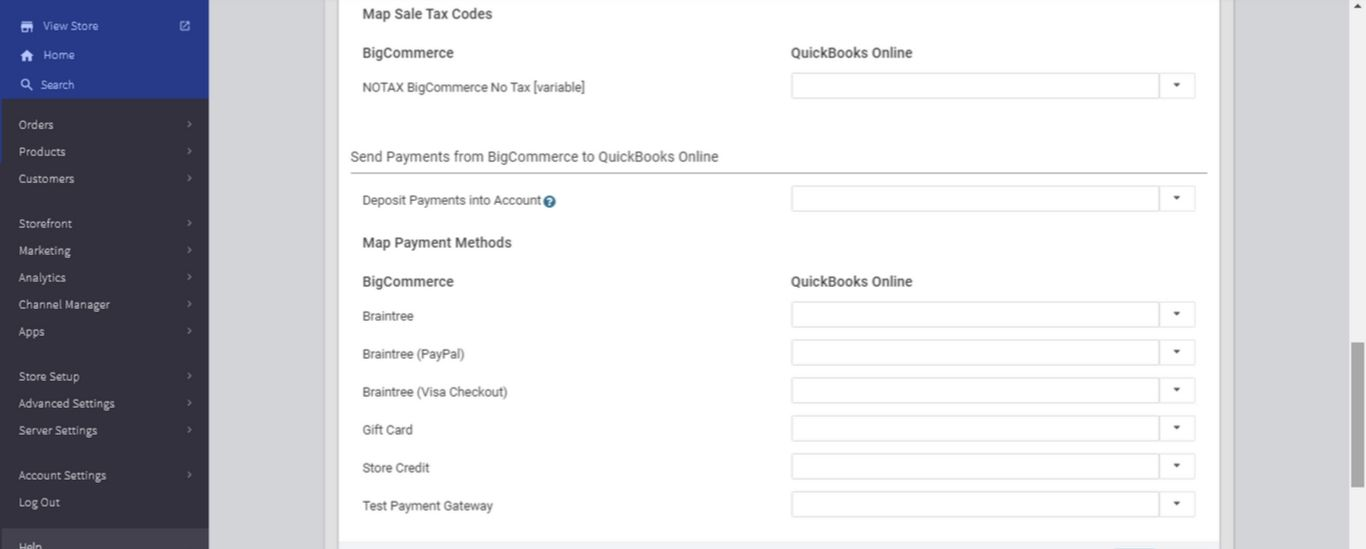
In case you do not see the code you are looking for, log into QBO and create it. Then get back to BigCommerce and refresh the current page. But if Automated Sales Tax are enabled in the first place, then no mapping tax codes are needed.
Step 3: Send Payments from Quickbooks to BigCommerce
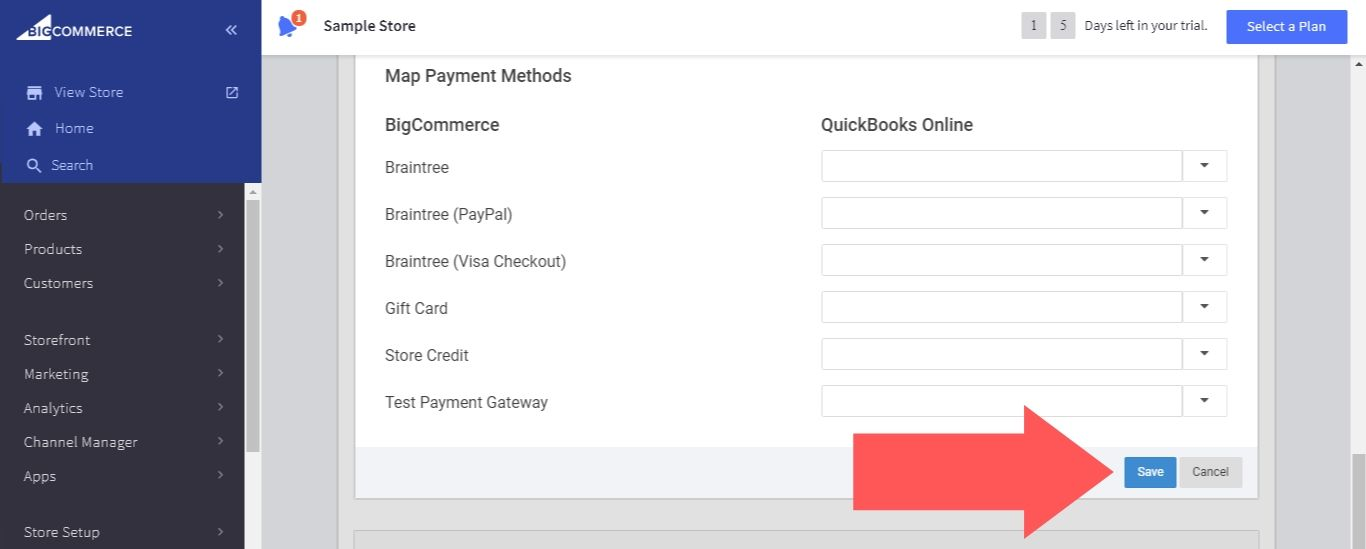
You can choose to assign payments to different accounts. All payments can go to one single account, or each payment can go to a different account according to your preferences.
Payments that are not individually mapped will be mapped to the default account.
Once you have finished setting up, click Save. Then, an outline of what you have configured will appear; click Edit if you want to make changes.
Quickbooks Online Versions and Pricing
There are five versions of Quickbooks Online. They are Self-Employed, Simple Start, Essentials, Plus, and Advanced. For Quickbooks online, payments are made monthly.
- Quickbooks Online Self-Employed: From its name, it is pretty easy to get the correct guess that this version is aimed at self-employed people, namely freelancers and private contractors. It helps users to estimate income tax every four months. Self-Employed is limited to one user only. Price: $15/month
- Quickbooks Online Simple Start: The Simple Start is suitable for small businesses. This package allows for managing sales tax as well as creating estimates and converting them into invoices. Like Self-Employed, this version limits access to one person. Price: $25/month
- Quickbooks Online Essentials: The Essentials package is the best option for small businesses that need to track unpaid bills and record multi-currency transactions. The maximum number of users for this version is three. Price: $40/month
- Quickbooks Online Plus: Quickbooks Plus is a wonderful choice for retailers, wholesalers, contractors, and other small businesses. It enables users to track inventory using a first-in, first-out method and track profitability by classes, customer types, and locations. Price: $70/month
- Quickbooks Online Advanced: Quickbooks Online Advanced is the most expensive version, with the most features available for its users. It is best suited for SMEs (small and medium-sized enterprises). With this version, up to 25 people can have access. Price: $150/month
Conclusion
Above is the detailed guideline on how to connect BigCommerce with Quickbooks Online Integration and some related topics. We hope that with what we have provided, you encounter no problems when doing so. So head on and do it by yourself!


