
How to Setup Year Make Model Search for BigCommerce
By Sam Nguyen

If you are having trouble with managing your large product database, then you have come to the right place. In today’s article, we will be introducing you to an application that enables you to set up a detailed search bar for finding products on your website. BigCommerce Year Make Model Search will be the perfect solution to all of your related problems. Keep reading, because besides how this spectacular app works, we will also focus on How to set up a BigCommerce Year Make Model search tool for your online store, too!
About Year Make Model Search

Year Make Model Search is an application designed with an aim to standardize product filters for your consumers and accelerates the process. With the availability of their limitless search dropdowns, Year Make Model Search can become a powerful solution for finding items from a large product database. You may rely on this application to keep track of your online business in good order.
Additionally, you may create up to 6 search dropdown filters once you have set up BigCommerce Year Make Model Search integration for your store. Besides the numerous search dropdowns, online merchants can also assign a shortcode to the app to have it run inside the website. Not only can you set up the search dropdown for your products page but customizing it is also possible with the help of Year Make Model Search.
Receiving 5 out of 5 review stars, Year Make Model Search has continually proved their productivity. And all of these outstanding features only come in $29.99 monthly. In case you are still wondering about how it works, you can try out their free trial version that lasts for 7 days.
The benefits of using BigCommerce Year Make Model Search
Up to the present, BigCommerce year make model search is considered as one of the most effective apps providing search dropdown method in the eCommerce industry. The reasons behind this recognition are their most-updated features, including:
- Multiple search dropdowns: the more specific search you set up for your store, the easier it is to keep your customers coming back. BigCommerce year make model search allows e-tailers to create up to 6 search dropdowns based on their preferences.
- Easy CSV file exporting: within a large number of products, it may be exhausting to export the entire CSV file. Fortunately, your problem is solved when working with Year Make Model search, they can quickly export your product file using SKU and product name.
- Universal products appearing in search results: You can use YMM filters to show relevant goods in search results regardless of search terms. This may be done by creating universal products that are shown in all results of the YMM filter.
- Rows importing with year ranges: It is possible to simplify the import data by providing ranges in CSV file. For example, if you provide the dates as beginning from 1990 and continuing until 2012, then the app will add the identical YMM Rows for each year from 1990 until 2012.
- Adjustable search box design: With various colors and fonts, you may create your own search bar. This software lets you display search results on both the default page, as well as your own, personalized results page for each client search.
How to set up a BigCommerce Year Make Model Search for your store?
Now that you have a grasp of how BigCommerce Year Make Model Search works and the benefits it brings back to your store. It is time to set up the integration! We will guide you through the tutorial of How to set up BigCommerce Year Make Model Search for your store by small simple steps. Be careful not to miss a single step as you might have to start over if the integration is not working.
Step 1: Installing the Year Make Model Search application
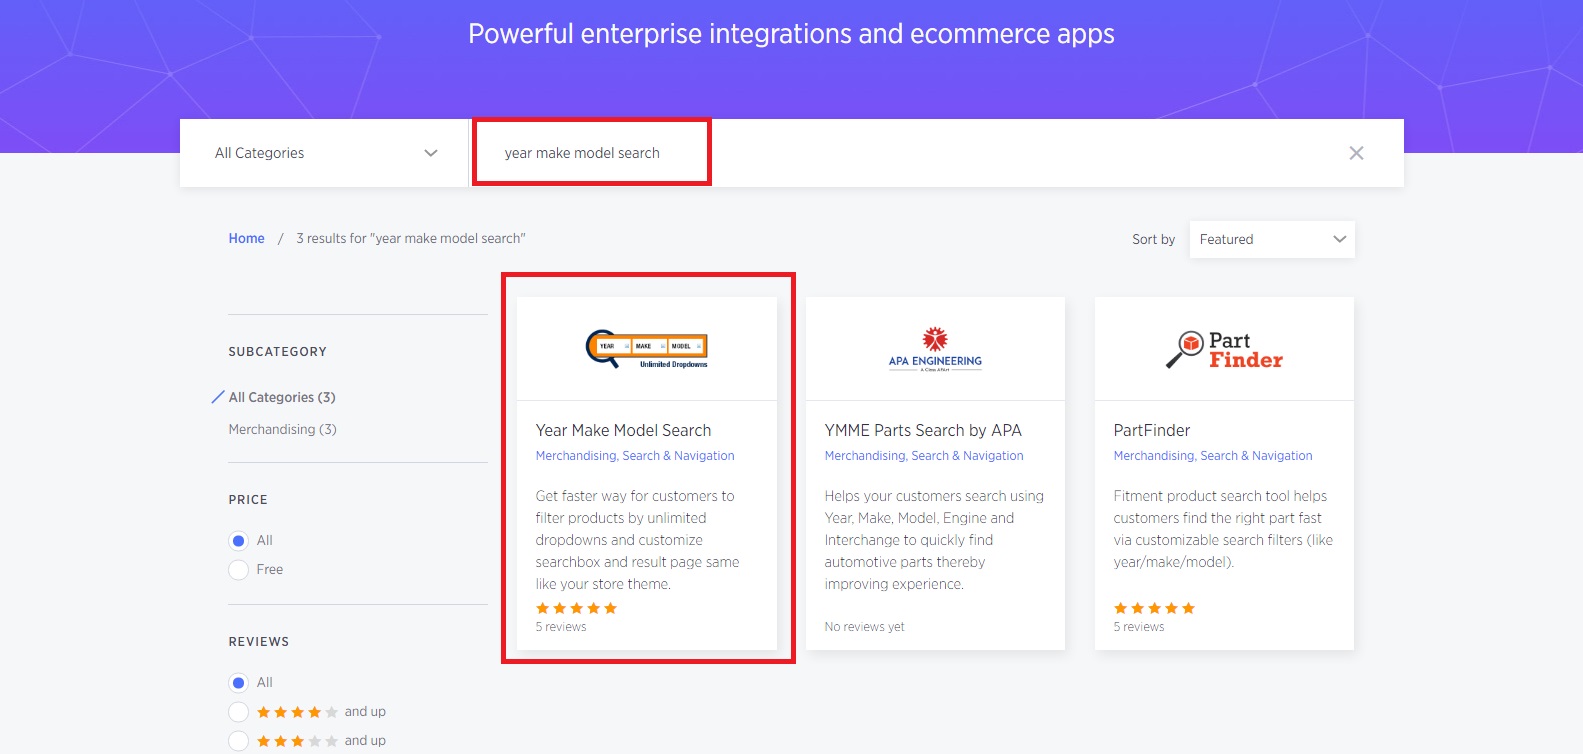
From BigCommerce App Marketplace, search for Year Make Model Search in the search bar and click on the first result that you see:
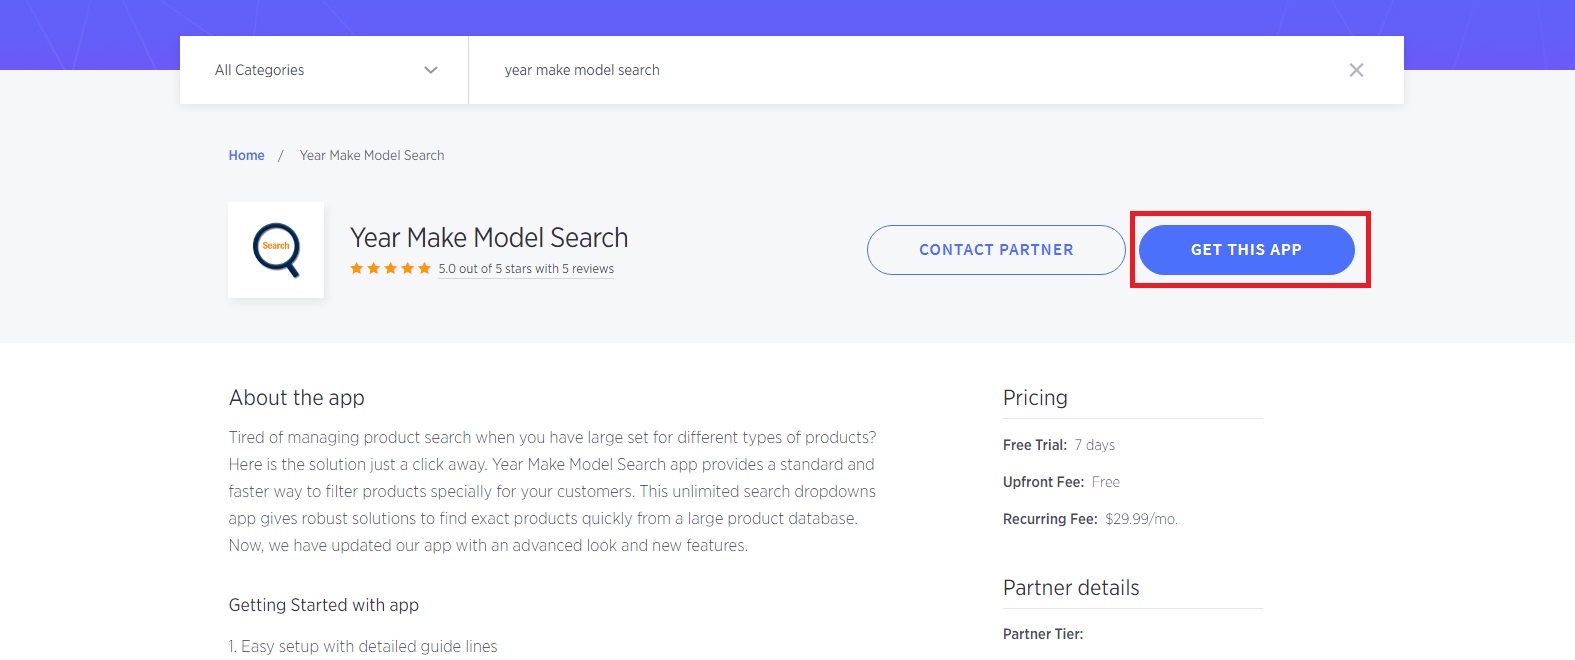
Then select the “Get this App” blue button:
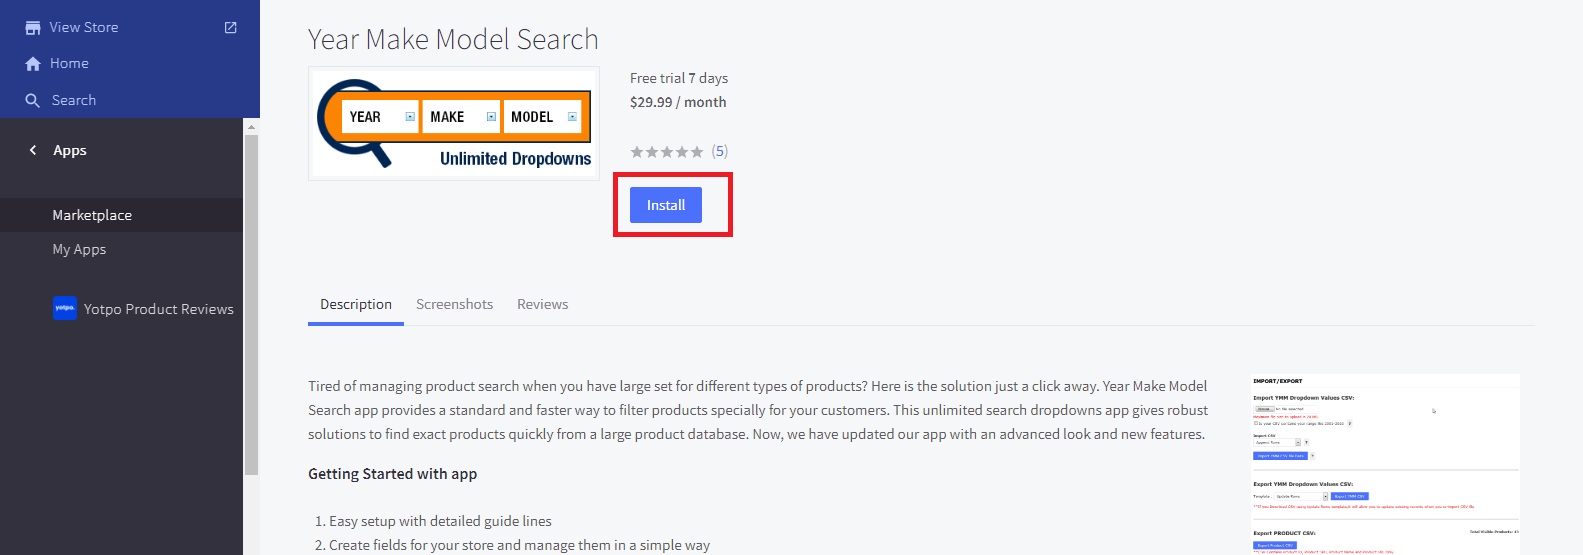
BigCommerce will redirect you back to the BigCommerce Dashboard, click on “Install” and “Confirm” to start the integration process:
Step 2: Make Year Make Model Search available in your Frontend
At your BigCommerce control panel, go to Apps > Year Make Model Search > How to Use it and click on the “Download” button located under the files:

After the downloading process is finished, you need to connect it to your store webdav server following the instructions here and open the “content” folder in webdav, there will be a “ymmapp” appeared in this specific file.
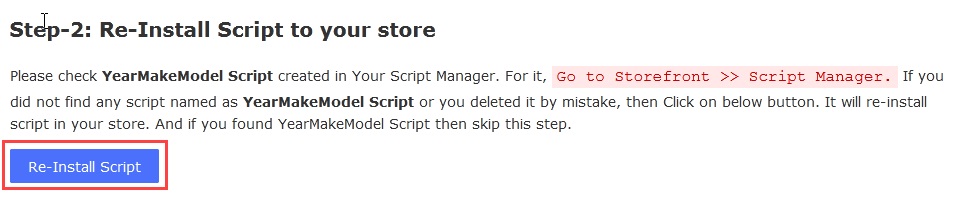
Moving on, enter the Storefront > Script Manager and check for your YearMakeModel script. In case you can not find it you can easily select the Re-install Scripts button:
We will be copying the given template code into our Theme files:
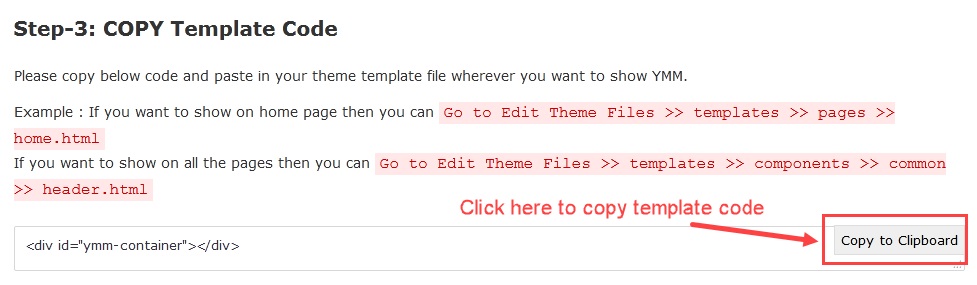
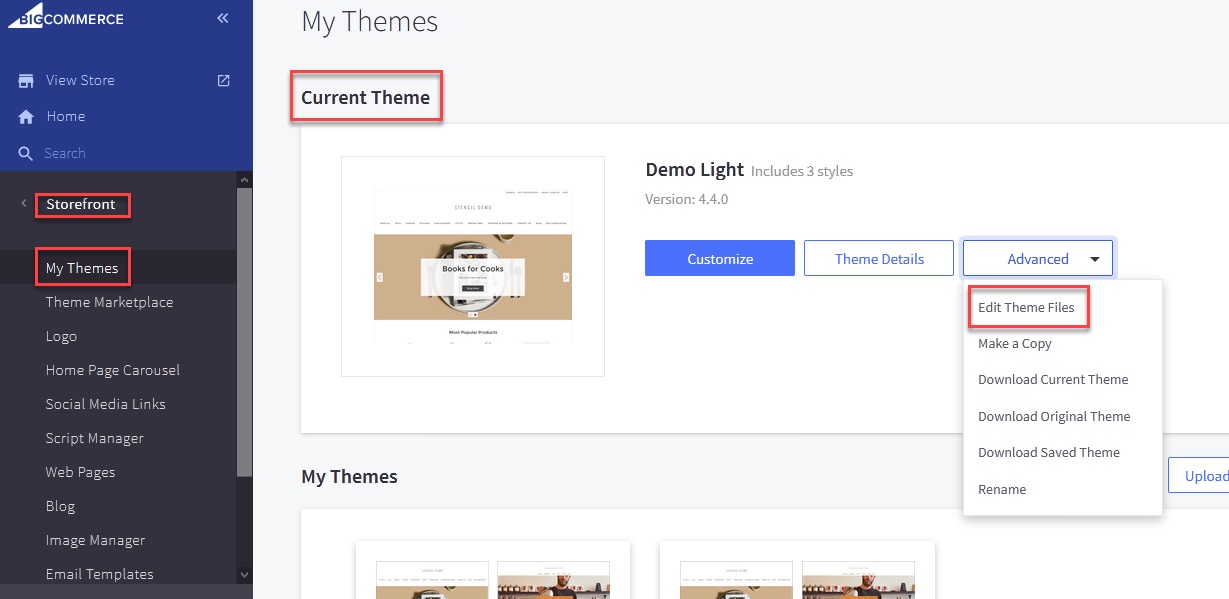
From your Storefront > My Themes, click on “Advanced” and “Edit Theme files” and paste the code into your templates > components > common > header.html file like below:
Continue, we go back to the “How to use it” page, copy the Webpage template source code like in the image:
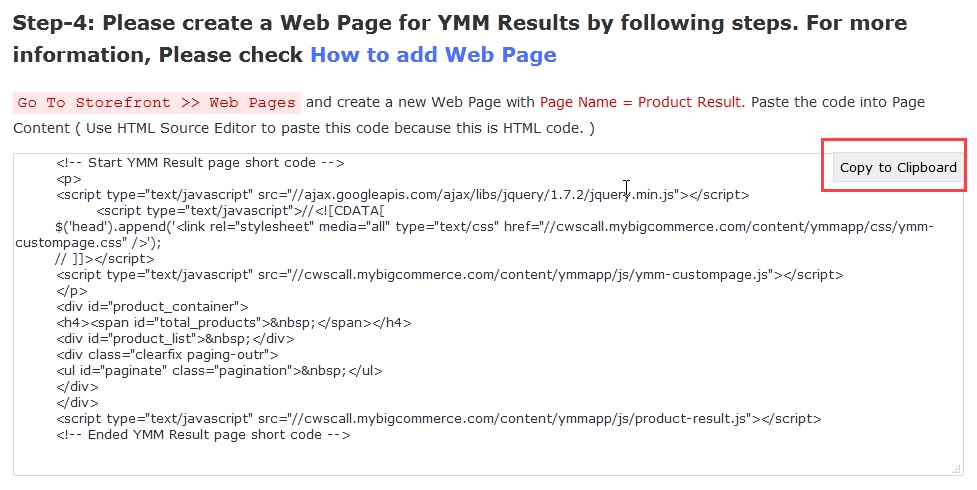
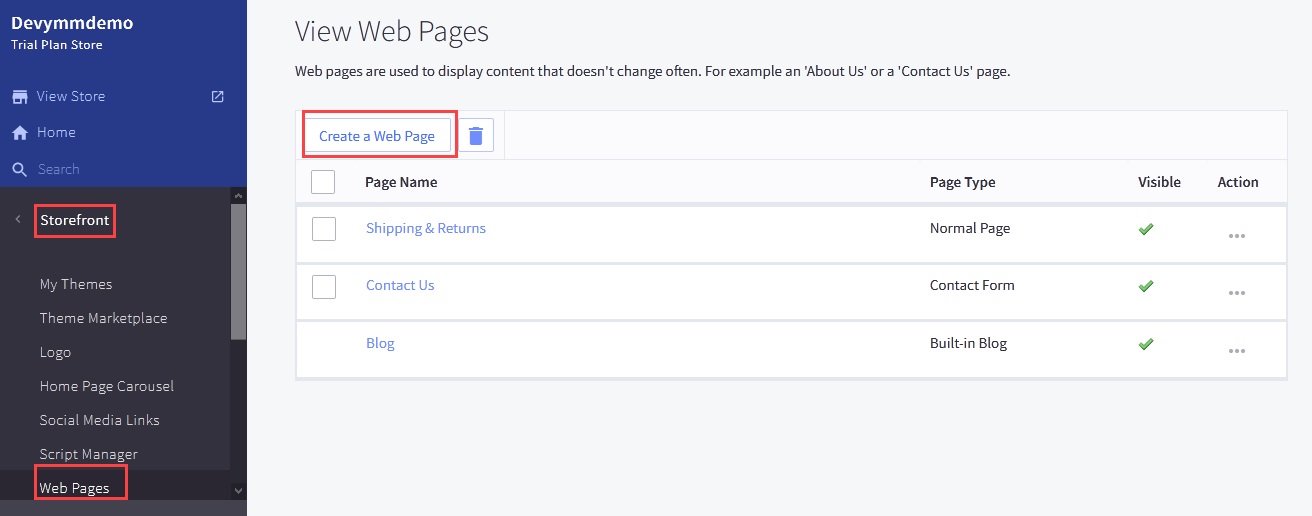
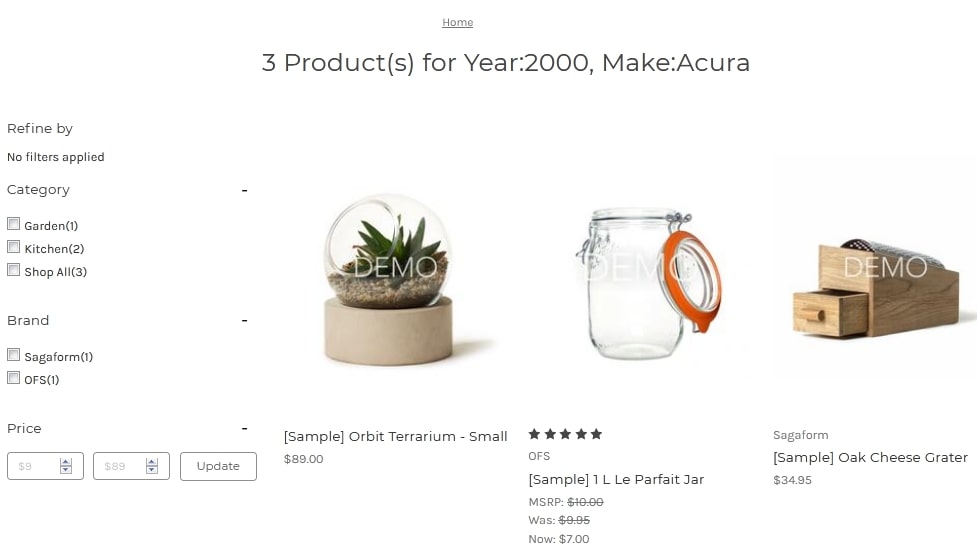
Last but not least, go to Storefront > Web Pages and click on the “Create a Web Page” button, paste in the previous code and name the page as “Product Result” or anything that you like. Go to your website to check for the result!
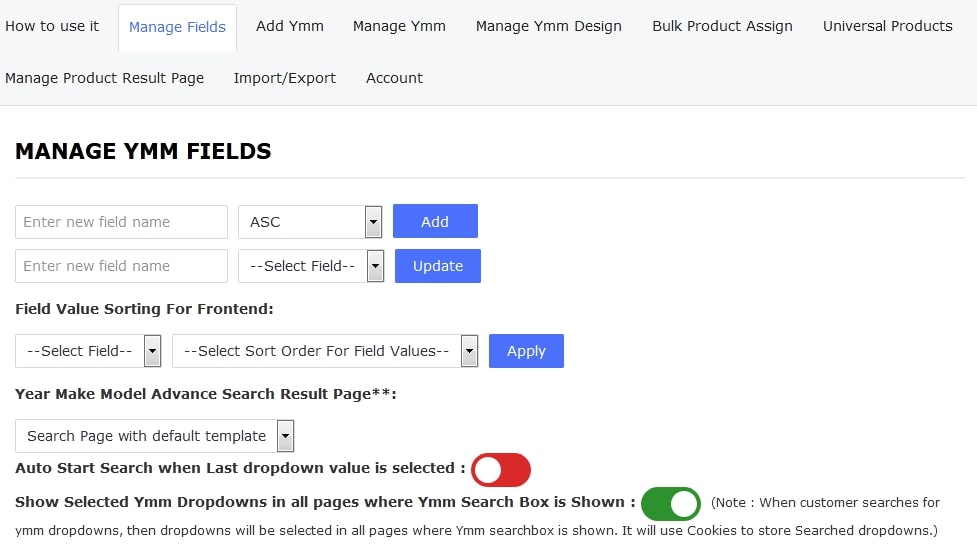
Step 3: Managing fields
At your Year Make Model Search app, instead of the “How to use it” tab like the previous step, we will go to “Manage fields”. This is where you can keep an eye on all of your dropdowns search and change it whenever you want:
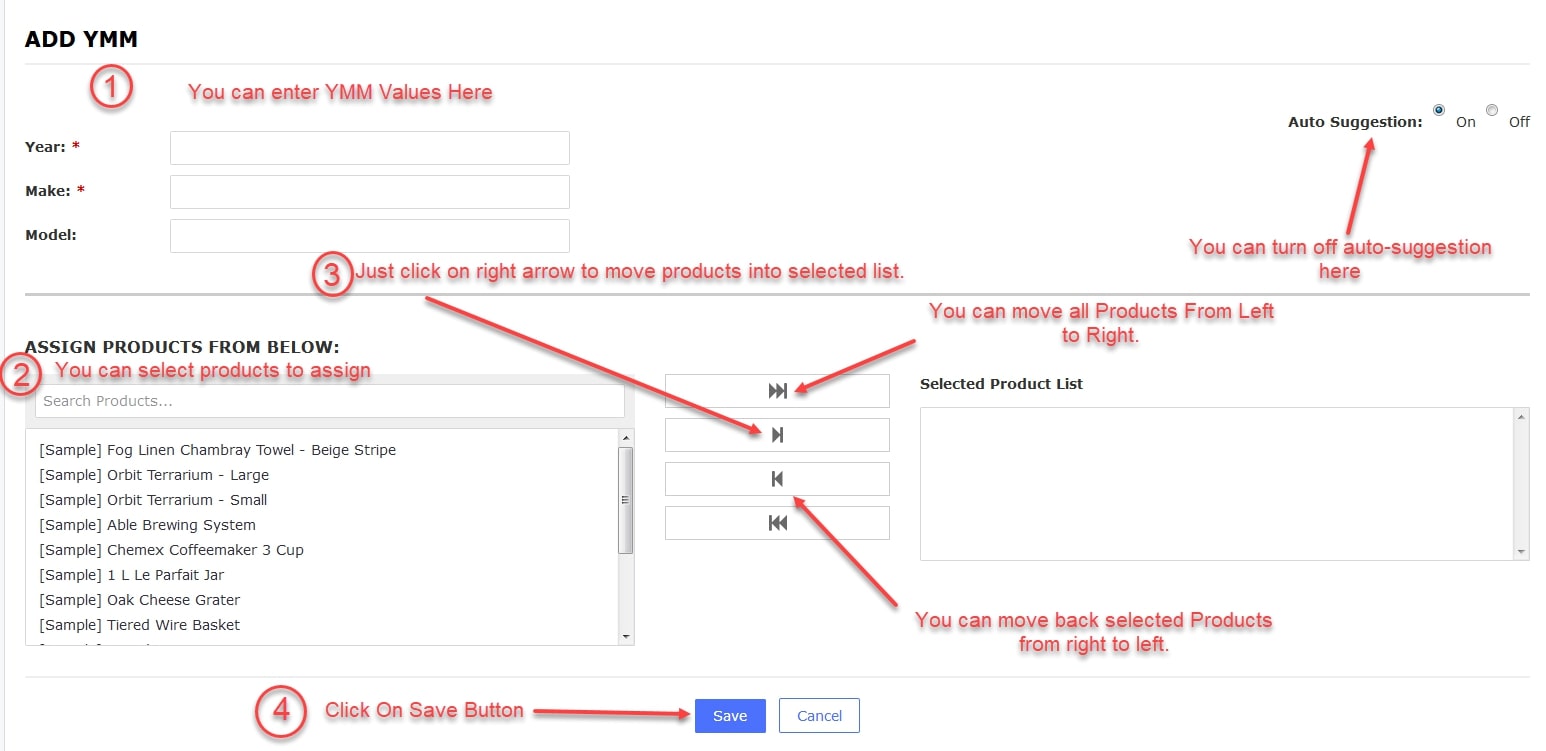
Step 4: Add and keep track of Year Make Model Search
Next to the “Manage fields” tab, we go to “Add YMM” in order to create a new dropdown search and here are the functions of each requirements:
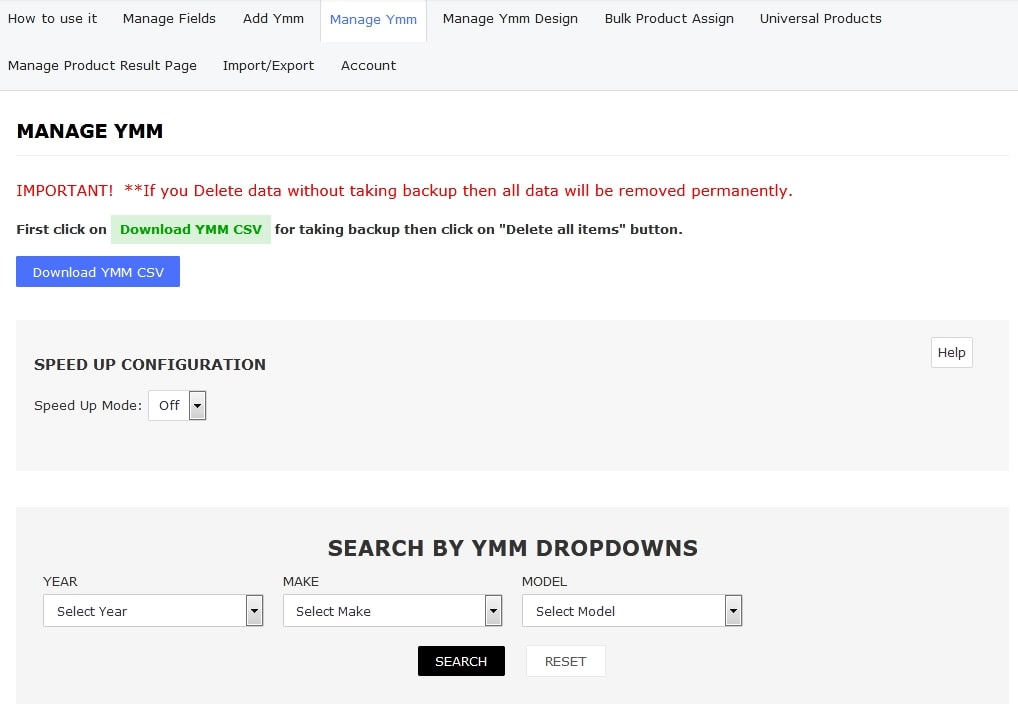
Then we also have the “Manage YMM” tab, which includes the “Speed up configuration” meaning that your application will work faster using the static HTML; remember to turn the toggle off when you are customizing the system:
Furthermore, you may manage your YMM data using the dropdown search box underneath and look for the records using a specific Product name or SKU:
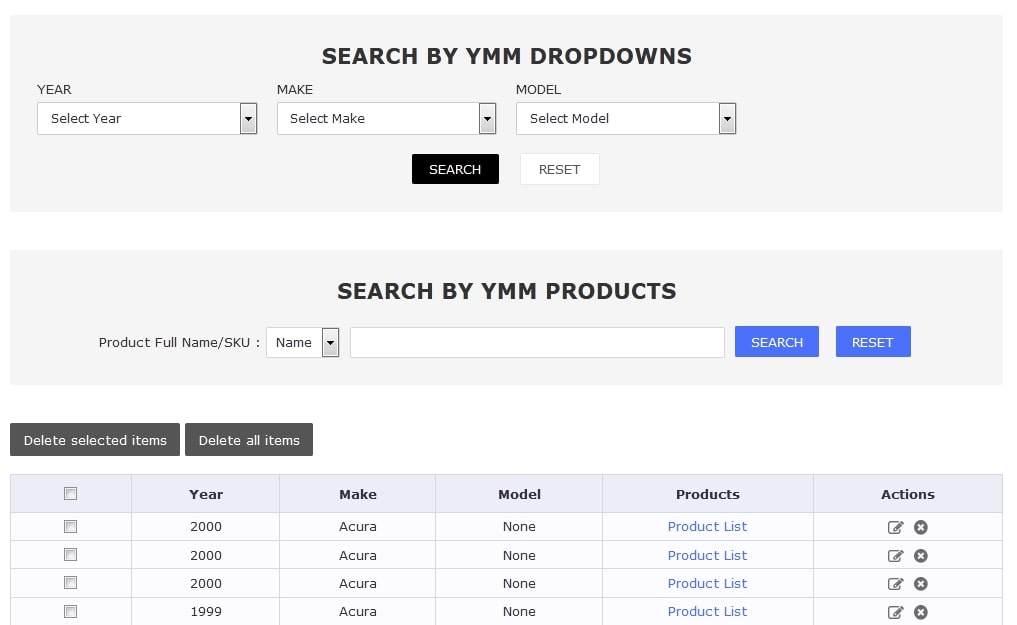
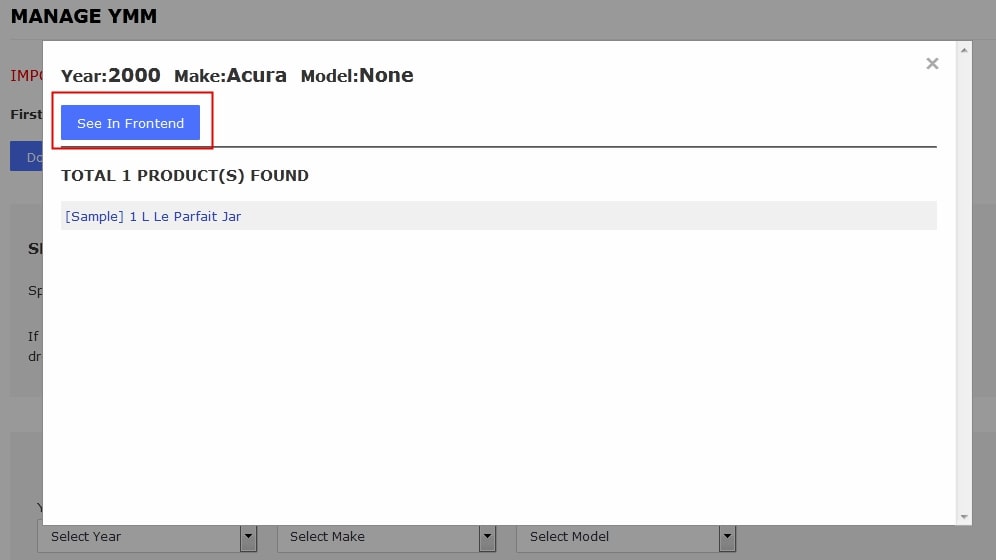
By selecting the Product List button, you may also search for each YMM record for your frontend:
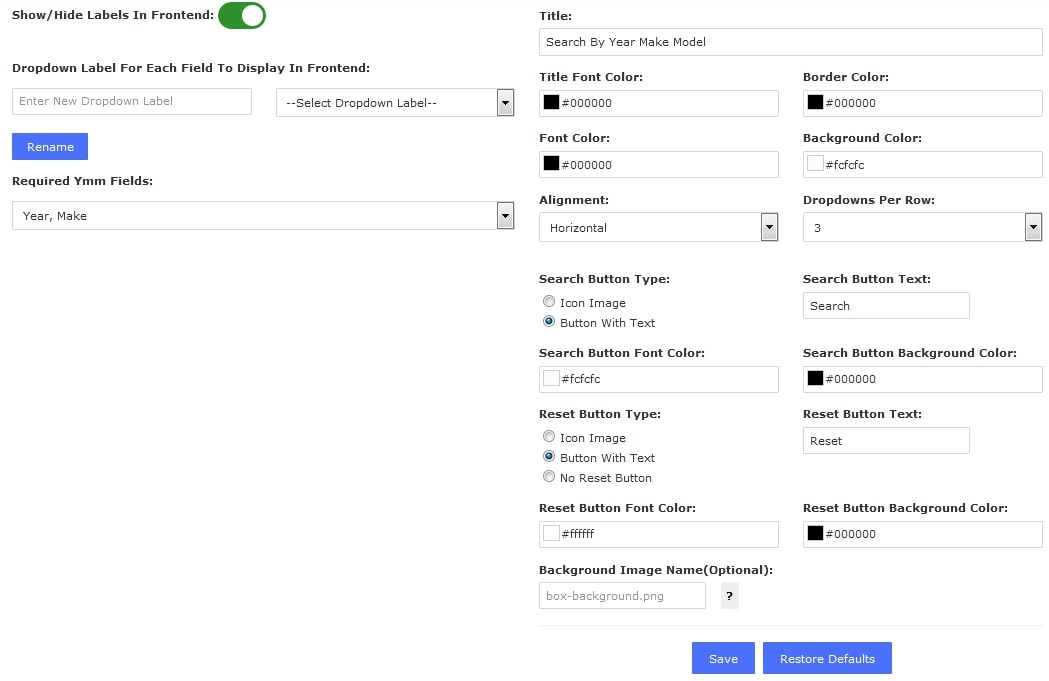
Step 5: Adjusting your Search box
As we have mentioned earlier, BigCommerce year make model search allows you to customize the search box depending on your store’s theme, all you have to do is go to the “Manage YMM Design” tab above and adjust it in any color, fonts and type of search button that fits with your website:
Step 6: Editing the design of Product Result page
When going to the “Manage Product Result Page”, you are permitted to change the design of your Product Result page. However, to let the journey begins, we must insert the source code from your grid.html, and card.html (templates > components > products) from your Theme templates HTML file into the following box:
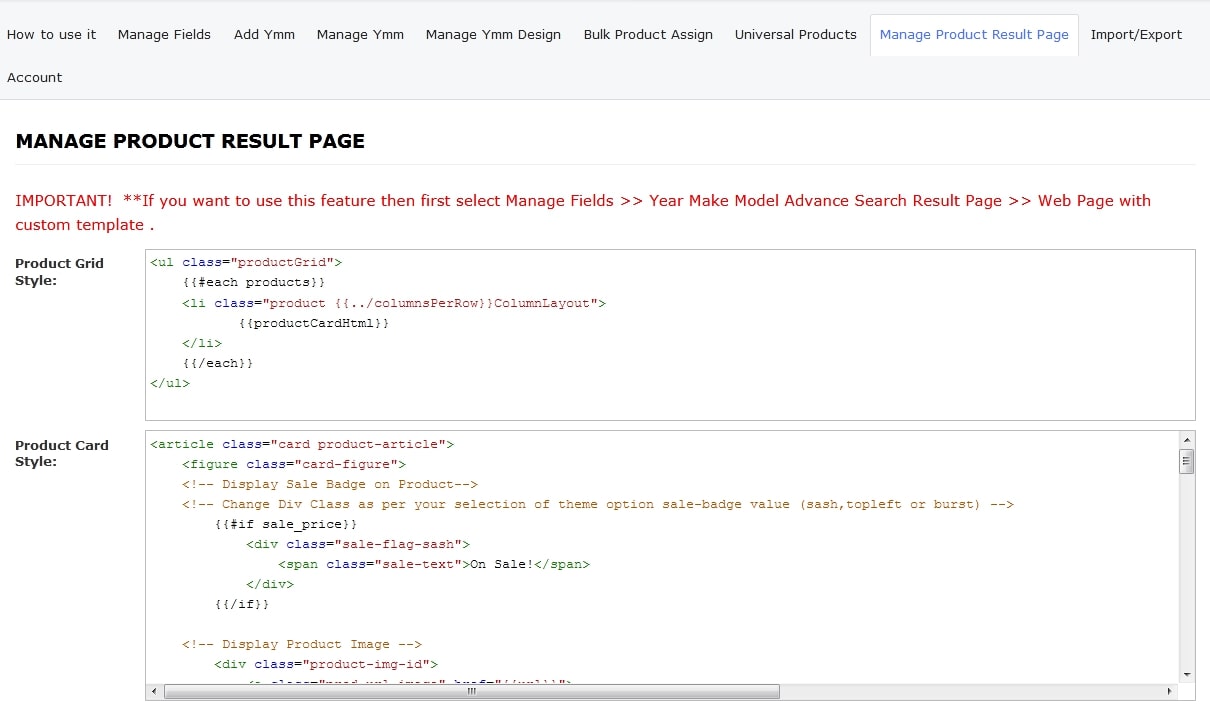
This gives you access to changing title, fonts, pagination values. A little note is that your Product Result page will have the same product filtering compared to your Category pages, meaning that you are changing the design for both of them:
Step 7: Assigning bulk products to multiple rows using Year Make Model Search
For the Bulk Product Assign tab, online store owners will be able to assign products in bulk to multiple rows of Year Make Model Search. In the image below, we have already explain the functions of each button and the order of how to assign bulk product:
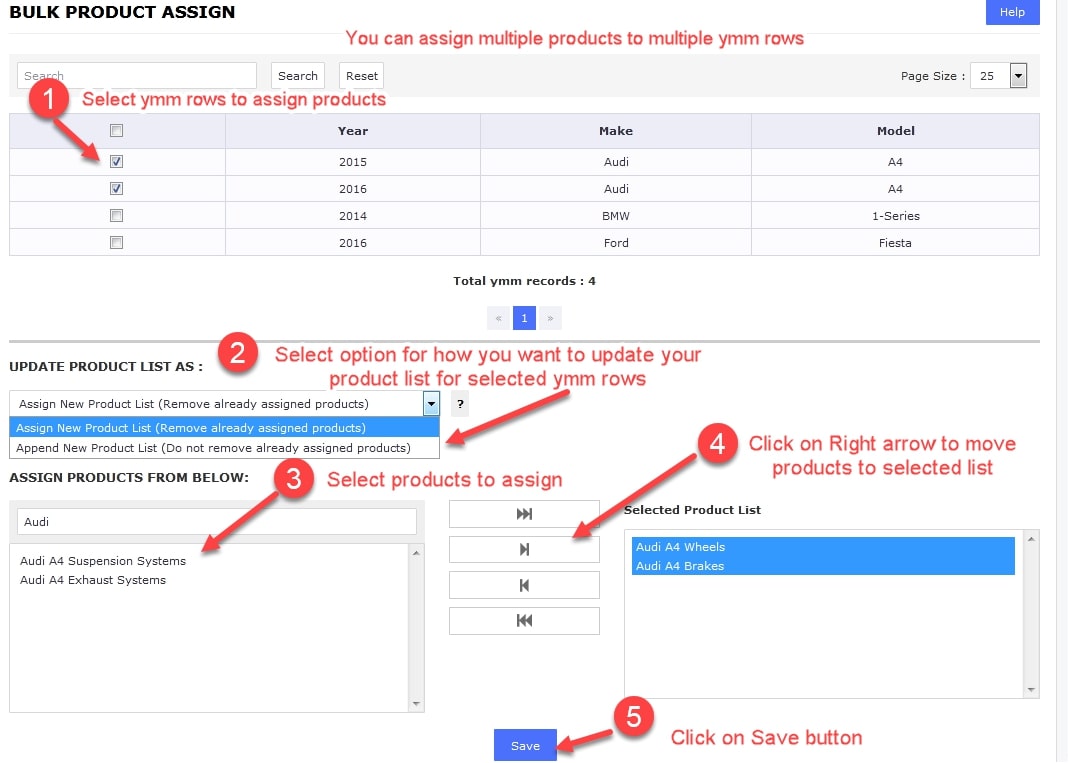
Number 2 ask you to choose one out of the two options given:
- Assign New Product List (Remove already assigned products): assign all the recently chosen items and delete all previously selected products in a list
- Assign New Product List (Remove already assigned products): Adding the chosen goods to the old product list and then appending that list to the old products previously allocated will apply to all specified YMM rows.
Step 8: Import and Export YMM CSV file
Last but not least is import or export your BigCommerce year make model rows by going to the Import/Export tab and your screen will look like this:
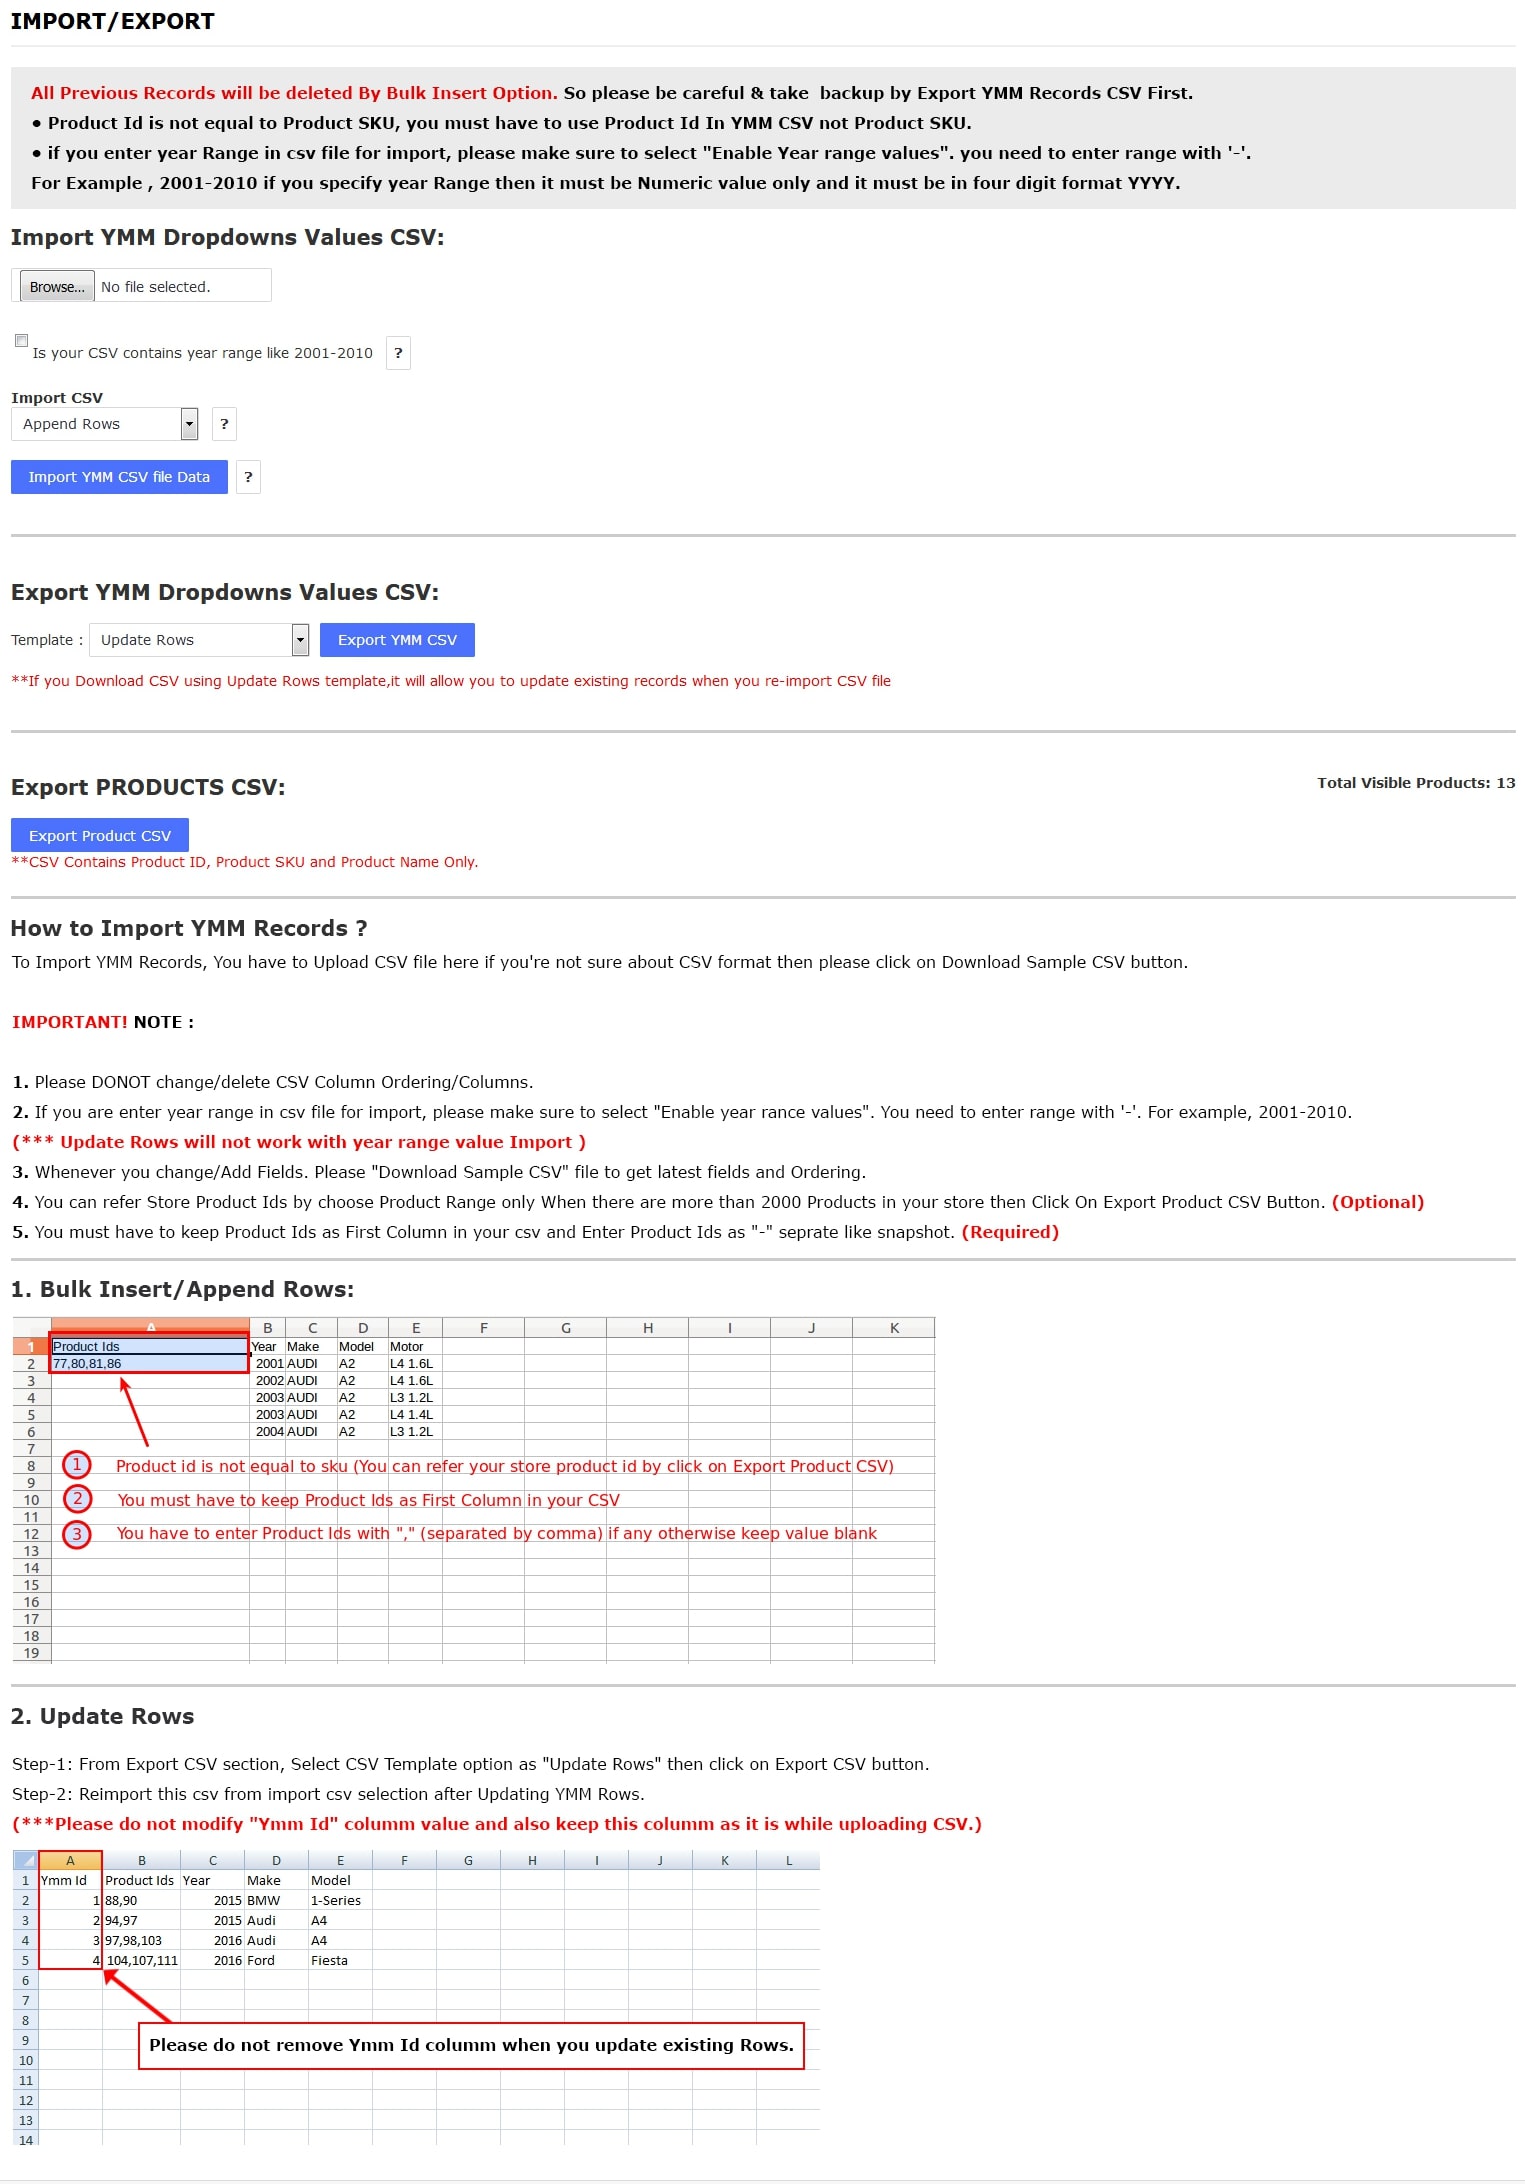
As you can see, we have already inserted the detailed guidelines for each step of How to import the YMM records, make sure that you have followed all of them before saving your work!
Final thoughts
To sum up, we hope that our article on How to set up BigCommerce Year Make Model search integration has answered all of your doubts about this specific topic and help you to find a suitable solution for your online business. After all, a detailed search bar will definitely gain your customers a better shopping experience as well as having a good impression of your website!


