How to hide product prices temporarily in Shopify
As a shop owner, you might want to hide the product prices on your storefront sometime. This is to increase the interaction between you and your customers because when you hide the price, the clients will curious about it and ask you directly. You can take the chance to advertise your products to the customers or answer their inquiries. Or else, you can also do this because of some other purposes. This article is a clear guide for you to follow step by step to hide product prices temporarily. In other words, this tells about the way to hide the prices in a period of time and you can reveal them whenever you want. Here come the details.
Hide product prices temporarily
- Step 1: Click Settings
- Step 2: Go to General
- Step 3: Click Change formatting
- Step 4: Make a change to the Currency formatting
- Step 5: Tap on Save
- Step 6: Go to Themes
- Step 7: Select Edit code
- Step 8: Go to Asset
- Step 9: Tap on theme.scss.liquid file.
- Step 10: Add the code in the file
- Step 11: Save
Step 1: Click Settings
Make sure that you log in your Shopify account firstly. Then, look at the left-hand side, you will see a list of buttons. Find the Setting button at the last and tap on it.
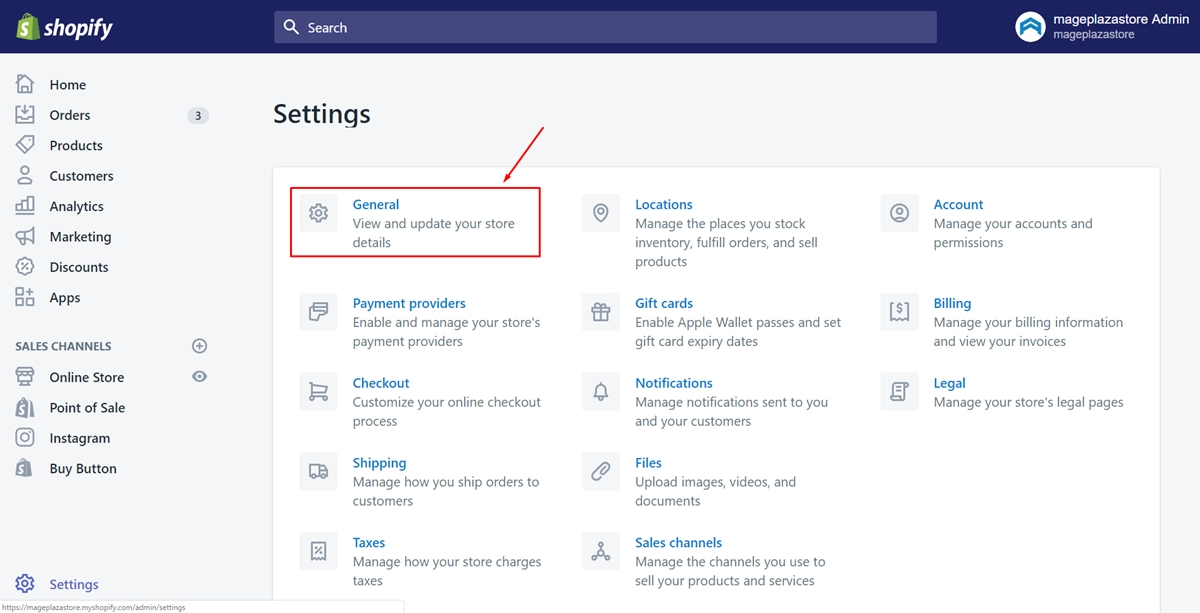
Step 2: Go to General
Select the General field which I’ve marked in the following picture.
Step 3: Click Change formatting
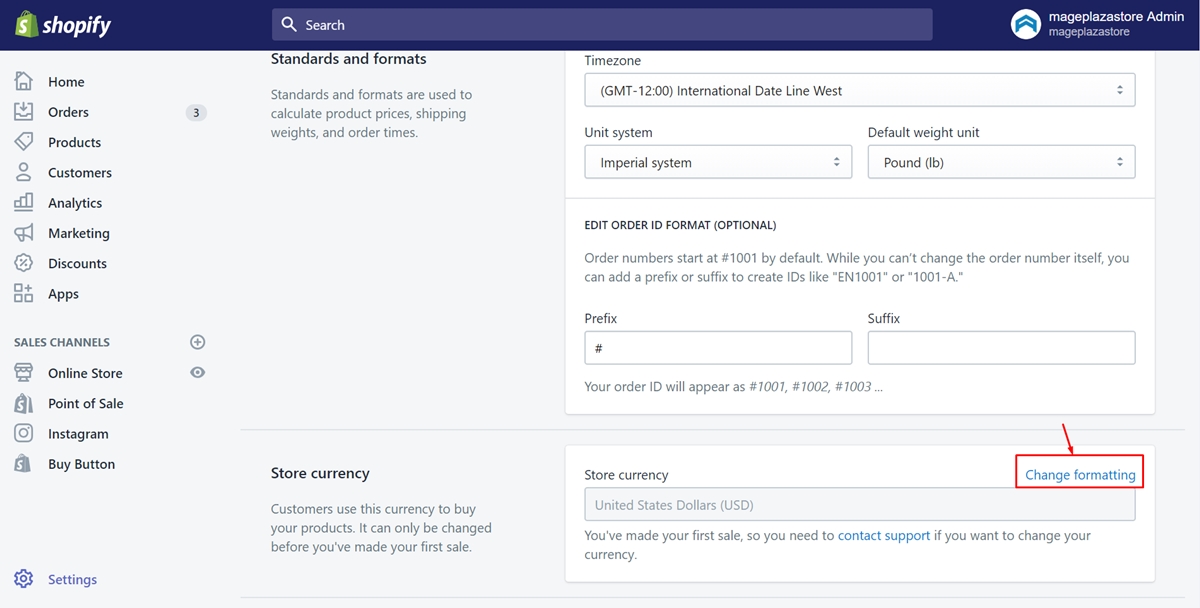
In this step, scroll down to find the Store currency at the very bottom of the page. Then, tap on Change formatting which is beside the Store currency.
Step 4: Make a change to the Currency formatting
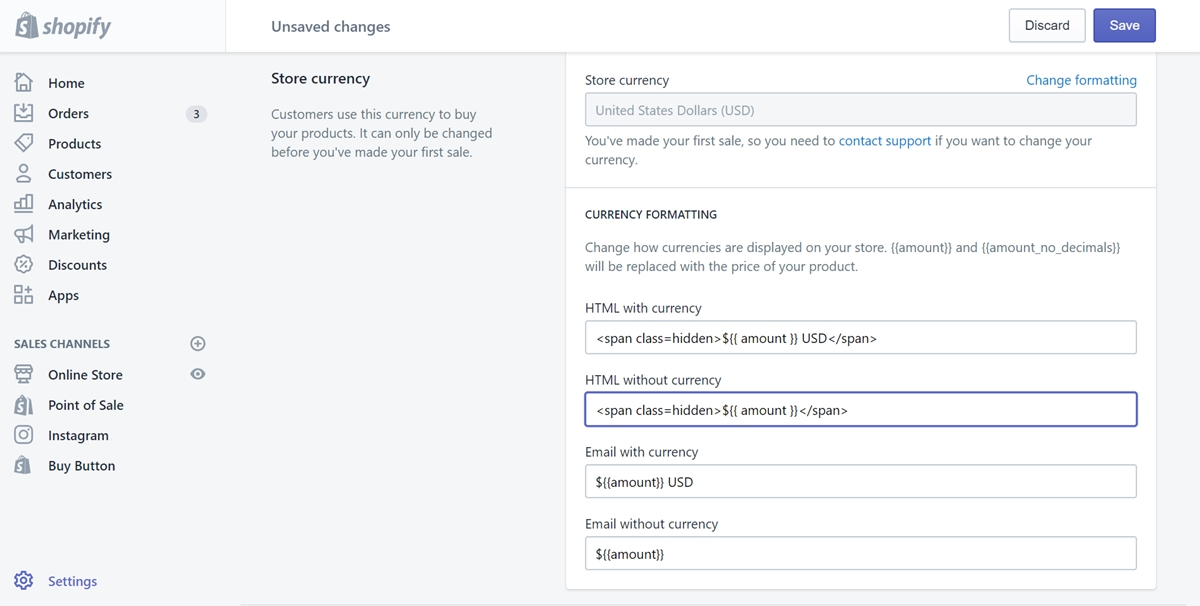
A new dialog will come out after you clicked the Change formatting button. What you need to do next is make a change to the HTML with currency and HTML without currency text box. Here is an example if you use USD as your store’s currency. In the HTML with currency format, type this:
<span class=hidden>$ USD</span>
In the next one called HTML without currency, it will be like this:
<span class=hidden>$</span>
You can take a view of the image below. That’s what these formats look like when you’ve done this step.
Step 5: Tap on Save
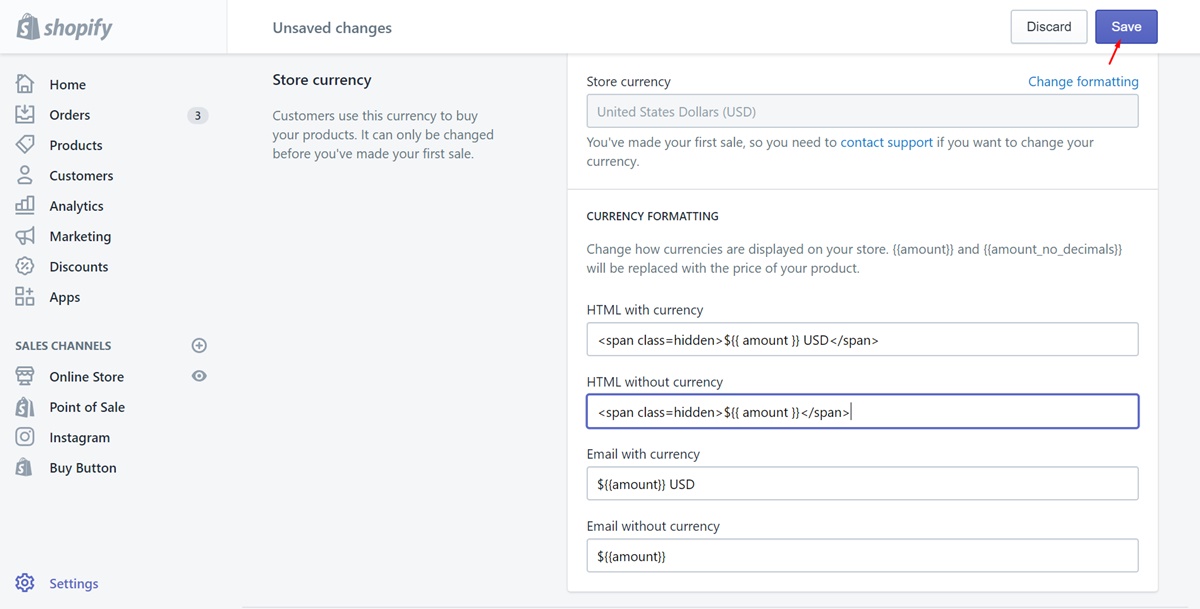
Make sure to click Save after you’ve made changes to the currency formatting.
Step 6: Go to Themes
Go back to the admin page. Then, find the Online Store field and select it. After choosing that button, you will automatically be in the Themes section.
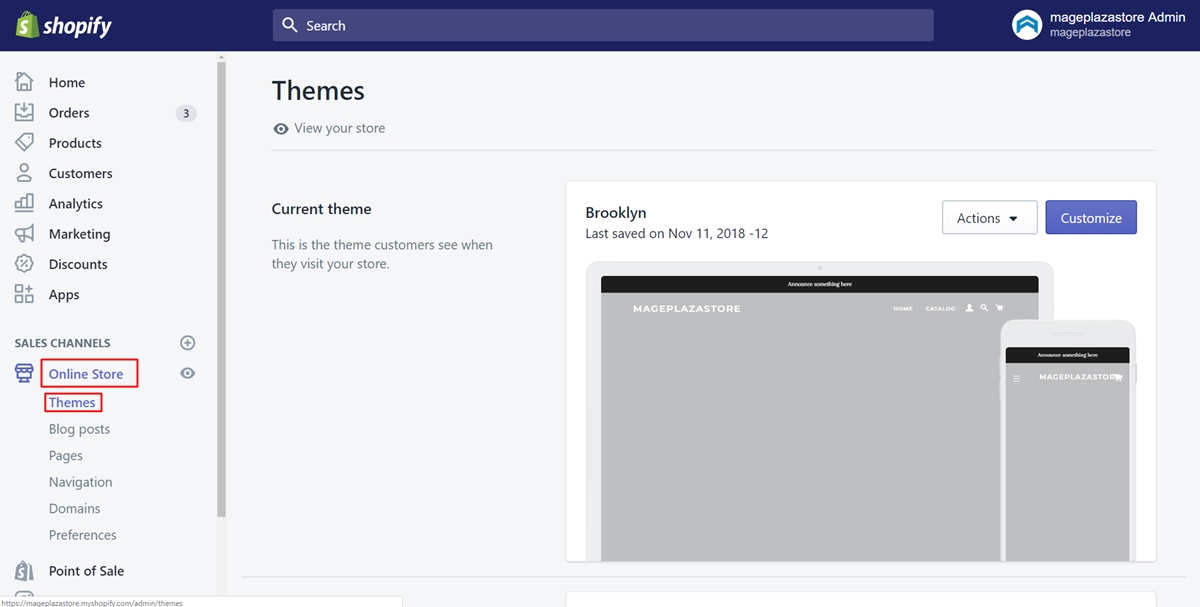
Step 7: Select Edit code
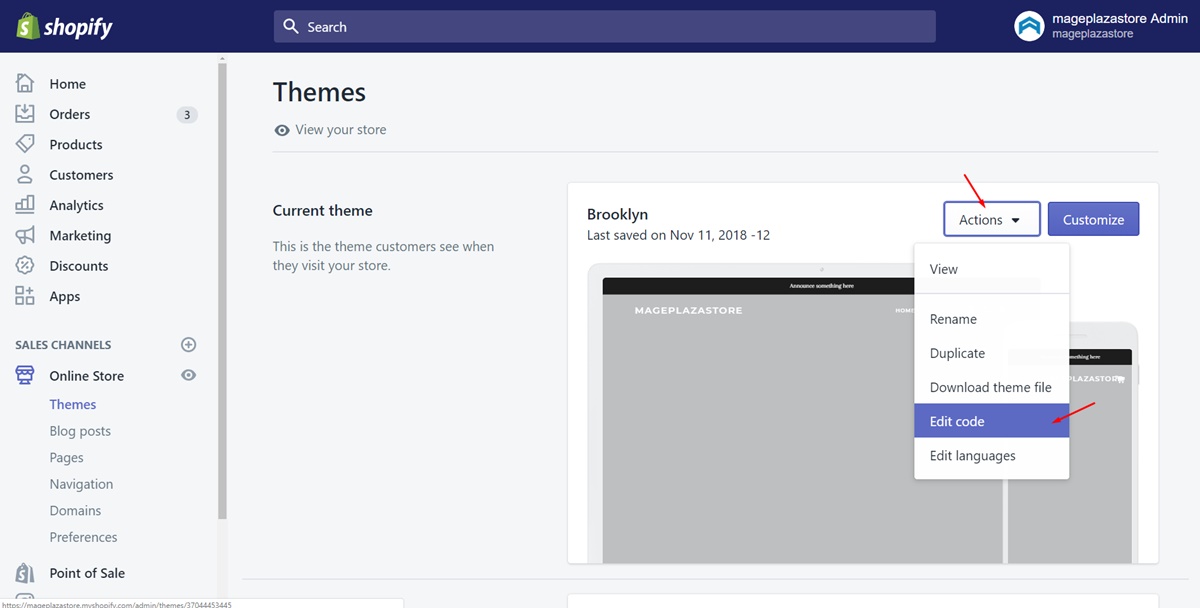
Point to the Action and there will come a drop-down list. Tap on Edit code to do the next step.
Step 8: Go to Asset
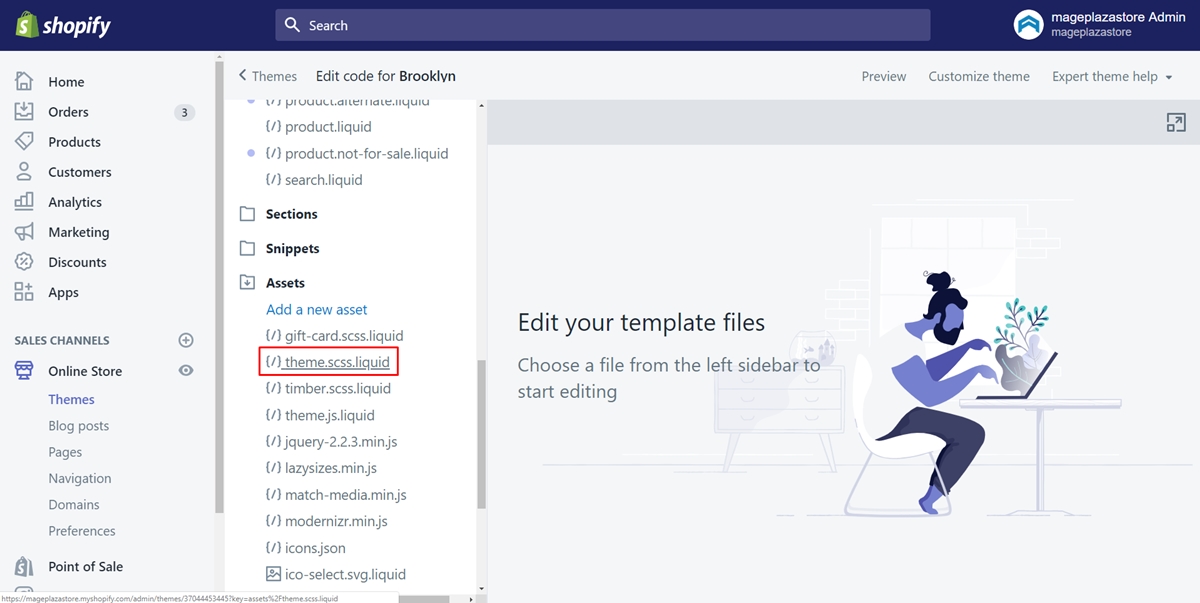
In the Themes section, scroll down to find the file named Asset. After you’ve found it, click it right away.
Step 9: Tap on theme.scss.liquid file.
After selecting Asset, tap on theme.scss.liquid to open this file. In case you can’t find out that file, you can also look for one of the three file: style.scss.liquid, styles.scss.liquid and timber.scss.liquid.
Step 10: Add the code in the file
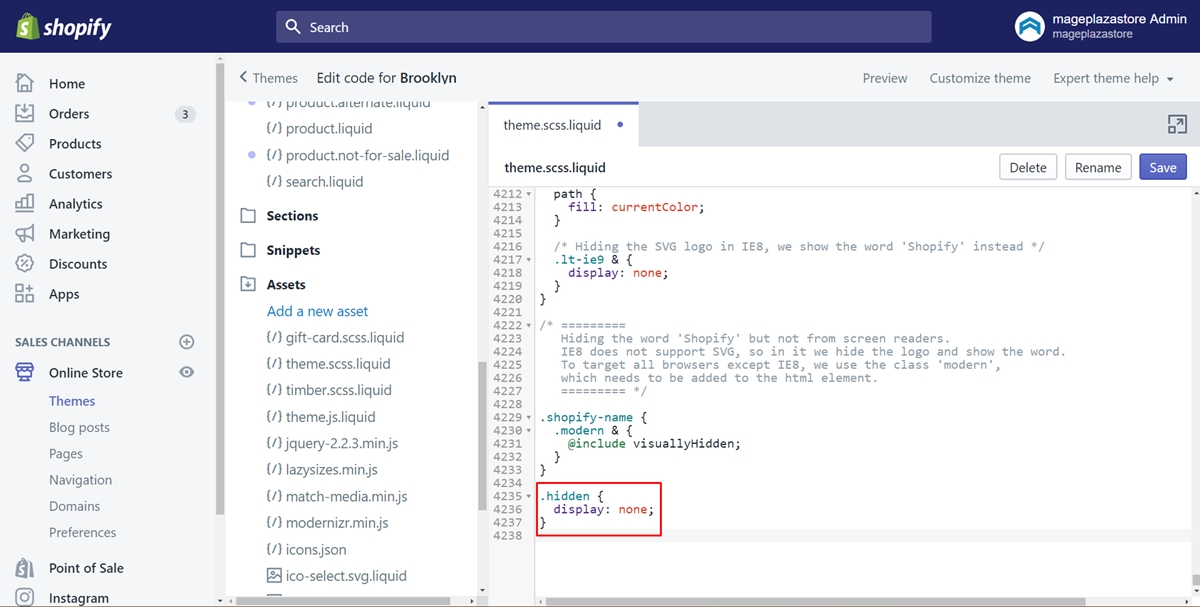
Scroll down to the bottom of the file. Afterward, add the following code into it:
.hidden {
  display: none;
}
Step 11: Save
Finally, tap on Save to finish up.
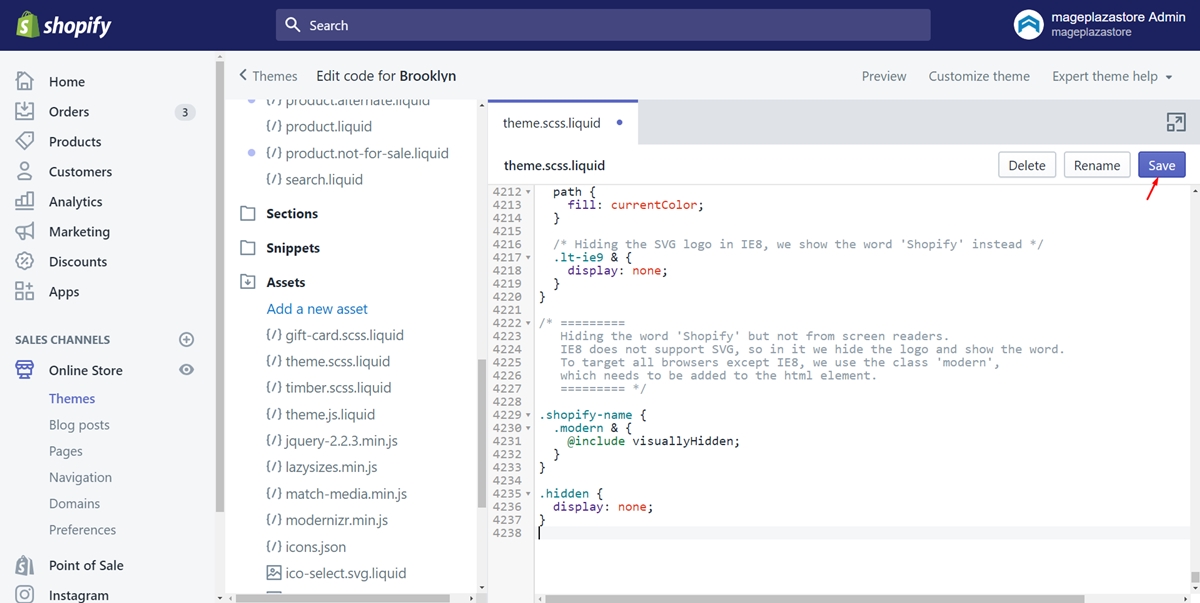
From now on, the product prices will be hidden from the customers to view. They only can see the prices when you reveal those ones again.
Hide product prices temporarily on iPhone (Click here)
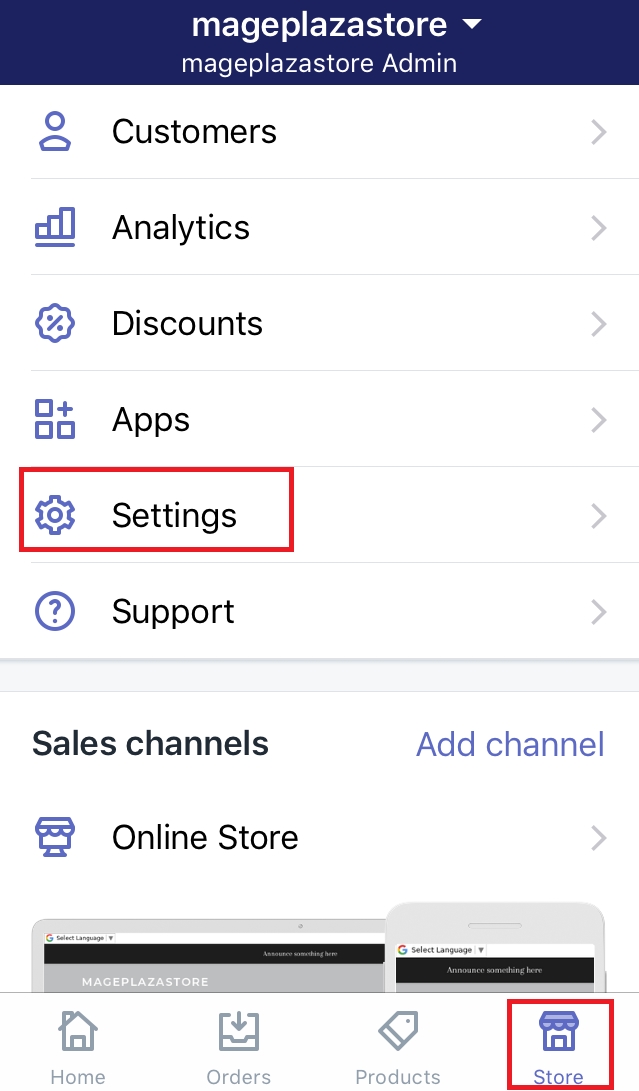
Step 1: Go to Settings
Make sure that you log in your Shopify account firstly. Afterward, at the admin page, tap on the Store button. Next, choose Settings.
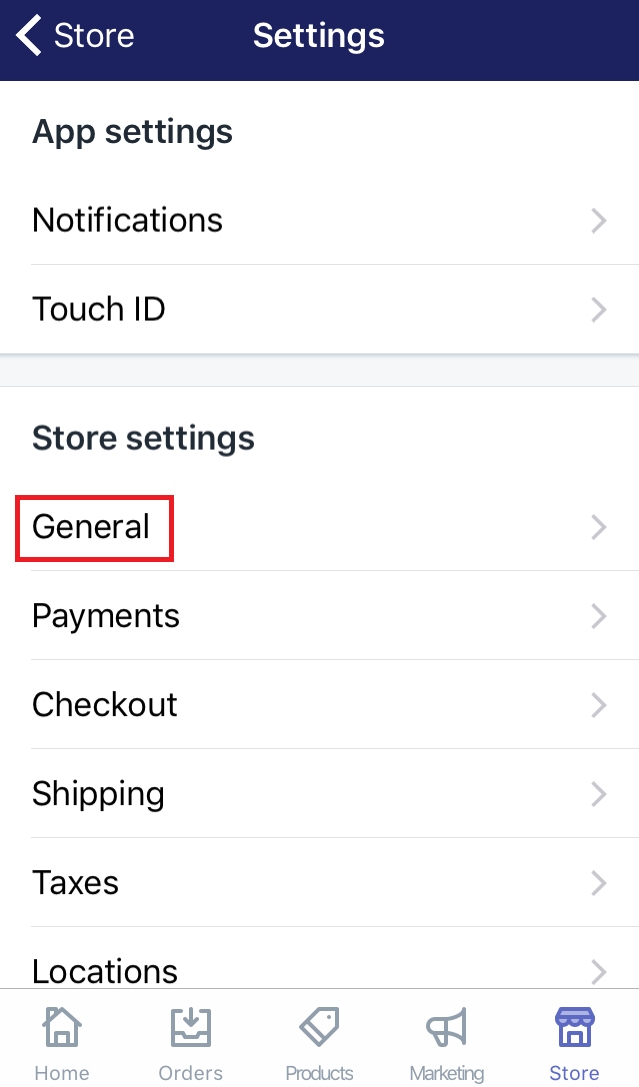
Step 2: Go to General
As you can see, under the Store settings section, there is a button named General. Select it to move to the next step.
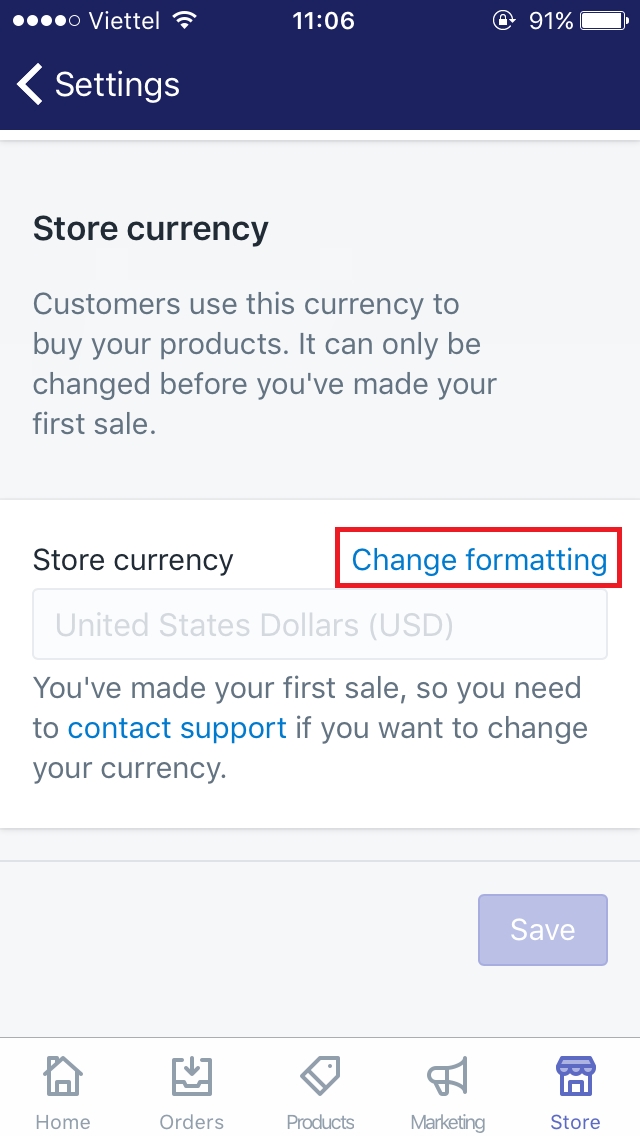
Step 3: Click Change formatting
Scroll down to find the Store currency at the very bottom of the page. Then, tap on Change formatting.
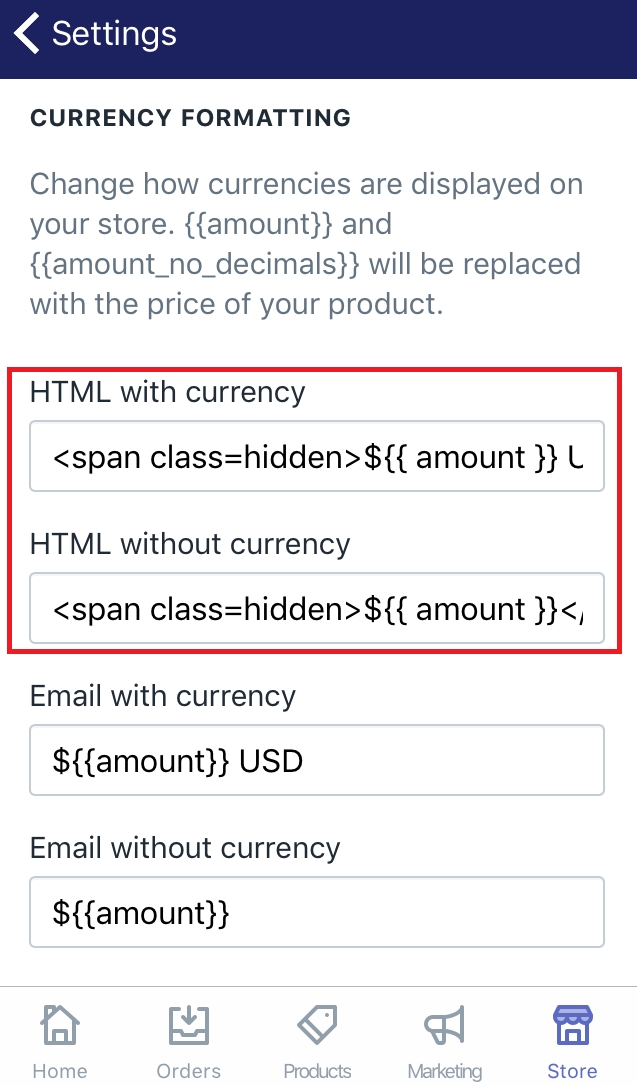
Step 4: Make a change to the Currency formatting
A new dialog will come out after you clicked the Change formatting button. What you need to do next is make a change to the HTML with currency and HTML without currency text box. Here is an example if you use USD as your store’s currency. In the HTML with currency format, type this:
<span class=hidden>$ USD</span>
In the next one called HTML without currency, it will be like this:
<span class=hidden>$</span>
You can take a view of the image below. That’s what these formats look like when you’ve done this step.
Step 5: Tap on Save
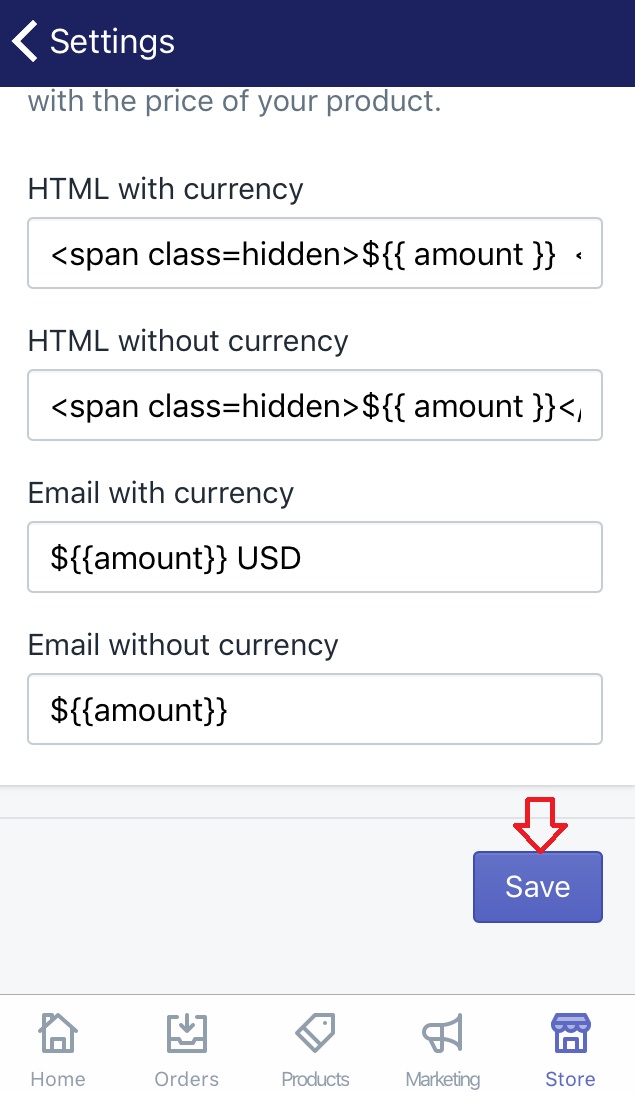
Make sure to click Save after you’ve made changes to the currency formatting.
Step 6: Go to Online Store
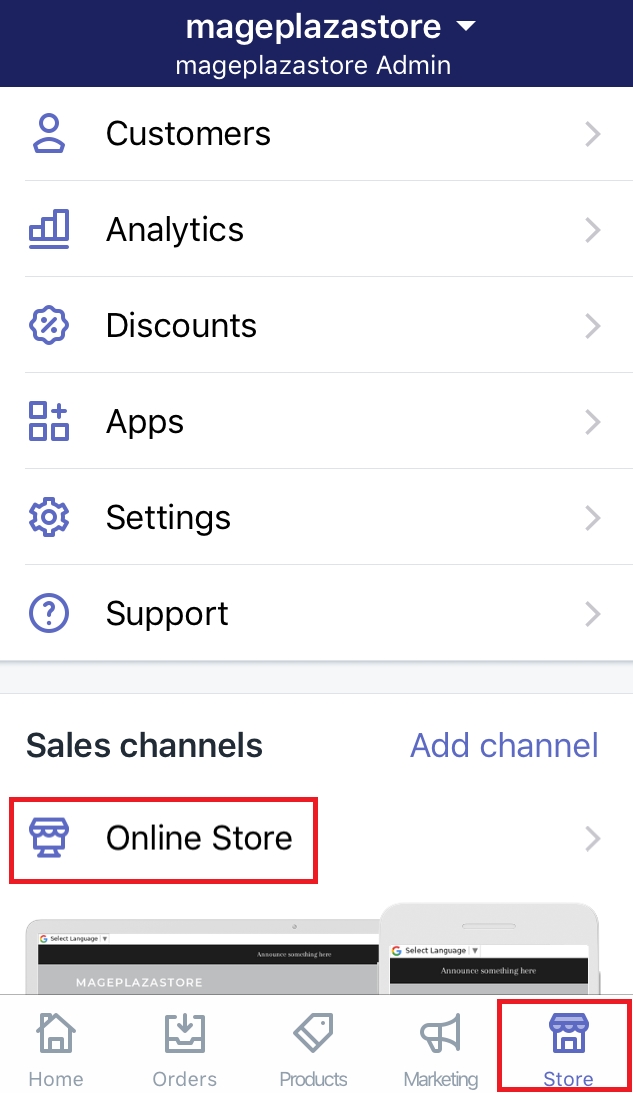
Go back to the admin page. Tap on the Store button again. Then, find the Sales channels field and select Online Store.
Step 7: Go to Manage themes
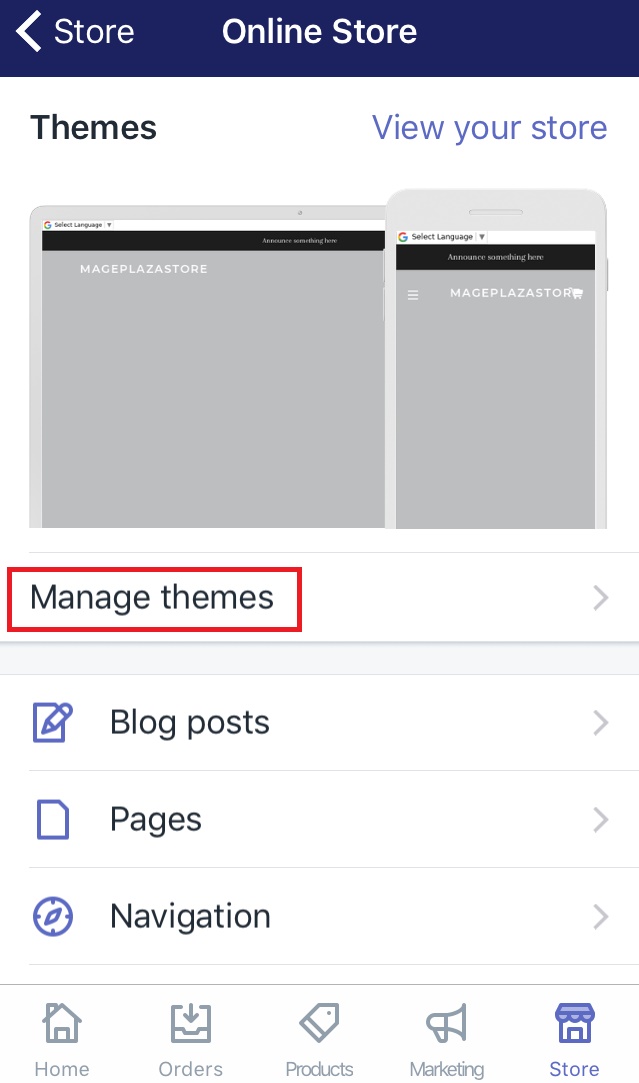
In this step, find the Manage themes button and tap on it.
Step 8: Select Edit code
Click to the Action and there will come a drop-down list. Tap on Edit code to do the next step.
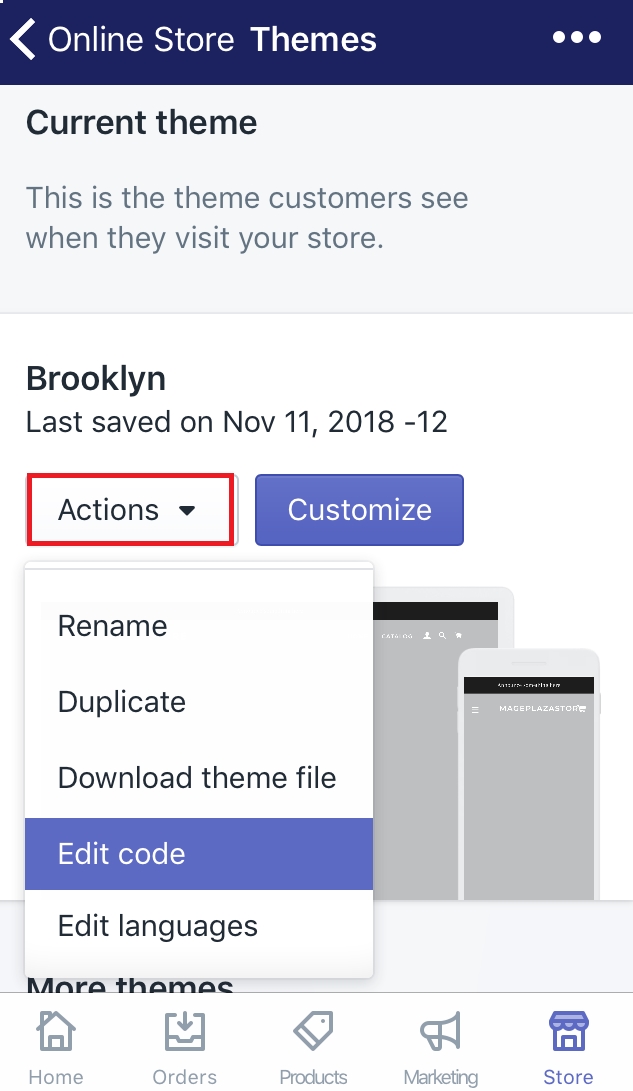
Step 9: Go to Asset
Scroll down to find the file named Asset. After you’ve found it, click it right away.
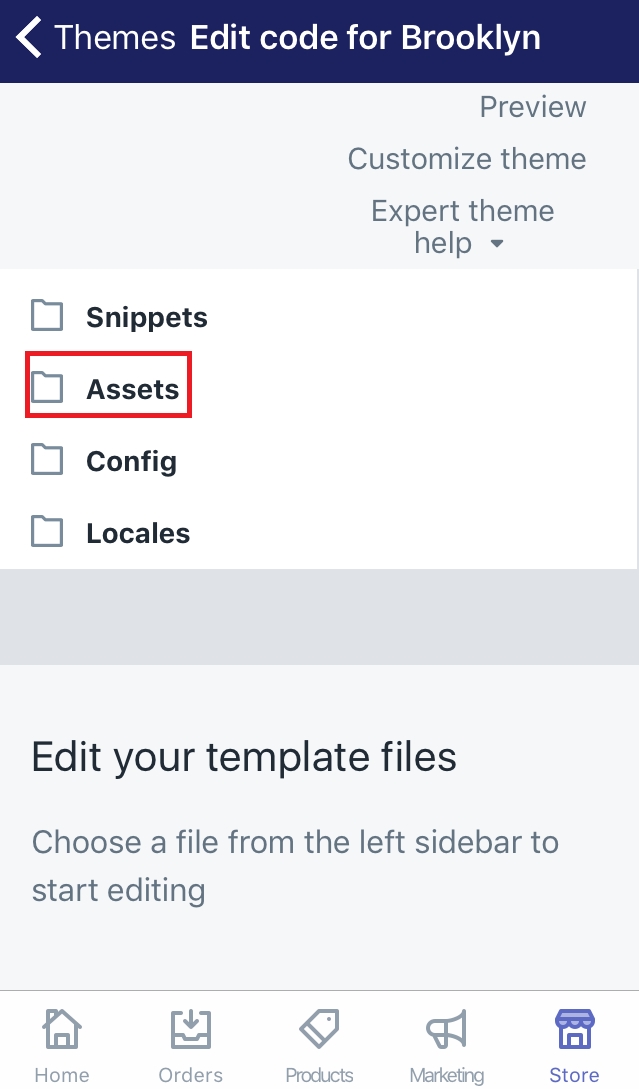
Step 10: Tap on theme.scss.liquid file.
After selecting Asset, tap on theme.scss.liquid to open this file. In case you can’t find out that file, you can also look for one of the three file: style.scss.liquid, styles.scss.liquid and timber.scss.liquid.
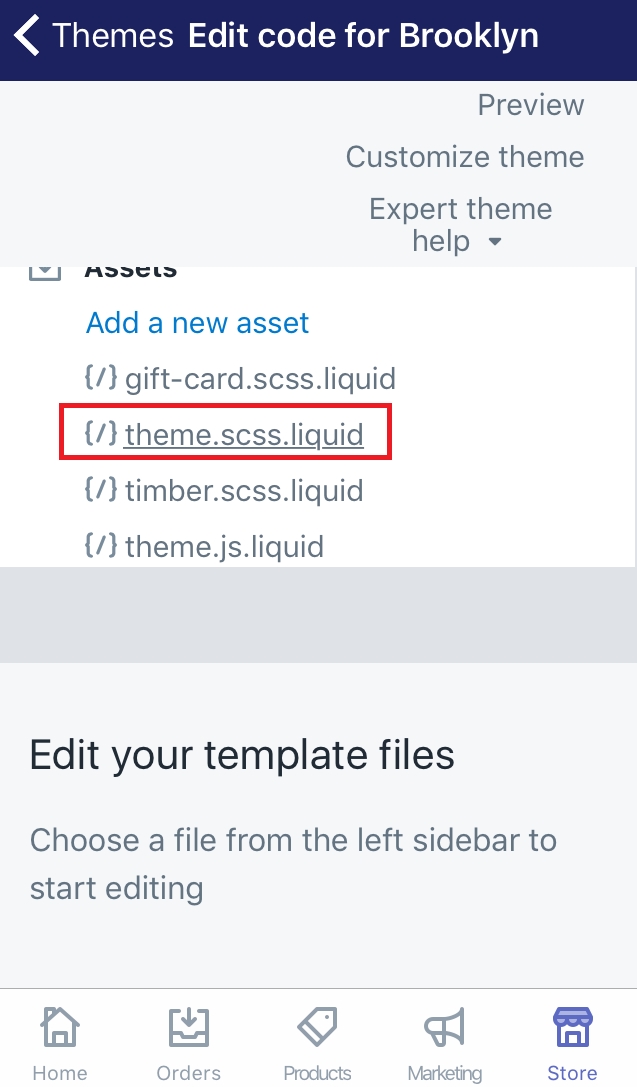
Step 11: Add the code in the file
Scroll down to the bottom of the file. Afterward, add the following code into it:
.hidden {
  display: none;
}
Step 12: Save
Finally, tap on Save to complete.
Hide product prices temporarily on Android (Click here)
Step 1: Go to Settings
Make sure that you log in your Shopify account firstly. Afterward, at the admin page, tap on the Store button. Next, choose Settings.
Step 2: Go to General
As you can see, under the Store settings section, there is a button named General. Select it to move to the next step.
Step 3: Click Change formatting
Scroll down to find the Store currency at the very bottom of the page. Then, tap on Change formatting.
Step 4: Make a change to the Currency formatting
A new dialog will come out after you clicked the Change formatting button. What you need to do next is make a change to the HTML with currency and HTML without currency text box. Here is an example if you use USD as your store’s currency. In the HTML with currency format, type this:
<span class=hidden>$ USD</span>
In the next one called HTML without currency, it will be like this:
<span class=hidden>$</span>
You can take a view of the image below. That’s what these formats look like when you’ve done this step.
Step 5: Tap on Save
Make sure to click Save after you’ve made changes to the currency formatting.
Step 6: Go to Online Store
Go back to the admin page. Tap on the Store button again. Then, find the Sales channels field and select Online Store.
Step 7: Go to Manage themes
In this step, find the Manage themes button and tap on it.
Step 8: Select Edit code
Click to the Action and there will come a drop-down list. Tap on Edit code to do the next step.
Step 9: Go to Asset
Scroll down to find the file named Asset. After you’ve found it, click it right away.
Step 10: Tap on theme.scss.liquid file.
After selecting Asset, tap on theme.scss.liquid to open this file. In case you can’t find out that file, you can also look for one of the three file: style.scss.liquid, styles.scss.liquid and timber.scss.liquid.
Step 11: Add the code in the file
Scroll down to the bottom of the file. Afterward, add the following code into it:
.hidden {
  display: none;
}
Step 12: Save
Finally, tap on Save to complete.
Summary:
In conclusion, this writing is about how to hide product prices temporarily. Hope that you will find this post helpful and follow successfully. With this, the product prices are completely hidden in a period of time and you can reveal them again in the future. In case you want to hide them permanently, visit this post.


