How to add Google Analytics tracking code on Shopify
When you run an online store on the Shopify platform, and you get many orders, you will realize the importance of figuring out How to add Google Analytics tracking code on Shopify.
You should read our article carefully to find out an easy answer. We will reveal to you what Google Analytics Tracking code is exactly, why you should add Google Analytics tracking code to your website before going to the step-by-step guide for adding Google Analytics tracking code on Shopify.
Recommend:
Let’s get started right now.
Related posts:
- How to Connect Google Analytics to Shopify
- How to Add a Tracking Number on Shopify
- How to Add Facebook Pixel to Shopify
What is Google Analytics Tracking code?
The Analytics tracking code is an example of a tag. A tag is a snippet of JavaScript that delivers information to a third party, like Google. Tags collect data, target your ad campaigns, track ads, and many more.
If you do not use a tag management solution like Google Tag Manager, it will be necessary for you to add these snippets of JavaScript straight to your site’s source code.
Why should you add Google Analytics tracking code to your website?
It is gratis
Google Analytics is 100% free. You do not have to pay for any charges when utilizing Google’s product. Hence, with the money saved, you can invest in other vital plans.
Not only that, it will reveal to you critical information, numbers, and statistics so that you can maximize your site’s performance at no cost.
Automatic data collection
An outstanding feature of Google Analytics is that it facilitates the process of putting Google Analytics data into Google Docs, Sites or Spreadsheets.
Your single job is only to set up your Google Analytics account and copy a bit of code on your website. It will allow Google Analytics to collect data from your website automatically and produce reports subsequently. To have the data, Google Analytics will play on the role for you.
Not only that, you can have access to your reports instantaneously.
Overall, Google Analytics is both a time and effort saver and enables you to see the reports soon.
The creation of customization reports
A custom report is a report that you generate.
From Google Analytics, you can select one among multiple reports that Google Creates. Or you can use the drag and drop interface to create your customized report.
You can select the dimensions and metrics and determine how you can show them.
Easy integration with other tools and platforms
Like every other Google services, Google Analytics displays a clear and user-friendly interface.
It can perform perfectly on the desktop. And it can work well on Smartphone and Tablets through its app on the Google Play Store, too.
Not only that, Google Analytics also has a robust integration with Google AdWords.
Once you connect AdWords account to Analytics, you are joining two tools and allowing them to work jointly. By doing it, you can gain actionable insights that will ultimately result in your AdWords Campaigns’ success.
Therefore, with all your devices, you can use Google Analytics to easily implement data to other dominant Google products such as Google AdWords and Google Search Console.
Ability to measure internal site search
The internal site will tell you what potential customers are searching for once they have visited your website.
It also indicates the area of growth opportunity by revealing the ambiguous or lacking situations on your site.
Google Analytics enables you to track the internal site searches with some customization.
Thanks to this internal site search’s remarkable feature, you can gain better insights into what customers are looking for in your site so that you can take action on critical revisions or supplements.
What’s more, you can further make some necessary modifications to your website navigation and product/service provides.
To grasp the reason why visitors are bouncing off your website
One of the most critical metrics, Bounce Rate means the percent of guests who exit your website after hitting only one page. There is no doubt that this rate should be as low as possible.
Many businesses experience massive traffic but unsatisfactory conversions. In other words, the visitors go to your website but can not spot the item that they are looking for. The consequence is a high bounce rate. You should do something about it and tackle the cause for it.
Nevertheless, Google Analytics gives a detailed report of the pages that are witnessing a high bounce rate, which may arise because you are not optimizing your website suitably or your landing page is not engaging enough for them to sign up.
Hence, based on the detailed report on bounce rate, you can figure out how to lower your website’s bounce rate as much as possible.
To understand the age, gender, interest, device, and location of your audience.
Google Analytics can reveal your audience’s valuable data that enables you to discover which channels attract a majority of the traffic to your website.
The Audience section will show you a ton of information about your visitors like their age, gender, interests, devices, and location.
Not only that, it also presents you the data on by what means the visitors were driven to your website.
To know which social platforms to target
To attract more traffic and engage more potential customers, you should take into consideration getting the most out of the social platforms.
Google Analytics helps you gain access to inspect what lures the users and then arrange the ad subsequently.
If you want to select the best platform to market your products to your audience, it is imperative to have ample budget in advance for the incoming social media ads.
Google Analytics also enables you to assess the performance of all the social platforms that you are currently making use of. Besides, you can estimate the level of conversion value each of the social platforms is yielding, the traffic coming from social referrals, and the number of users are mentioning you.
To gain insight into the type of content you should write
High-grade content is one of the most effective ways to be closer to your customers. Various businesses produce blogs, infographics, and slide shares that can bring additional value to their customers.
With Google Analytics, you can keep track of all the content that gets views and shares. Thanks to this valuable data, you can improve the top viewed blogs to make them more engaging to your customers.
Google Analytics creates a breakdown of the page views that each of your blog posts draw. You can focus on the top performed blog to attract more traffic.
How to add Google Analytics tracking code to your Shopify store?
Step 1: Make sure you’ve never enabled Google Analytics for your store before
The act of enabling Google Analytics more than once leads to inaccurate data. If you are 100% sure you have never enabled Google Analytics for your store before, then go straight to Step 2: Create Google Analytics account. If you are not certain about having enabled Google Analytics for your store before, then follow these steps below to find out:
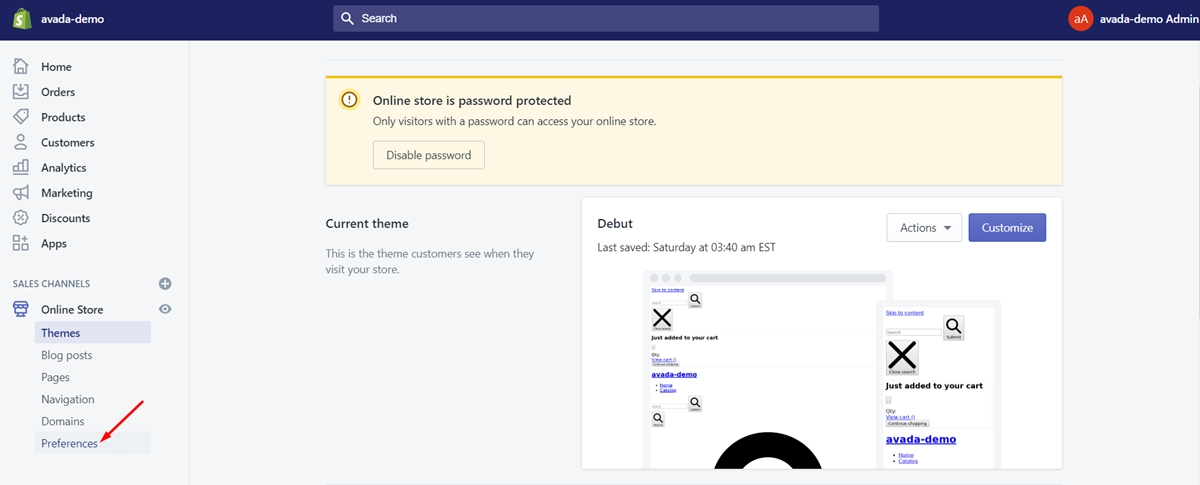
Click Preferences
In your Shopify admin, head to the Online store section, then click Preferences.
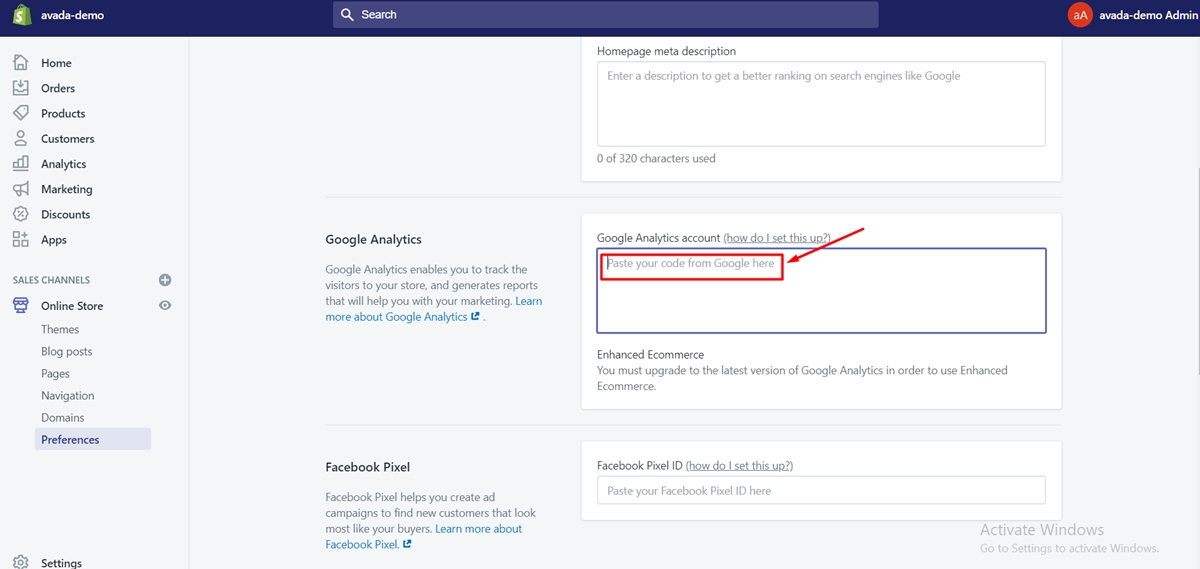
Check whether there is a text Paste your code from Google here
From the Google Analytics section, guarantee that the box has only the text Paste your code from Google here, and is otherwise blank. If you notice this text, then proceed to the following step. If you spot a code starting with UA- instead, then you have already enabled Google Analytics and can jump to Step 4: Turn on eCommerce tracking.
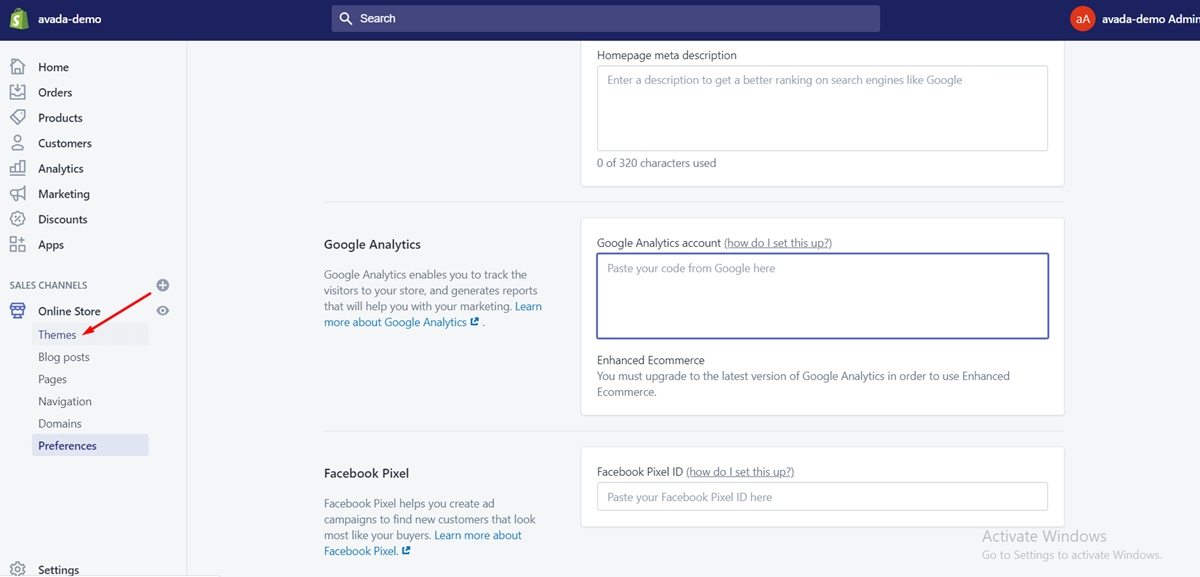
Tap on Themes
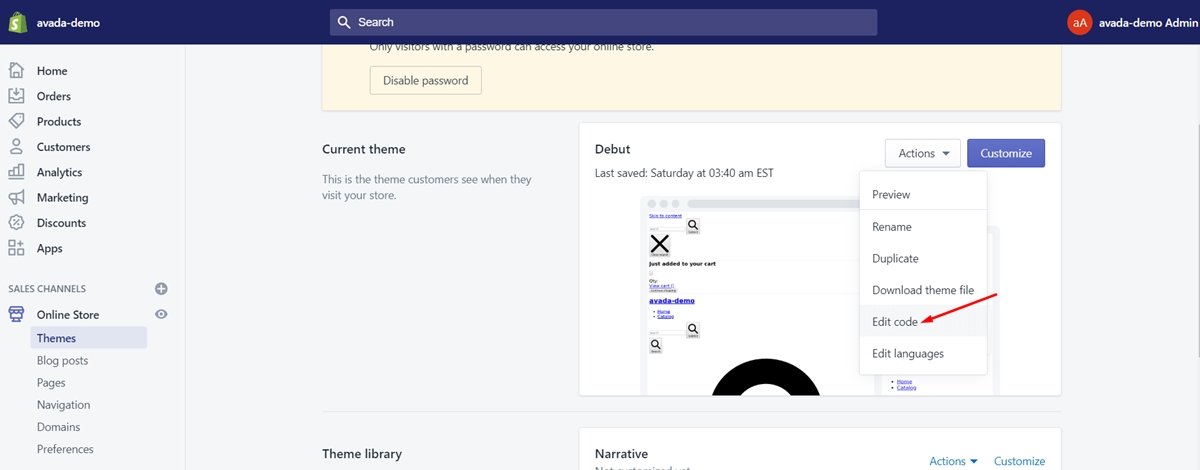
Tap on Edit code
Click ` {/} theme.liquid `
Then, from the Layout section, tap on {/} theme.liquid.
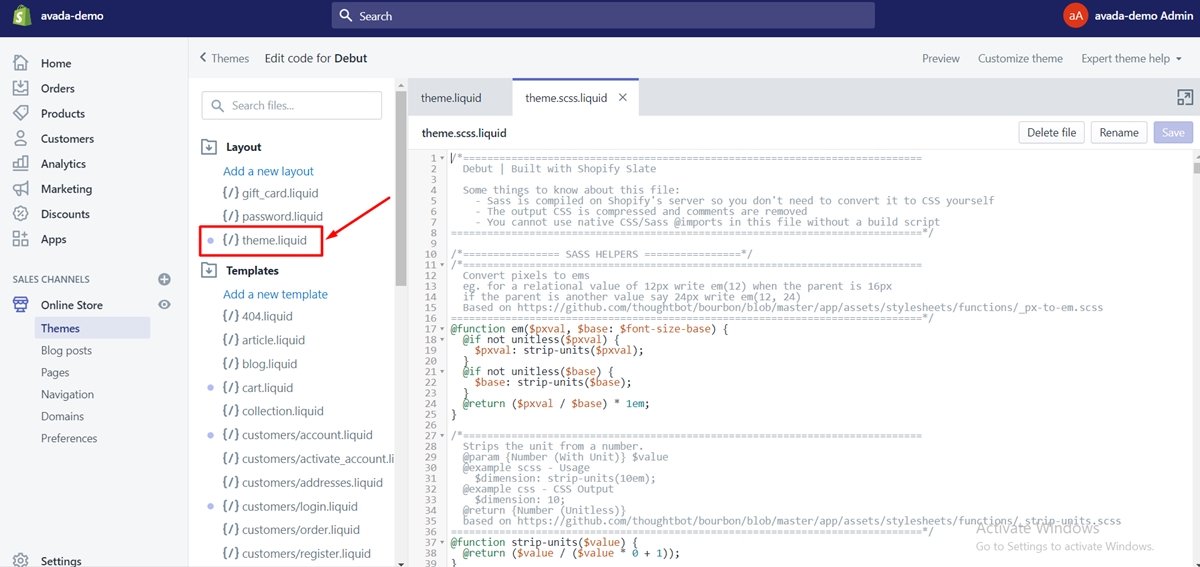
Search for the Google Analytics tracking tags
From the theme.liquid file, search for the Google Analytics tracking tags like one of these: ga.js, dc.js, gtag.js, or analytics.js. If any of the tags pop up in your theme.liquid file, then you have already enabled Google Analytics enabled already and can proceed to Step 4: Turn on eCommerce tracking.
If you do not notice a tracking code in your Preferences page’s Google Analytics section, and you do not have a Google Analytics tracking tag in your theme.liquid file, then you have not enabled Google Analytics for your store. Now, move on to Step 2.
Step 2: Create Google Analytics account
To use Google Analytics, having a Google account is crucial. If you have already used Google products, like Gmail or Ads, then you can still make use of the same account for Google Analytics.
If you have not already had an account for a Google product, then you can create a Google account here. The use of the Gmail account is only for signing in and out of Google Analytics. Once you have had a Google account, proceed to Step 3.
Step 3: Enable Google Analytics on your store
Whether or not you have used your Google account to set up Google Analytics before will decide the steps to enable Google Analytics. However, in general, you can follow the steps below:
From a new web browser, open Google Analytics
Tap on Add account
Select the Google account you intend to sign in with, or tap on Add account to sign in with a new Google account.
Tap on Sign up
Select Website and complete the given information.
In this step, you can use your primary domain for the Website URL.
Note that if you have used your Google account to set up Google Analytics before, then instead of performing this step, you can click tap on SIGN IN and choose Analytics. Then, you can choose the Google account you intend to sign in with, or you can tap on Add account to sign in with a new Google account. The next step is to click Admin, then choose + Create Account.
For both cases, you can proceed with the following steps:
Tap on Get Tracking ID
Tap on I Accept
If you have not chosen your country, then you can use the drop-down menu to choose your country. After that, tap on I Accept to confirm that you have gone through the terms of service.
Copy the global site tag to your clipboard
You will spot a great deal of information and options on the next page but what you need is Global Site Tag. Then, to copy the global site tag to your clipboard, you can highlight it and press ctrl+C on PC or command+C on Mac.
Open your Shopify admin in a new browser tab
Click Preferences

Paste your global site tag in the Google Analytics account field
From the Google Analytics section, paste your global site tag in the Google Analytics account field. From here, you will notice that you have Google Analytics just enabled for your Shopify store when you spot a code starting with UA- below the Google Analytics account heading.
Bear in mind that Google Analytics can not track visitors until you remove password protection from your online store. After you enable Google Analytics for your online store, jump to Step 4: Turn on eCommerce tracking.
Step 4: Turn on eCommerce tracking
You can perform Google’s eCommerce tracking at two levels of detail: basic and enhanced.
Basic eCommerce tracking
If you only require transaction and revenue data, then you can follow the steps below to turn on basic eCommerce tracking:
-
From your Google Analytics account, tap on Admin.
-
From the View menu, tap on Ecommerce Settings.
-
Tap on the Enable Ecommerce toggle to switch it from OFF to ON.
Turn on enhanced eCommerce tracking
If you want more detailed tracking information like visitor behavior, then you can turn on Enhanced Ecommerce tracking.
Open your Shopify admin.
- Click Online store > Preferences.

- In the Google Analytics section, tap on the Use Enhanced Ecommerce checkbox.
If you are currently using an older version of Google Analytics, then it will be necessary for you to tap on Upgrade to the latest version before you can tap on the Use Enhanced Ecommerce checkbox.
-
Tap on Save.
-
From your Google Analytics account, tap on Admin.
-
From the View menu, tap on Ecommerce Settings.
-
Tap on the Enable Enhanced Ecommerce Reporting toggle to turn it from OFF to ON.
-
Tap on Save.
Step 5: Verify if you added the code correctly
To check if you have added the tracking code correctly, you can select one of the two alternatives: View Real-Time Reports and Install Google Tag Assistant.
View Real-Time Reports
From your analytics account reporting tab, browse to Real-Time » Overview and open your website in a new tab. From here, you can view how many active visitors are on your site.
You can also tap on the send test traffic button and browse to the tracking info page from your analytics account to do this.
Install Google Tag Assistant
Google Tag Assistant is a browser extension that indicates how many analytics tracking tags on your site and the tracking status with various colors. Not only that, you can get immediate notifications should anything arises with your tracking tags.
Conclusion
To sum up, we have shown you a step-by-step guide to help you figure out how to add Google Analytics tracking code on Shopify. We hope that you can do it without any effort and empower your Shopify store.
Also, in order not to fall behind the competition, the analysis of what customers think about your brand is crucial to every business owner. Hence, you should check out our article: How to Connect Google Analytics to Shopify for more information.
Furthermore, should you have any questions, comments, or concerns; please do not hesitate to contact us. We are always ready to help you out in case you need anything.


