How to Add a Logo to my Shopify Store on all pages
Add a logo to Shopify store is one of the biggest questions from any store owners who are about to lay the foundation for their own online business.
As you plan to build an online business in the Shopify platform, creating and adding a logo to your Shopify store should be your top priority. In fact, a logo plays an important part in making your brands to easily recognize and raising its owner’s voice in various online business markets.
Therefore, in this article, you will be shown on How to Add Logo to Shopify Store. Hope it will be helpful for you when adding your own logo.
Related Posts
- Add a Logo to the Checkout Page
- Add Logo to your Email Templates
- How to Use a Custom Logo on Apple Wallet Passes
Top Reasons Why a Logo is Important
Before going further, let’s find out the reasons why a logo is such a necessity for your stores in Shopify.
Draw the attention of people
First, a logo is used to draw everyone’s attention. As you might not know, attention is something that can only last for a few days in people’s minds, including the customers. In order to make visitors remember your stores and convince them to complete their purchasing in 2 minutes, a logo is a useful tool at that time. A logo can grab visitors’ attention and convey your store’s value to customers in a unique way. If you can prepare a solid logo to speak for your brands, then it is an indispensable item that should not be ignored by most users.
Create a strong impression and lay the foundation for your brand identity
You need to understand that a logo will help you fulfill your goal by introducing you to the customers. If it is well-designed, a logo is the best way to aid you in communicating with your customers on your products. In addition, a successful brand can tell the story affecting customers’ feelings, which is simple and plain. A logo works well as the foundation for the whole narrative on which your brands are built.
Become memorable and separate users from the competition
A logo serves as the identification and symbol for customers to recognize your store with ease. Hence, a good logo can instantly remind customers of your company without requiring you to speak any words. More interestingly, if you dare to make your logo different and suitable for the majority of its visitors, it will be a good leverage to bring you on top, which is far ahead of your competitors. In other words, logos can immediately explain to your customers why you are unique and the best compared to your fellows at the same level.
How to add or change logo on Shopify store
If you are reading up to this part, we can guarantee that you are an intelligent person who acknowledges the importance of creating a logo and have a desire to find out how to add a logo to Shopify store. Don’t rush and just calm down since you will be shown how to do this in a few minutes.
Step 1: Login your Shopify account
By typing your registered email and password, you are able to log in to your Shopify account and make your stores activate for further usage.

Step 2: Go to Customize Theme
If you have your own store, let’s go to Online Store -> Theme -> Customize Theme to continue.
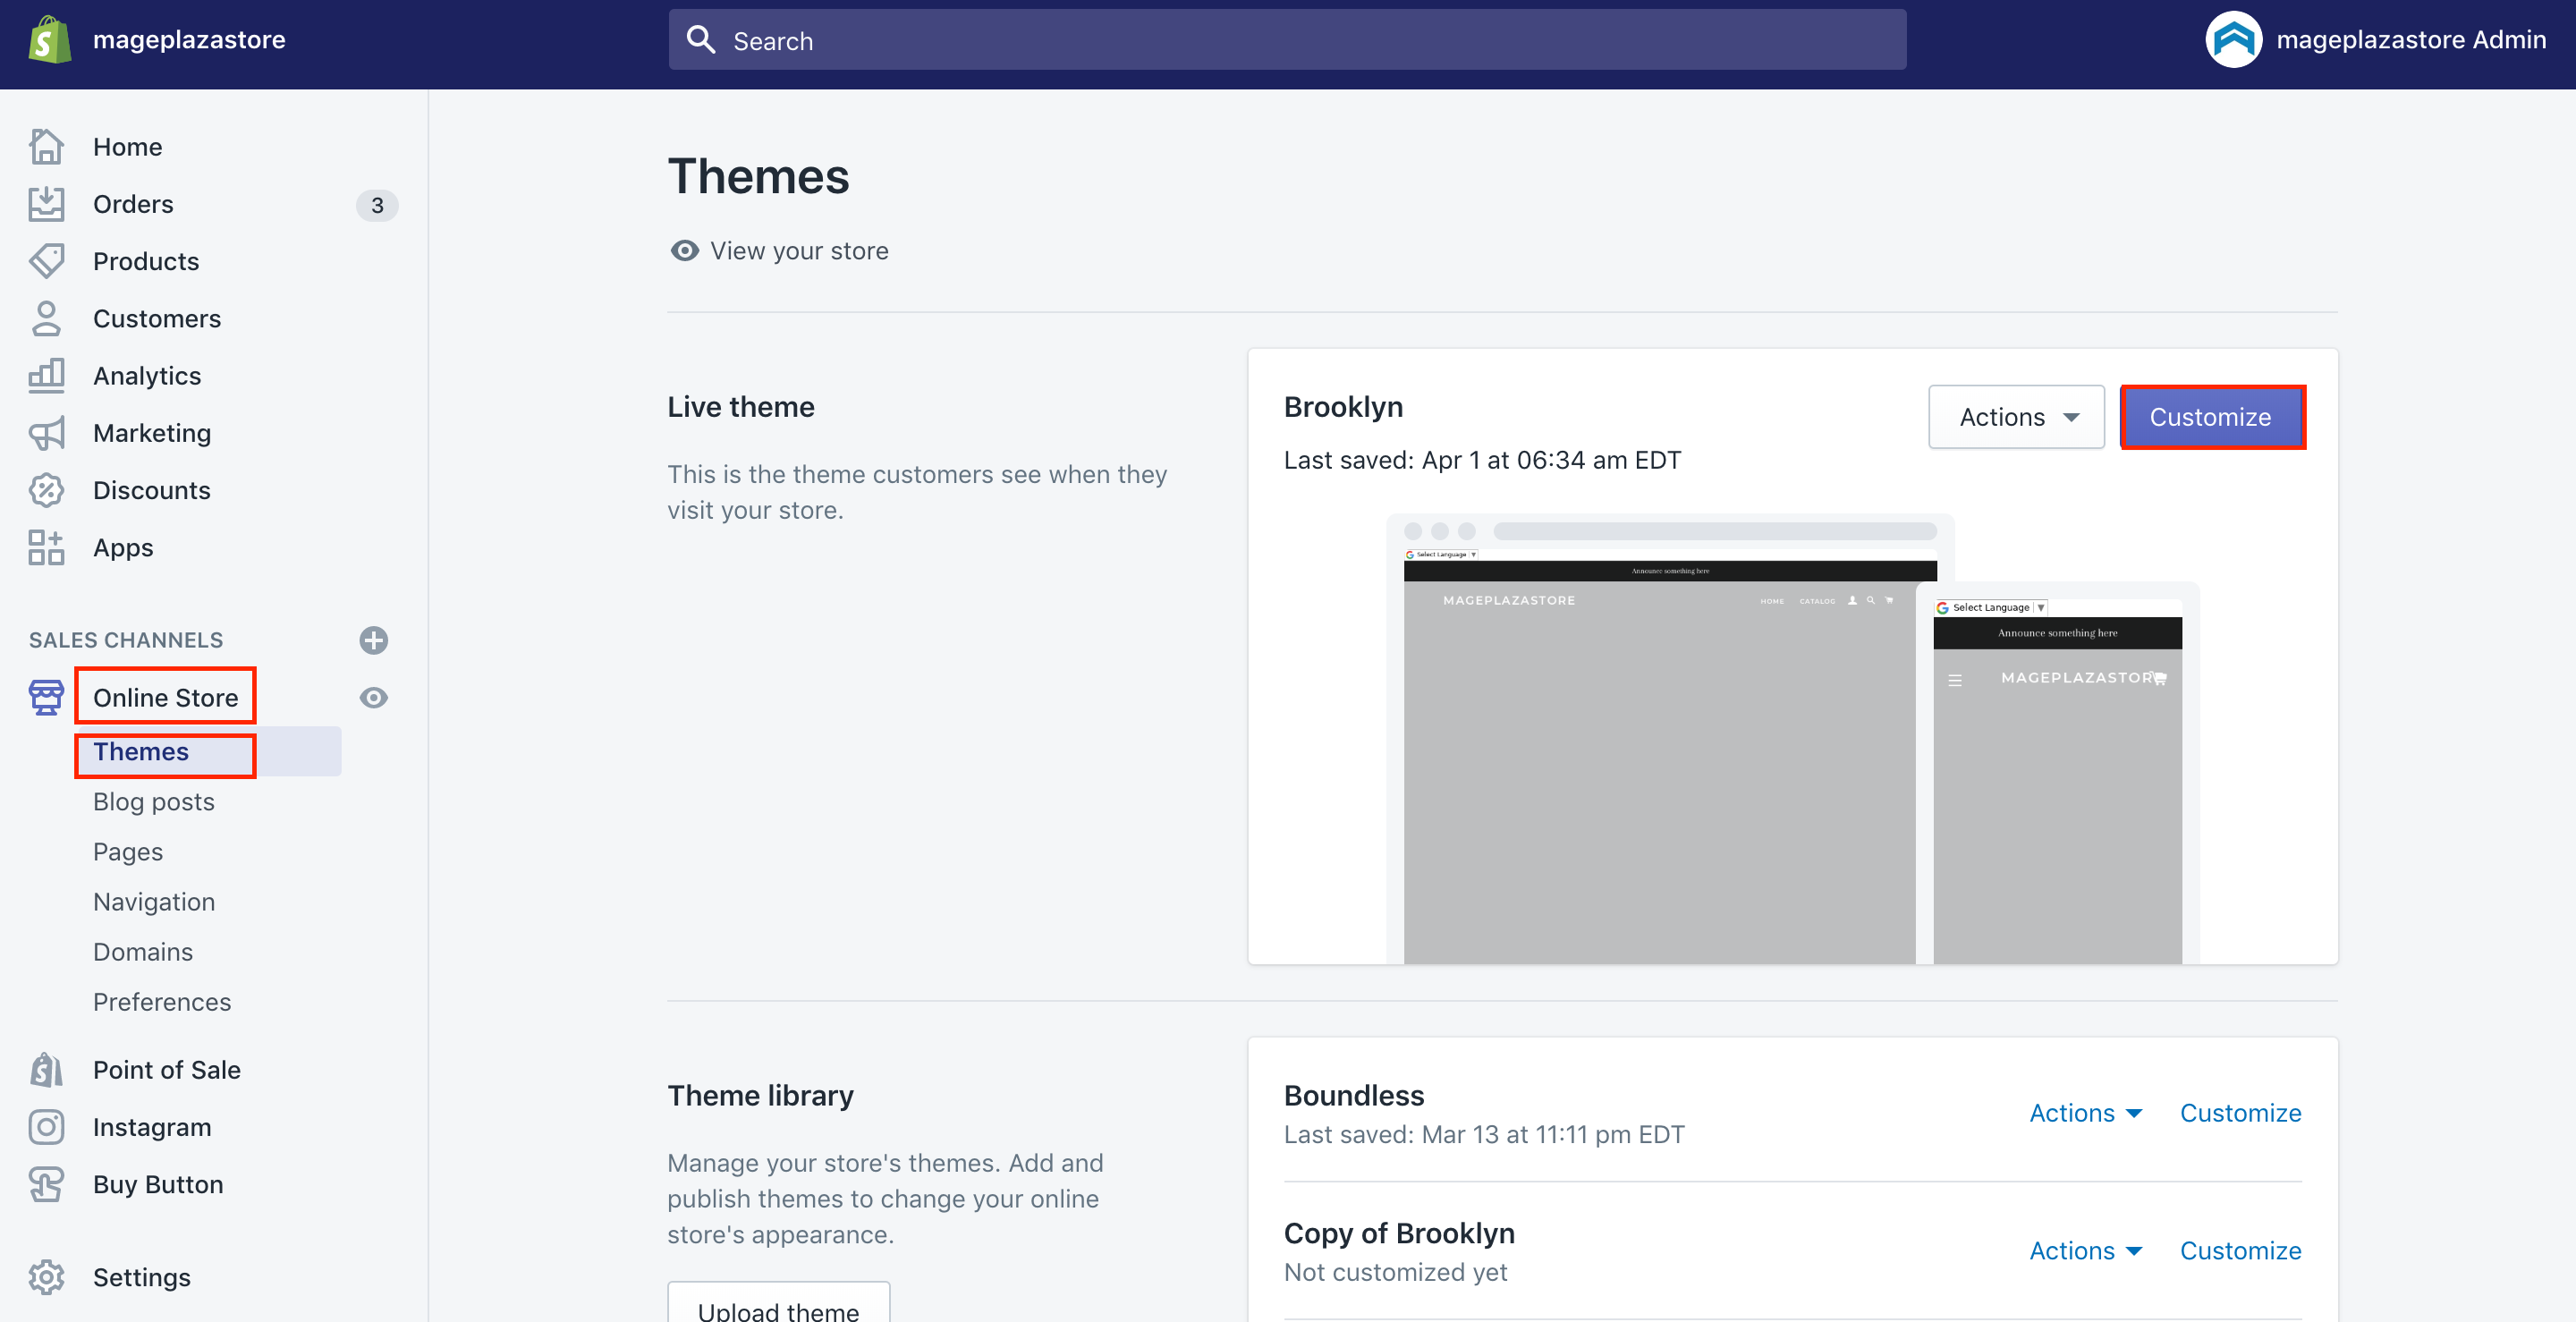
Step 3: Choose Header
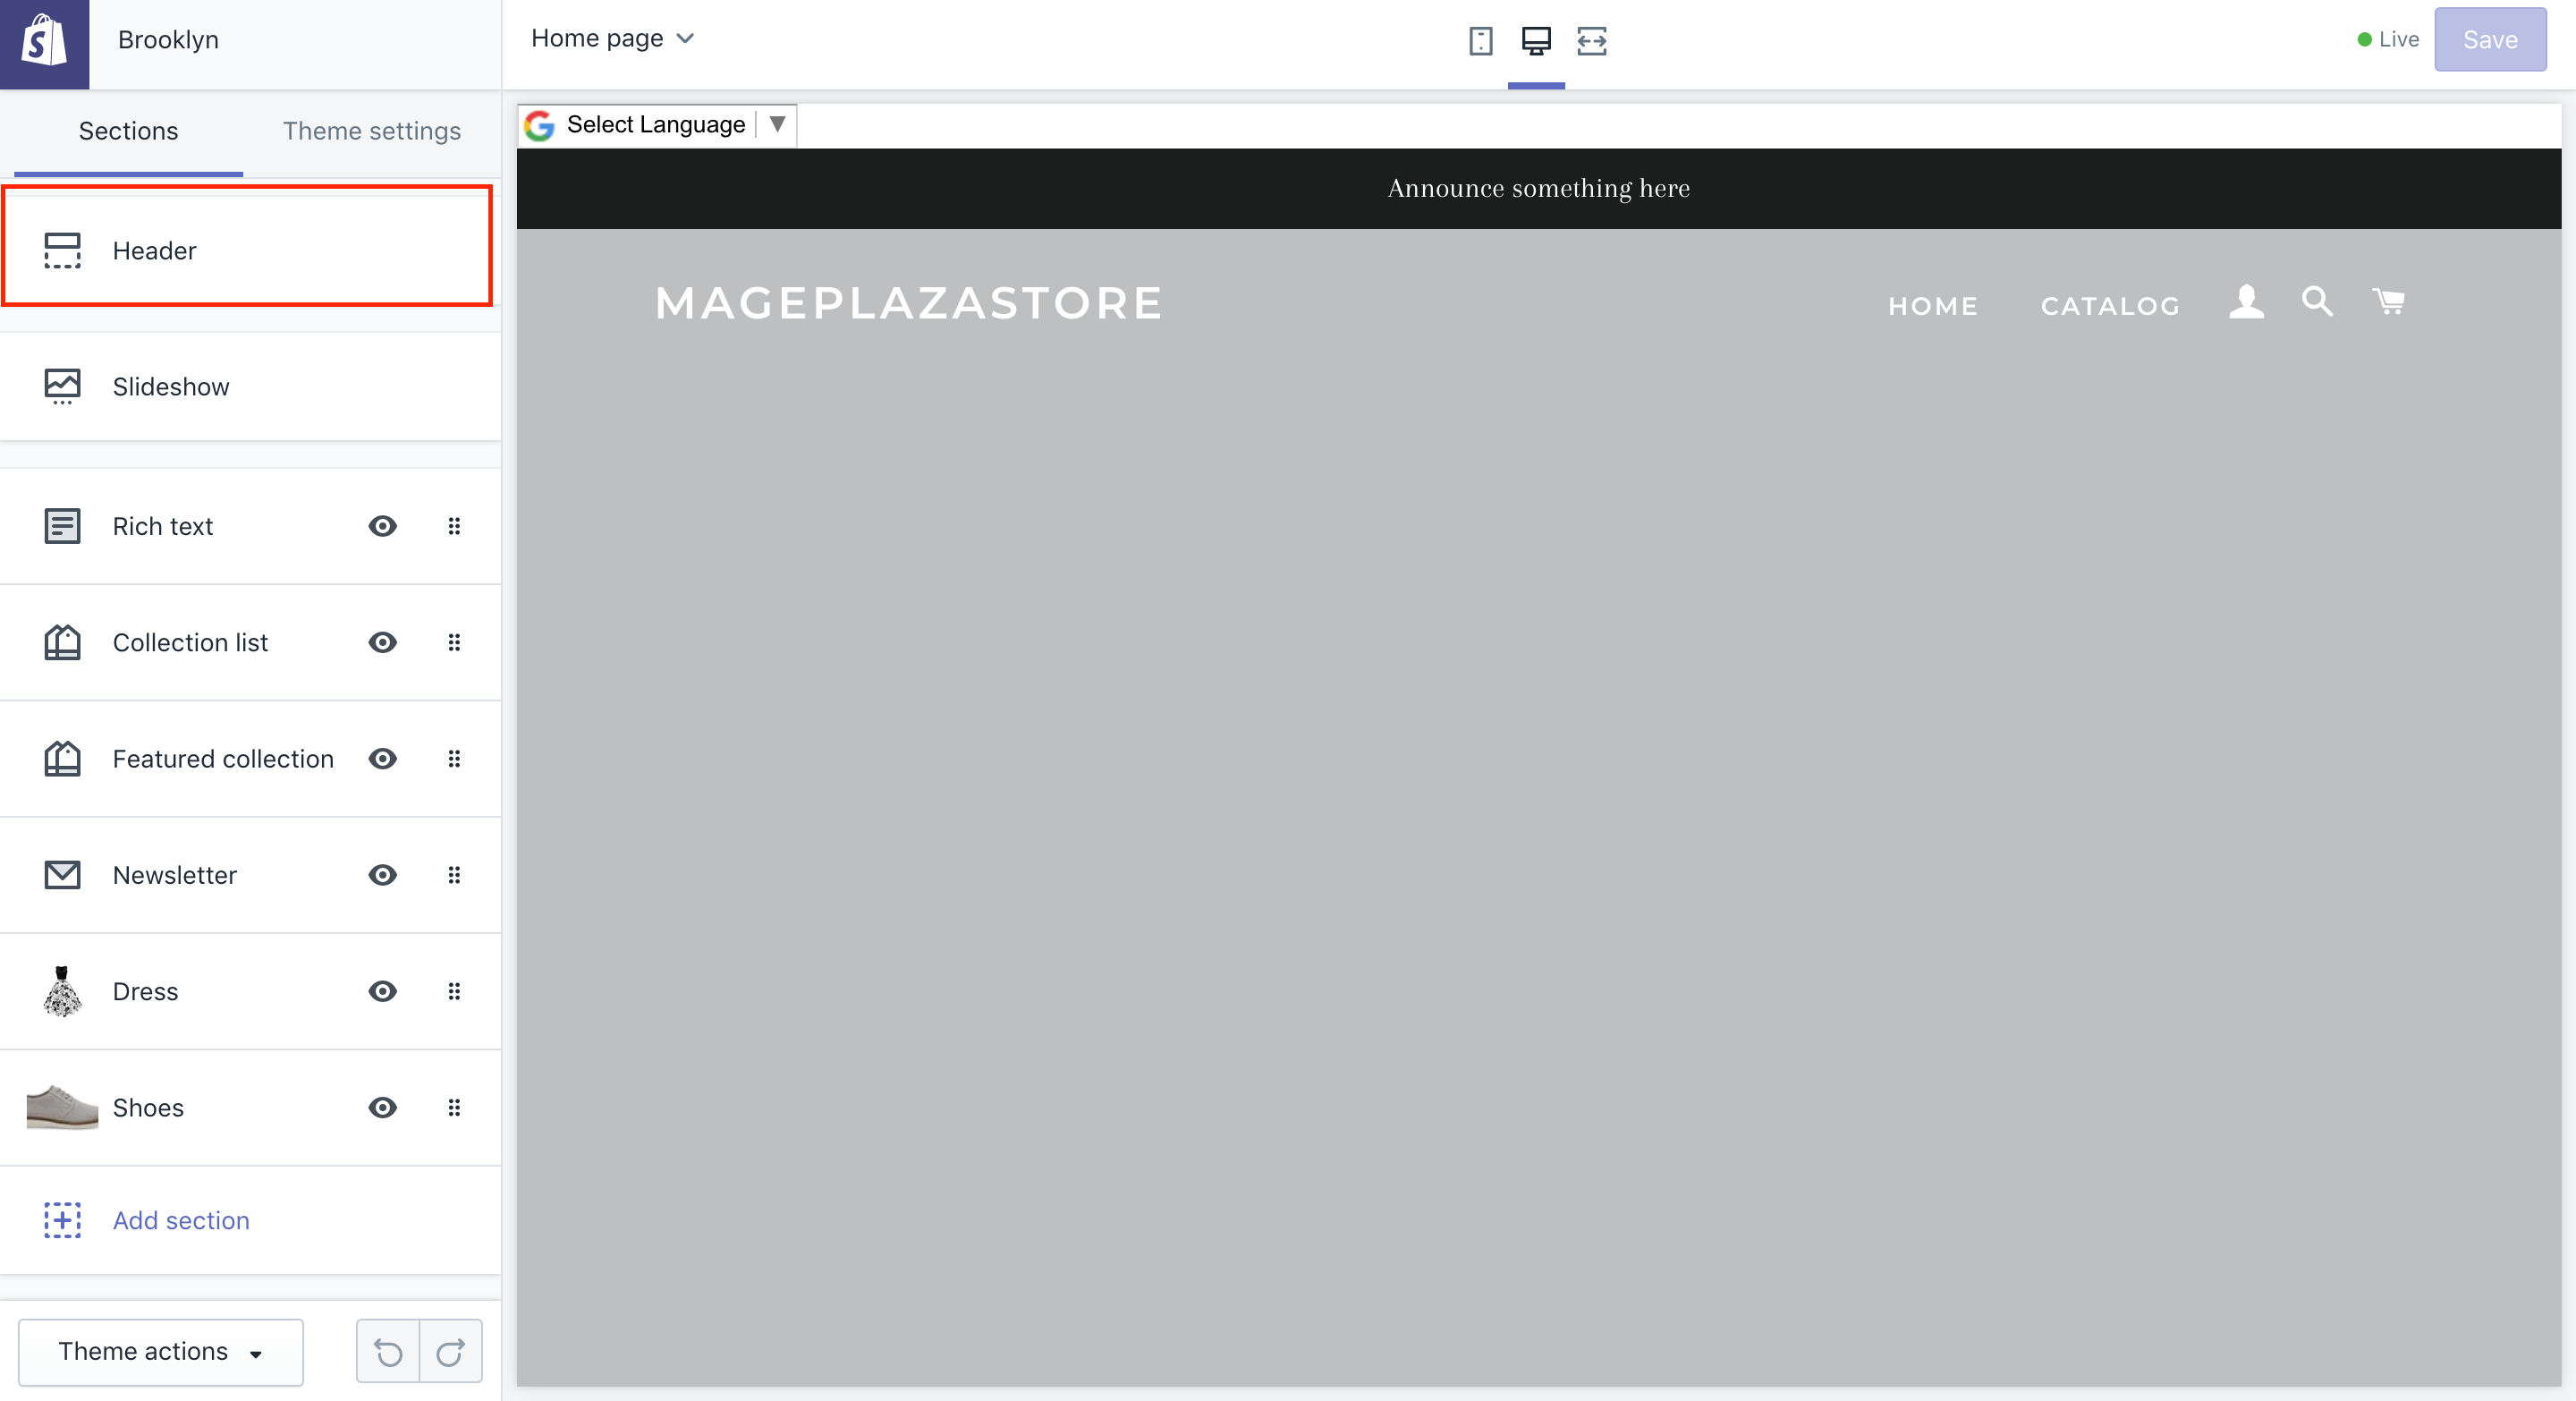
Next, you can click on the Header located on the left side of your new options panel.
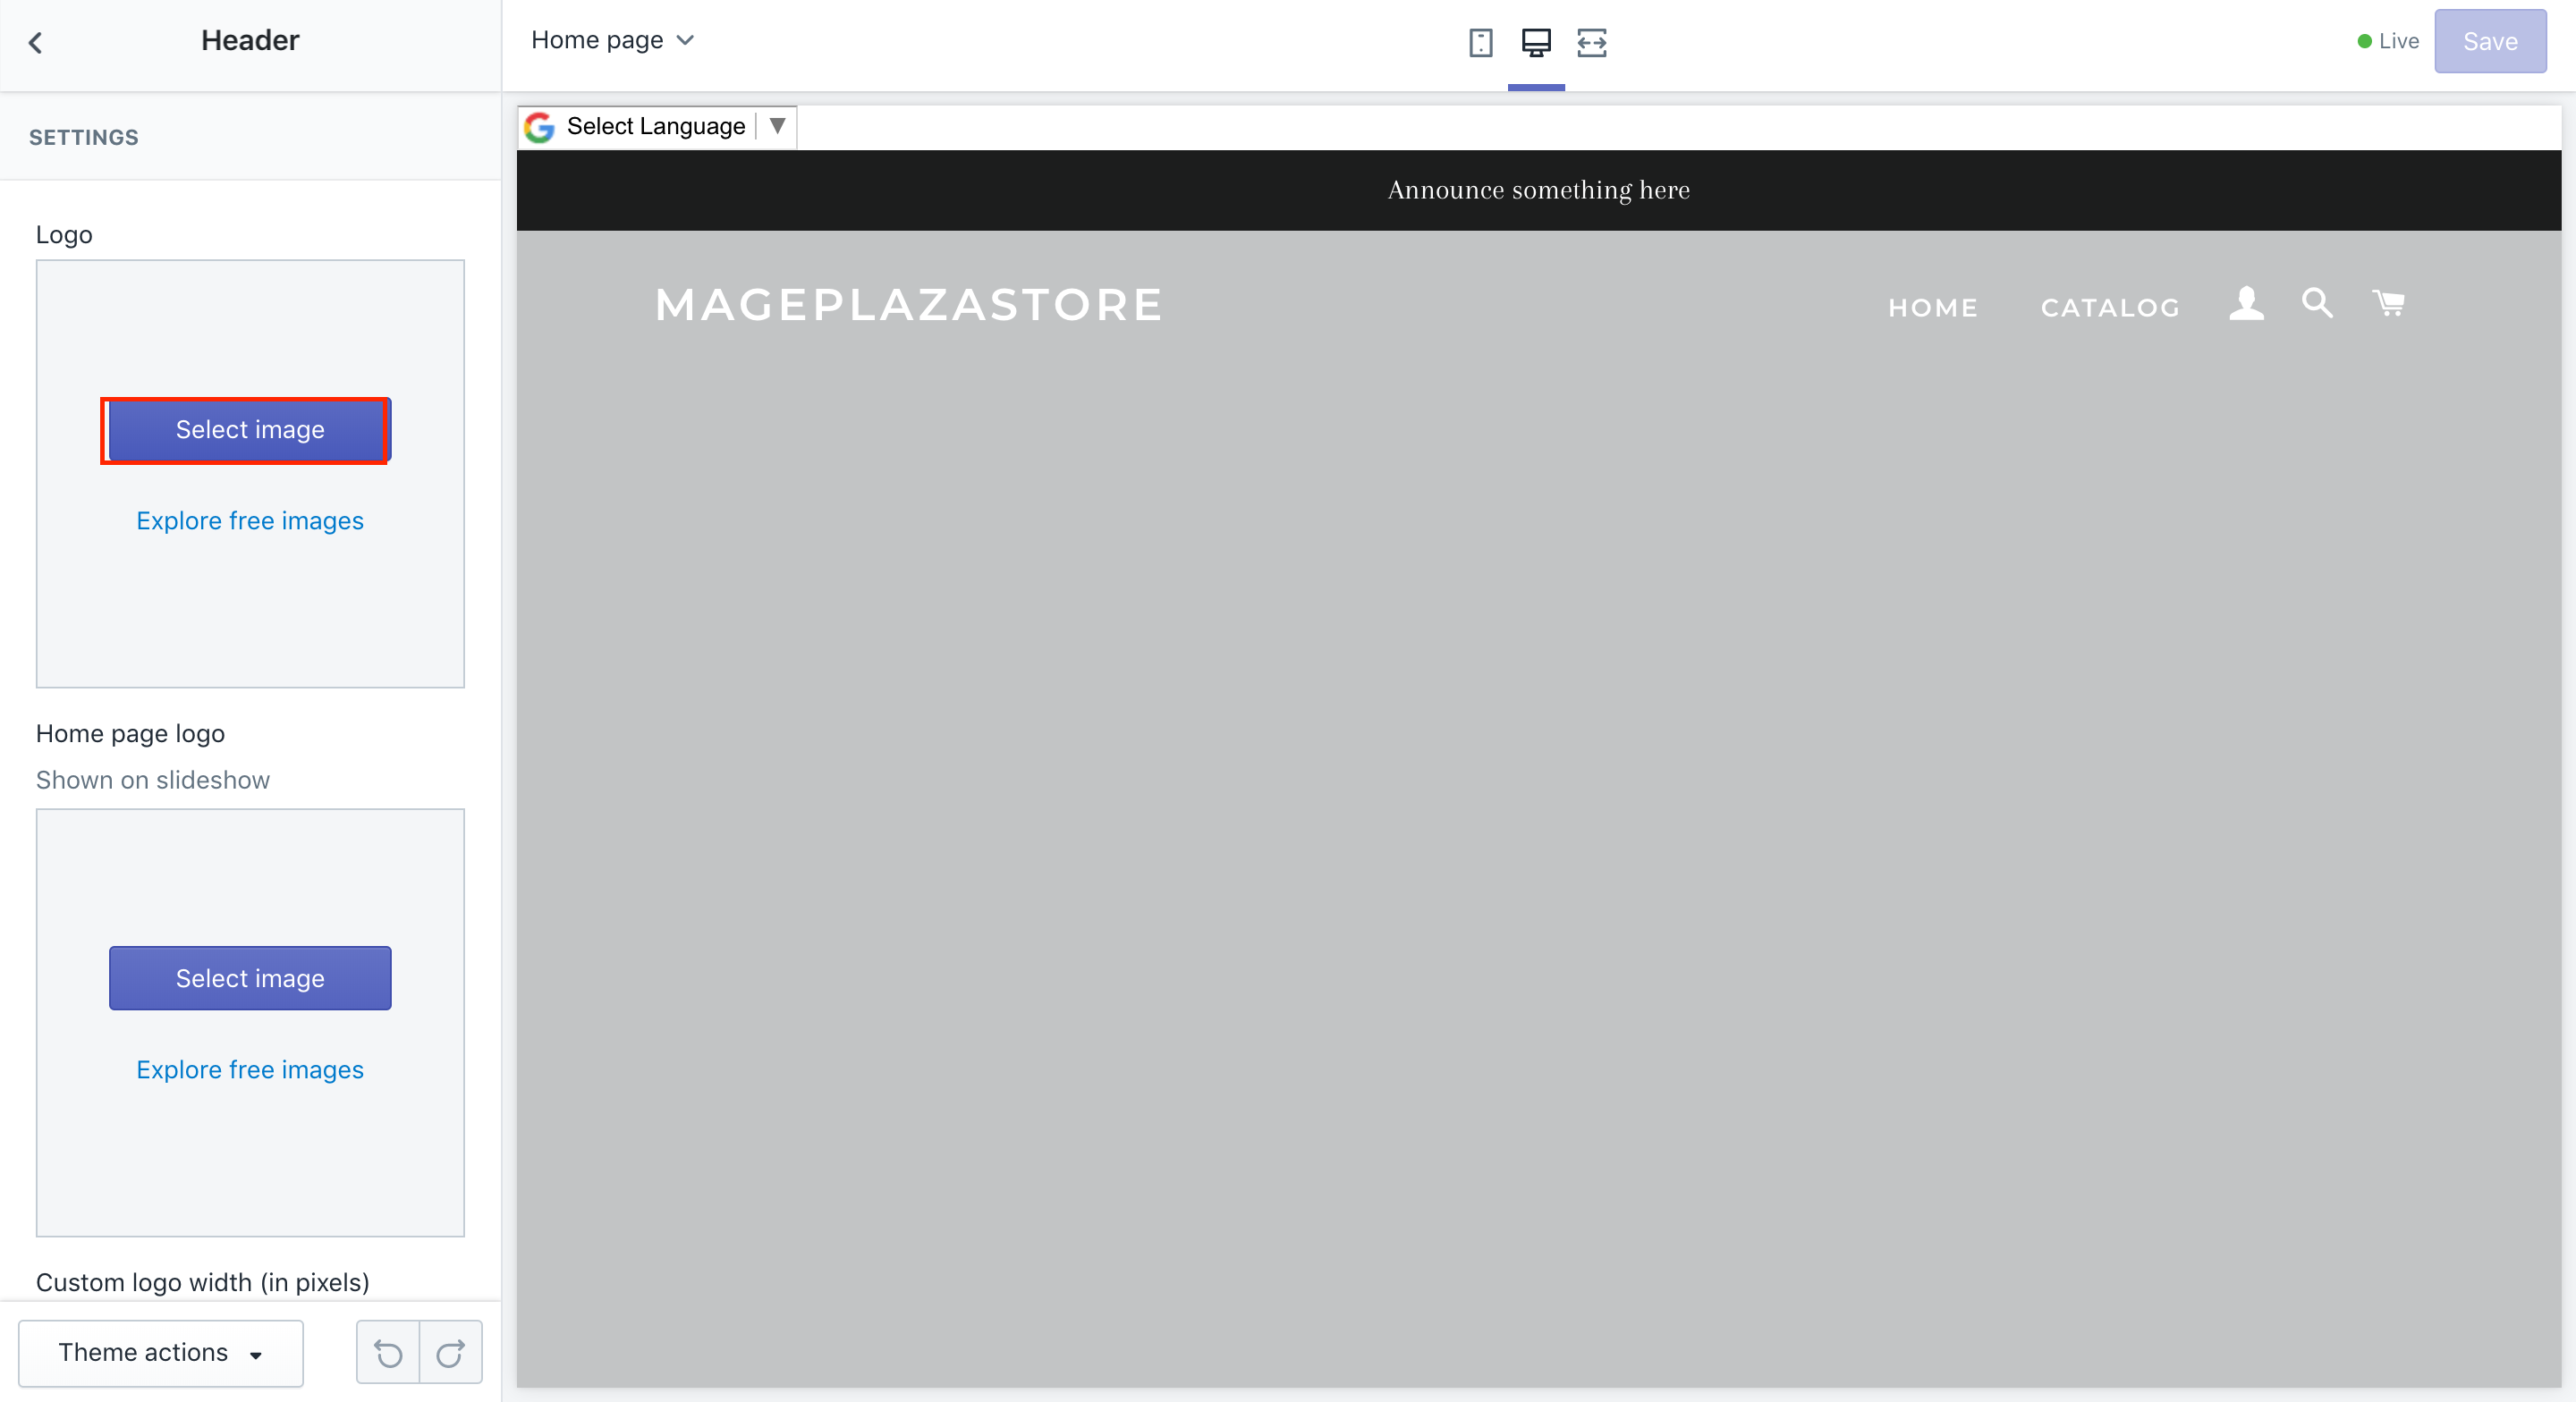
In the same position, you will see two sections, which are Logo and Home page logo. To add a logo for your store, you can click on the Select image button.
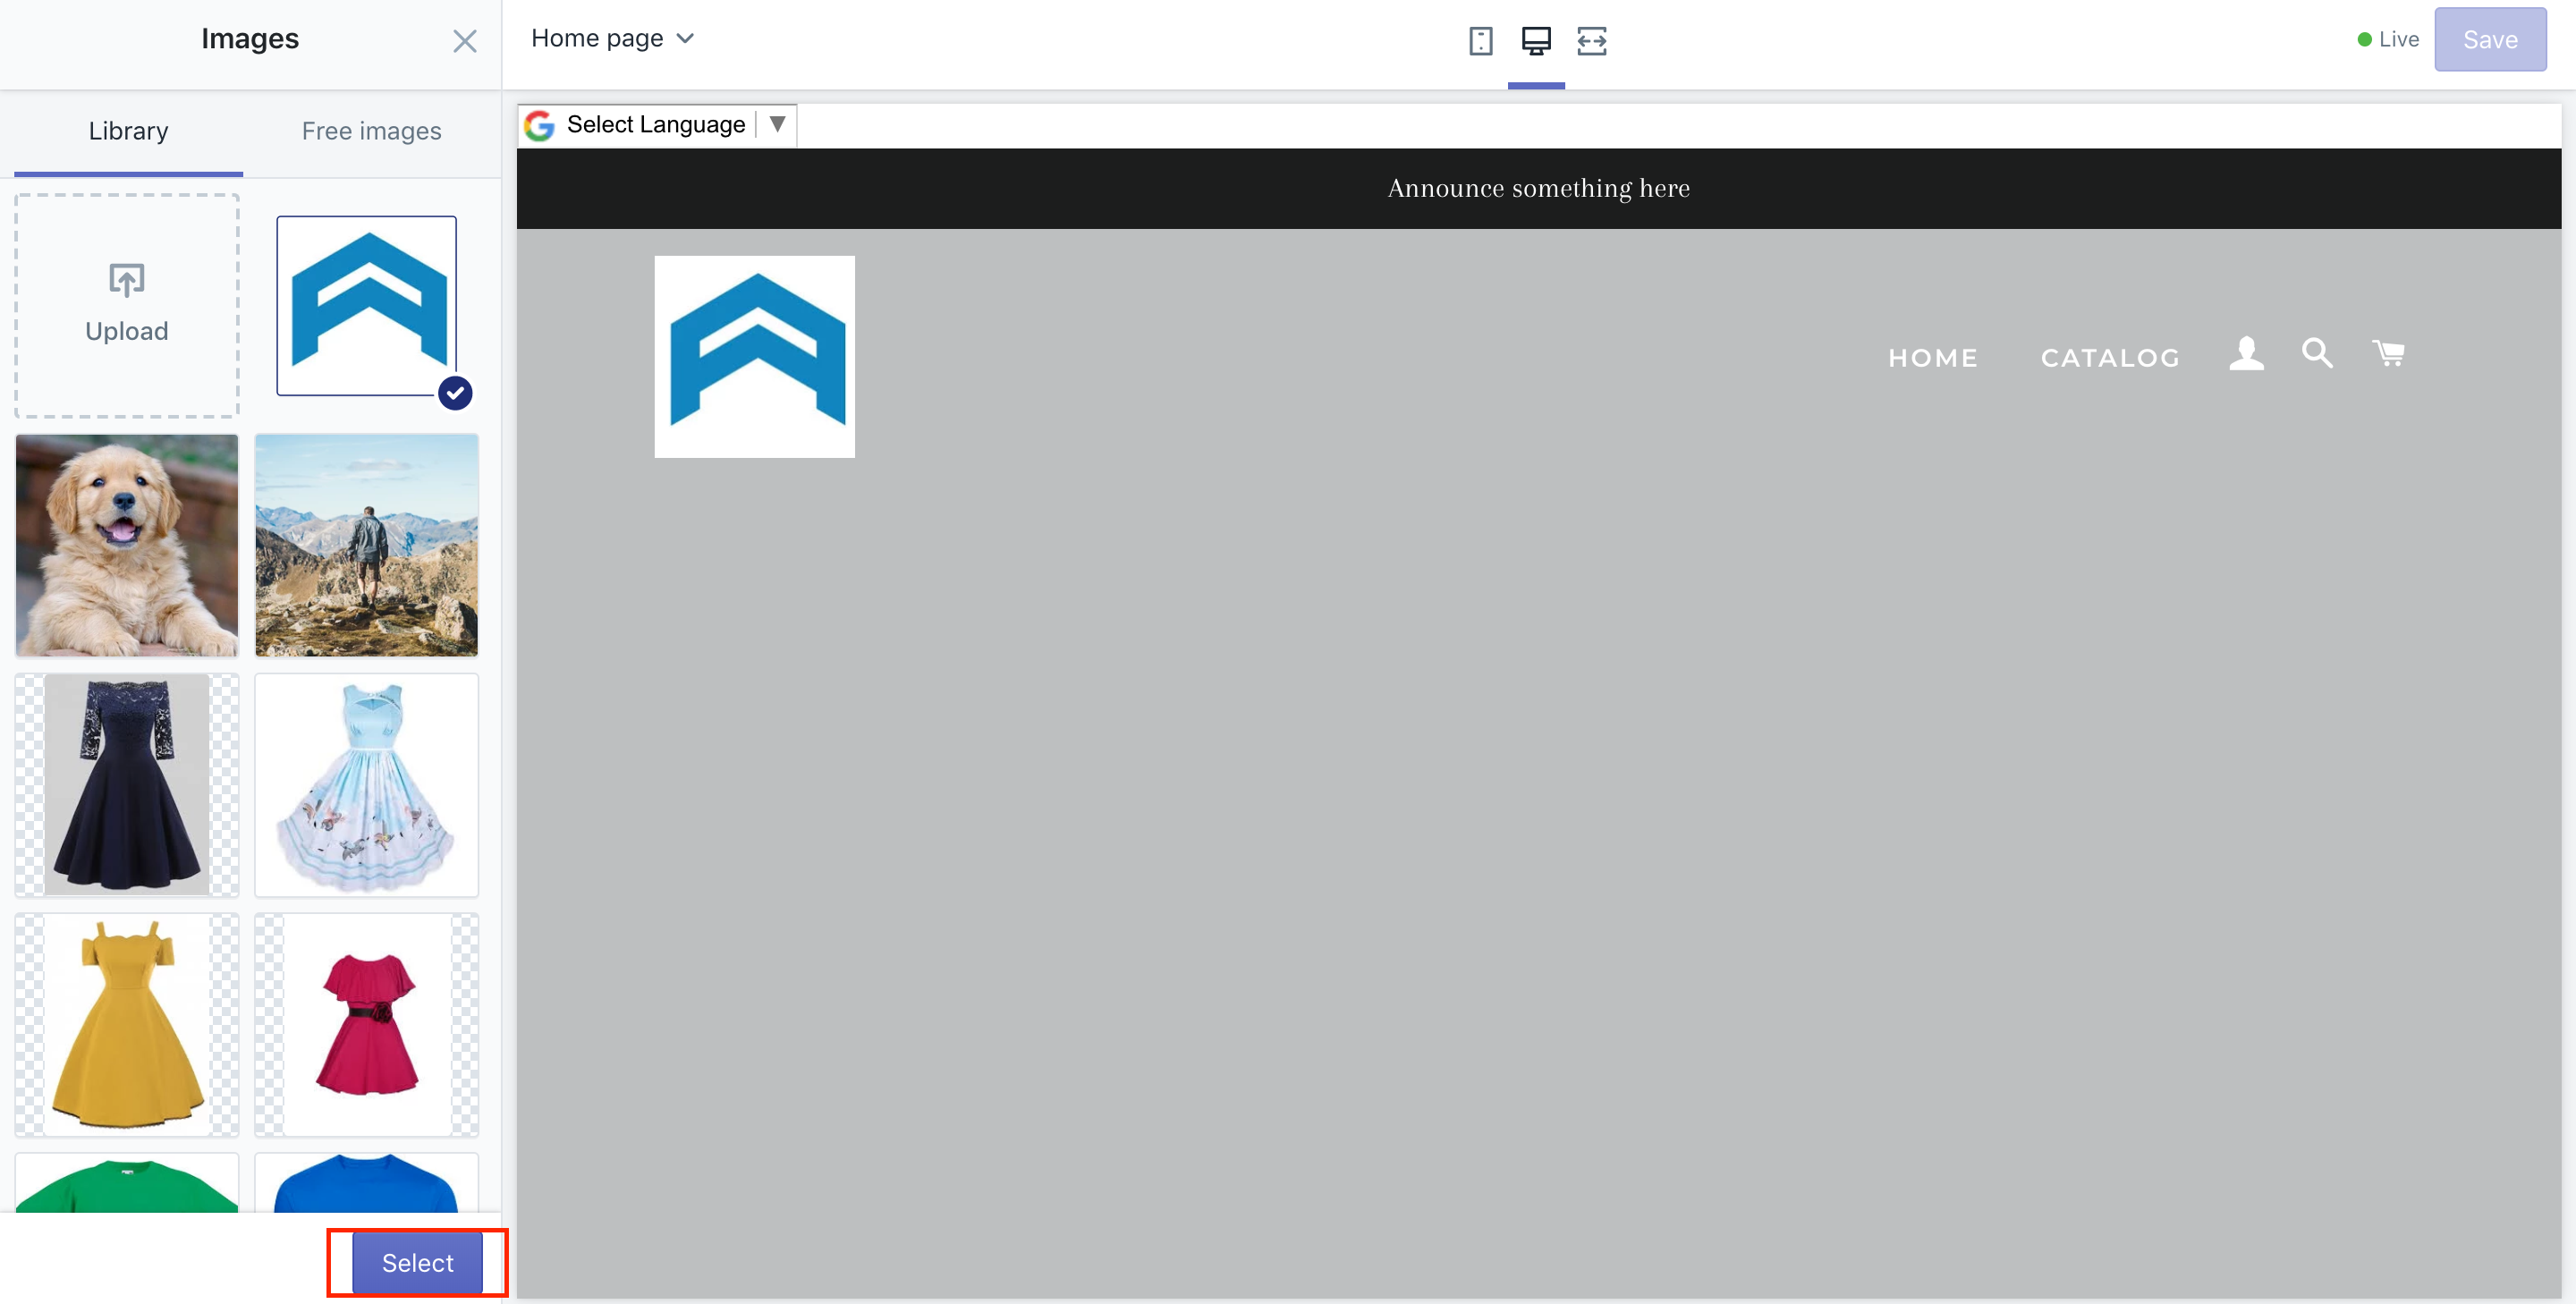
Then, a box comes out to allow you to upload a picture as your logo or choose from available images. At the same time, Shopify lets users customize their logo width in pixels so that they can feel free to choose the suitable dimension for their logo.
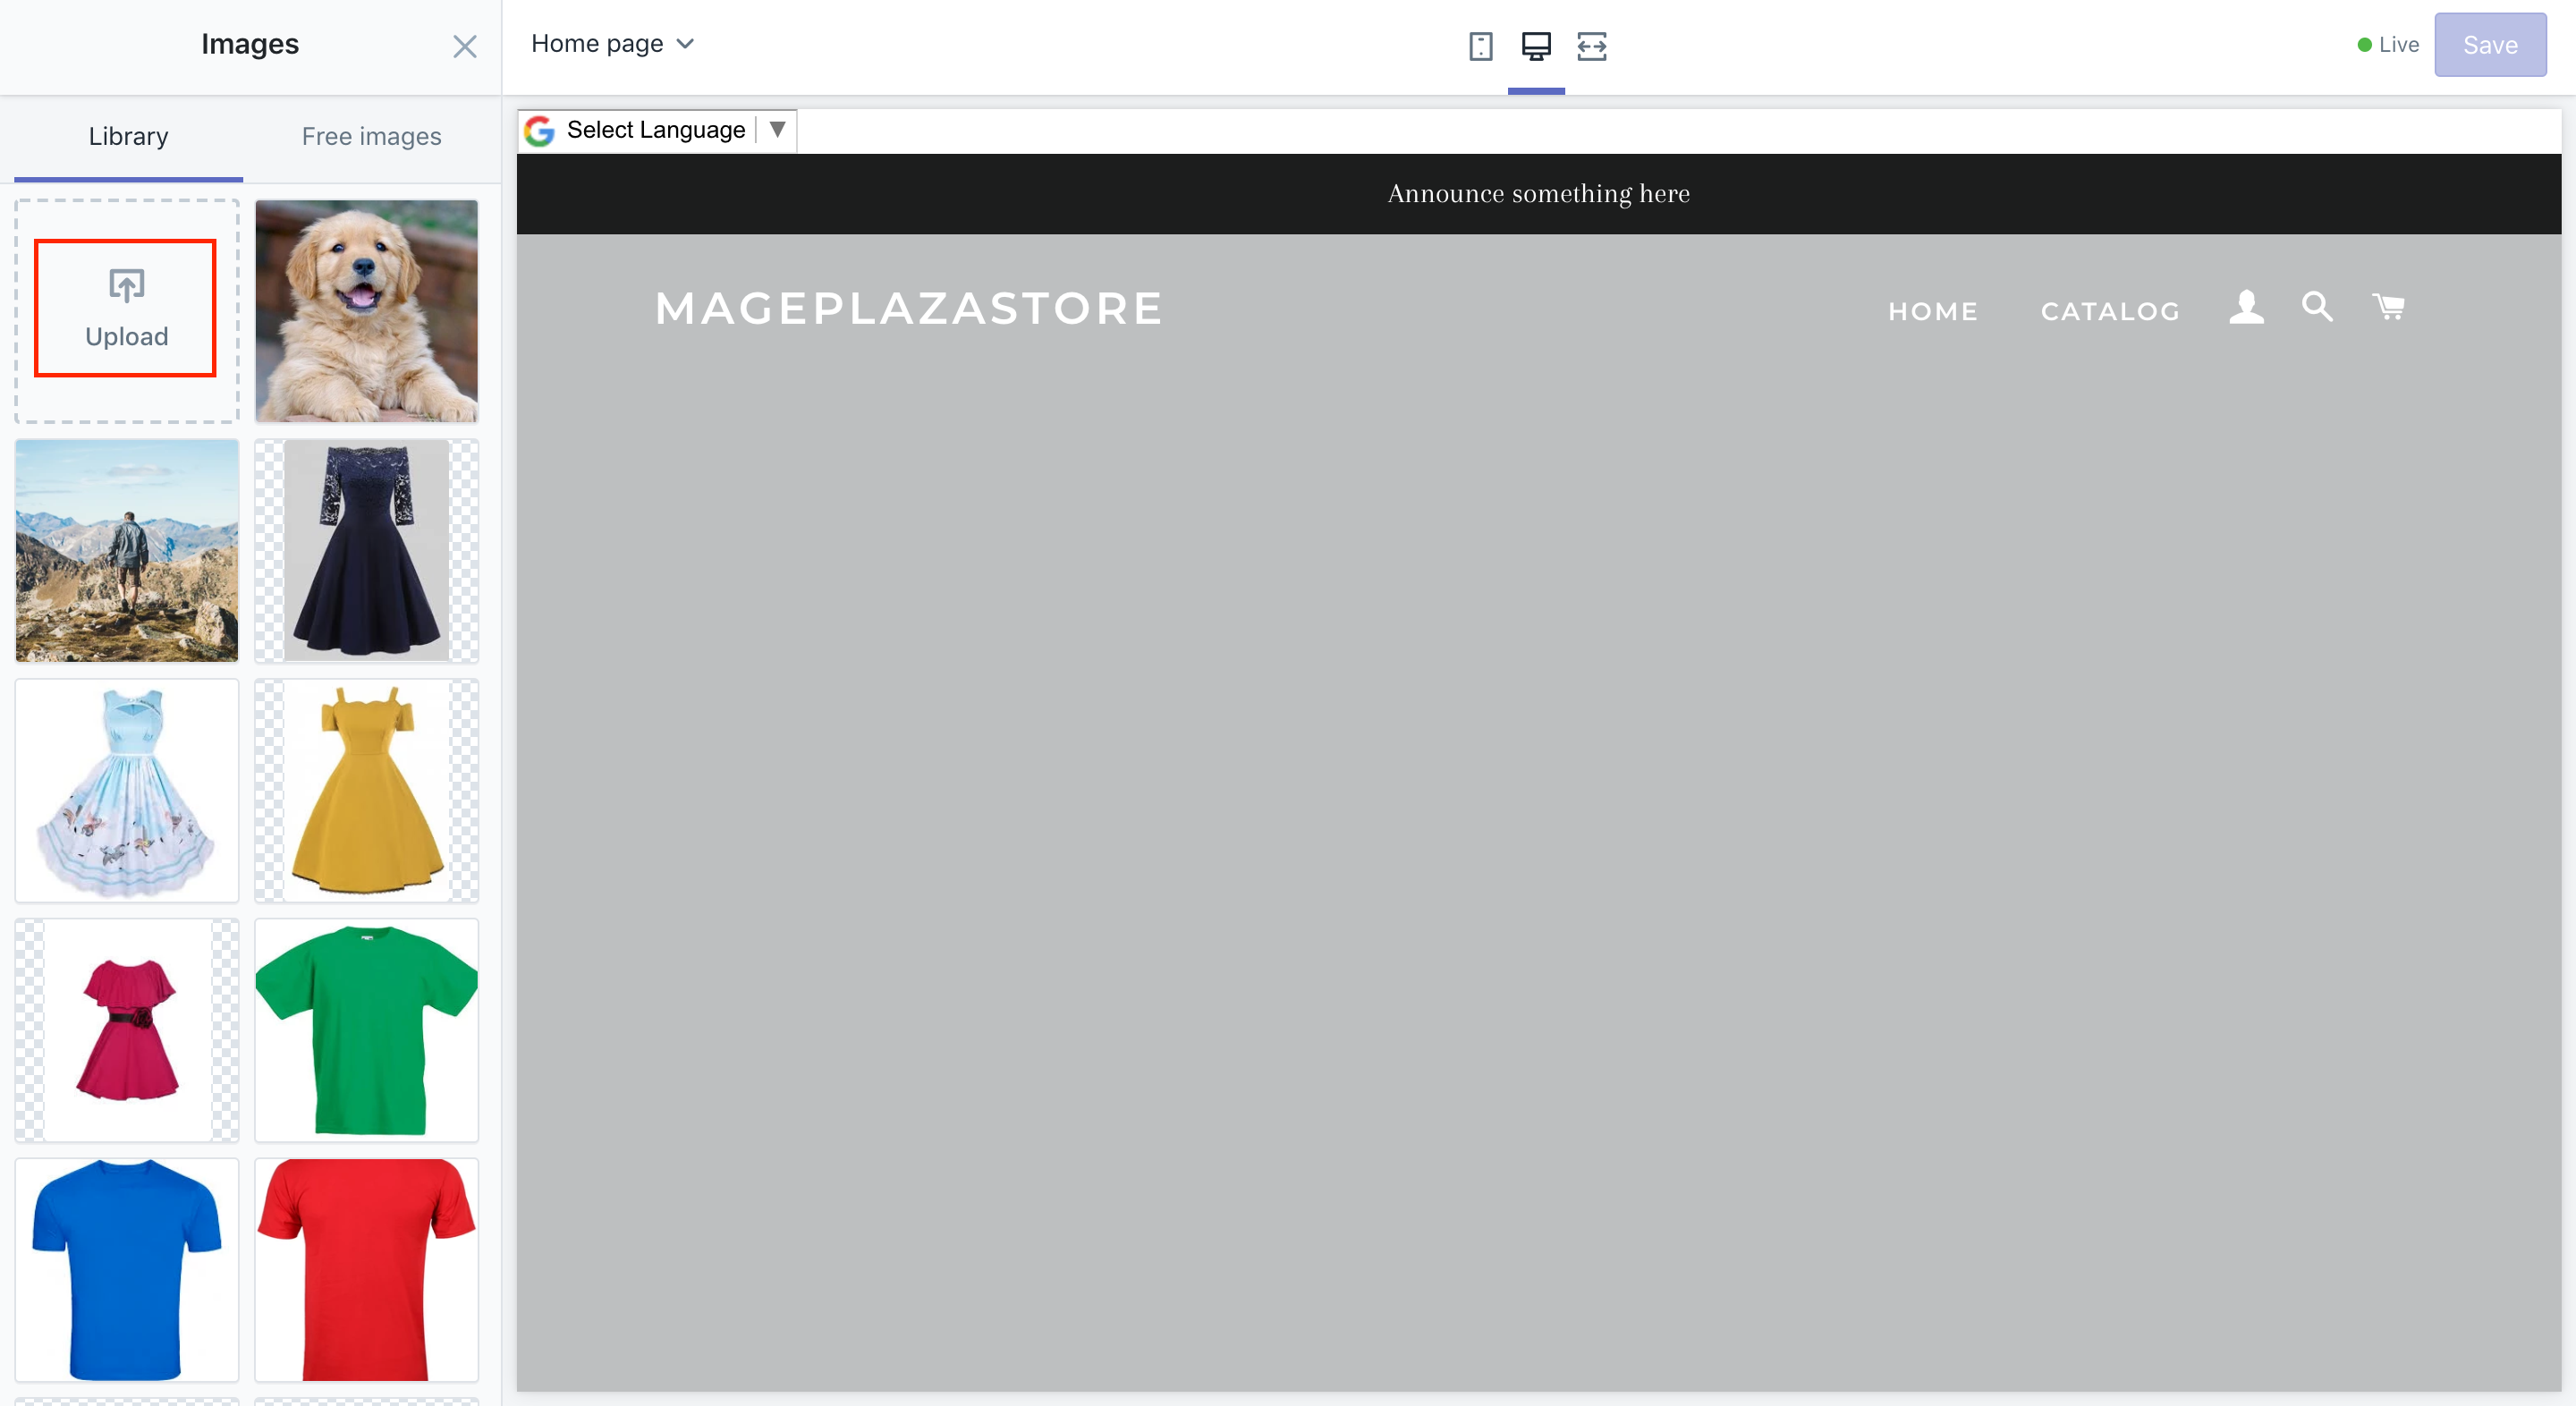
Step 4: Click Select
After everything is done, don’t forget to click on the Select button to finish your completion.
Step 5: Change, edit or remove logos
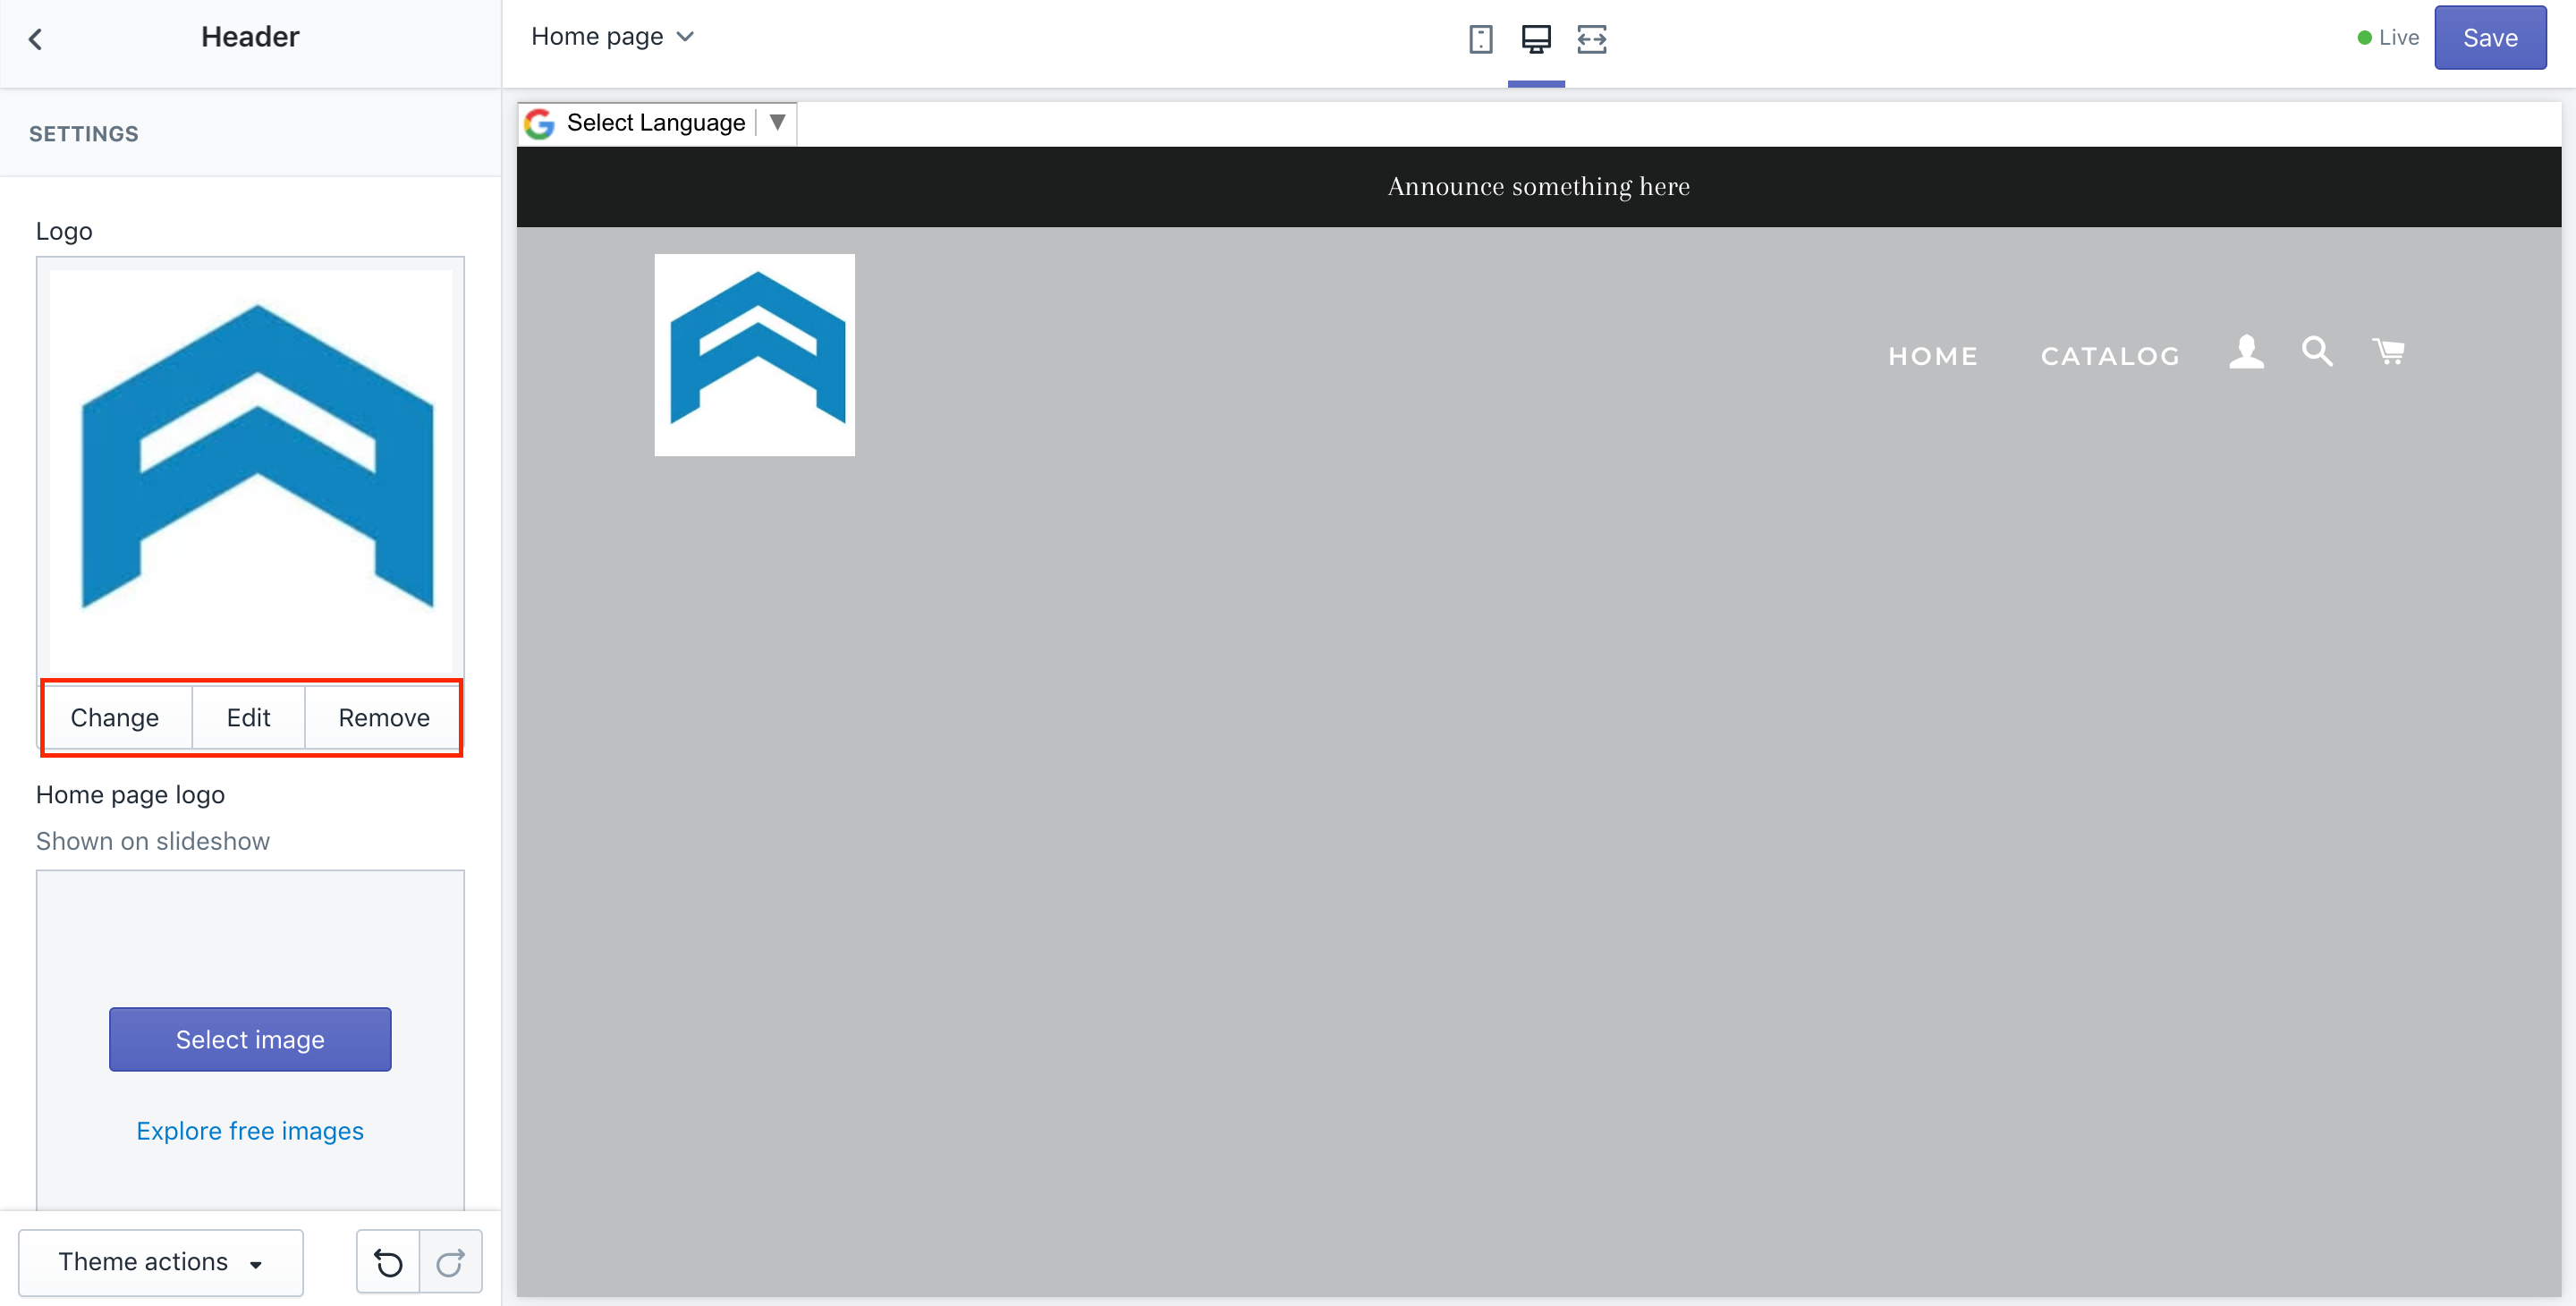
In case you want to change, edit or remove logos, let’s return to the Header section and click on it. Under your logo, you can see there are three small buttons that allow you to change, edit, or remove this logo. By selecting Change, you have one more chance to choose your favorite logo again. By clicking on Edit, you will make your logo less boring by giving it a short description and if you choose Remove, your current logo will disappear instantly.
How to create a beautiful logo
In order to create an ideal logo, you had better follow those steps below strictly.
Step 1: Build up your brands’ identity
You should think of first what your brand tends to represent so that visitors can imagine how well your logos work and symbolize. Let’s consider some of the world’s most famous logos to understand why you need to define your brand’s identity.
Step 2: Create a logo’s style
Whenever you are successful in identifying your brand’s idea clearly, it is time to choose a deserved design for your logo. You can easily refer a series of the most widely used logo styles, including EMBLEMS, LOGOTYPES, MONOGRAM LOGO, BRAND MARKS, and COMBINATION MARKS.
Step 3: Understand Typography
In fact, there exist 6 typography styles, which means that font styles are also various for you to choose from. Each lively font style consists of its own power and meaning to assist you in conveying your unspoken saying to the customers.
Step 4: Understand Colors
In most cases where words are not enough, colors have done its good job in expressing your own emotions and ideas. You can set a single color for your logo or combine different colors to make it become more interesting and memorable.
Step 5: Have communication with designers
After understanding all of the elements to help you create a perfect logo as you wish, you are willing to get it created. By communicating with designers, you are trying to explain everything to them. You can strive to make a clear discussion on how you want your logos to look like and come out. Don’t forget that the lack of understanding and mistakenness between two sides can make your effort become nonsense.
Hence, to create a beautiful logo is not so complicated, but it takes time and requires your patience as well as carefulness. To help you find out more details and references, don’t hesitate to bury your head into How to create a logo for business. It is certain that this post can provide you with further useful information and guidance.
What is the Shopify logo size?
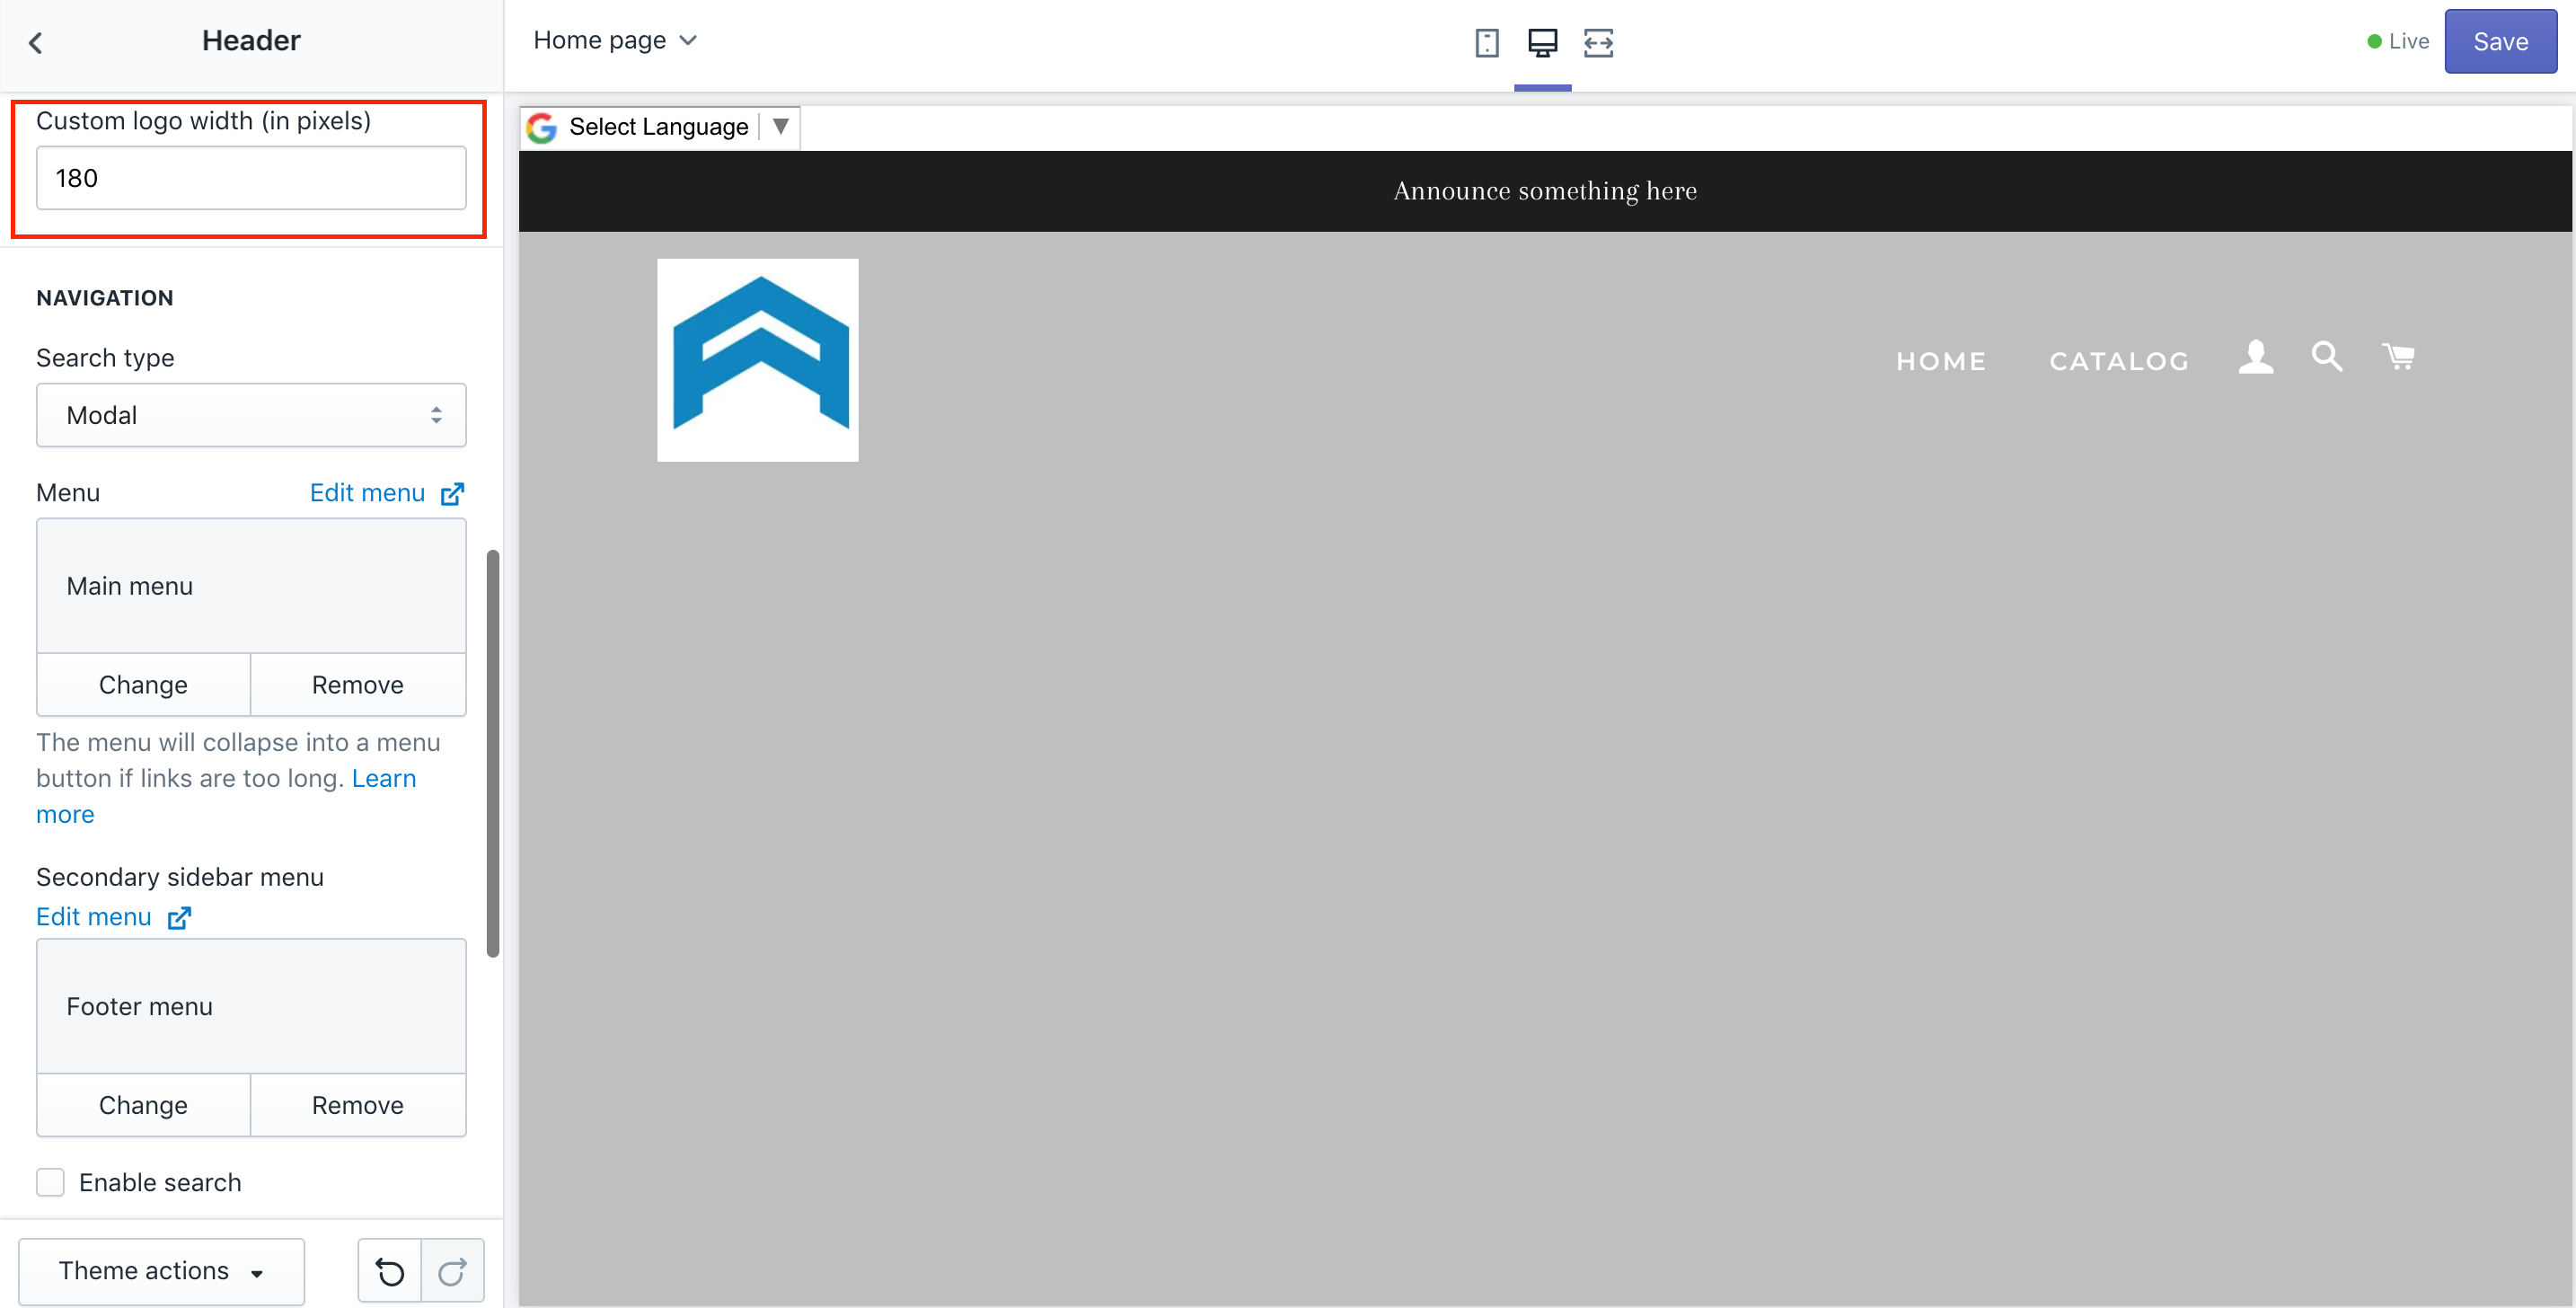
Shopify can help you increase the pixel width up to 5000; however, the image size stays the same. You are able to increase the value to 250 or 300 or whatever you need.
In case you would like to customize your images, let’s take a closer look at 8 Image Editor Apps for Shopify.
How to make your logo bigger in Shopify
As mentioned earlier, to make your logo bigger in Shopify is just a piece of cake since you were already shown before. Let’s go back to the Header section and look at the below boxes. You are able to make your logo become bigger by typing its width in the pixel in the Custom Logo Width (In Pixel) box.
Conclusion
As you can see, a complete instruction on how do I add my logo to Shopify is already here for you to finish your task. We hope that you can successfully create your desired logo and add it to your Shopify store.
If you find the post helpful, let’s share it with your friends and tell us your experience.


