How to Add Sitemap on Shopify?
The Shopify store owners will be provided with automatic ` sitemap.xml ` files. These files contain links to all the products, images, pages, etc. These Shopify stores with the collections and blog posts will index the site, which is used by search engines like Google and Bing. That online shops will appear more and more in search results. The Shopify sellers can submit the sitemap to Google Search Console and index valuable pages on their site.
If the Shopify pages can be linked properly, the store owners can be displayed on Google easily. The sitemap helps them to improve the crawling process. In addition, there are more specialized files that allow users to crawl in the more complex sites. This article How to Add Sitemap on Shopify includes important parts to boost sales by adding a sitemap to Shopify.
Related Posts:
- How to Import Orders into Shopify?
- How to Sell Digital Downloads on Shopify?
- How to Add Collection to a Page on Shopify?
- Disable Two-Step Authentication for a Staff Account on Shopify
What is a sitemap?

Providing information about the pages, videos and other files on the site, the sitemap is also the tool to represent the relationships between them. These files will be helpful for search engines like Google to read this file so that they can crawl their sites more intelligently. The sitemap allows Shopify users to tell Google which pages and files are important for your site. In addition, they also provide valuable information such as how often the sites are updated and when the page was updated. Another example is there any alternate language on the page.
For specific types of content, online merchants can use a sitemap which the information on the pages such as video .The video entry can be specified by the running time, category, and age-appropriateness rating. Or image content with the entry including the image subject matter, type, and license.
How to find sitemap of a Shopify store?
The location of the sitemap file is at the root directory of your Shopify store’s primary domain name.
For instance, there is a sitemap like johns-apparel.com/sitemap.xml which is automatically generated and updated when adding new products, collections, images or any blog posts. Moreover, there are many links to separate sitemaps such as blogs, products, collections, and webpages.
The Shopify store owners submit the sitemap whenever they want. When the website has a password to protect, the readers can not access to the site. In that case, the store owners want to disable their websites, click to Remove your online store password.
How to add sitemap to your Shopify store?

There are many choices that online merchants to use third-party services requiring them to verify their domain such as Pinterest and Google Webmaster. From this activity, they can make sure who is the correct owner of the Shopify stores before these third party services provide their services.
Verify your site with Google
To protect your online stores, it is essential for online sellers to verify their domain. It is high time to disable password on the online store. When the shop owners are not ready to launch their store, after verifying their domain, it is possible for them to disable password protection and then enable it again.
There are some steps to verify the domain as below:
Step 1: Copy meta tag to clipboard
On the third-party site like Google, by using a meta tag verification method, online sellers can choose to verify their sites.
On the Google Webmasters, by clicking to HTML tag option button on the Alternate methods tab, it is easy for them to verify this website.
The full meta tag on the third-party site will be highlighted. First of all, online merchants can copy this meta tag to their clipboard by cicking cmd and c on a Mac. For personal computers, they can click ctrl + c. But it is necessary for online sellers to ensuring they had selected everything including the < and >.
For example:
<meta name="google-site-verification" content="IV7BPLESttSpBdxSWN1s4zlr4HIcuHkGQYmE3wLG59w" />
Step 2: Choose Themes
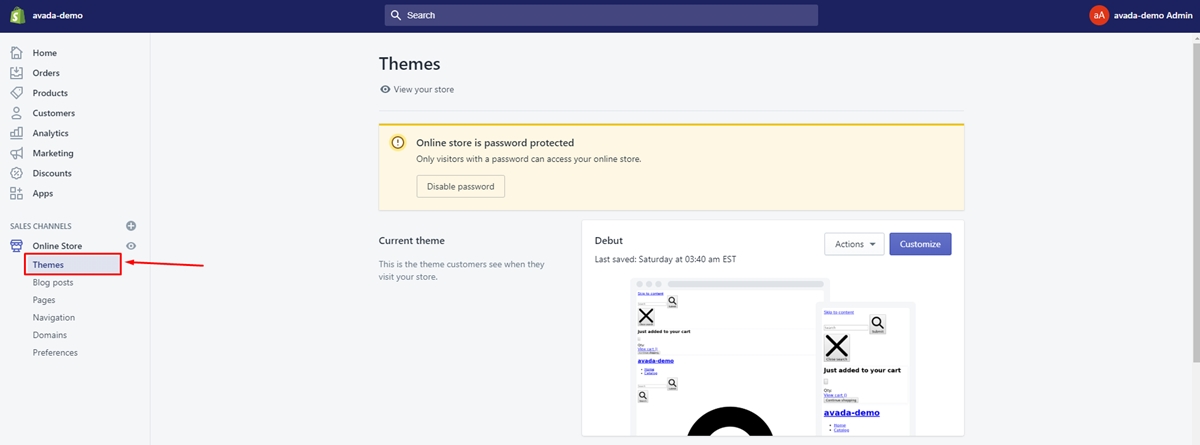
At this step, on the Shopify admin, the online merchants choose to Online Store and then Themes.

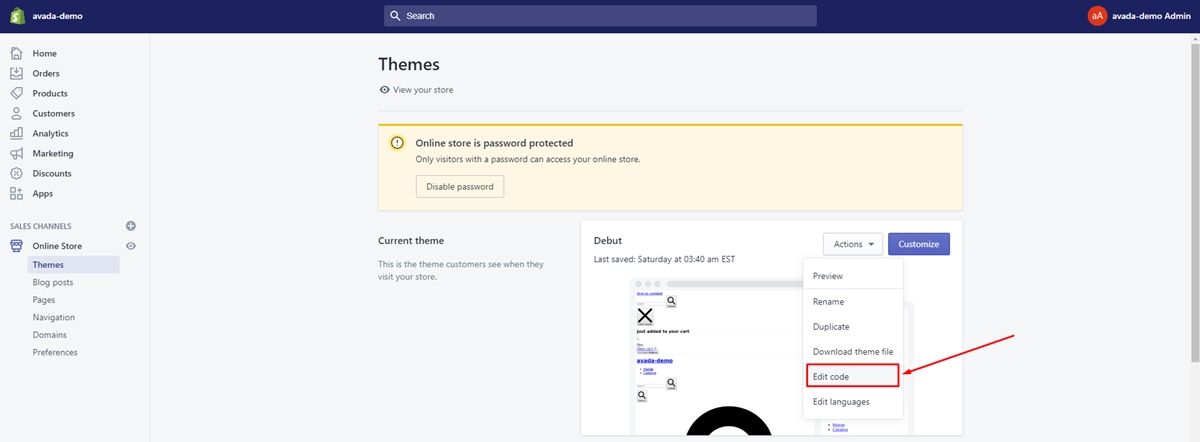
Step 3: Click Edit code
On the list of themes, the Shopify store owners find the theme that they want to edit.
Moreover,the Shopify store owners click Actions and then Edit code.

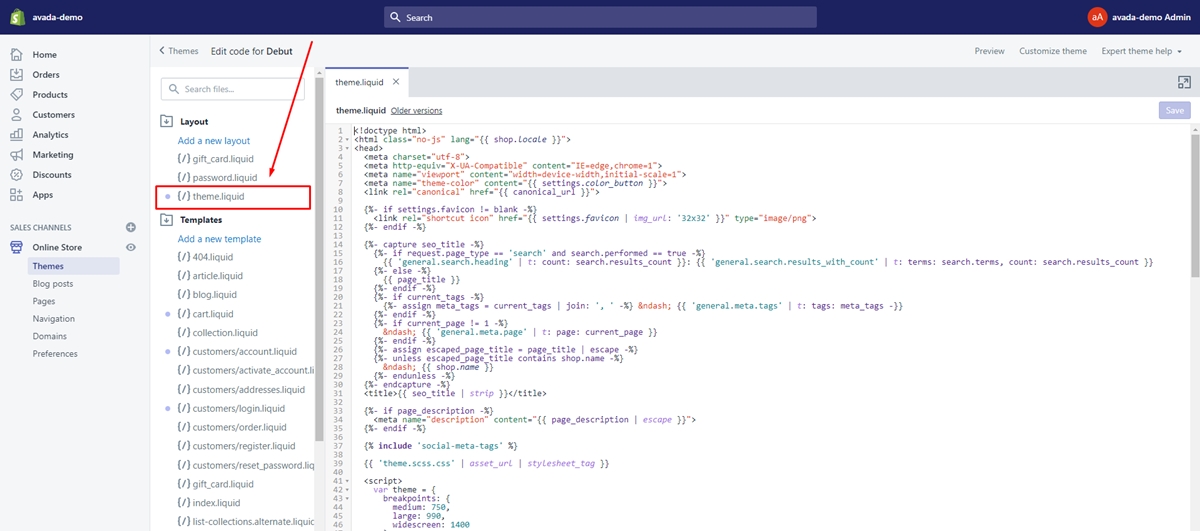
Step 4: Open theme.liquid
The section of Layout, in the online code editor, the Shopify store owners click theme.liquid to open the file.

Step 5: Paste meta tag
After that, the store owners click to paste the meta tag that they had copied on a blank line directly in the opening <head> tag.
Step 6: Submit changes
Click Saveto submit the changes.
The verification steps can be completed on the third-party site like Pinterest or Google Webmasters.
Submit sitemap to Google
The Shopify store owners can be submit to sitemap to Google Search Console to help the Google to find and index their pages. The list of steps which can be easily tracked by store owners such as:

Step 1: Click Google Search Console
When online merchants finish the above process of verification, firstly, they click to Google Search Console.
Step 2: Choose to Sitemaps
And then choose to Sitemaps.
Step 3: Choose SUBMIT
On the Shopify admin, in the Add a new sitemap section, they click to sitemap.xml and then choose SUBMIT.
Conclusion
When online merchants submit their sitemap, the third party as Google can help them to crawl and index their sites. No matter millions of webpages that they index, Google doesn’t crawl all the pages on the web. Therefore, not all the pages on a site will be indexed. Sometimes this process takes a lot of time for your site to be crawled. It is necessary for online sellers to follow with these guidelines
By this article How to Add Sitemap on Shopify, Shopify store owners can indeed their understanding of sitemaps by reading this tutorial and add them into their shops. If you have any questions, let’s leave a comment below.


