How To Change Shopify Payment Method
In the Shopify marketplace, there is default Shopify payment which is automatically integrated into the shops. However, in many cases, online shoppers want to make purchases by their available items with the most convenient methods. Therefore, it is essential for any Shopify store owners to know how to change the payment method on Shopify?
By a click on this article, the online merchants will know how to customize their stores to have a suitable Payment method for their customers.
There are multiple methods for the store owners to vary their methods besides Shopify own gateway. For example, online merchants can choose to make purchases through PayPal with or without paid accounts. Furthermore, the Stripe is another choice for them to optimize their payment process.
To discover more about how to add other Shopify payment methods, let’s continue to read this post
Related Posts:
- How To Test Payment On Shopify?
- How To Set Up Shopify Payments?
- How To Use Suggested Manual Payment Method?
What is the payment method?

In Shopify, the payment method with multiple payment gateway is an effective tool for any online store owners to deal with all purchases on their Shopify stores.
Besides, the default Shopify Payment Gateway which is integrated into online shops, Shopify store owners can add any third-party providers. They can choose to pay via credit card or using PayPal, bank accounts, debit cards, etc. In this marketplace, Shopify sellers need to pay for recurring payments because of a regular cycle.
To change Shopify payment method?
For the new customers coming to the shops, they can include their information such as the credit card number and their billing address. When the credit card number changes, it is necessary for the customers to update these data in their Shopify account. Fortunately, it is easy for the store owners to change their data, which requires them to enter in the admin page.
Step 1: Change your credit card details
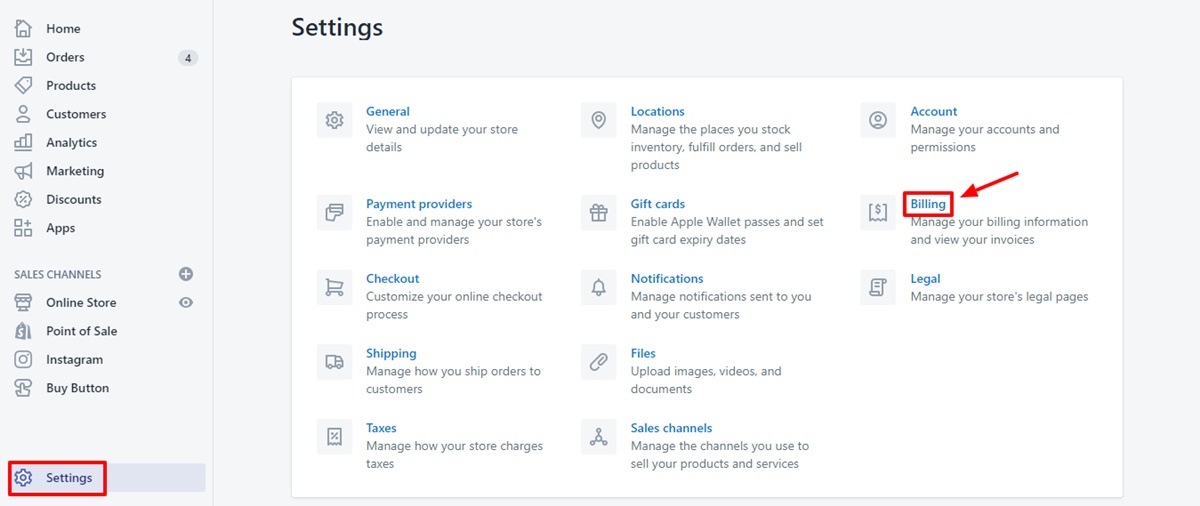
To Change your credit card details! Firstly, after logging into the admin page, shop owners can access Settings section and click to the Billing in the menu

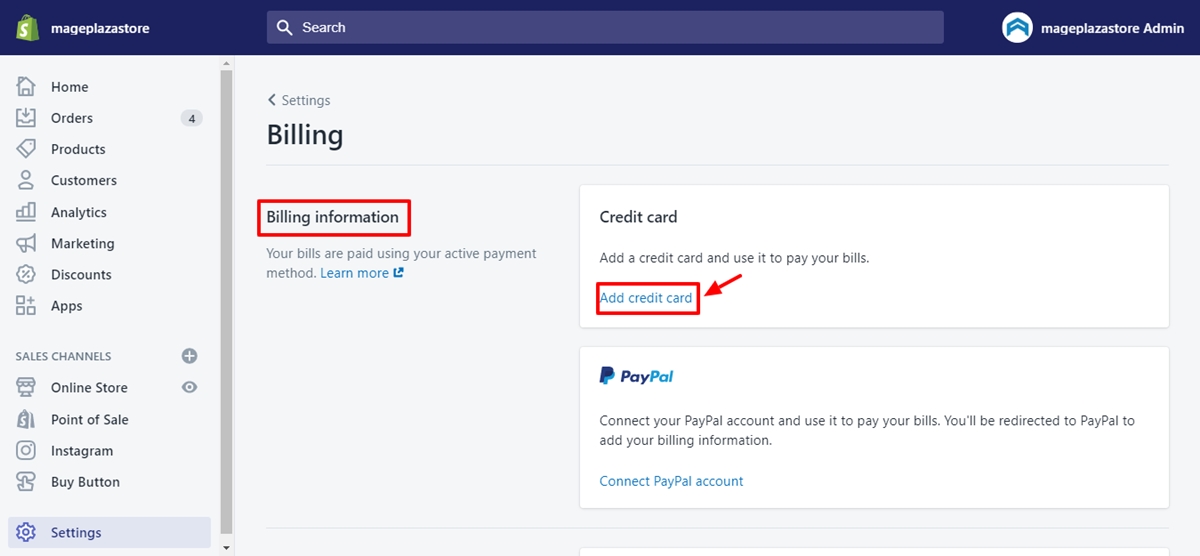
Then, store owners continue to update the billing information by clicking to Billing information section. When this section opens, clicking to Replace credit card to change the expected data.

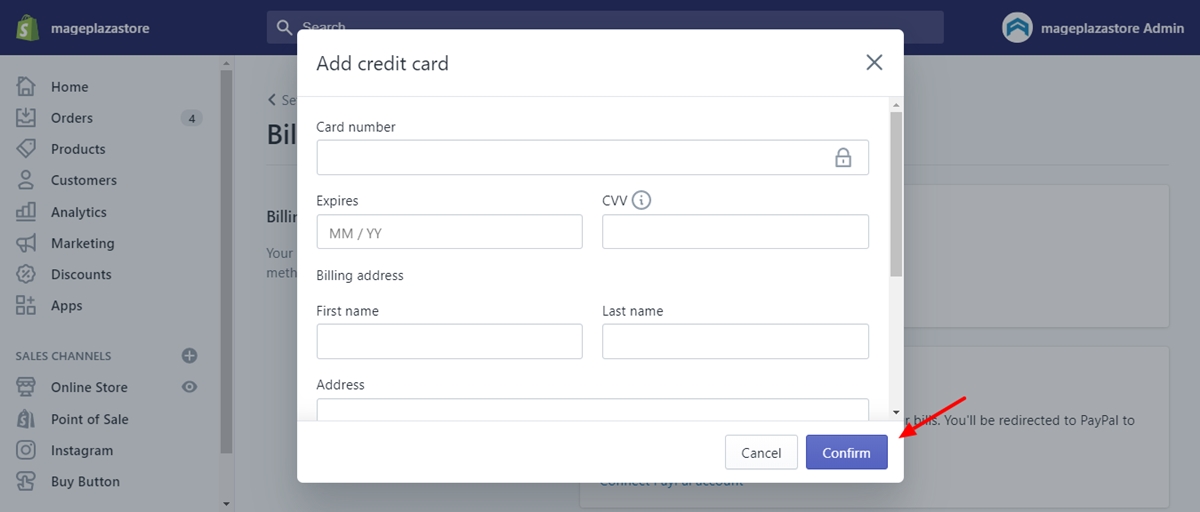
After finishing the credit card information updated, the users can click to Confirm to complete the changes.

Step 2: Change your billing address
In some cases, the billing address is also one of the factors that the mistakes in payment delivery are happening. Therefore, it is essential for shop owners to change their address when they move to different billing accounts.
On the Shopify admin menu, there is a gear icon located at the end of the page called Settings. The online sellers click to this button to choose Billing.

After choosing this button, the shop owners can choose to Replace credit card to update their billing address in the Billing information section.

By typing the new addresses in the billing address information, the changes will be finished by clicking to Confirm button.

Step 3: Add a bank account to pay for your bills
At present, the function of verifying bank accounts is not added as a default into the Shopify. If the customers want to have it into their stores, they can add the Shopify Plus.
Starting by logging into Shopify admin, after that, the store owners can click to Settings. After that, the shop owners go to Billing section.

To continue adding the bank account, they need to click click Add bank account in the Billing information section.
On the Add bank account window, the users will easily enter their account with routing numbers or enter their private information as any type of Personal or Business.
The shop owners can verify the change by clicking Start verification.
After one to three days working with any purchase in your account, the accounts will be confirmed and the bank account shows as Active status in Billing information sections.
Recheck again with the status of the bank account with Billing information box titled Make this bank account my active payment method.
Finally, online merchants click Finish verification when they see the Active status. In case the verification fails, it should have some problems with the bank account so that the shop owners need to contact their bank to check it again.
Step 4: Change verified bank account information
In the box title, the online sellers can check their bank account, whether active or not. They need to ensure that this bank account is an active payment method.
Starting by logging into Shopify admin, after that, the store owners can click to Settings. After that, the shop owners go to Billing section.

To continue adding the bank account, they need to click click Add bank account in the Billing information section.
On the Add bank account window, the users will easily enter their account with routing numbers or enter their private information as any type of Personal or Business.
The shop owners can verify the change by clicking Start verification.
Click Finish verification. If verification is successful, then the bank account shows as Active.
Step 5: Save new Shopify payment method
Finally, don’t forget to save your new Shopify payment method. Besides, you can enhance checkout customization with third-party Shopify apps. Use Payfy, an app from the Shopify App Store, to easily hide, rename, and reorder payment methods based on specific rules.
Conclusion
This payment gateways are responsible for dropshipping the payments from customers to sellers. From the payment gateway page, they can make the purchases easily without many efforts. All customers can choose the best method to finish their orders without much effort. All the thing that customer needs is entering the credit card detail on the payment gateway page. Furthermore, all this information will be kept safely to ensure the customer’s privacy.
I hope this How To Change Shopify Payment Method article will become helpful for you. If you have any question related to this topic, feel free to leave a comment below.


