How to Activate Authorize.net on Shopify in 6 Simple Steps
Shopify recommends its own payment gateway, Shopify Payments, for its ease of use and convenience. However, it also gives you the flexibility to choose other payment providers, like Authorize.net.
This powerful payment gateway can transform your checkout experience, reduce cart abandonment, and boost customer satisfaction. If you’re interested in using it, this article will show you how to activate Authorize.net on your Shopify store.
Before Setting Up Authorize.Net Payment Provider
Before diving into the activation process, ensure you have the following in place:
- An Active Authorize.Net Merchant Account: You'll need an existing Authorize.Net account to connect it with your Shopify store. If you don't have one, you can sign up on their website.
- API Login ID and Transaction Key: These credentials are essential for establishing the connection between Authorize.Net and Shopify. You can obtain them from your Authorize.Net account settings.
- Disable Authorize.Net Test Mode: When you first open an Authorize.net merchant account, it's usually set to test mode. Unfortunately, Shopify doesn't work with these test servers, so you'll need to disable this mode in Authorize.net before connecting it to your Shopify store. You can follow these steps
- Log into the Authorize.Net at https://account.authorize.net/.
- Select Settings under Account in the main menu.
- Click Test Mode in the Security Settings section.
- Click Turn Test OFF.
Step-by-Step Guide to Activate Authorize.Net For Your Shopify Store
Activating Authorize.Net on your Shopify store is quicker than brewing a cup of coffee - less than 10 minutes! Here’s how to do it:
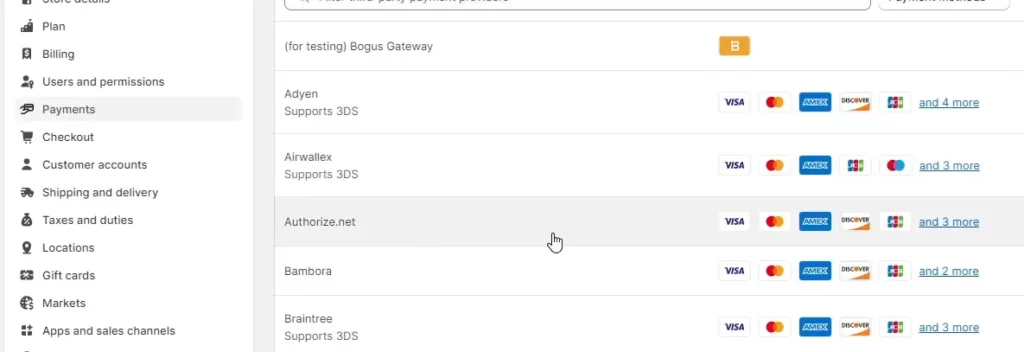
Step 1: From your Shopify admin, go to Settings > Payments.

Step 2:
- If Shopify Payments is enabled
- Click Manage.
- Scroll to the bottom and select Switch to a third-party provider. Confirm the switch.
- If Shopify Payments isn’t enabled: Click See all other providers
- If Shopify Payments isn’t available in your country: In the Payment providers section, click Choose a provider.

Step 3: From the list of payment providers, select Authorize.Net.

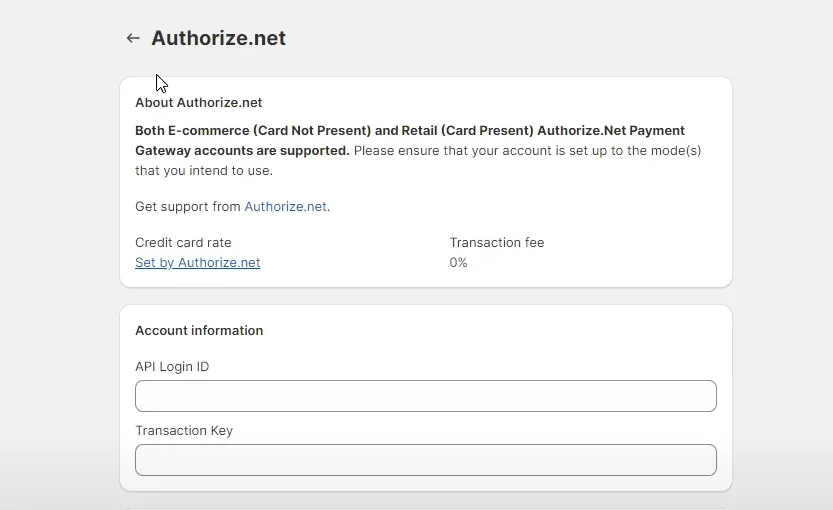
Step 4: Input your API Login ID and Transaction Key from Authorize.Net.

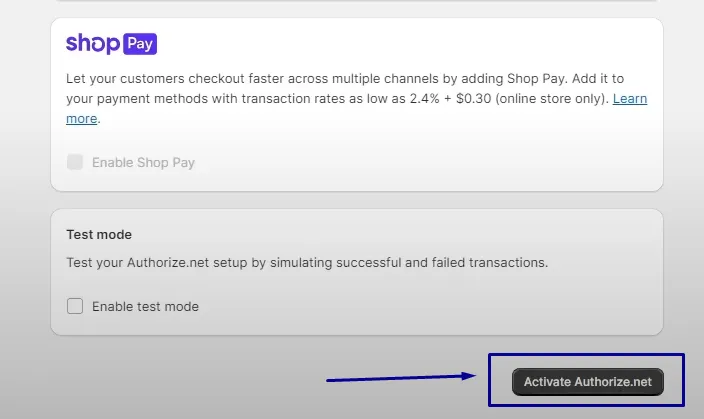
Step 5: Scroll to the bottom and click Activate.

How To Use Authorize.Net In Test Mode
Before going live, you should enable Test Mode to simulate transactions without processing real payments. This allows you to test your checkout process and integration thoroughly. You'll need to use sandbox credentials provided by Authorize.Net for testing.
To put your new payment gateway through its paces. Here's how:
- Log in to your Shopify admin.
- Go to Settings > Payments.
- In the Authorize.Net section, click Edit.
- Check Enable test mode and enter your sandbox credentials.
- Click Save.
You can now test your Authorize.net configuration by making a purchase on your store using one of the Authorize.net test card numbers.
Bottom Line
Activating Authorize.Net on your Shopify store is a simple yet crucial step in providing your customers with a secure and reliable payment experience. By following this guide and leveraging Authorize.Net's robust features, you can enhance your store's credibility, streamline payment processing, and ultimately boost your sales and customer satisfaction.
FAQs
Can I use Authorize.Net and Shopify Payments together?
No, you cannot use Authorize.Net and Shopify Payments simultaneously. Shopify allows only one credit card payment provider to be active at a time. If you want to switch to Authorize.Net, you'll need to disable Shopify Payments first.
What credit card brands can I accept with Authorize.Net on Shopify?
Authorize.Net supports a wide range of credit card brands on Shopify, including:
- Visa
- Mastercard
- American Express
- Discover
- JCB
- Diners Club
This comprehensive coverage ensures you can cater to customers with various preferred payment methods.
How to select specific card types to accept with Authorize.Net?
To select specific card types:
- Go to your Shopify admin panel
- Navigate to Settings > Payments
- Click on Authorize.Net in the "Alternative payment methods" section
- Look for "Card types" or similar option
- Select or deselect the card types you wish to accept
- Save your changes
Can I process refunds through Authorize.Net on Shopify?
Yes, you can process both full and partial refunds through Authorize.Net on Shopify. Here's how:
- Go to the order you want to refund in your Shopify admin
- Click "Refund"
- Enter the refund amount
- Select Authorize.Net as the refund method
- Click "Refund" to process
Note: Refunds typically take 5-10 business days to process, depending on the customer's bank.
Are there any transaction fees associated with using Authorize.Net on Shopify?
While Shopify doesn't charge additional fees for using Authorize.Net, Authorize.Net charges transaction fees based on your specific pricing plan.
Additionally, if you're not using Shopify Payments, Shopify will also apply its own transaction fees. It's essential to be aware of both sets of fees to accurately calculate your costs.
I'm having trouble activating Authorize.Net. What should I do?
If you're experiencing issues activating Authorize.Net, try these steps:
- Double-check your API Login ID and Transaction Key for accuracy
- Ensure your Authorize.Net account is fully set up and verified
- Clear your browser cache and try again
- Attempt the activation in a different browser
If problems persist:
- Contact Shopify support for assistance
- Reach out to Authorize.Net customer service
Related Posts:


