Set Tax Rate for New POS Location on Shopify - A How-to Guide
You can use Shopify POS app to calculate the tax rate for your store. However, be noted that this app applies tax rate based on the store location then remember to include these addresses in the shipping zones. If you are still curious about this setup, follow this writing to know how to set the tax rate for a new POS location on Shopify.
Related Posts:
- Shopify POS (Point-of-sale): A comprehensive guide
- How to set up automatic tax rates on Shopify
- [How to set up tax rates in countries other than the United States on Shopify]
- How to include taxes in product prices on shopify?
Step 1: Check the new location
To help the system calculate the tax correctly, you must ensure that your new location is added in your shipping zones. Even though you don’t ship your products but only run Shopify POS, you still have to complete this step. Hence, remember to check this information.
Step 2: Choose Taxes
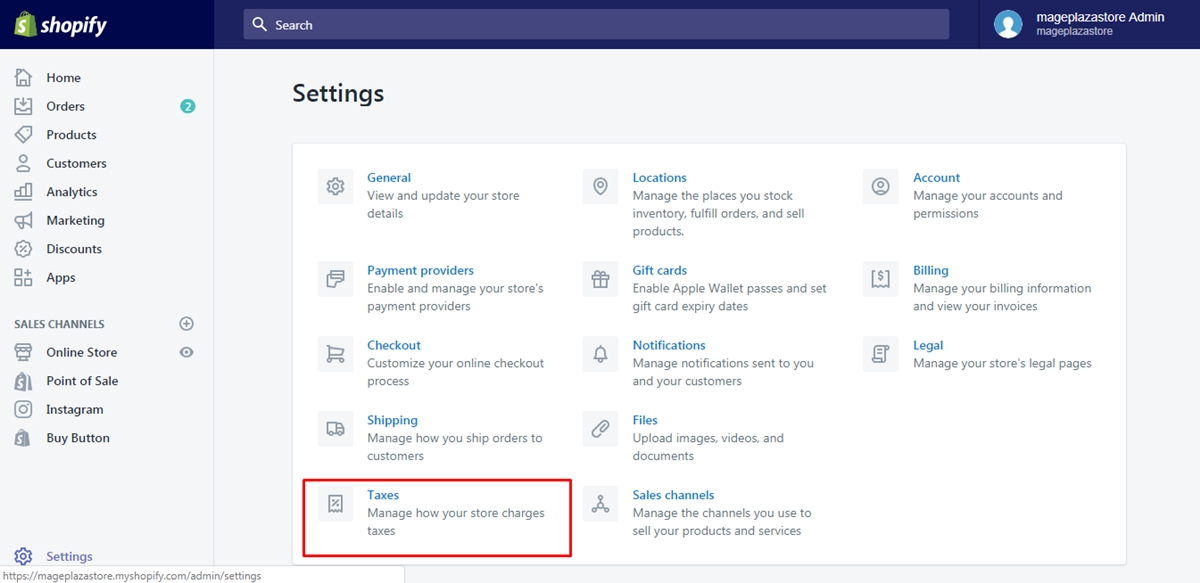
Sign in your Shopify account and click on the Settings near the end of the admin page. You will see the list of Settings appear in three columns then press on the Taxes which is the last one in the first column.

Step 3: Set tax rate
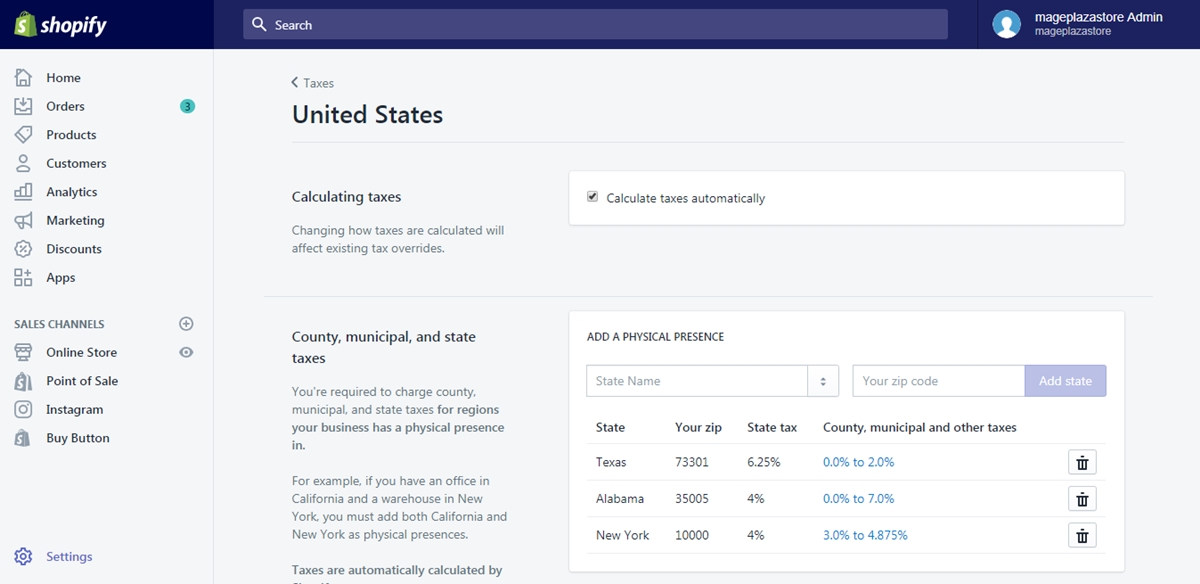
There are two sections in the Taxes, which are Tax settings and Tax rates. Look at the latter one and pick a tax region to set the rate.
- If you are in the United States, you can select
Calculate taxes automaticallyor enter the number for county, municipal and state respectively.

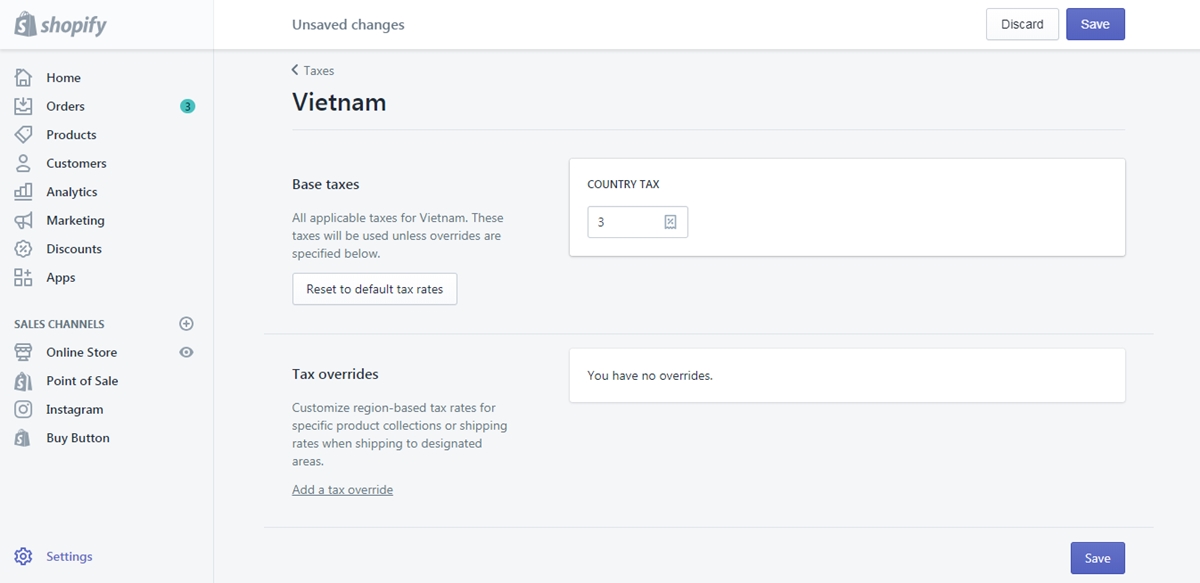
- If you are [outside of the United States], you can fill in the value for the countries and regions or use the default tax rates instead.

After editing the rates, remember to press Save to help the system record your changes.
Step 4: Add new store location
If you have done all the above steps, you can add your new store address in the Locations page of Shopify admin. Because there are other posts that related to this topic, I will not go into details here.
Step 5: Assign POS device with new location
Switch the store location to the new one that you just add. If you can’t find the address in the Shopify POS app, close it and reopen afterward, you will see the location available.
To set the tax rate for a new POS location on iPhone (Click here)
- Step 1: Include new location in shipping zones
This step is important that you need to check whether the new location is within or is added to your shipping zones. Even when you don’t aim to ship the products, you still have to complete this one.
- Step 2: Head to Settings
Open the Shopify app on your phone and press on Store. After that, select Settings in the list of options.
- Step 3: Tap Taxes
The Settings is divided into smaller categories, which includes Store settings, App settings and About. Find the Taxes under the Store settings and tap on it.
- Step 4: Setup tax rate
In the Tax rates, select a Destination by clicking on its title. The system will direct to the setting page for tax rates that you need to set the value following the below conditions:
-
If your store based in the United States, you can check on the option
Calculate taxes automaticallyand leave the rest for the system. In case you want to do it yourself, add the rates in theCounty, municipal, and state taxessection which also contains shipping tax rates. -
If you are in others, not the United States, you can use the default rates or specify the value in the given box, including the tax rates for shipping also.
-
Step 5: Enter the new store location
As the title of the step has already mentioned, you have to move to the Locations section in the Settings to add your new store place.
- Step 6: Allocate POS device with new address
Because you want to use the new store location, you have to change it in the Shopify POS as well. If your app does not update the new address, you need to out of the app and open it later.
To set the tax rate for a new POS location on Android (Click here)
- Step 1: Include new location in shipping zones
Make sure that the address you gonna use is added in your shipping zones in order to ensure the tax rates are calculated accurately.
- Step 2: Select Settings
From the homepage of Shopify app, tap on Store at the bottom bar and choose Settings with a gear icon beside respectively.
- Step 3: Press on Taxes
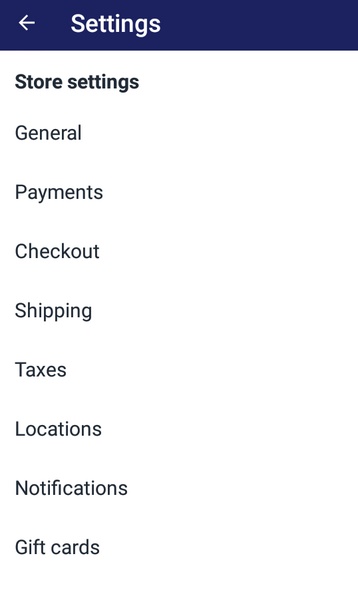
You will see that there are three main parts in the Settings then look for the Taxes in the Store settings. It stays at the fifth place in the options list that you need to click on it.

- Step 4: Setup tax rate
There are differences between the regions then choose a region or a country to set the rate and follow these instructions:
-
For stores in the United States, you can manually enter the value in the
County, municipal, and state taxesor let the system do for you by selectingCalculate taxes automatically. Remember to include the shipping taxes as well. -
In case you are not in the United States, put the rates into the provided box or use the default ones.
-
Step 5: Enter the new store location
After setting the tax rates, back to the Store settings page and select Locations to add the new address for your store.
- Step 6: Allocate POS device with new address
You have to change the store location on the Shopify POS app also then it can calculate the rates correctly. If you don’t see your new one in the app, refresh it by backing to your main screen and reopening the app.
Conclusion
In summary, I have introduced to you the process of how to set the tax rate for a new POS location on Shopify for both laptop and phone uses. This topic is quite important that I try to deliver it in the simplest way to help you understand what to do. There are photos included in the writing also that may provide you a clearer vision of the steps. With such effort, I hope that you enjoy the reading time and earn some benefits from this so that you can have an easier time dealing with taxes.


