How to Import Orders into Shopify
As we already know, Shopify is considered as one of the most common online platforms to help begin your business through your online store. This is the reason why Shopify includes more than 600,000 Shopify stores in a variety of categories. If you tend to plan and decide to use Shopify as your own platforms to sell, you have to make an instant decision. However, you can be stuck on importing orders into the Shopify store with wase. If it is your concern, you should not miss out on this post since it will guide you with different ways to get your orders imported into the Shopify store.
In this article, you will be instructed on how to import orders into Shopify.
Import orders with Shopify Transporter App
CSV file descriptions for Orders
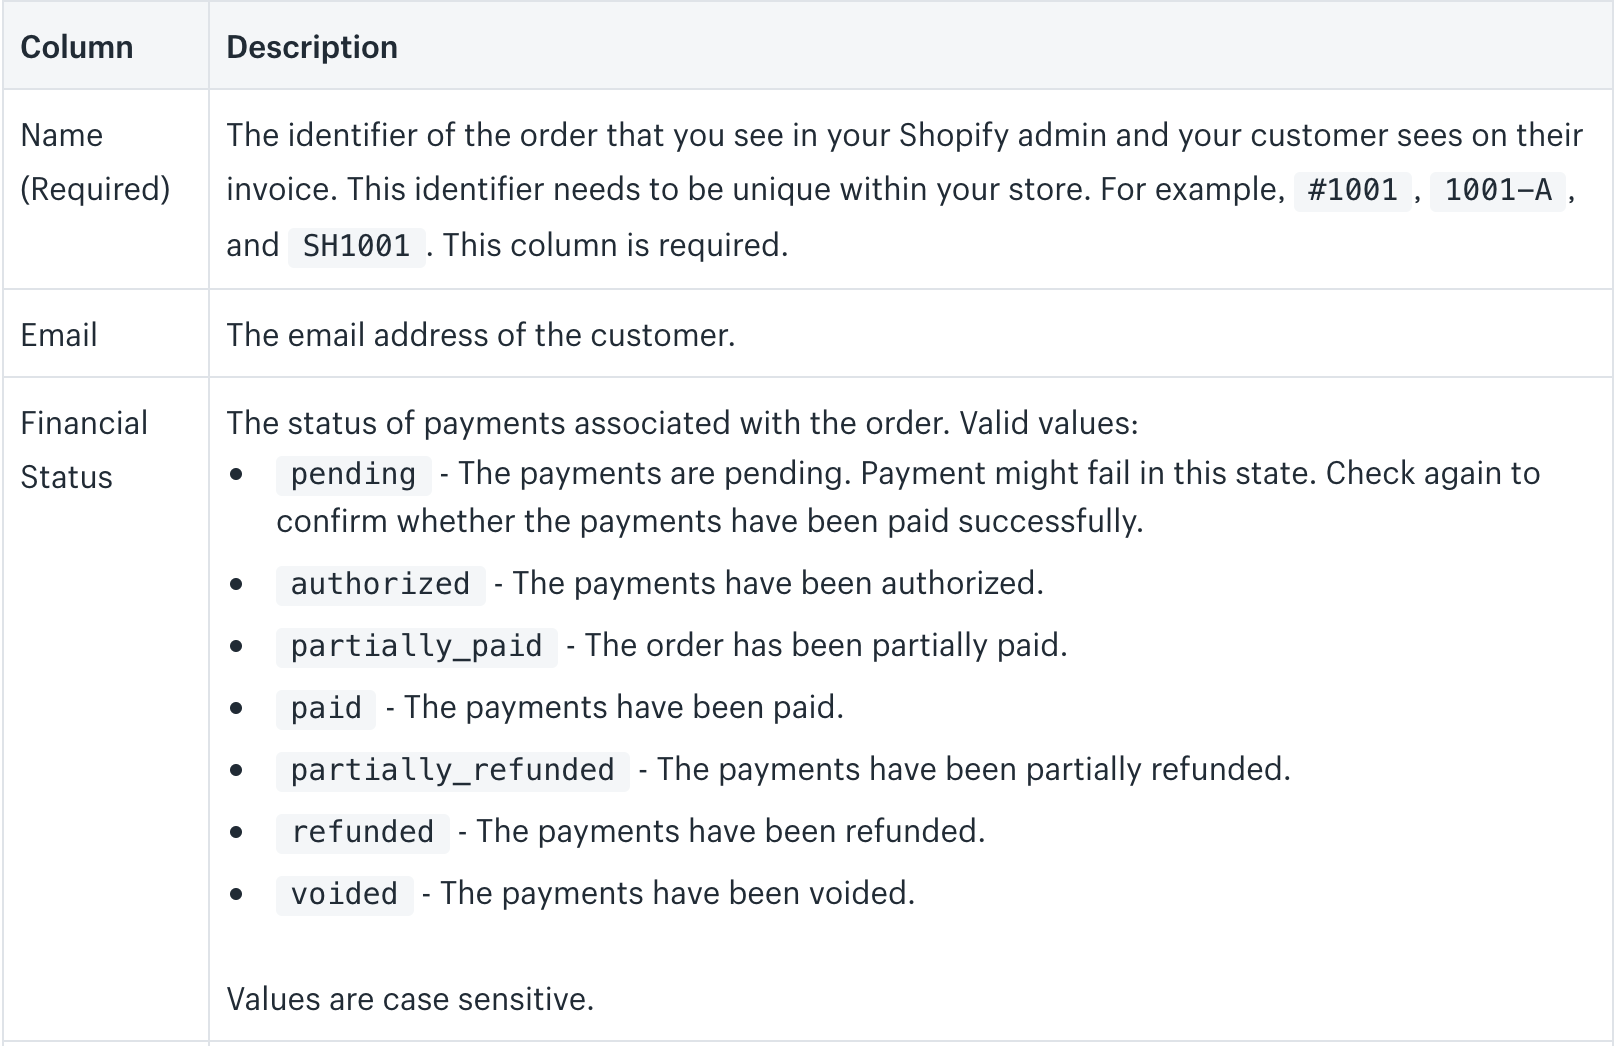
In order to have products, orders, and customers imported into Shopify, you are requested to separate CSV files for every record type. In such cases, you can apply the Transporter command-line tool in order to create this kind of CSV file or you can obey the format in the sample CSV file so as to generate it by yourself.
Sample files, along with the descriptions of supported columns, are also available for every object.
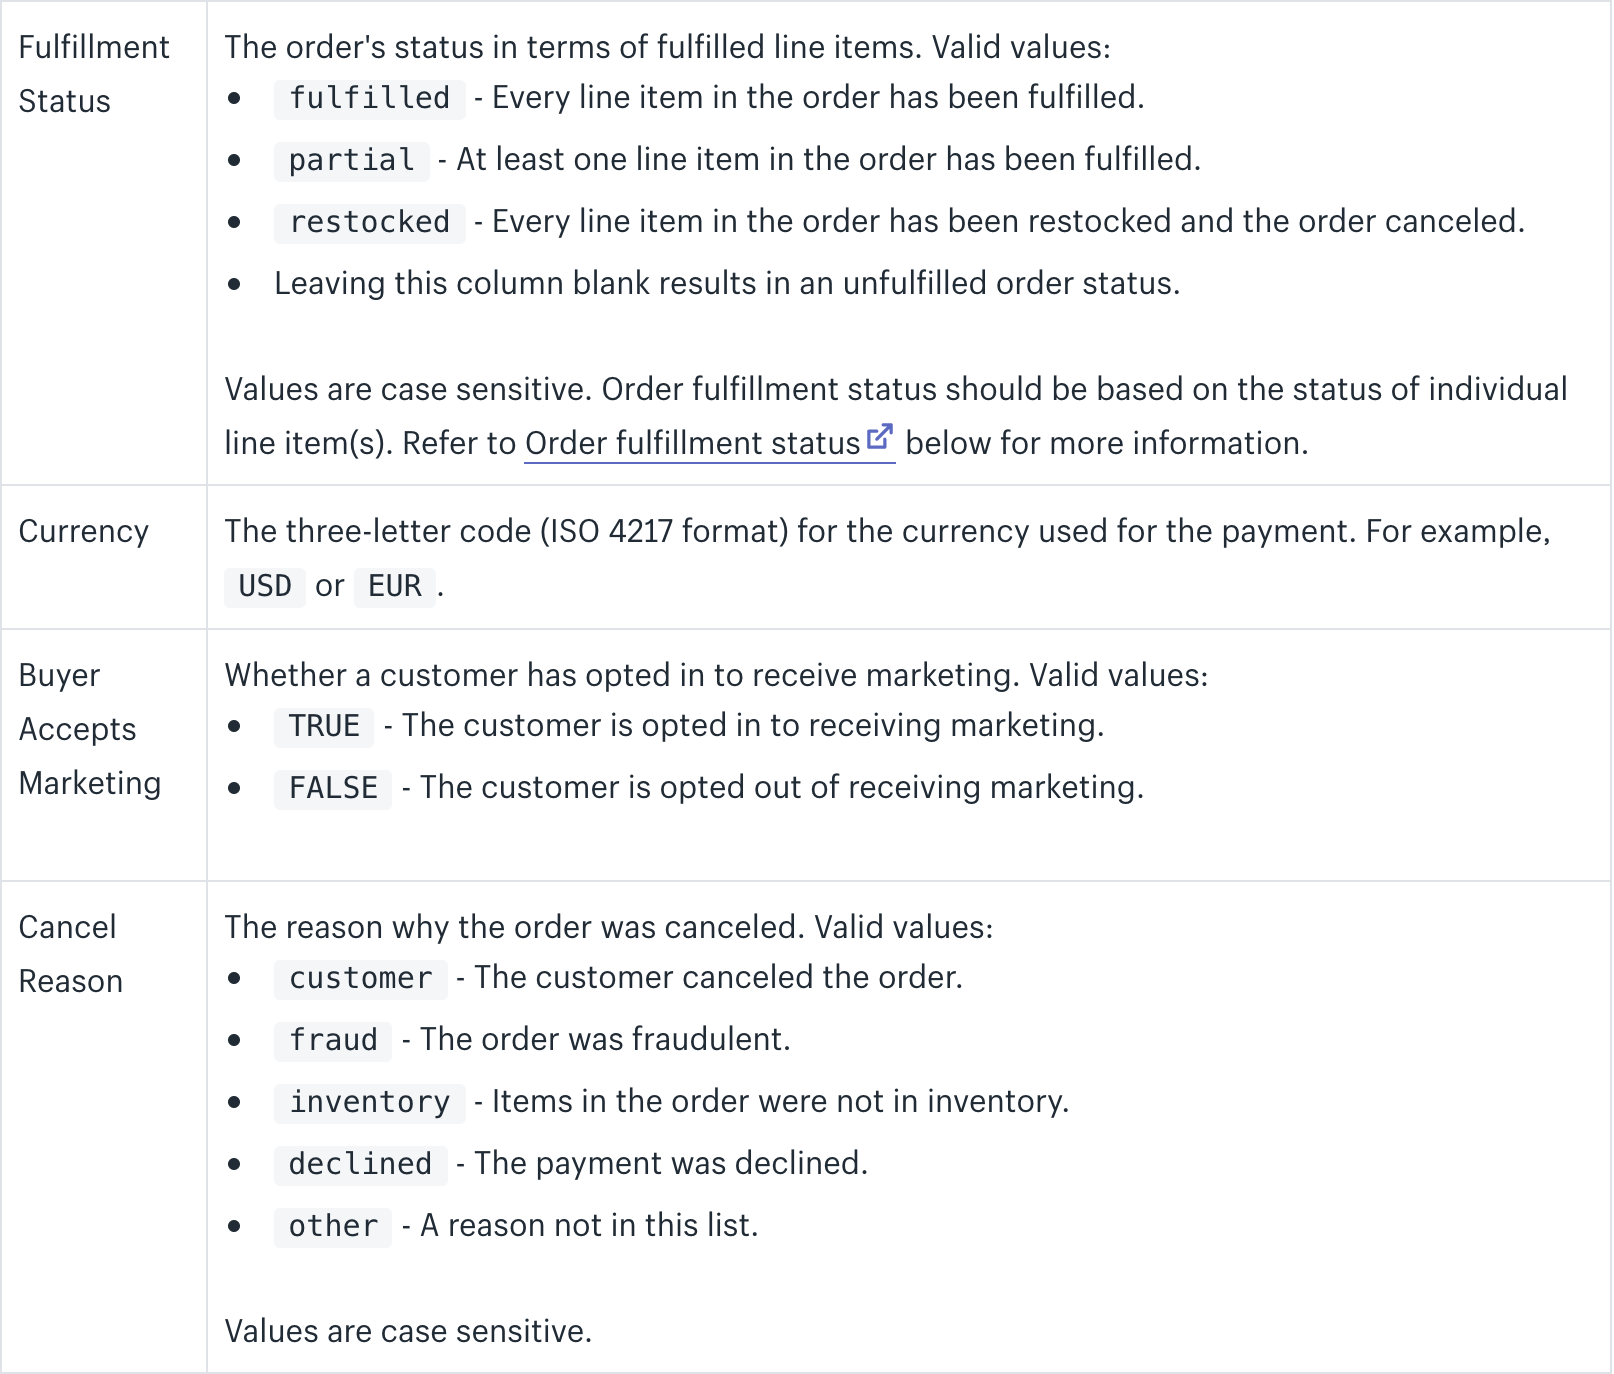
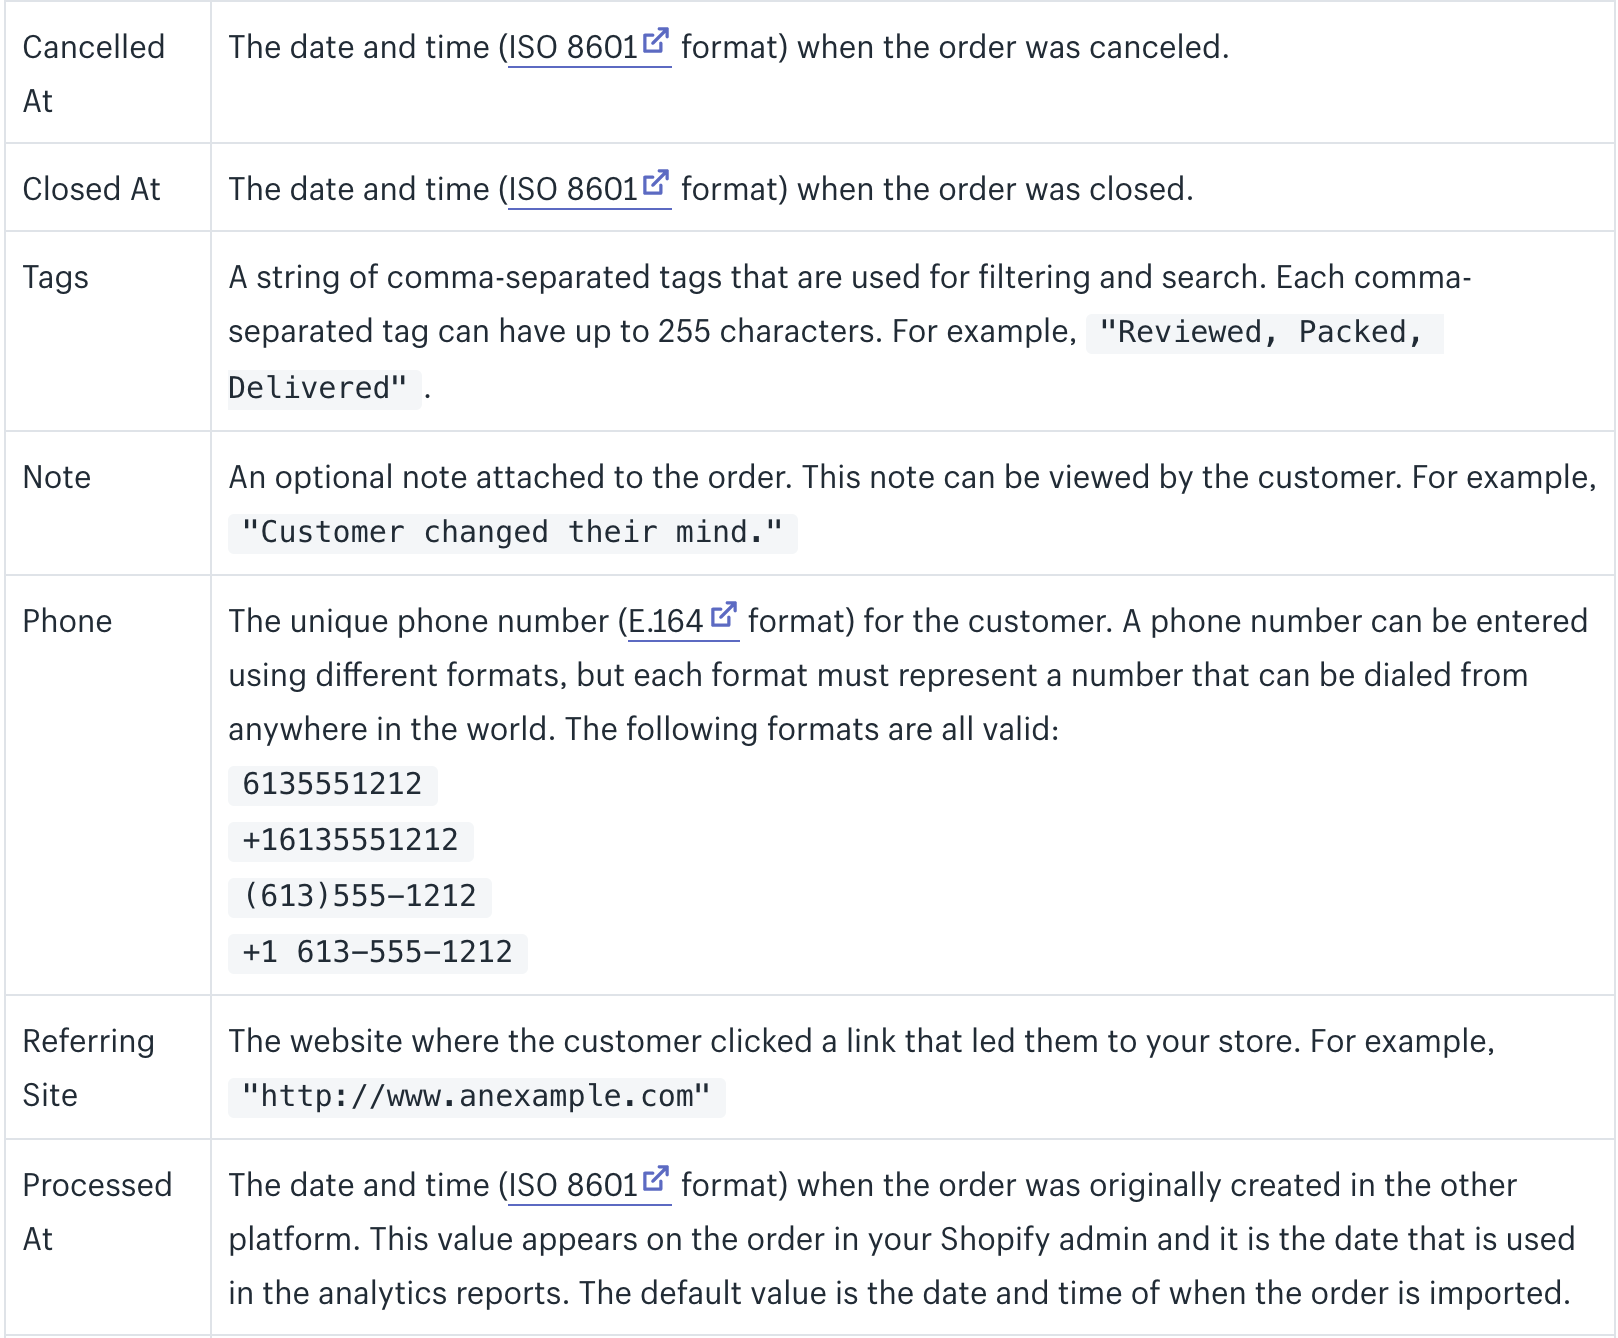
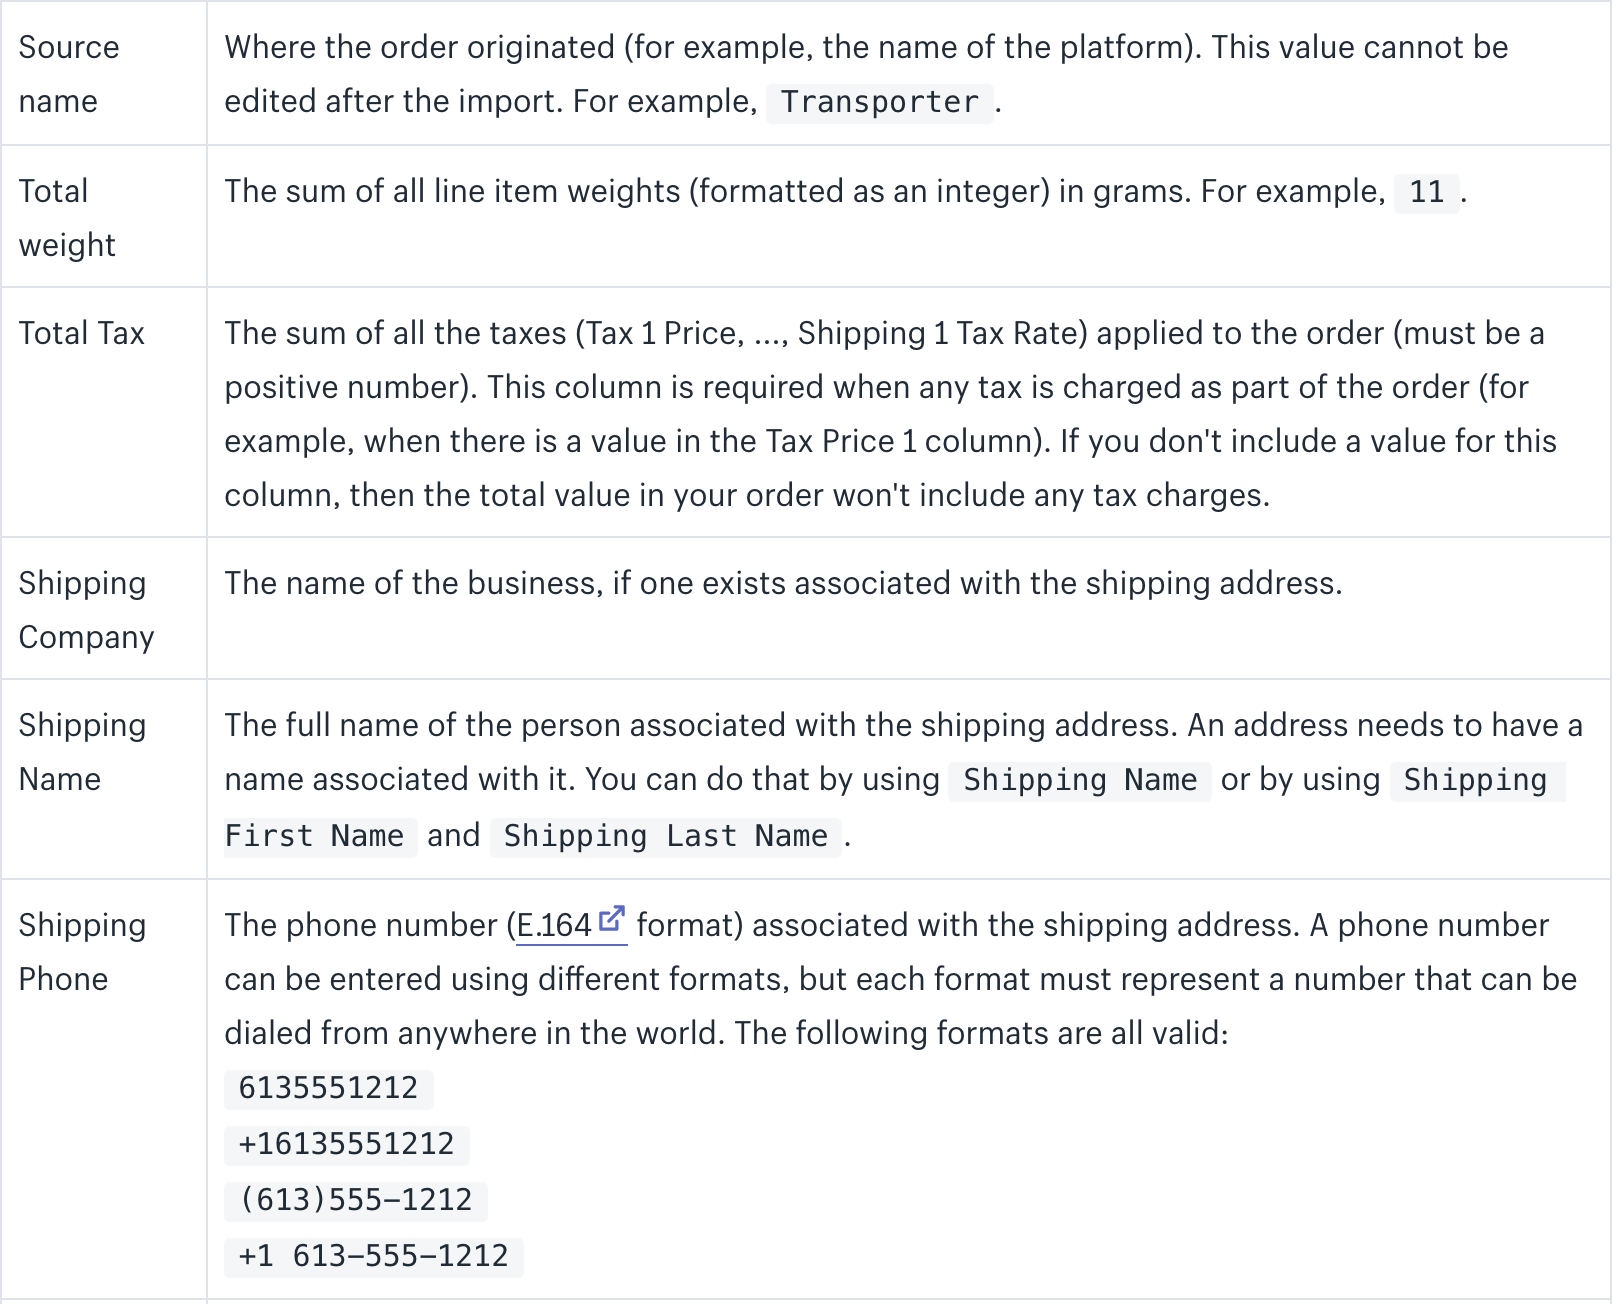
The following table will tell you the column headers for your CSV files:
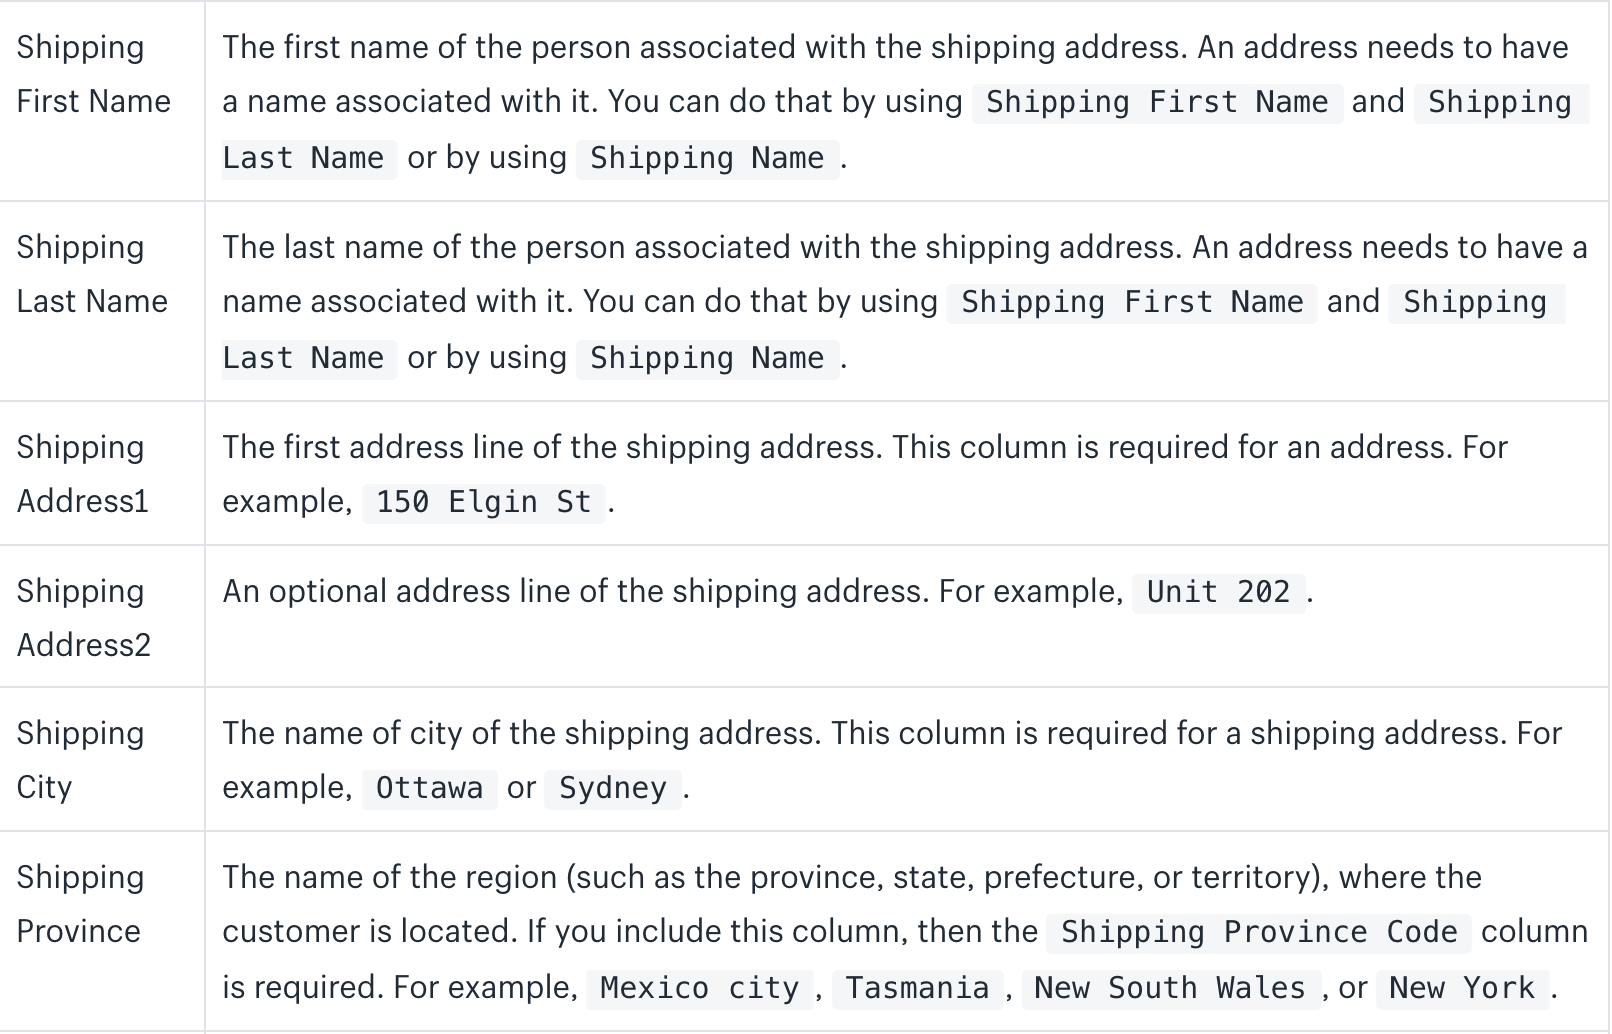
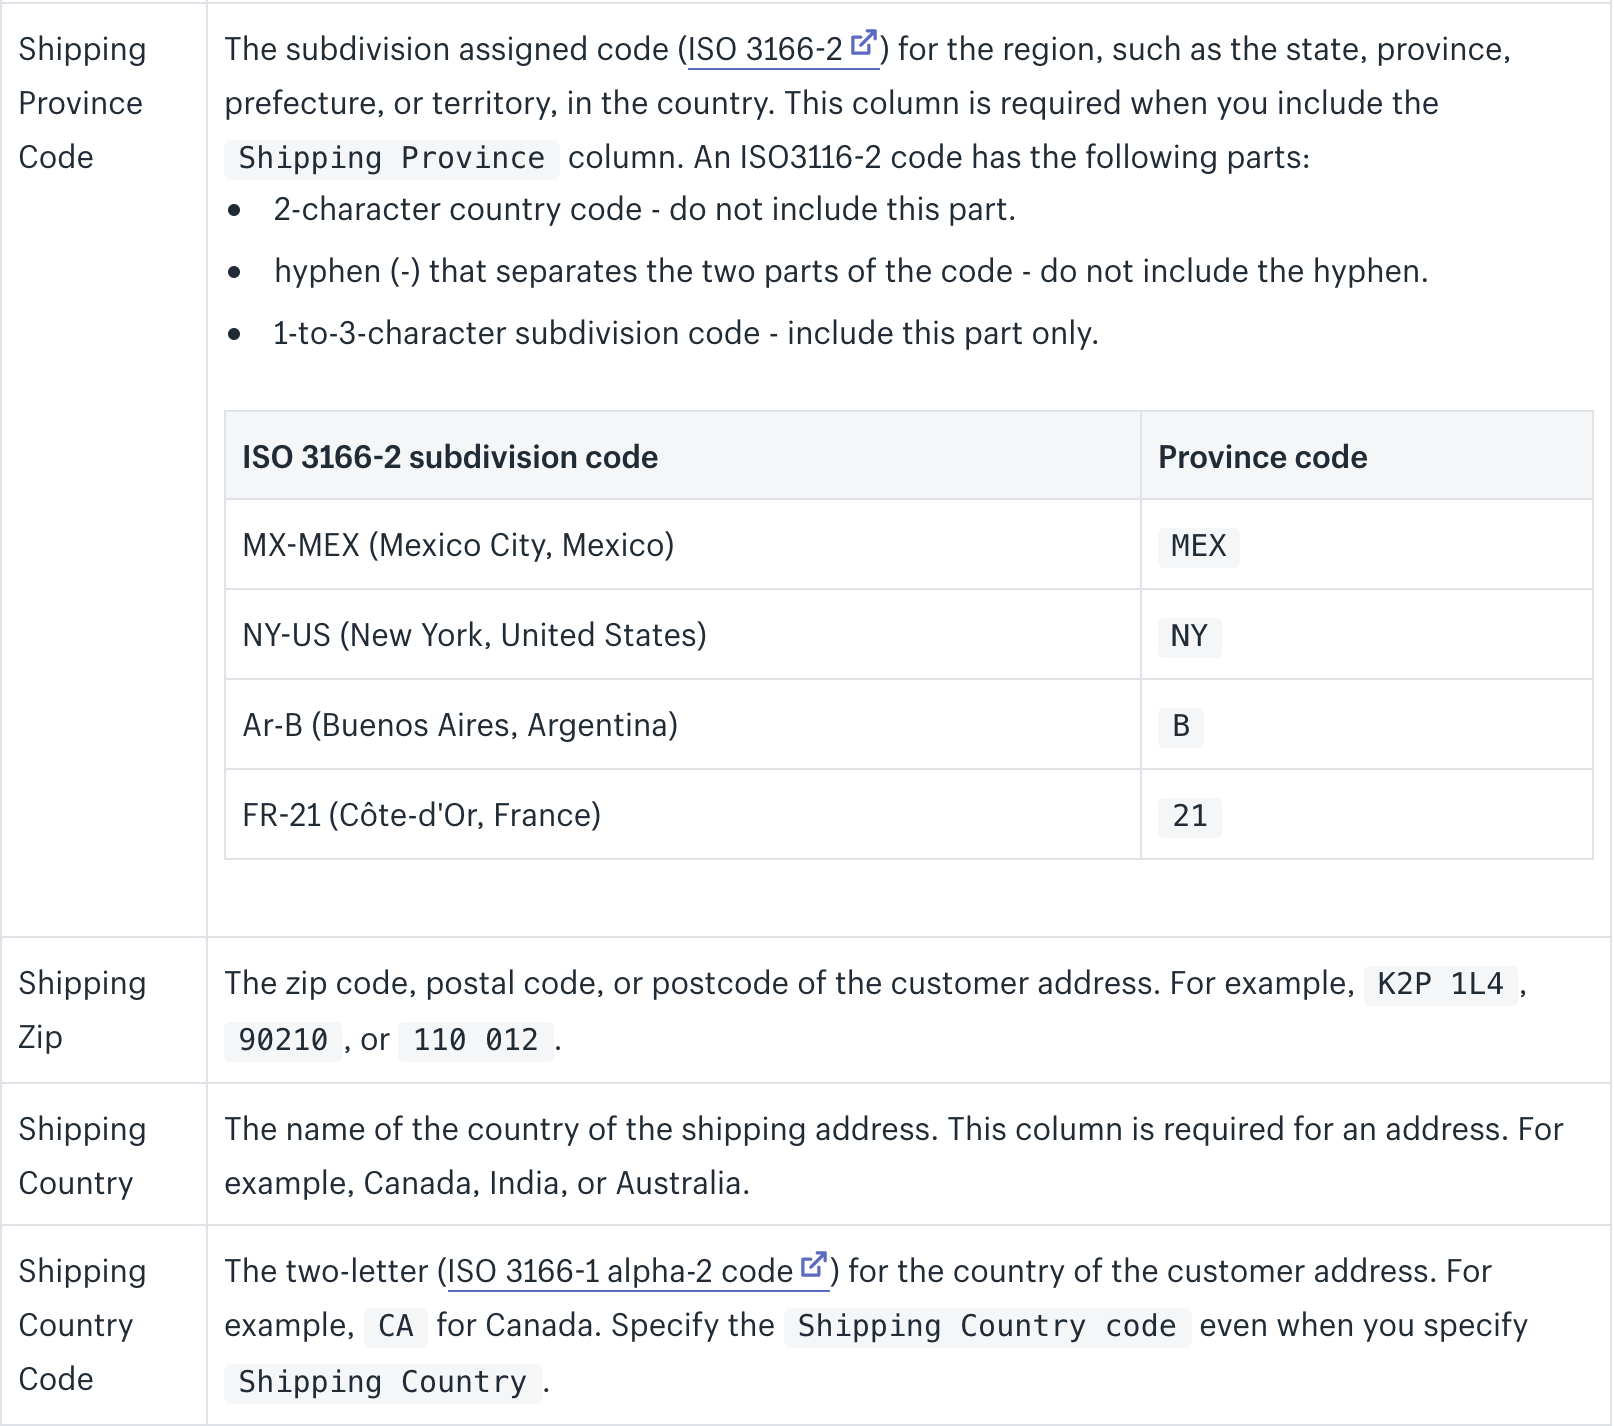
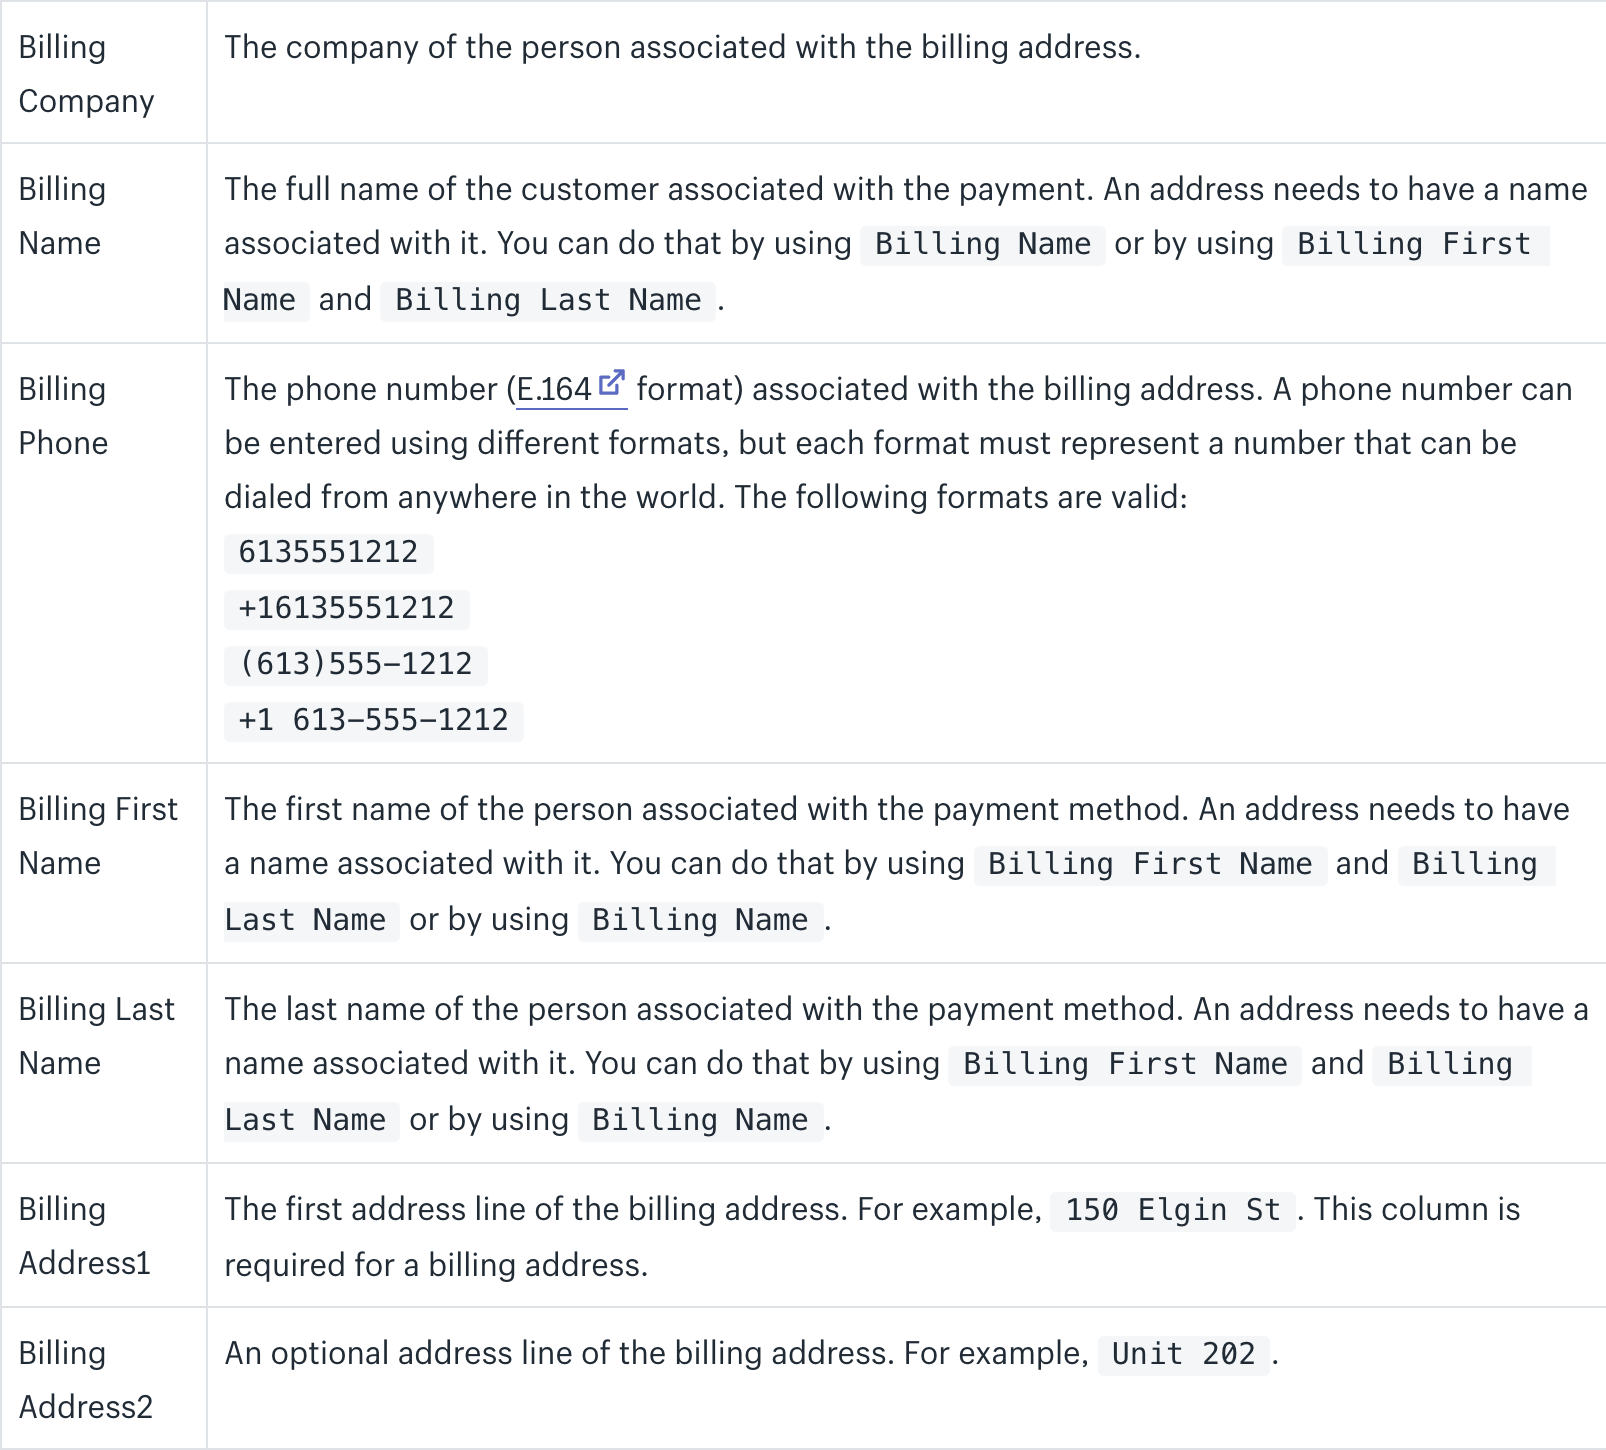
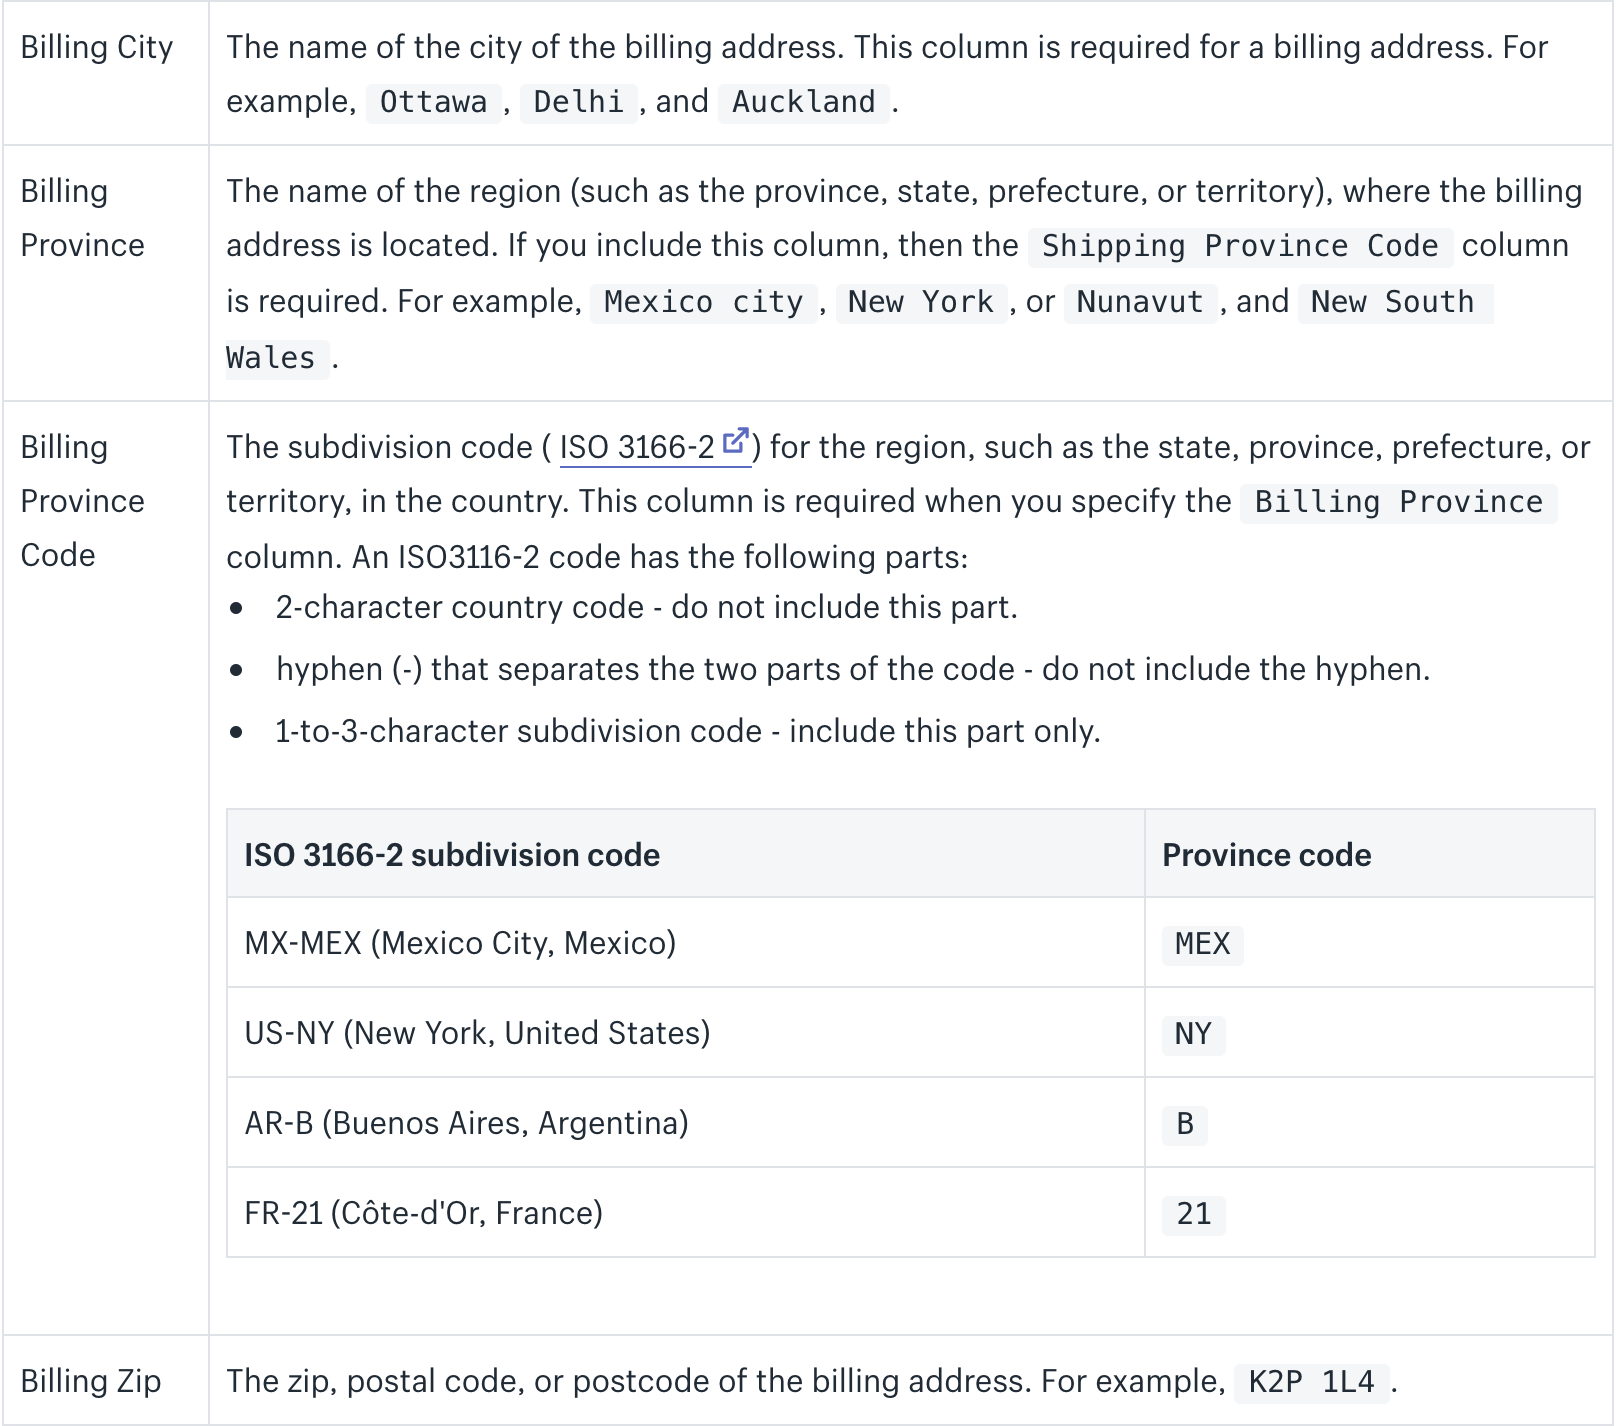
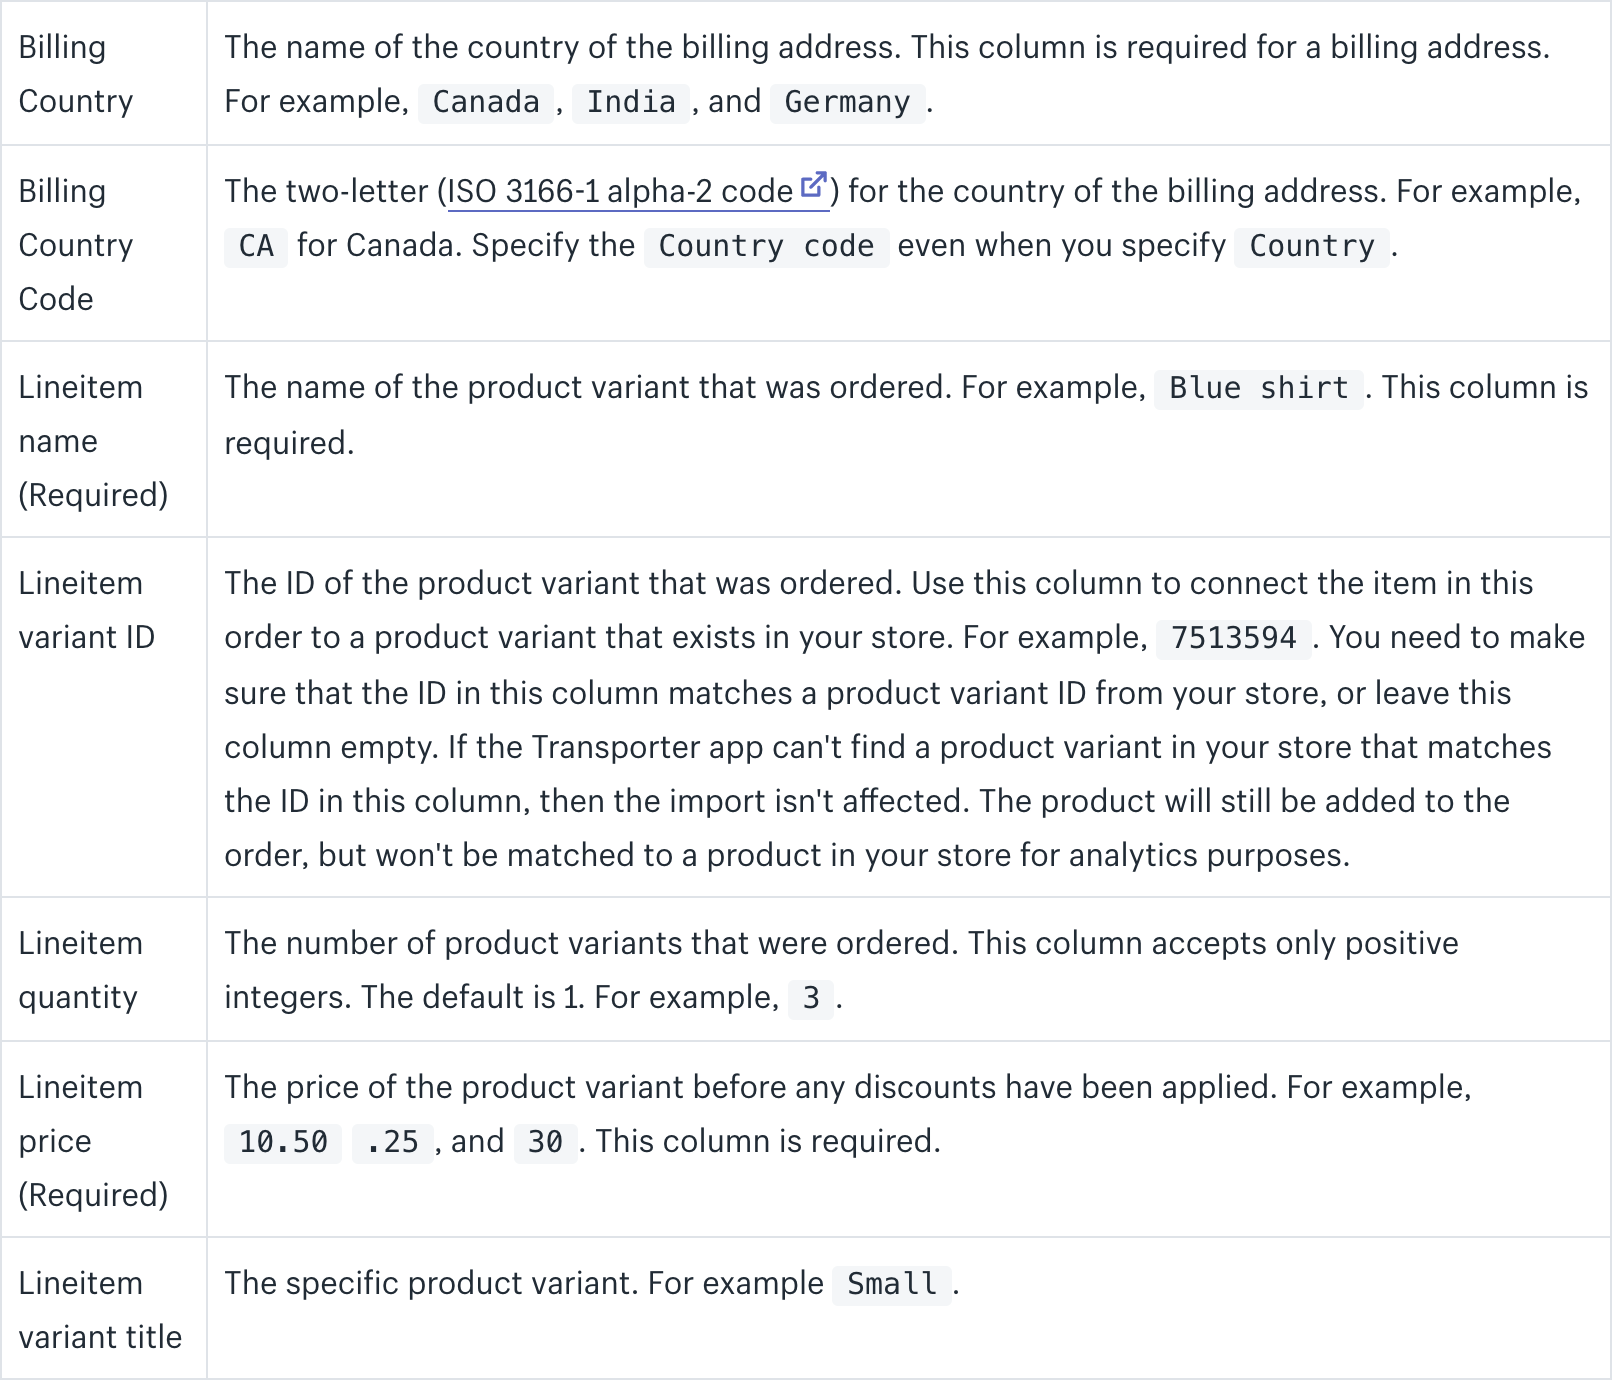
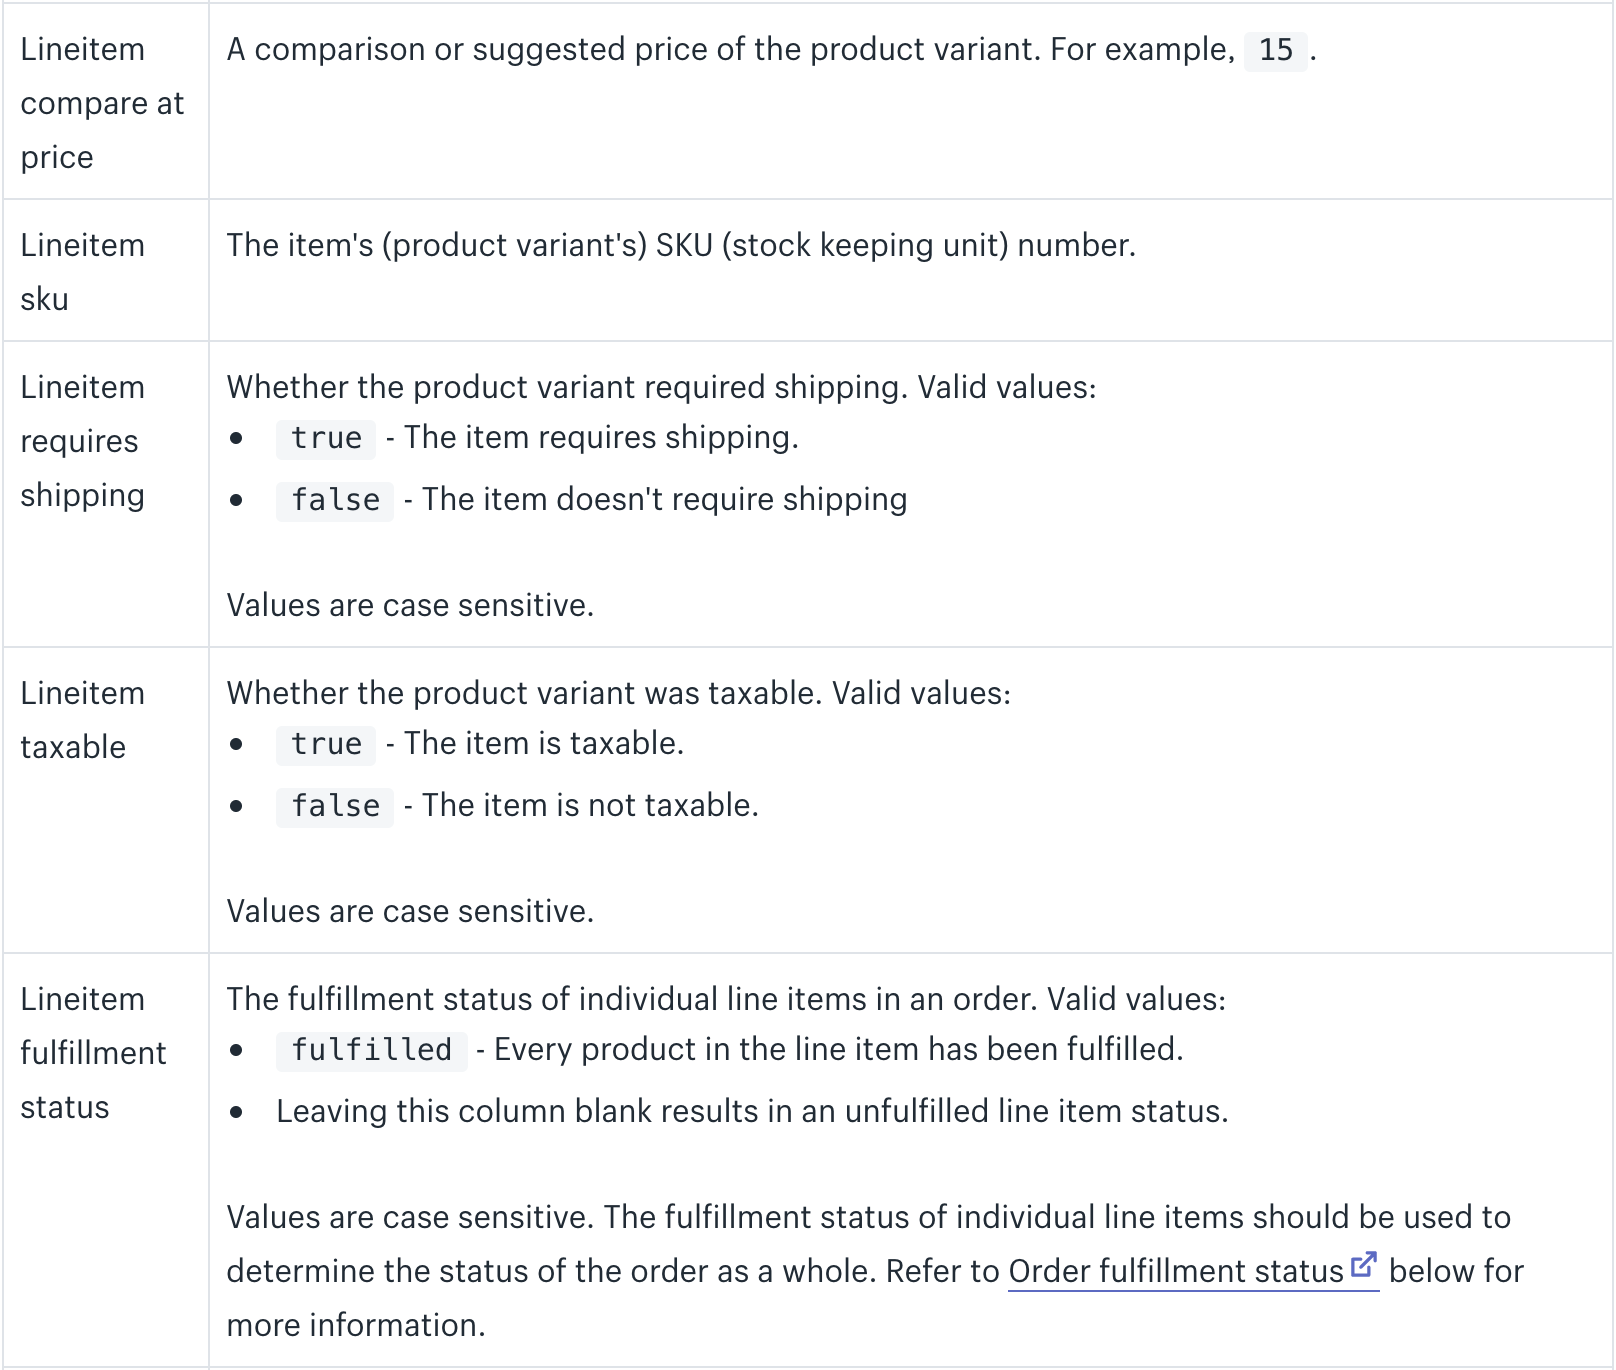
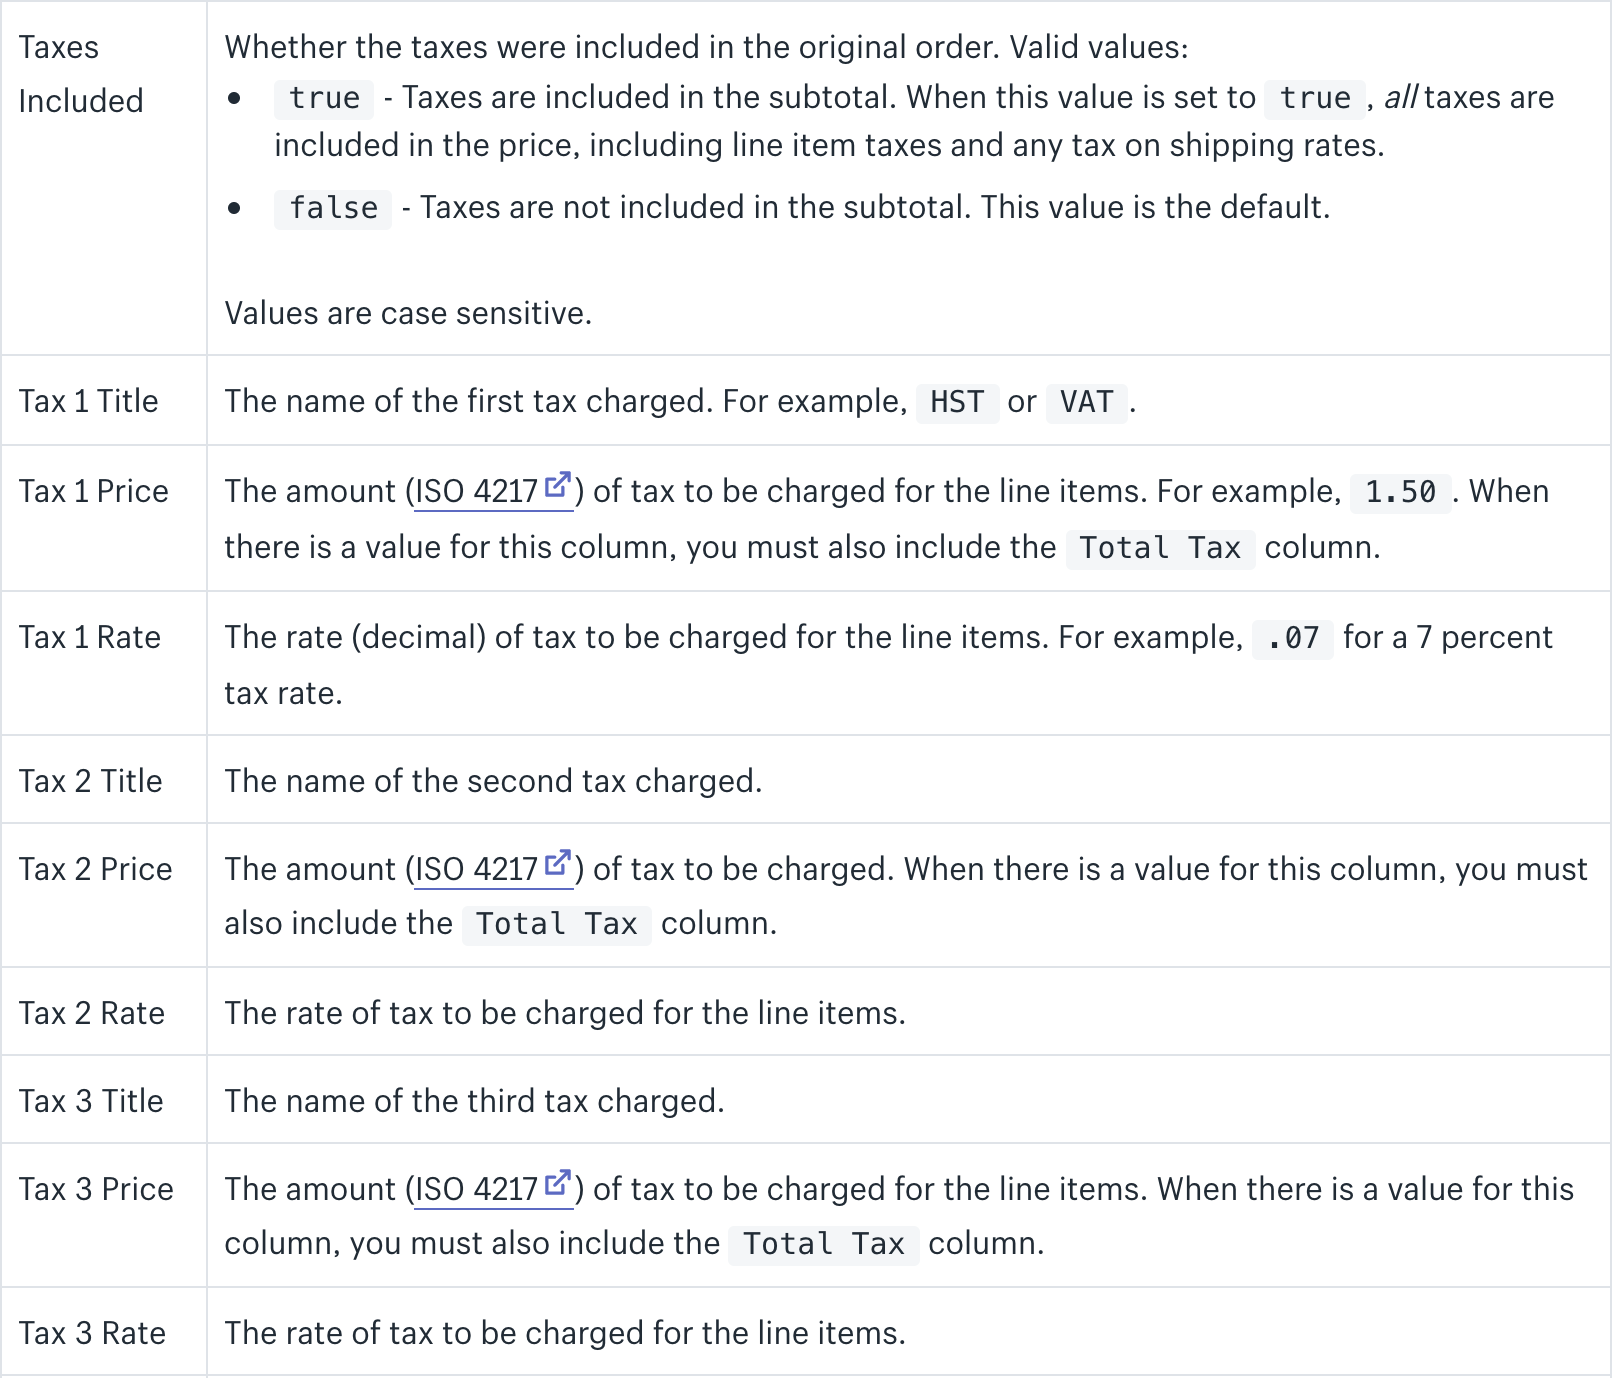
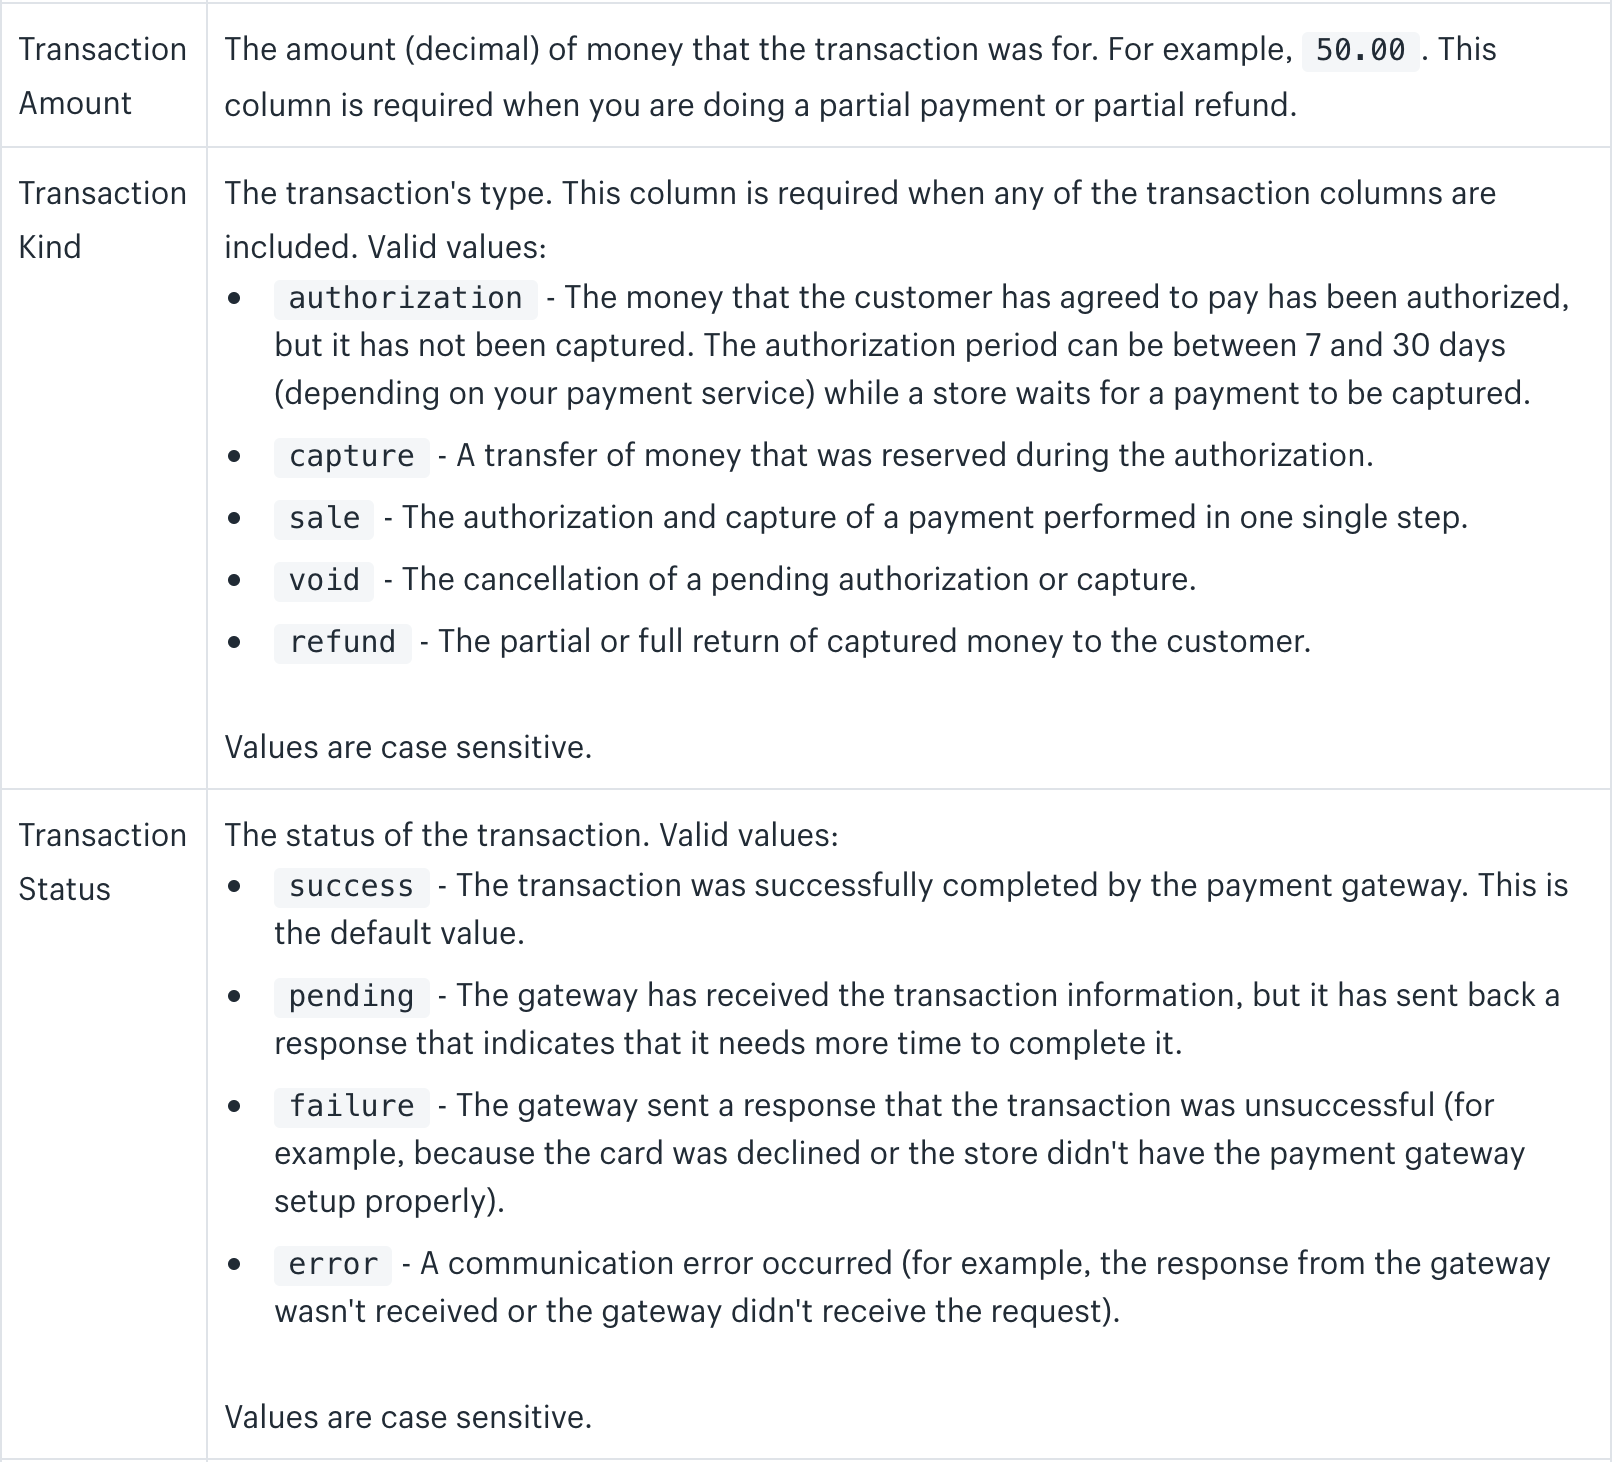
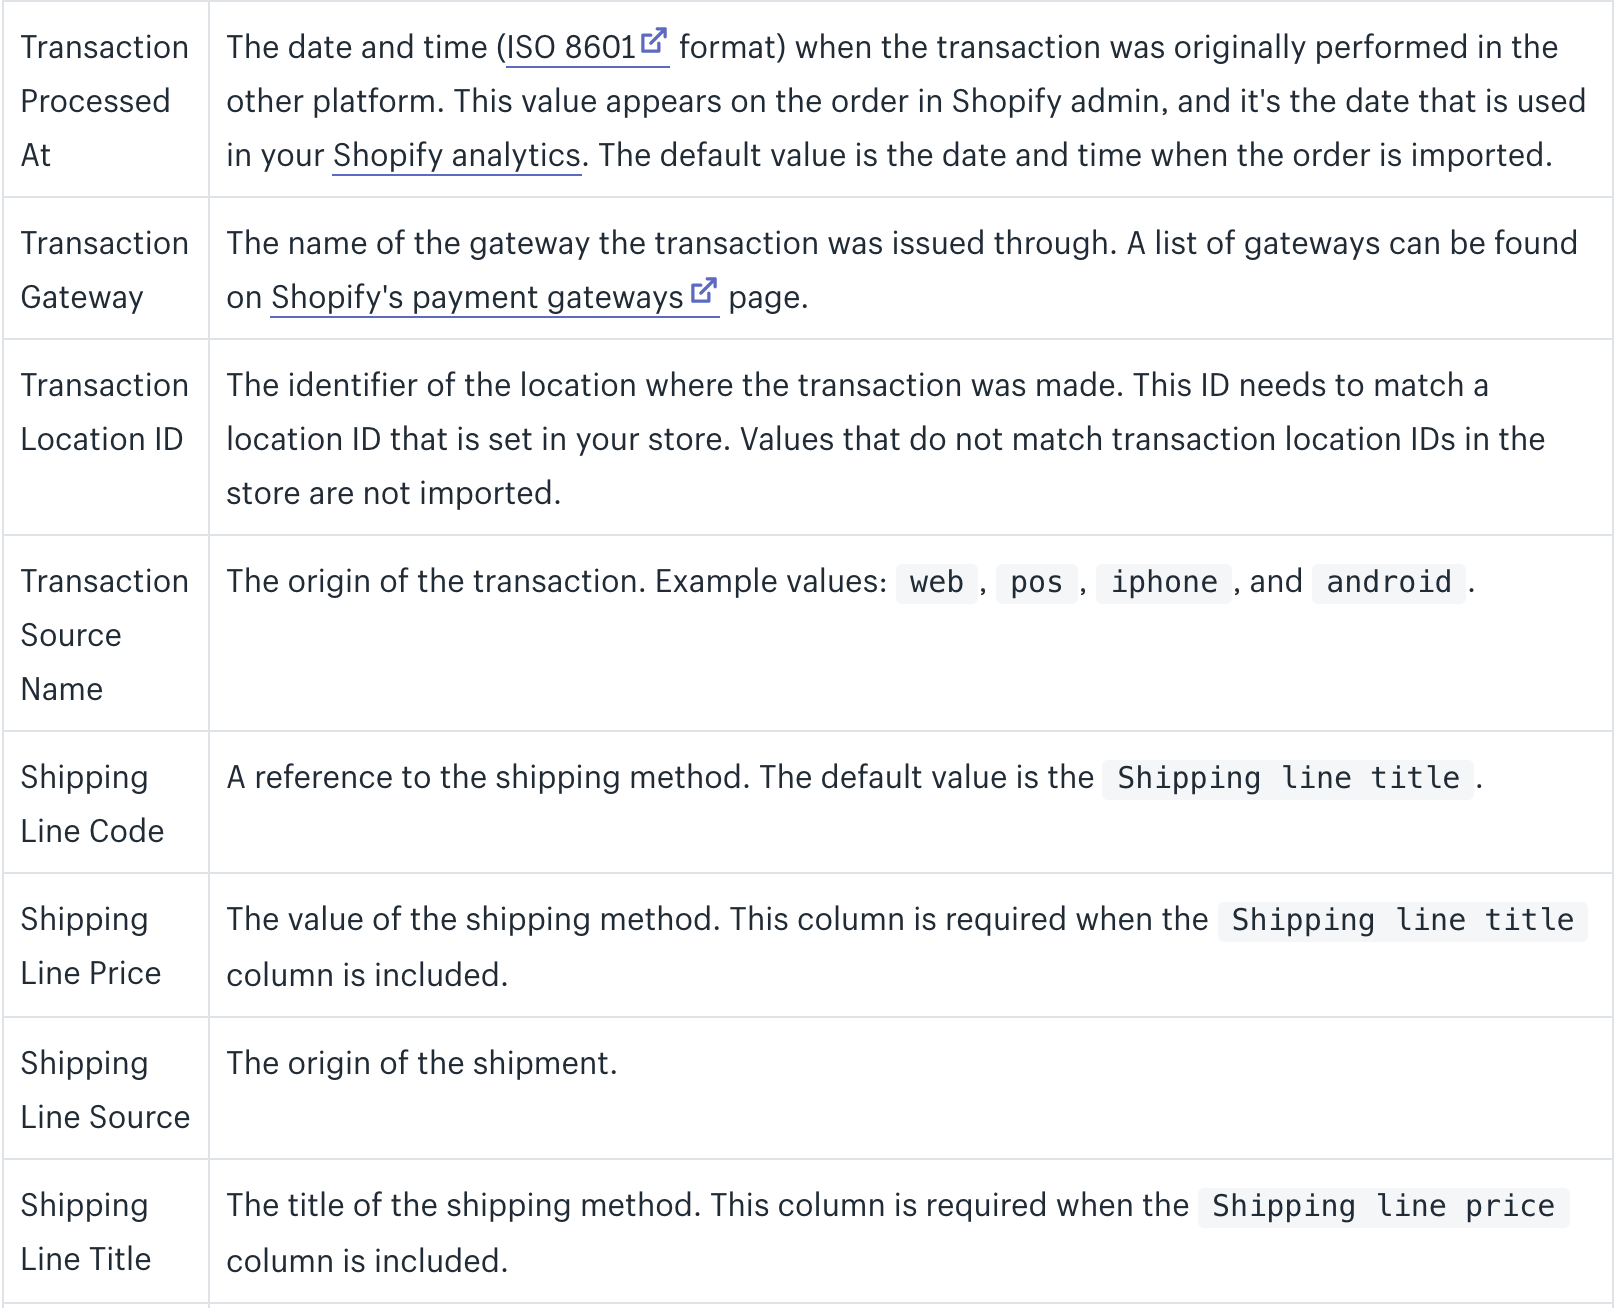
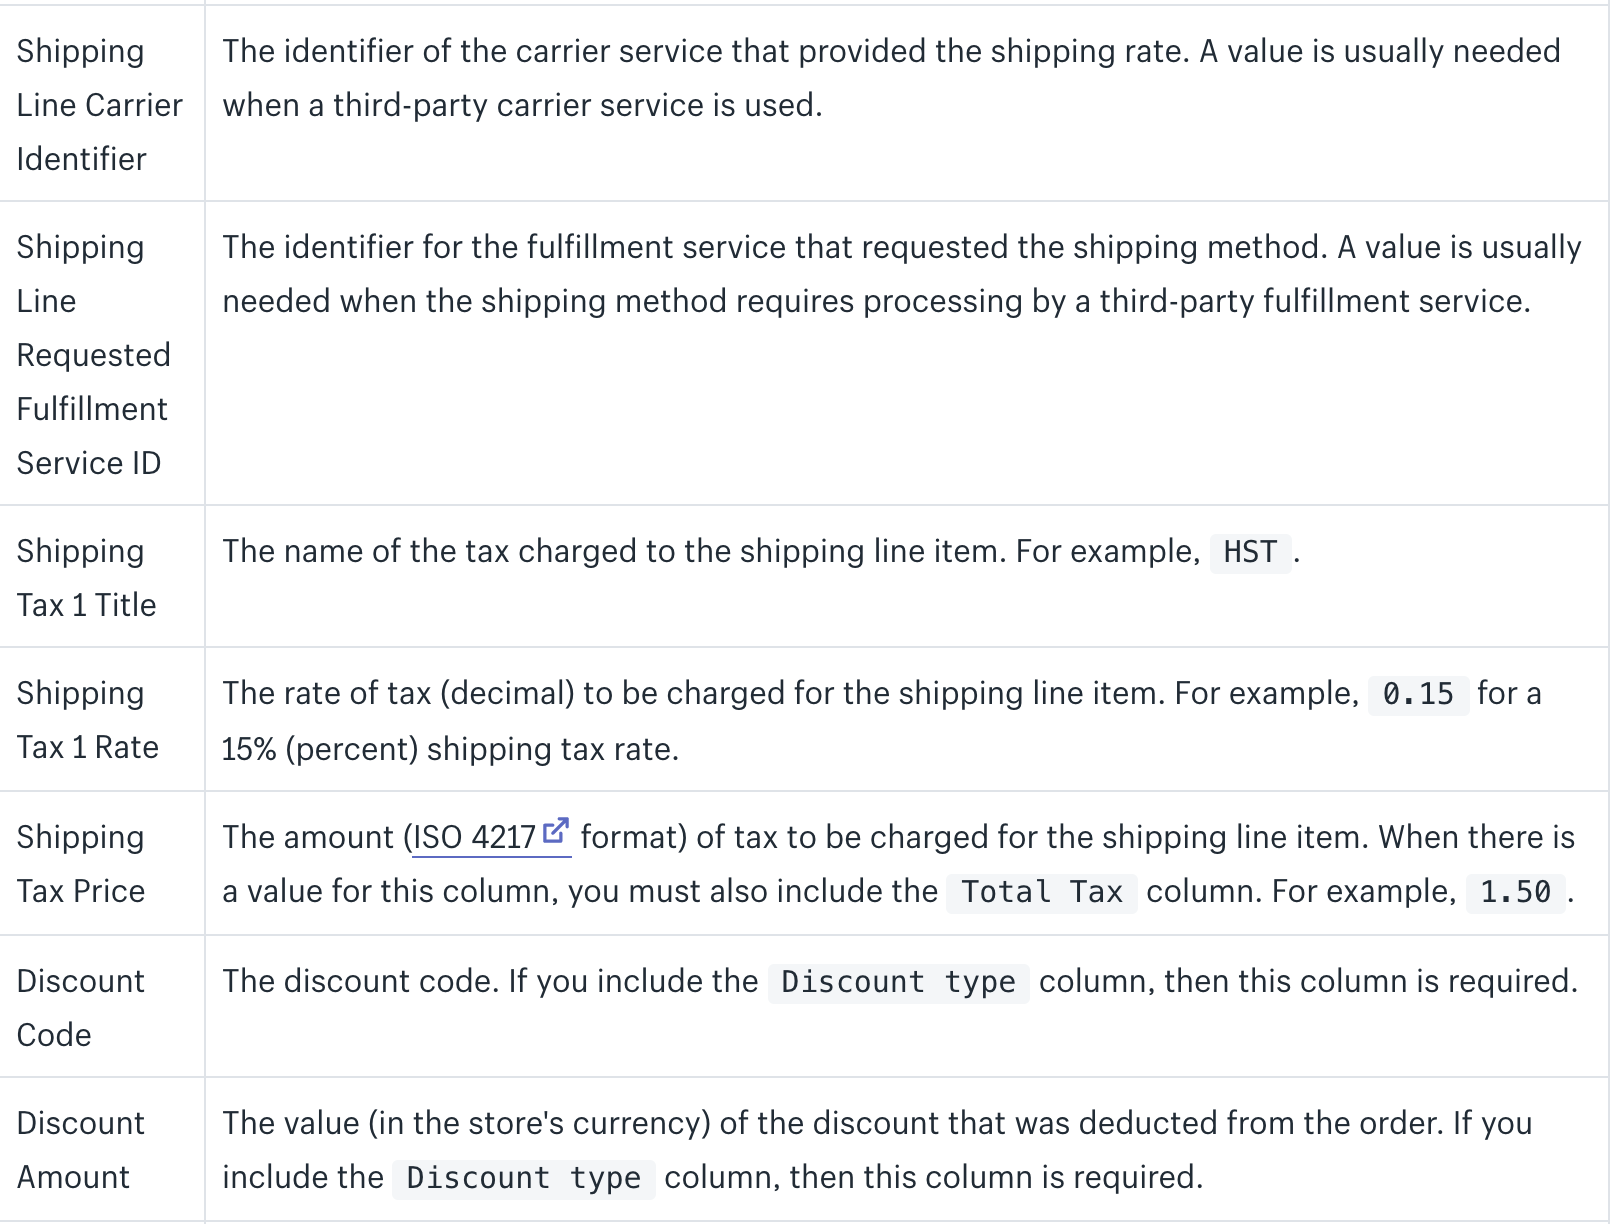
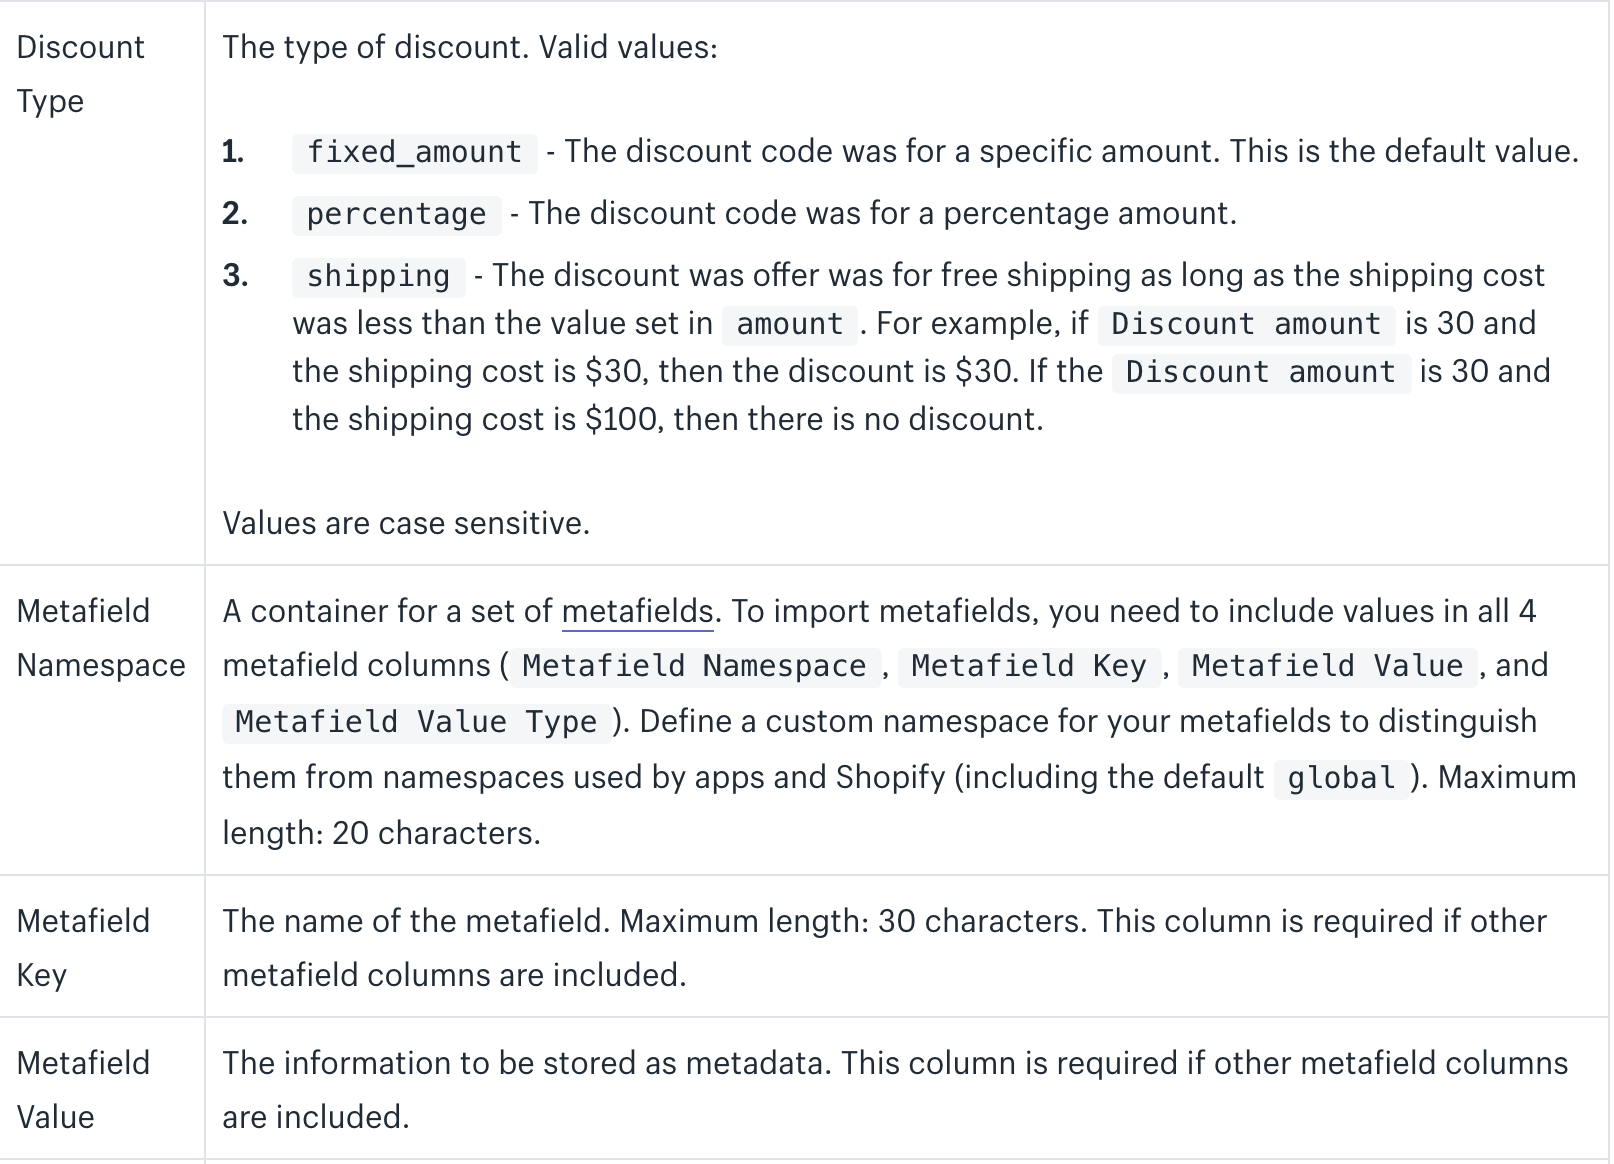

File name
The name of the CSV file also needs to add the word order (name of the object type that it contains). For instance, myorders.csv. This file has to be under the UTF-8 format.
Addresses
The shipping address in each order can become your customer’s default address. As you are importing an order which includes a customer associated with this, the Transporter app can check for your customer in your own Shopify store:
-
If Transporter can find the customer, the order will be associated with your customer. In addition, the shipping address in this order is also set as your customer’s default address.
-
If Transporter cannot find the customer, your customer will be included, and the order will be associated with them.
Multiple transactions
More transactions can be included in order by generating separate rows for every transaction. The Order name has to be added in a row to link the transactions to this order.
Order fulfillment status
An order’s fulfillment status needs to be decided depending on the fulfillment status of the line products making up this order:
-
In case all of the line items are unfulfilled, the order fulfillment status should be left blank to show that the order is not fulfilled.
-
In case all of the line items include any combination of statuses (fulfilled or unfulfilled), the order fulfillment status should be marked partial.
-
In case all of the line items are fulfilled, the order fulfillment status should be marked fulfilled.
CSV file rule
If you are using the Transported command-line tool to generate CSV files, your files conform to the rules below:
-
Your CSV file’s name has to consist of the object type’s name, including customers, orders, and products it has. For instance, a file containing customers’ records has to have the word customers on it.
-
CSV files must include UTF-8 that encodes to avoid the creation of unwanted special characters in your own files. In case your files are saved without applying UTF-8 encoding, your data might be corrupted as you upload it as new spreadsheets. Shopify finds it hard to recover your corrupted files.
-
You have to contain the names of column headers in the first line in your CSV file.
-
The order of each column is not very important; however, every now has to follow the similar order of columns.
-
Each column in the file has to be separated with commas, and every line also needs to be divided by a line break.
-
If each value includes special characters, like a comma (,), a quote (‘), or a double quote (“), you must surround the total value with the double-quotes. For instance, “Unit 8, 150 Elgin Street” (not Unit 8”,” 150 Elgin Street). Should you want to use a double quote in this value, you can use the two double quotes:” “8th Floor’’ ``, 150 Elgin Street”.
-
Make sure you are using straight quotes instead of the smart quotes known as “curly quotes”.
If you get your CSV files edited or you are using other processes to generate CSV files, you have to guarantee that your CSV files obey those above rules. Should you have difficulties in working with CSV files, you can try to use Google Sheets.
Order imports
The orders you are importing your items, orders, and customers are important. You need to get them imported in the order below:
- Products
- Customers
- Orders
Run test imports
Before importing a large quantity of records in Shopify, you can try to import some records. When an interactive approach is necessary, like one involving importing a small number of records, correcting CSV files, reviewing their outcomes in the apps as well as in admin, and re-importing the objects. Prior to re-importing any kind of object, you have to cancel them from your Shopify admin. You are allowed to use the Transporter apps to remove any object by giving CSV files containing a list of deleted objects.
Notification emails
As orders are successfully imported into the Shopify platform by using some Transporter app, there will be two status:
- Notifications are not sent to the customers
- Notifications are not sent to the team
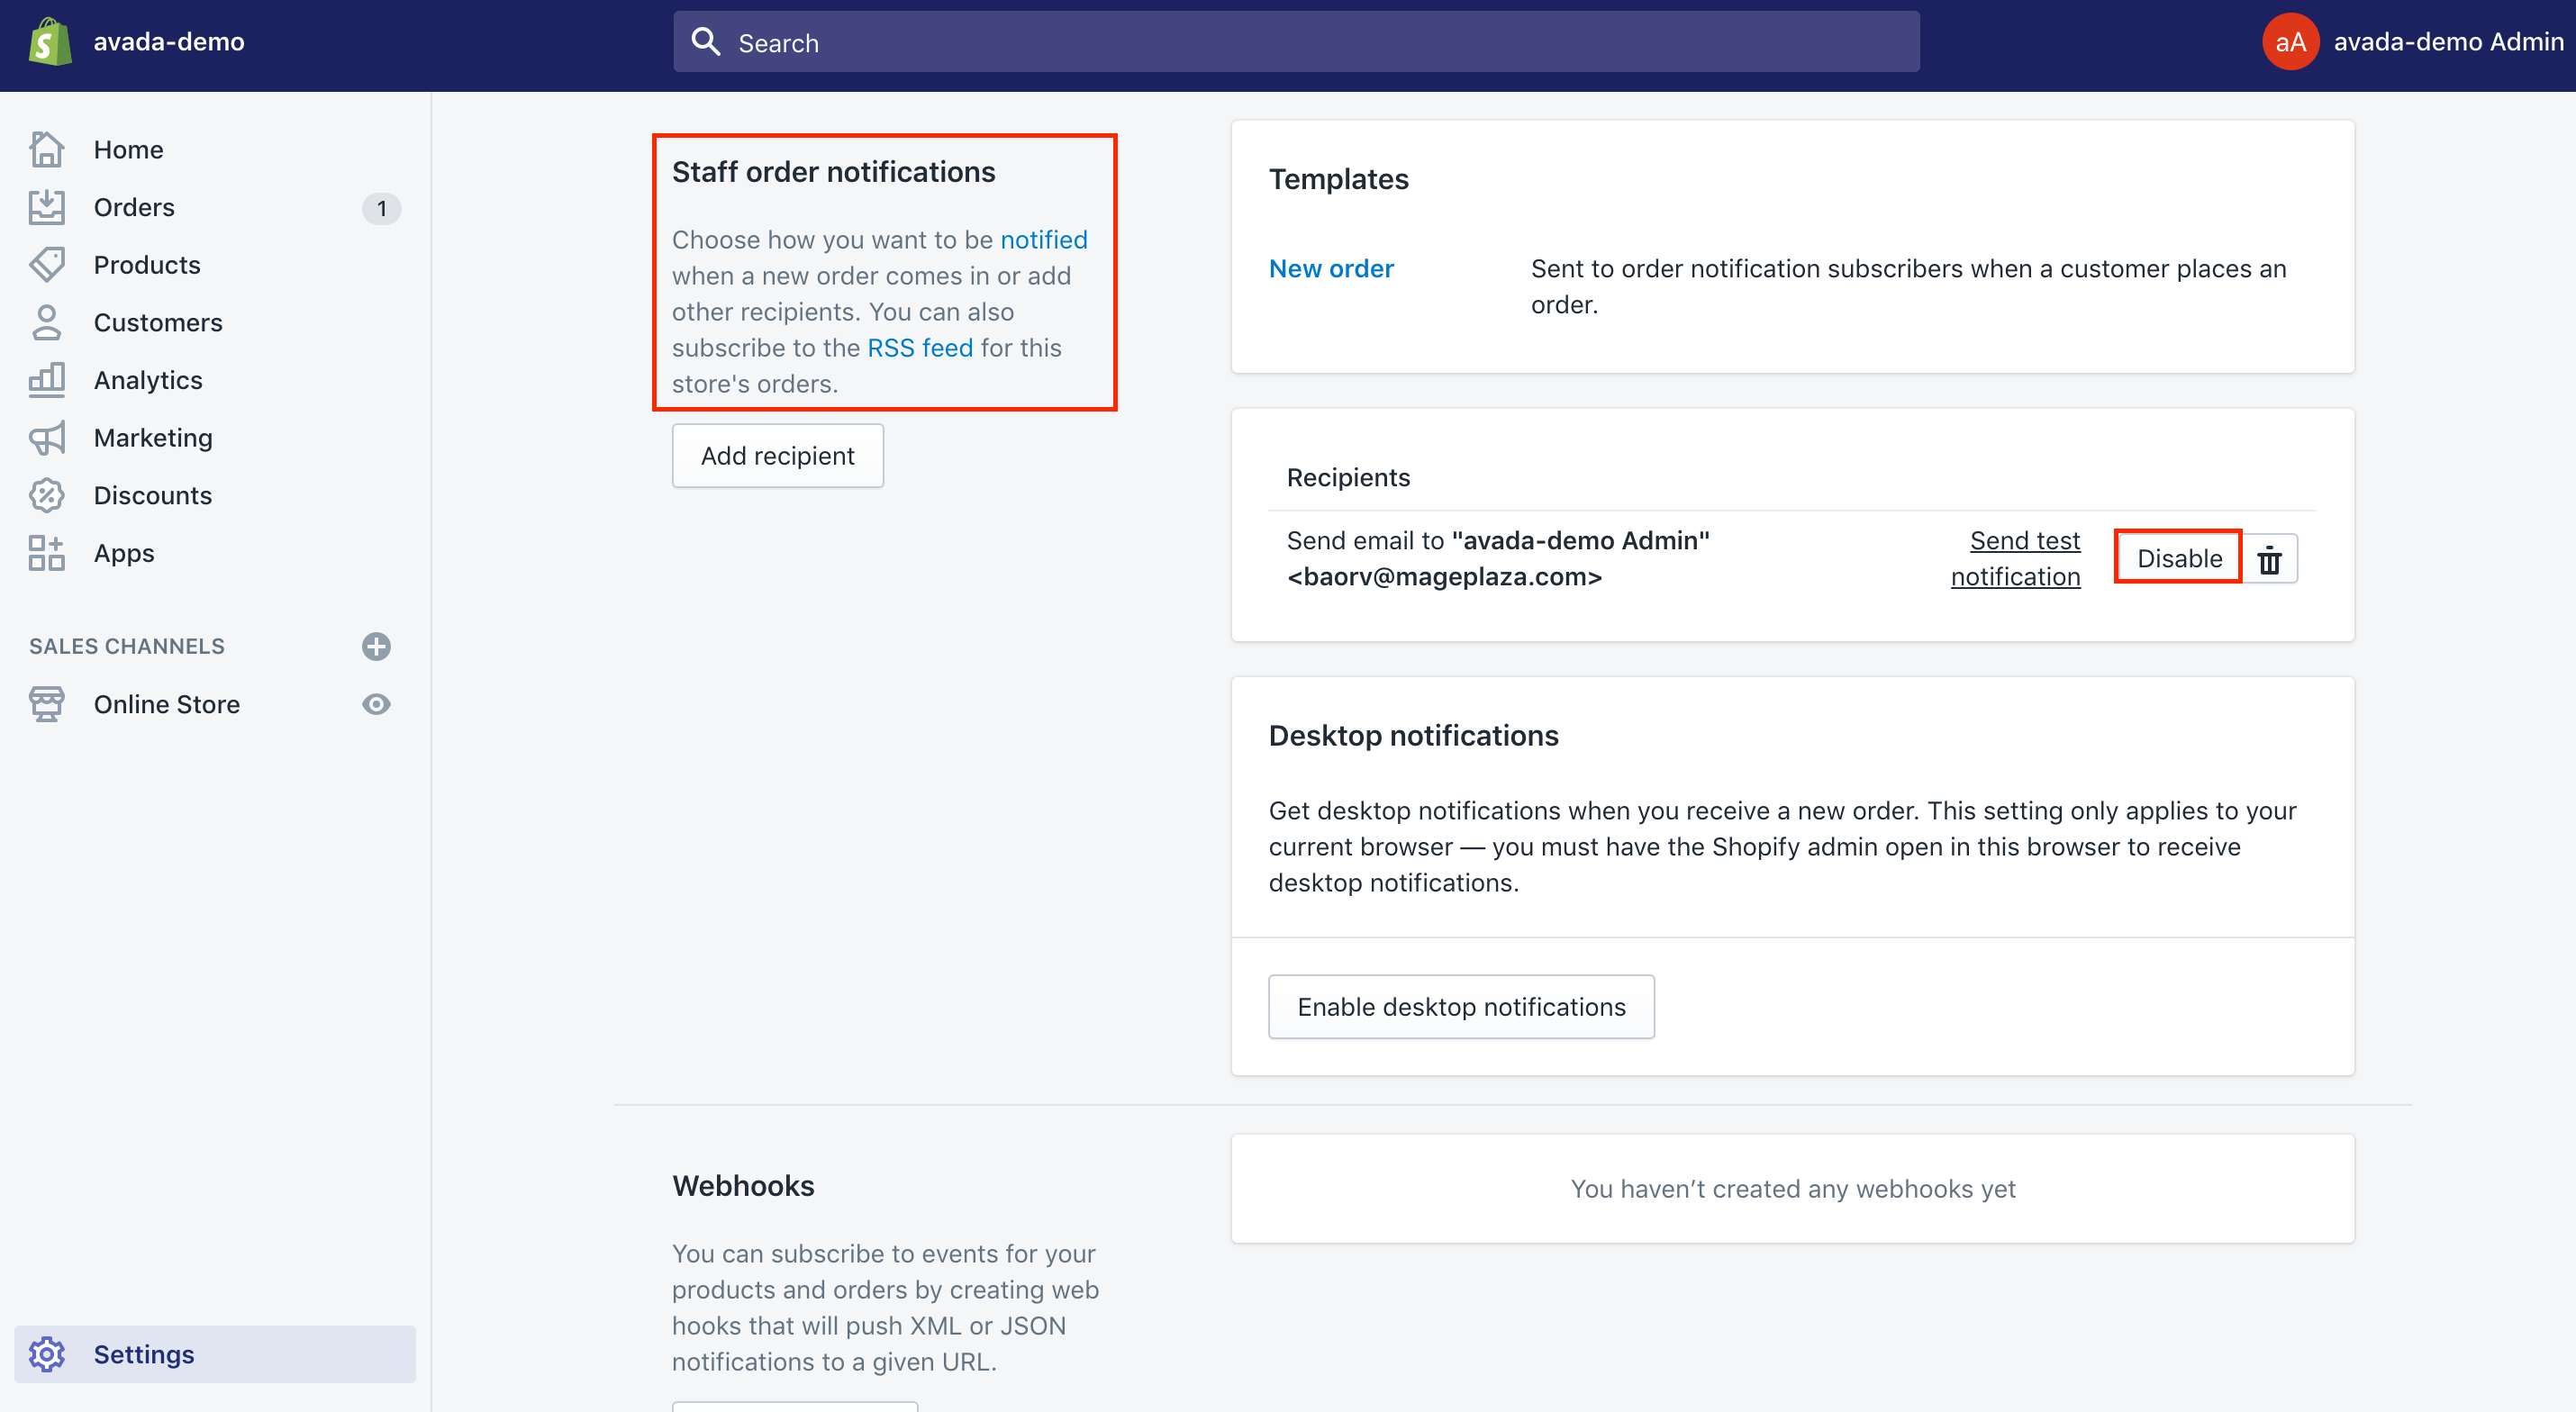
In general, this does not have any effects on your notification settings for your new orders after imports are completed. Should you want, you are able to disable the staff notifications for orders in your own Shopify admin.
Step 1: Choose Settings and Notifications
First, you can choose Settings > Notifications.
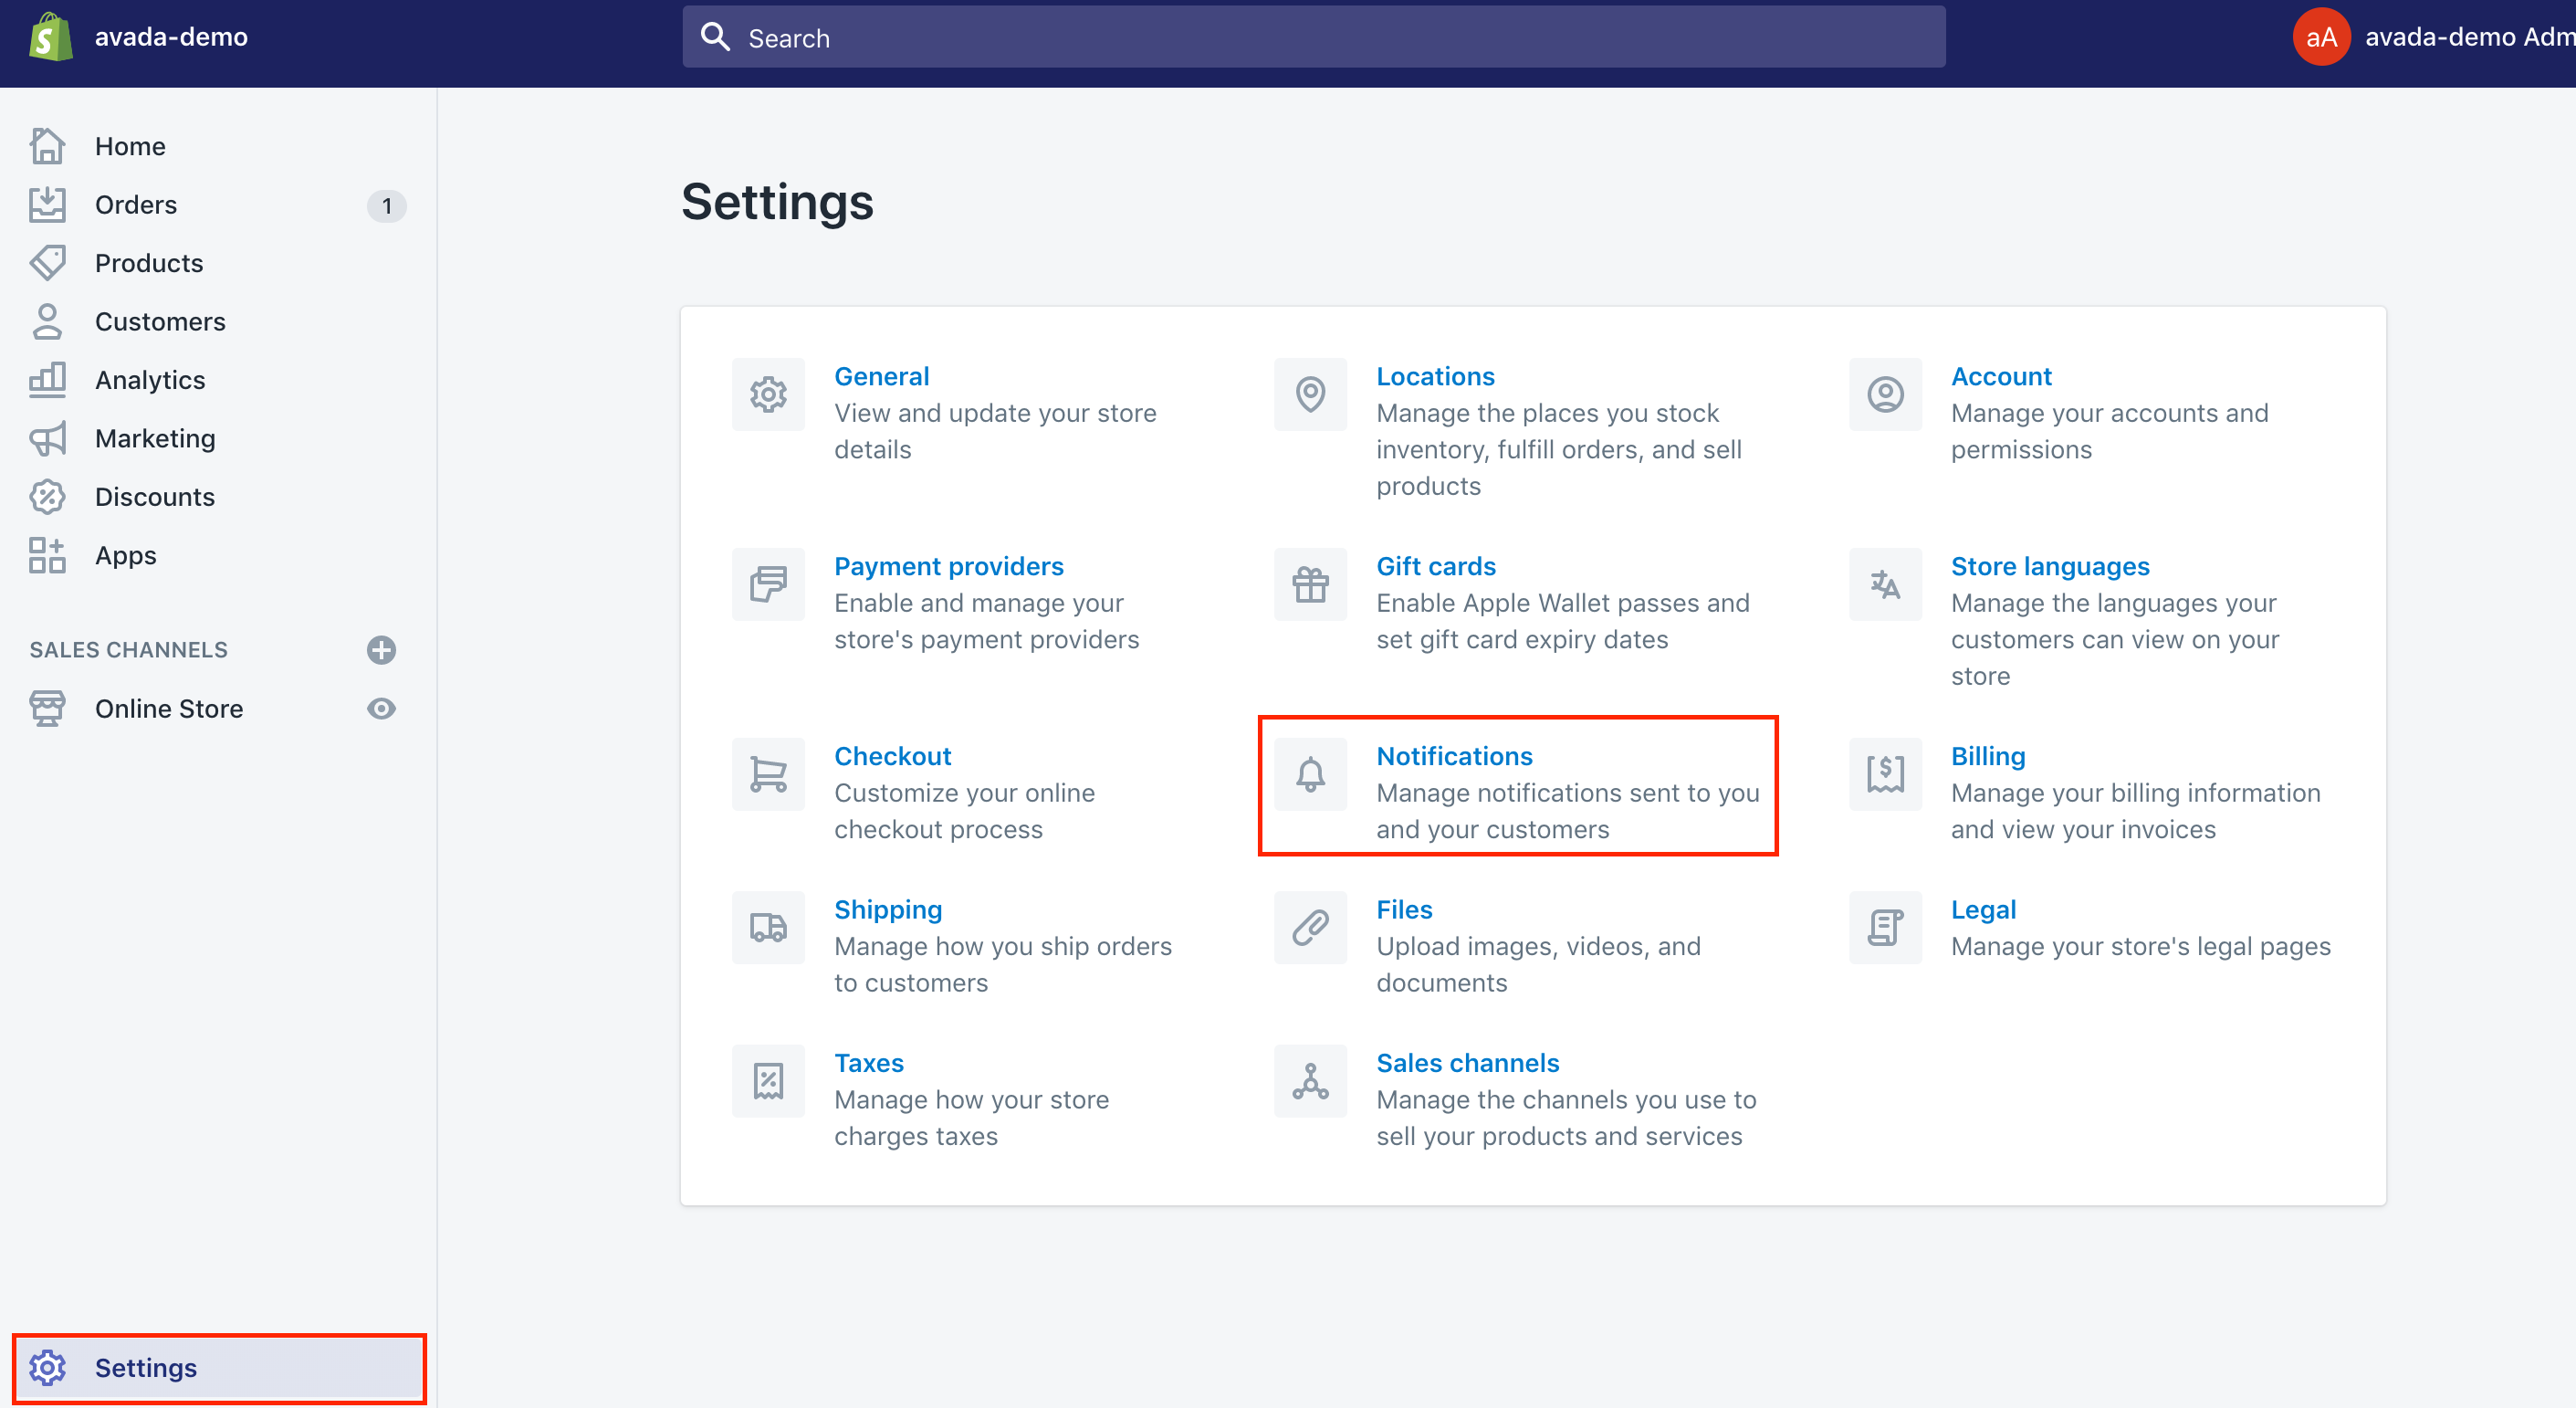
Step 2: Select Disable
After that, from the Staff order notifications, let’s click on Disable.
Start importing
Take note that before importing orders, you had better import products and customer data.
Here are the following steps:
Step 1: Enable Upload file
The first thing to do is to get the Upload file in the Transporter app for the Action section.
Step 2: Enter the CSV file
Then, don’t remember to enter the CSV file.
Keep in mind that after your file has been uploaded, the app can start importing your own objects.
Using other apps to import orders into Shopify
Orderimp by Orderimp
Orderimp developed by Orderimp is known as an easy solution to help import your multi-channel or historical orders into your Shopify. In fact, Orderimp is tailored to become a quick and reliable solution for getting your orders imported from many different platforms.
To get started with Orderimp, the process is very simple. The first thing you need to do is to upload an Excel File or a CSV file. Then you had better map your column file before finishing importing your own orders.
With Orderimp, you are able to have all of your order history imported while you are migrating to the Shopify platforms. Orderimp allows you to import countless orders through Orderimp. You can have a simp and easy access to the order information in Shopify, and you do not need to care much about old cart platforms.
Orderimp is useful to assist you in creating your customer account automatically with ease and getting them updated the existing ones with the entire spending or the number of orders. Orderimp gives you the best solution to sort out your item collection based on the best-selling products. It works with all of your apps that use the customers’ existing order history. In addition, the app can email your customers the order receipt, send the tracking email to them, and reduce the inventory QOH for line items to get them imported. Orderimp is responsive to work well with Big Commerce, Amazon, Magento, WooCommerce, Wix, and Saprespace, and so on.
Smart Order Import by WEBDESK SOLUTION
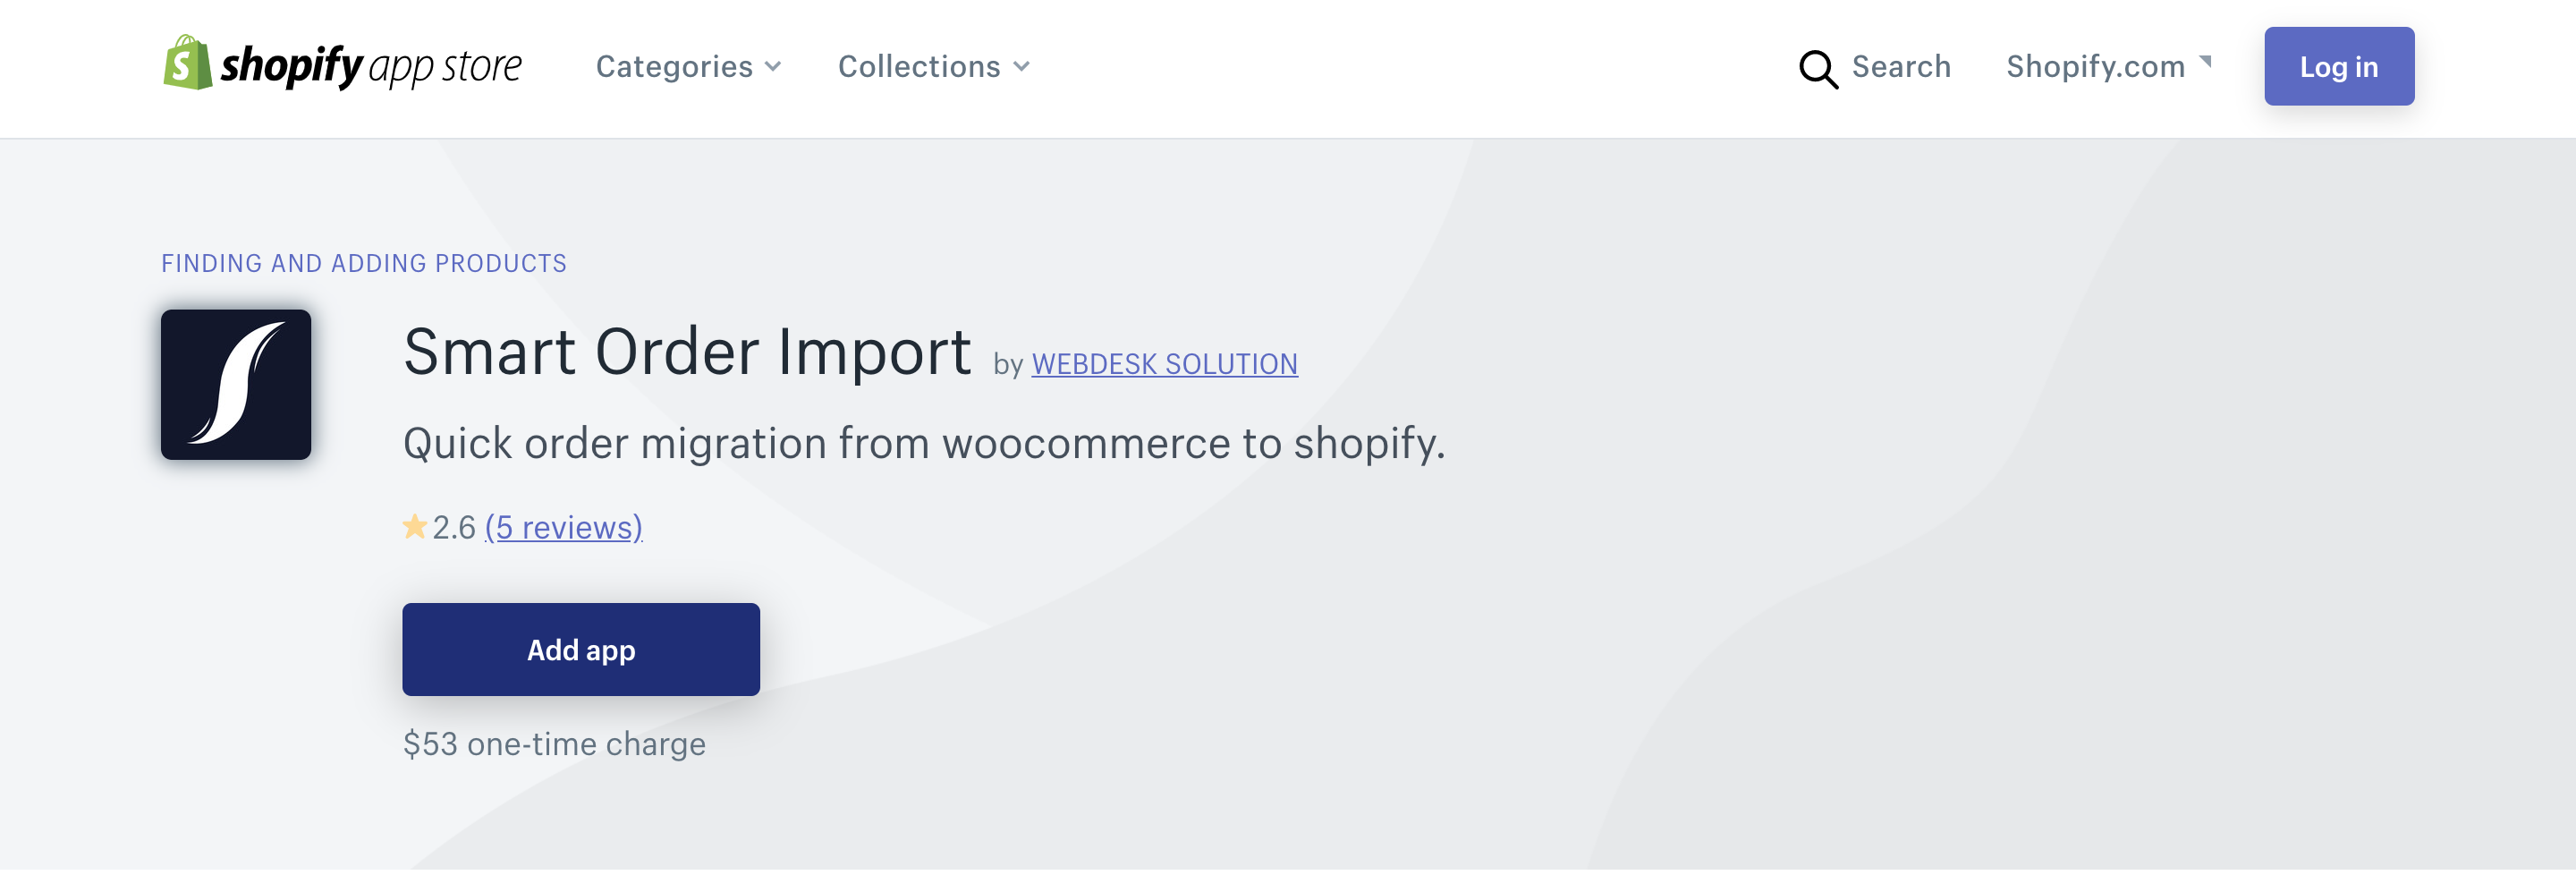
Smart Order Import launched by Webdesk Solution is known as one of the quickest order migration from the WooCommerce to the Shopify platform. Smart order import offers the Hassle migration for orders existing in the WooCommerce store to the Shopify store. What Smart order import can do for you is very important. It assists you in migrating your existing orders from the WooCommerce store without manual work. In addition, the app allows you to track imported orders and you do not need to code anything. Everything is committed to going smoothly with the interface application. There only one thing you should remember is making sure to get the order notifications disabled before you begin to import to stop the app from sending the order notifications to your customers. For more details for your references, you can go to further review of Smart order import.
EZ Importer - Order Importer by Highview Apps LLC
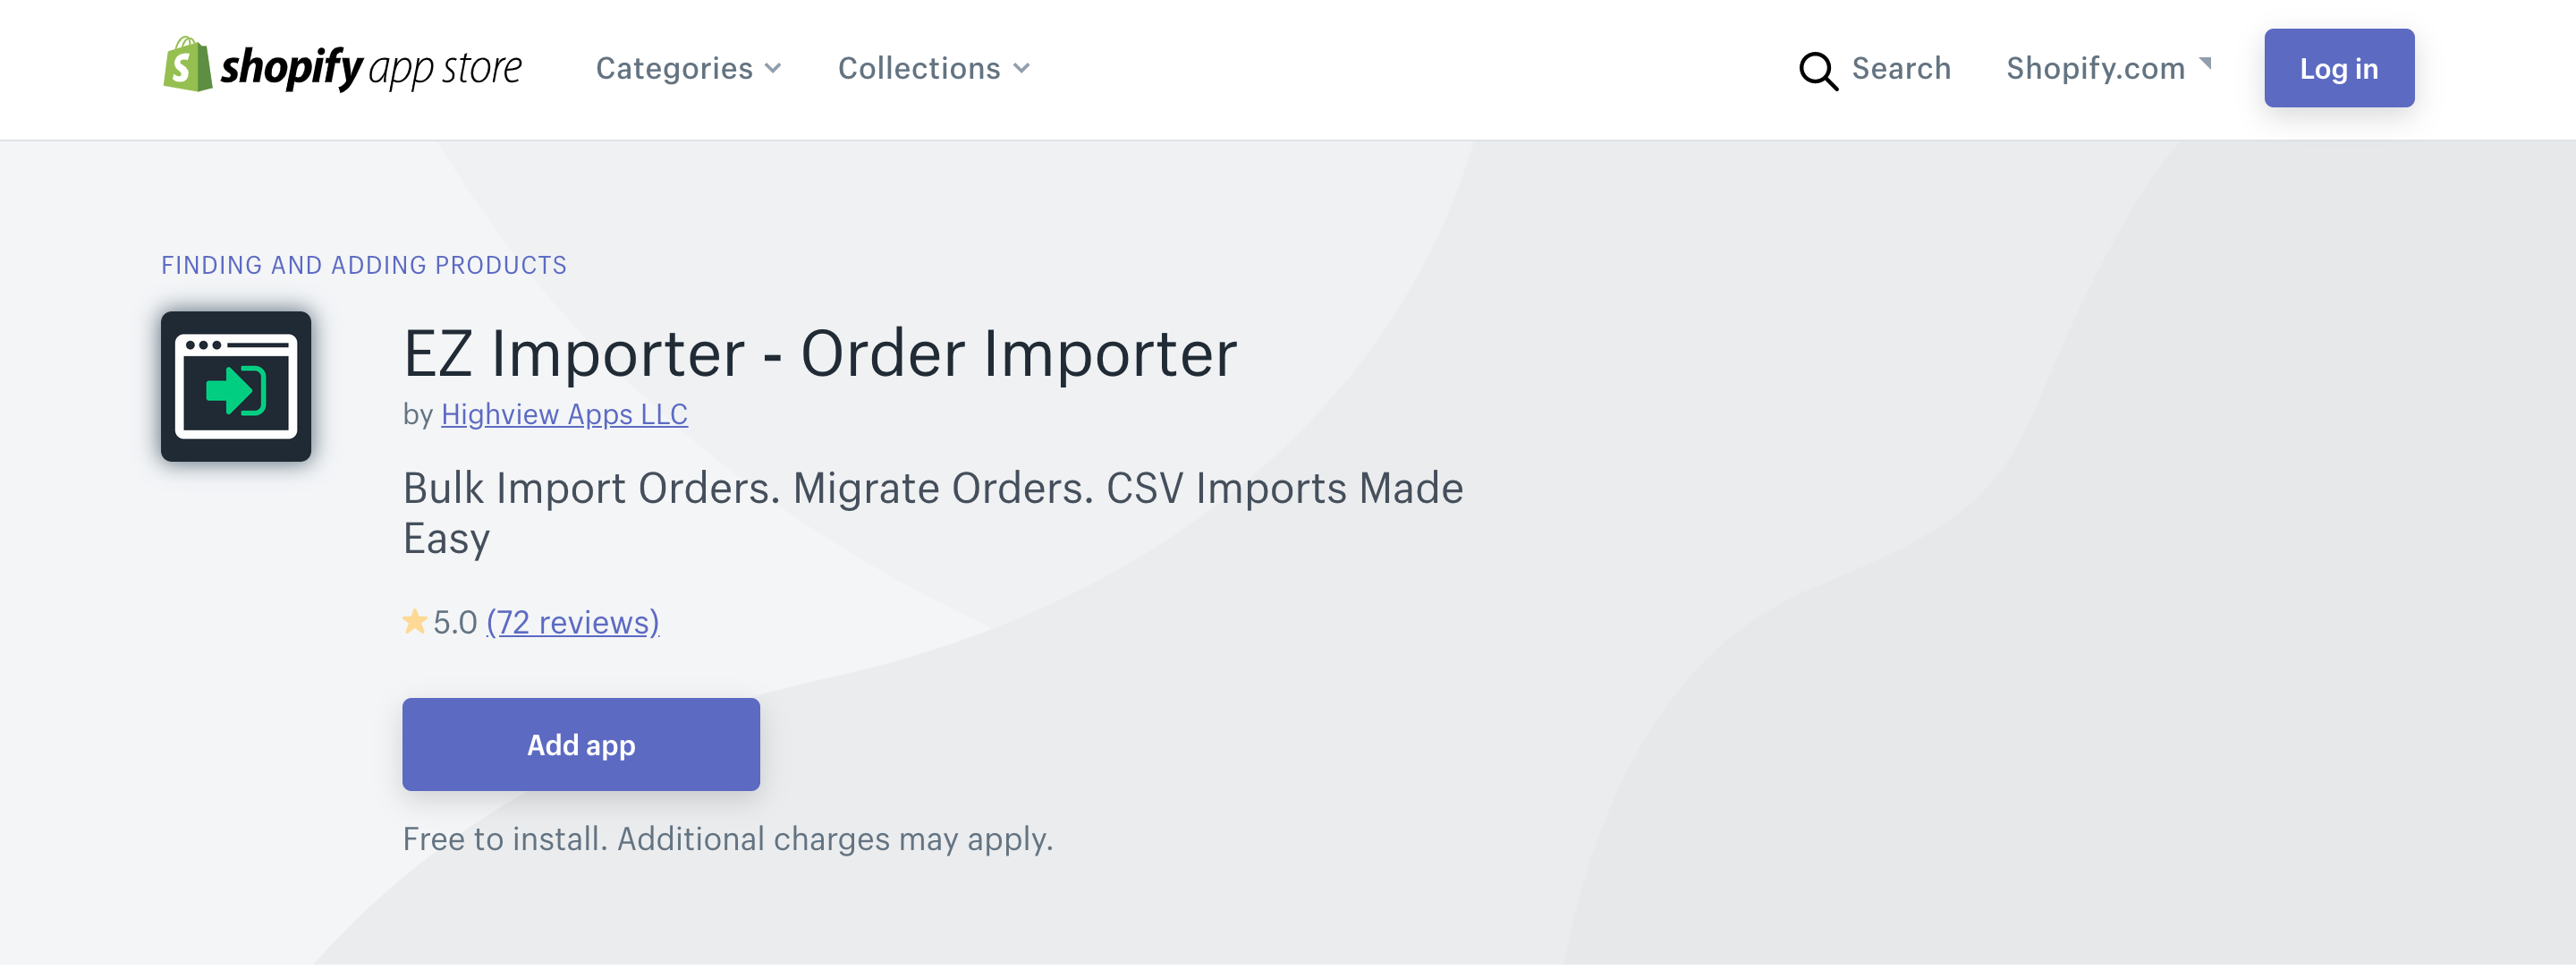
Another best app to help you import orders is EZ Importer - Order Importer, developed by Highview Apps LLC. EZ Importer - Order Importer is perfect for migrating your own order history while you are migrating them to Shopify. After setting up one time, you are able to create your imported orders in bulk from CSV files with ease. With EZ Importer - Order Importer, you can save your time to import orders from any source by applying its built-in Shopify data mapper. IT allows you to choose the fields you wish to import. Besides, EZ Importer - Order Importer helps you review as well as import data with just a click of a button. If you want to find out more credit credit-based, here is the answer. With EZ Importer - Order Importer, credits will never be expired. Credit can be used to import personal orders from any CSV file.
Woo Importer by Ablestar
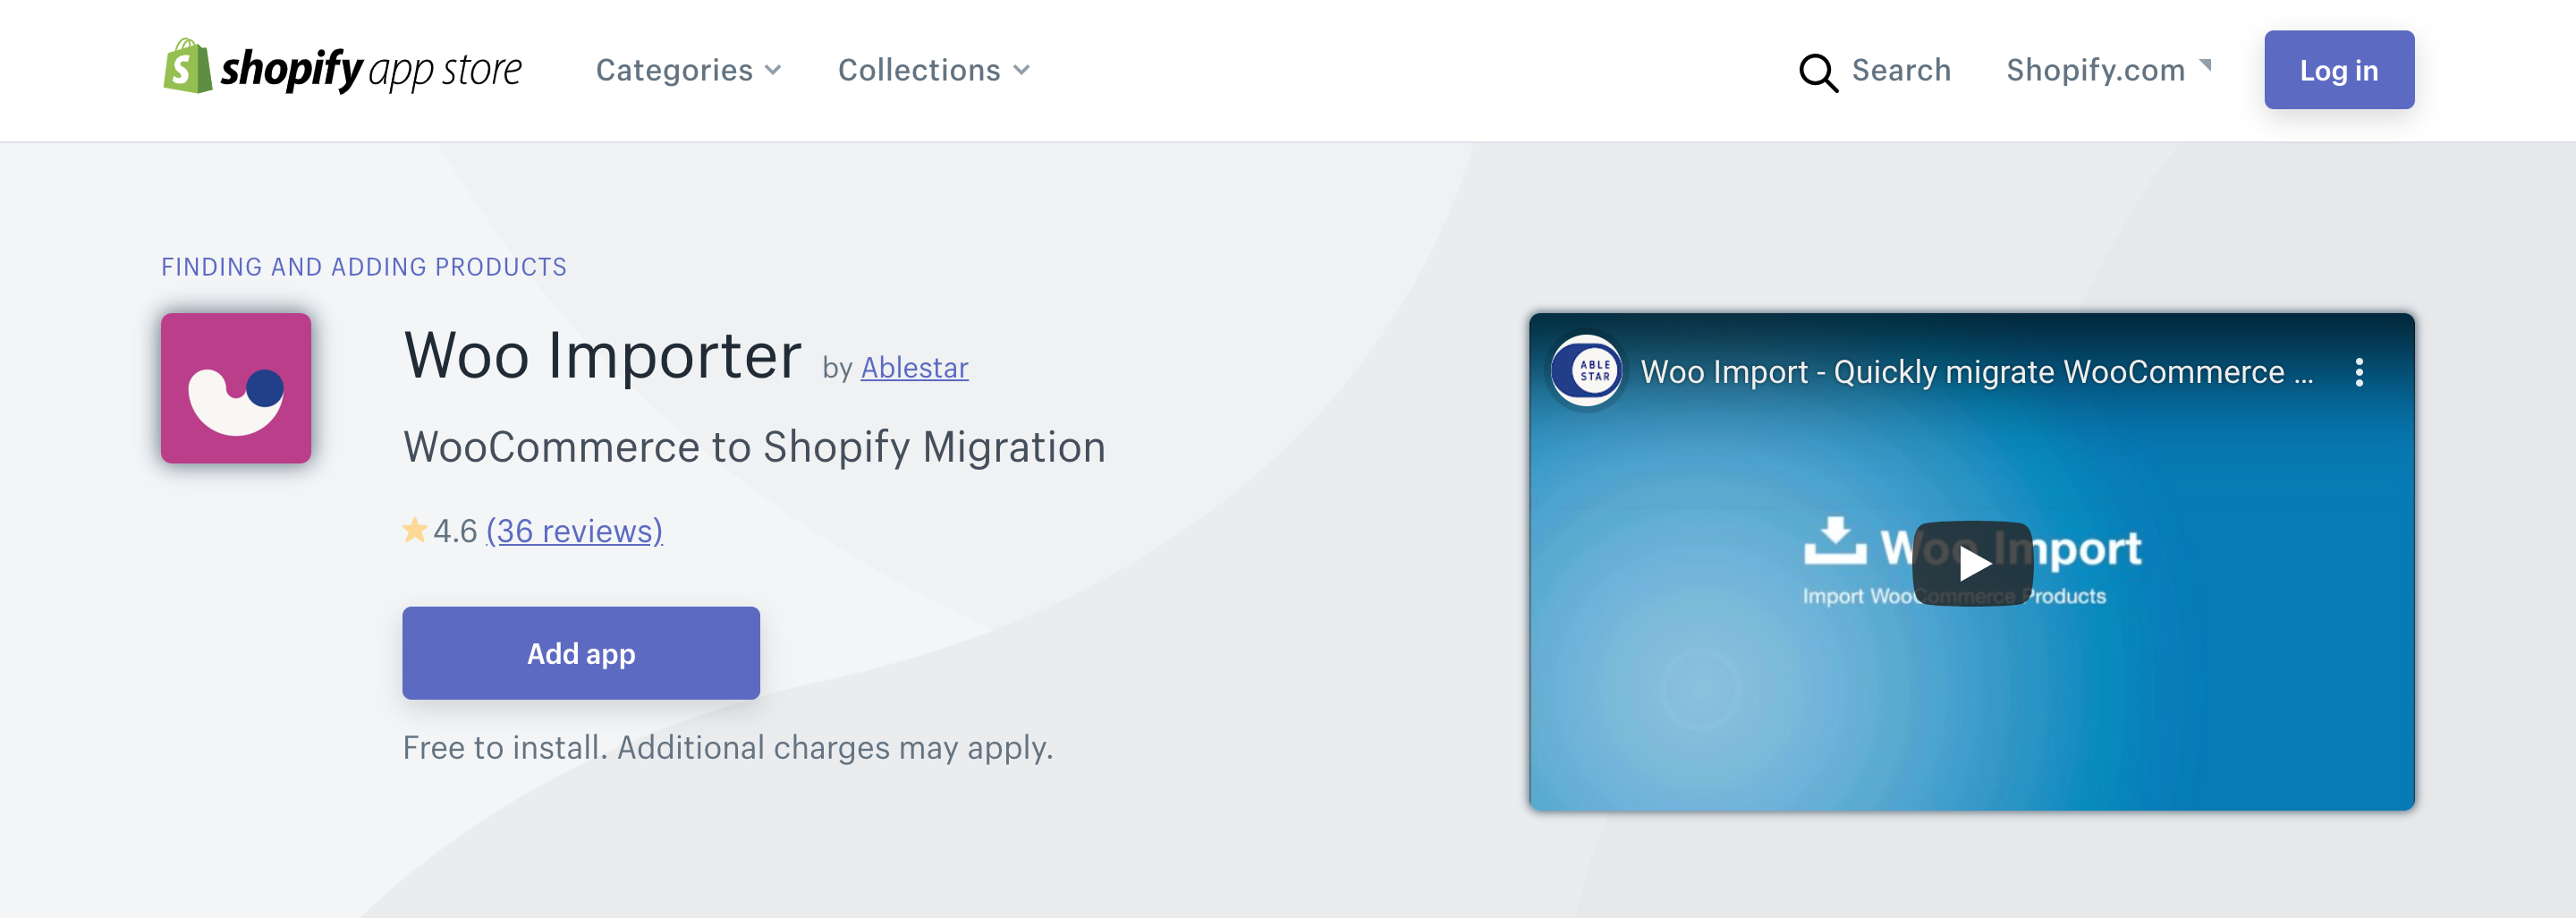
As you might now know about, Woo Importer by Ablestar is being used by many Shopify users to help migrate millions of items to Shopify. Now, it is your turn to try. Woo Importer run by Ablestar helps save your time by getting products and orders imported quickly from the WooCommerce into the Shopify store. It aids in migrating items to Shopify and having your customers as well as orders transferred to Shopify. By using Woo Importer, you are able to import product reviews to the Shopify. Thanks to the help of Woo Importer, you can create account activation links for your own customers. Don’t forget that the app enables you to generate URL redirects to fix your broken links as you switch to Shopify.
Cart2Cart Service
Running Shopify migration through Cart2Cart Shopping Cart Migration Service, you are able to export and import orders, products, customers, categories, manufacturers, and other eCommerce data from or to the hosted solution. With Cart2Cart Service, you can migrate many kinds of data to and from Shopify. It lets non-tech-savvy users perform the Shopify migration in the successful and accurate ways. This Cart2Cart service will not have any effect on your store performance, along with that it will help you remain the available purchases during the data transfer. Cart2Cart Service aids in preserving product image URL and change the quantity of the product up to 100 on the target store.
LitExtension

LitExtension is considered the leading company in shopping cart migration. If you intend to migrate your online store from one eCommerce platform to Shopify, LitExtension can help you out because it allows you to import and export all your data including customers, orders, products, manufacturers, taxes, reviews, multilingual languages and more. Particularly, for orders, you can totally migrate all order information, including:
- Order Date
- Order Status
- Order Products
- Order Comments
- Customer Information (name, address, email, phone number, zip code…), and so on.
Even people who are not tech-savvy can easily perform the migration steps with the help of LitExtension service .Moreover, the migration process does not affect your store performance as the LitExtension team will help you remain all the upcoming purchases as well during the migration and migrate those later on. Even the SEO URL that you have built for years is guaranteed to be preserved.
Conclusion
With our complete guide on how to import orders into Shopify, we hope that you can have a better understanding of imported orders. In case you need help, don’t forget to contact us for more information. If you find this post useful, let’s help us share this on your own social platforms.
Related Posts:
- Why is my Shopify Store Unavailable
- How to Sell Digital Downloads on Shopify
- The Difference Between Shopify Partner Login & Shopify Login


