Shopify Sales Tax: The Ultimate Guide for Merchants
While running a business on Shopify, most retailers might have to pay an amount of money for the taxes on their sales. Then, those taxes will be reported and remitted to your government. However, tax laws and regulations seem to be complex and often change through times. Lucky you, Shopify does provide some tools that can make your Shopify tax preparation a bit easier.
To go more in detail, Shopify works based on other default sales tax rates, which are often updated. Because you will need to confirm that these default rates are available at present and correct for your specific situation. However, your sales taxes will not be filed or remitted by Shopify for you. It’s your thing to register your business with your local or federal tax authority so that you can handle your sales tax. Then, Shopify will provide the calculations and reports to make things easier for you while filing and paying your taxes. People consider this Shopify Sales Tax report as a time-saver in their business.
That’s why this article today is here so that I can help you a bit with this quick overview of Shopify Sales Tax and the Ultimate Guide for Merchants on how to set up Sales Tax on Shopify to calculate what you might have in income and self-employment taxes.
Related Posts:
3 Types of Tax Applied to Your Sales on Shopify
Before we start, we should understand some available types of tax that apply to buy goods and services. These kinds of consumption taxes depend on the country. As the business owner, you will need to meet different requirements from each type. But here are the three most common consumption taxes that you should know on Shopify:
Sales Tax
The first type is the “Sales tax”, which can be understood as the one-time tax charged in terms of purchase. In this type of taxes, the consumer charge the money, then it moves to the vendor, and finally, to the government. You will see this form of sales tax in the United States, which is determined at the state and local levels without overarching the national sales tax.

As the fact that all various rules, sales tax in the US are decided by the states and local jurisdictions so that this could be difficult to understand. I recommend you to check out the US sales tax on digital products to understand how the system works.
Value-added Tax
VAT, which shorts for Value-added tax, is the tax that is charged at each stage of production in the consumption tax. The value of the good or service might change at different stages so that the “value added” is what’s being taxed when that value increases.

When you are a business owner, when you have the VAT that you pay in the production chain refunded when there is a consumer pays out of pocket. The way VAT works are simple. Basically, when you pay an amount of money for the VAT to other businesses that help you produce your product, which will be called “input taxes”, after that, it will send you the tax credit for each one. When you sell something on Shopify, you need to input the appropriate VAT rate to each transaction so that the customer will pay for the tax of that product.
Goods and Services Tax
GST, which shorts for Goods and Services tax, is also the required tax to be levied at every step of the supply chain. Not alike VAT, the way GST is charged doesn’t depend on the added value. Normally, it is just a flat-rate percentage of the transaction.

GST works when payment is charged for the specific businesses at each stage of the manufacturing process. Meanwhile, the customer will be charged at the point of sale. Except for the final consumer, the GST tax will then be refunded to everyone via tax credits.
How to Set Up Sales Tax on Shopify
Before starting to collect Shopify sales taxes, you will need to get them set up. This process might take you a lot of time because there are so many variable kinds of stuff that you need to keep straight.
1. Create Shipping zones
The very first step here would be Create Shipping zones for your store. As different states and cities have their own tax rates, so you need to form a shipping zone for each one. If you are in a destination-basis state, then your tax will be calculated based on your customer location.
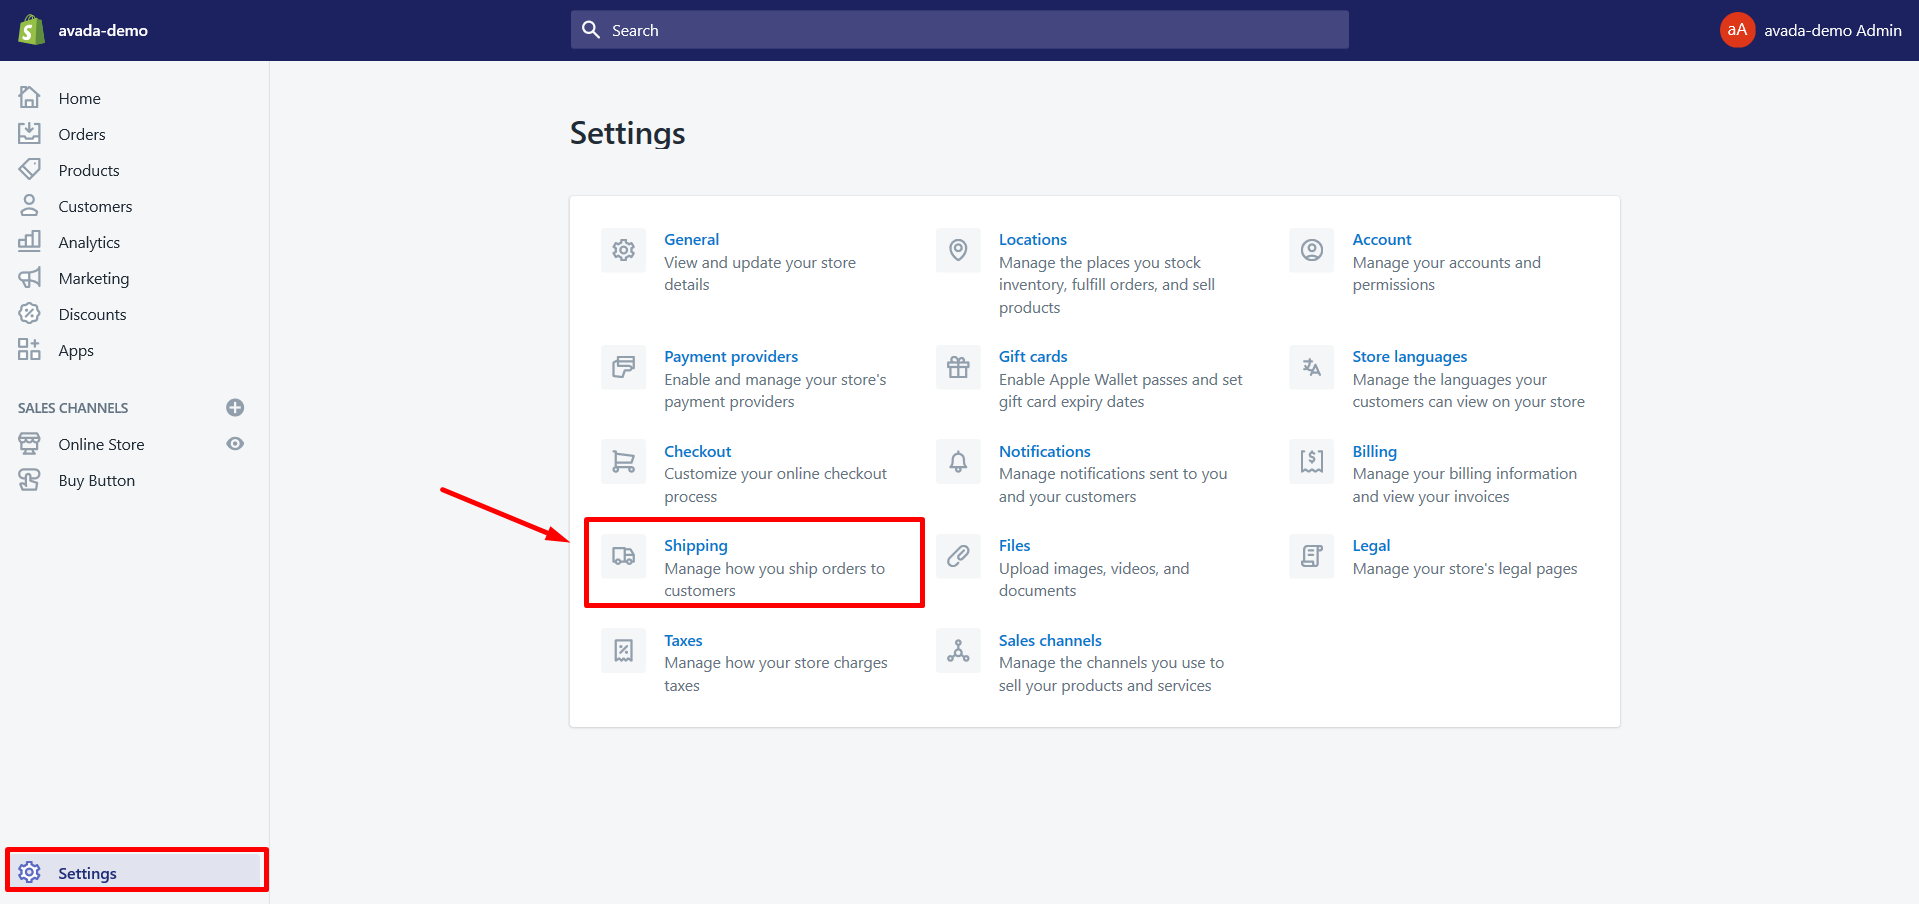
- First of all, hit a click on the
Settingsbutton in your Shopify Admin. - Then, choose
Shippingto navigate to the Shipping zones section.

- At the
Shipping profilessection, click onManage ratesto see more details.

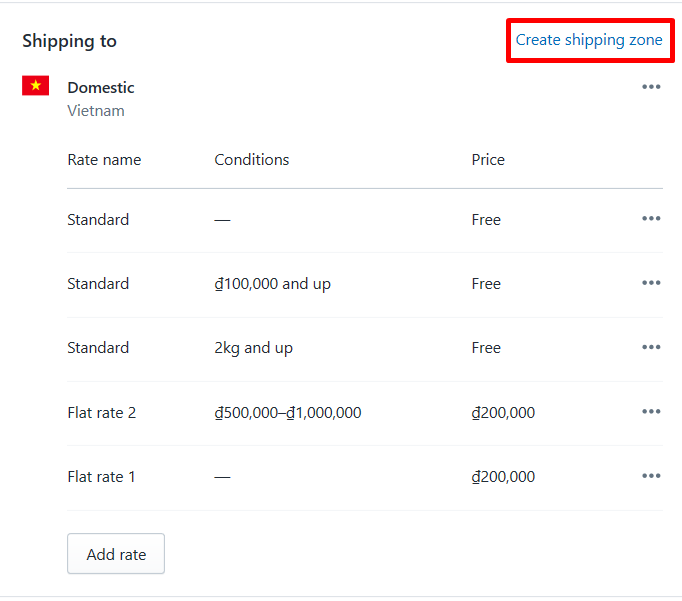
- Navigate to the
Shipping tosection and hit a click onCreate shipping zones.

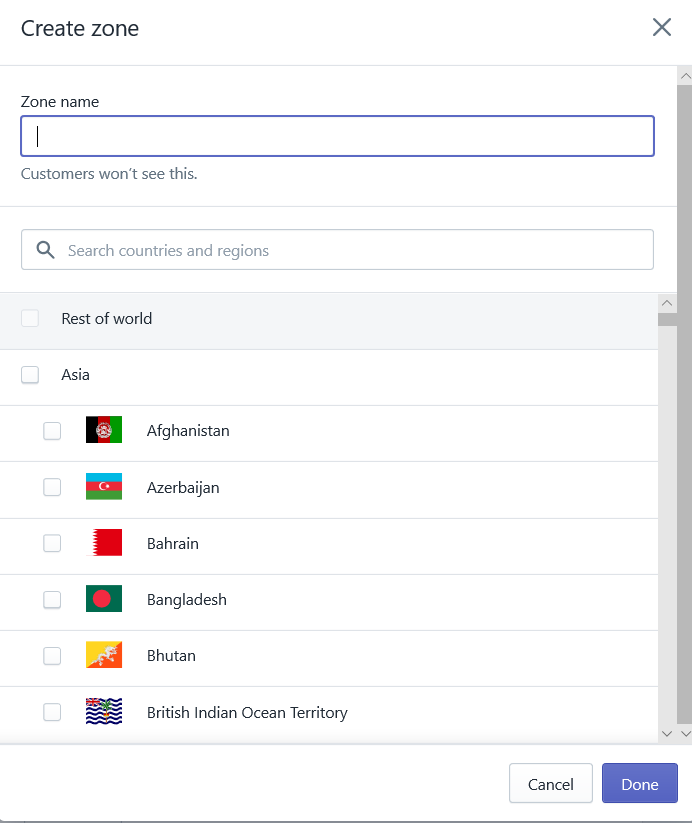
- From here, you must enter your zone’s name, after that, select the country or region name of yours.

- Finally, simply click
Doneto complete for one zone. - If you want to add more rates that you want for the zone, just go ahead and remember to click
Savein the end.
2. Set up the tax rates
Subsequently, you will have to set up the tax rate for all the shipping zones that you have just created.
- First of all, direct to
Settingssection and choose theGeneralbutton. Based on your nexus, you will need to enter your current address. - After that, just navigate to
Settingsagain, chooseTaxesthis time to insert tax rates. This step can differ in different countries based on your destination-basis or origin-basis:
Merchants Selling in the United States
For sellers in the U.S, you should select the automatic tax settings or manually specify the rates for each state, county, and municipal taxes, which has shipping taxes included. From here, your tax settings will base on the type of state that you are currently at:
- In case your state is a destination one, then you can insert your physical presence by using the zip code for that nexus. Consequently, the taxes will be calculated based on the location of your buyer.
- In case your state is an origin one, then you need to input your physical presence by using the zip code for that nexus. After that, your taxes for sales will be made within the state, and it will be calculated based on the location of your nexus.
- In case your state is the one that has only a single tax rate applies, so you need to input your physical presence that utilizes any zip code for that state. From here, if it is required, you will need to input a tax override to a collection that your applicable products are in.

Merchants Selling in Canada
For retailers in Canada, you must enter your tax registrations to pay for the tax. In January 2019, there is a new way to set up taxes for Canadians on Shopify that supports users to simplify the procedures for charging sales taxes. In order to use this new feature, follow this simple step below:
- If you are a new users on Shopify, go to the Setting up Canadian taxes article here for more information.
- If you has used Shopify before, go to the Updating to the new Canadian taxes feature section here for more information.

When you have already decided what sales taxes that need to charge in your country: Canada, you can set up your Shopify store for the automatic management in the tax rates that you pay for your customers. Remember that Shopify will not remit or file the taxes for you. They just help you in ensuring that your business has already had the right settings for charging taxes.
Merchants Selling Outside of Canada and the United States
For merchants who are outside of the United States and Canada, they have to follow the default values on Shopify. First, you will need to decide that you are obligated to charge the tax sales to your customers, as well as the fact that your product is taxable. Then, you also have to specify the rates in the region where your product is delivered.

Next, when you are at your Shopify admin, open your Settings tab and choose the Taxes section. When you are already in that tab, in the Tax rates section, just click on the name of the country that you want to select. Next, the Base taxes section is where you need to enter the rates that apply in the country and any regions you are heading to. Finally, don’t forget to click the Save button.
Shopify Apps for Sales Tax Automation
If you are having trouble in calculating sales tax as it is too complicated for you and requires a lot of manual work, also, if you have a budget to pay for an assistant tool that helps you collect enough tax during your reporting period, then I have a suggestion here for you. It is three Shopify apps that can simplify your sales tax workloads:
TaxJar
TaxJar is an app that will support you in tracking what you charge to ensure that you are in compliance. As you can not receive detailed enough reports from Shopify after it collects your sales tax, then TaxJar will help you file your taxes automatically by publishing detailed reports that present the information about charged tax for each state and country that you sell in. As a result, you can save your precious time on Sales Tax for Your Store, at the same time, still ensure that your filings are accurate.

Quaderno
Another option here is the Taxes Automation by Quaderno app that helps you not to worry about the tax compliance. This app plays as a personal accountant, which is set up to manage your invoices and bookkeeping thing to be in compliance with tax laws. Quaderno is absolutely customizable so that you can change its settings to suit your store qualities based on your unique needs.

Avalara
Avalara is an automated sales tax app that helps you a lot via automating the preparation and filing process. The system is designed to sync your sales data and it will tell you where, when and how much to file each filing period. In addition to that, this app is compatible with the most widely used shopping carts, marketplaces, and accounting software so that you can consolidate all your sales data at any time. So, if you remit sales tax monthly or quarterly, I believe that the reports from this app will save you a lot of time in dealing with your transactions to sort out and organize the sales tax that you have collected.

Conclusion
In conclusion, taxes are one of the most crucial parts of running a business on Shopify. Hence, spending time to understand the way they work in your state, other states and even the countries that your buyers are in is worthy. I know that Setting up sales tax in Shopify properly will take you a certain amount of time and effort.
Hopefully, this Shopify Sales Tax: The Ultimate Guide for Merchants article today has helped you understand and run things easier. If there is any trouble occurs during your practice, don’t hesitate to contact us and inform your problems. We will help you with that. Plus, don’t forget to visit AVADA so that you can find more helpful articles to help you in running your business on Shopify.


