How to upload Google verification file to Shopify?
Running an online store on the Shopify platform requires that you have to deal with a lot of tasks. One of them is to figure out how to upload Google verification file to Shopify.
The task will be so much simple if you equip yourself with a good knowledge of Google verification file, and the steps to upload it to the best platform for eCommerce in the world. Hence, this writing aims to help you do that effortlessly and manage your online business efficiently and effectively.
Related posts:
What is Google verification file?
What is verification?
First thing first, what verification is. Well, it is the procedure of ensuring you possess the assets you assert to own. It is necessary to confirm ownership since if they verify you for a property, you can have access to its Google Search data and can impact its existence on Google Search. Each property in the Search Console needs at least one verified owner.
Verify a website
Either add a new property or select an unproven property from the property selector bar.
To verify ownership of a site, you can upload a special HTML file to your site. This file is tied to a specific user. You can also add a <meta> tag to the HTML of a specified page or add a DNS record in your domain name provider. If you utilize Google Analytics to monitor your site’s traffic, you can do that by using the Google Analytics tracking code related to the site. There are also other methods and to understand more about them, visit this post and follow the steps. Remember that not all verification methods are applicable for all kinds of properties, so the article will specify the possible and useful methods for your site.
How long does verification last?
Google regularly reviews the validity of your verification (e.g. checking if your HTML verification tag is still available). If authentication can no longer be verified, then after a given duration of time, the access on that property will lapse. If all verified owners fail to gain access to a property, then all delegated owners (property owners added by a confirmed owner), users, and associates of the property will also lose access to the Search Console property.
How to upload Google verification file to verify your Shopify store?
Before upload Google verification file
Before you start uploading an HTML file to your Shopify account, you should bear in mind two vital things below:
- Upload an HTML file is only feasible if you are currently using a custom domain. Besides, you should set it as your primary domain. For instance, if your Shopify URL is like this:
xxxxx.myshopify.com, you will not be able to validate your ownership to this domain on a third-party site. - For verification goals, it is mandatory to disable your Shopify account’s password protection. Luckily, you can enable this again once the verification process completes.
Get Google verification file/code?
After you go to the dashboard, you will notice the choice to add a property. You can copy your Shopify store’s URL from the address bar of the browser and paste it in the space. The next step is to tap on ADD A PROPERTY button.
Verify your domain with Google search console
Third-party services like Pinterest and Google Webmaster normally ask you to verify your domain. It helps guarantee that you are the true owner of your Shopify store so that they can offer you their services.
You may have to disable password protection for your online store to verify your domain. If you are not 100% sure to initiate your store, you can disable password protection and then enable it again once you have already verified your domain.
Verifying your domain will be more simple if you follow the simple steps below:
Step 1: Use a meta tag verification method
In the third-party site, you can have an option to verify your site utilizing a meta tag verification method. For instance, for Google Webmasters, you may need to tap on the HTML tag option button on the Alternate methods tab.
Step 2: Copy full meta tag to your clipboard
Highlight the full meta tag on the third-party site and copy it to your clipboard with cmd + c on a Mac or ctrl + c on a PC. You must choose everything, even the < and >. You can take a look at the example:
<meta name="google-site-verification" content="xxxxxxxxxxxxxxxxxxxxxxxxx" />
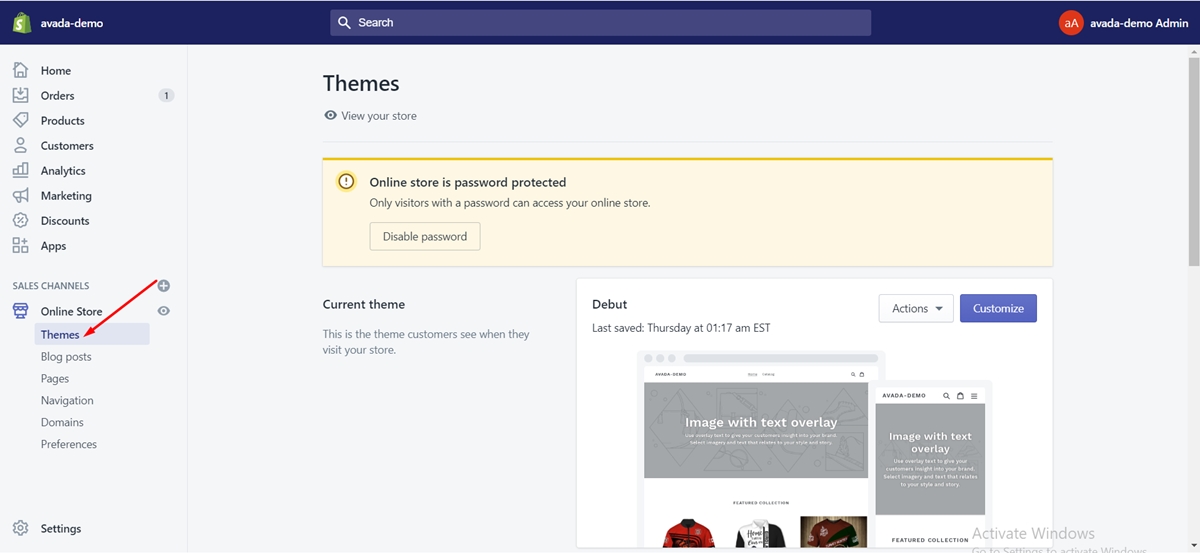
Step 3: Go to Themes
In your Shopify admin, proceed to the Online Store section, then click Themes

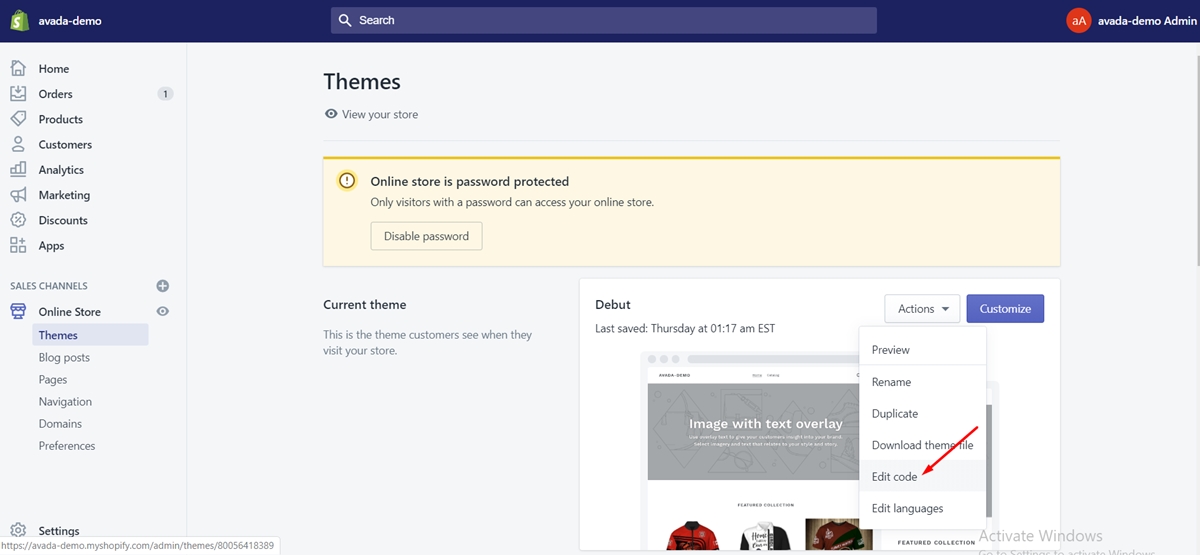
Step 4: Click Edit code
Identify the theme you intend to adjust, tap on Actions, and then Edit code.

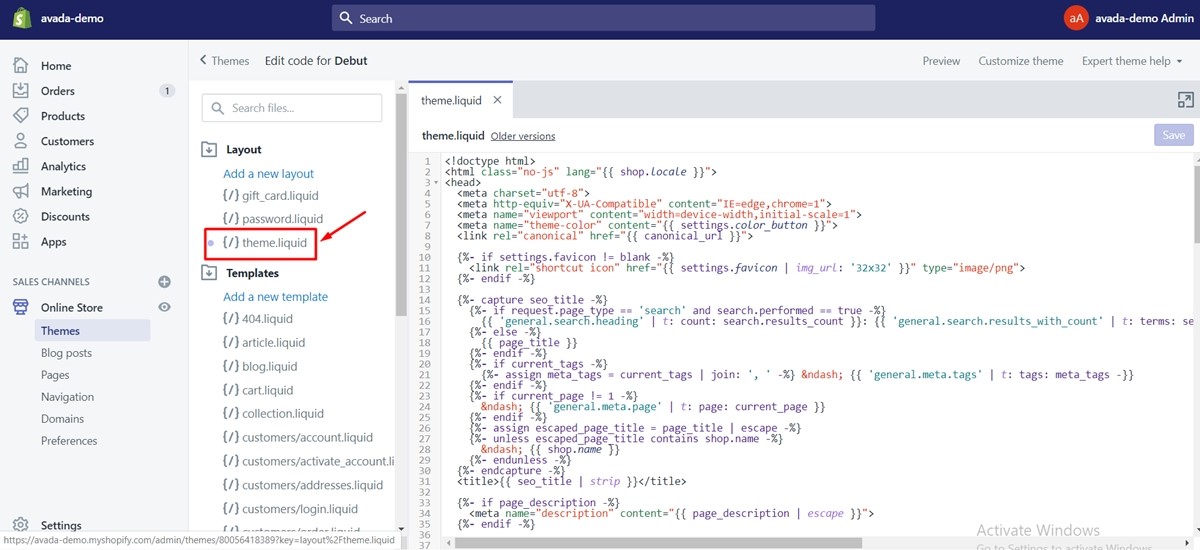
Step 5: Click theme.liquid
The <header> is in your theme.liquid file. From the Layout section, tap on theme.liquid to open the file in the online code editor.

Step 6: Paste the meta tag that you copied
Paste the meta tag that you copied on a blank line right under the opening <head> tag or before the first <body> tag.
Step 7: Tap on Save
Step 8: Perform verification steps on third-party site
Perform the verification steps on the third-party site, such as Pinterest or Google Webmasters.
Conclusion
To sum up, we hope that you can gain more knowledge about the Google verification file and how to upload the Google verification file to verify your Shopify store. Also, in the future, hopefully, you will become more popular and successful in the online marketplace after reading our article.
Furthermore, if you do not want to fall behind the competition, then the analysis of what the customers think about your items, the design, and the checkout process is a vital element to your survival. Therefore, you should check out our post How to connect Google Analytics to Shopify for more information about Google Analytics.
Should you have any questions, comments, or concerns, feel free to contact us or leave any comments below.


