How to Use tags in Shopify?
Using Tags is a great way to insert the searchable keywords involved in your products. It can save you a lot of time to label products, transfers, orders, draft orders, customers, and blog posts based on type, vendor, price, weight, or any fields. Also, your customers search and filter your product through your online store search can be helped a lot by tags. Read more on our site to learn how to edit tags in Shopify as well!
Shopify enables you to apply up to 250 tags for each product. Sounds a big number, right? In case you have a small number of products on your Shopify store, then you might not need a product tag strategy to be concerned. However, if you own a large number of products, then tags can be a helpful way to promote and control your products and collections effectively.
For instance, when you insert the ‘Spring’ tag to your related products, then at the end of the season, you will be provided a list of ‘Spring’ related products. As a consequence, you can utilize the tags to make changes to them more quickly. Also, you can use a bulk action to hide them from your sales channels.
That’s why I highly recommend you to know more about this useful Shopify tags to add in your store as it is so helpful. This article today will be fully about the Shopify tags and the way to use tags on Shopify.
Learn more: Shopify Product Tags SEO: Is it good or bad for your website?
What is Shopify tags?
Shopify tags is the element that is designed to be utilized to label products, transfers, customers, or orders, and also draft orders, even blog posts from your Shopify store. When a tag is done being added, it is always available for you to search and filter out. Consequently, you will be helped you to stay organized while working with your Shopify. Meanwhile, your customers will stay unaware of the tags from your store. At the same time, your online store can utilize these tags to search and to categorize products, then organize them for the customers to use.

Types of tags in Shopify
Shopify allows you to form a custom set of tags for each section of your store, where your tags are used. With different tags in a particular section, they can not be copied to the other sections where tags are used.
To help you understand this matter more clearly, you might need to sort out orders by tags like packed or test. However, some tags like tax, exempt or wholesale, are preferable to describe some of your customers.
I will present the table below that shows all the types of tags in your Shopify store:
| Type | Description |
|---|---|
| Product | This will help you insert and remove tags for a product on your details page. You can also view all product tags from any product details page. Additionally, help you filter products by tag on the Products page and the Inventory page as well. When you are creating an automatic collection, or as filters when you’re creating a menu, you are able to utilize the product tags as selection criteria. The tagged products will also show up in the search results when a customer searches for a term that matches a product tag. Customers are unable to view the tags. Each product can be applied up to 250 tags. |
| Transfer | You can add and remove tags with a specific transfer on your details page. It enables you to view all the transfer tags from any transfer details page, and also filter the transfers by tag on your Transfers page. |
| Order | You can add and remove tags for specific orders on its details page. Filter orders will be available by the tag on the Orders page. |
| Draft order | You will be enabled to add and remove tags for a specific draft order on the details page. Also, you can view all draft order tags from any draft order details page as well as filter draft orders by tag on the Draft orders page. When an order is created from a draft order, its tags will be carried over and added as order tags. |
| Customer | This will be helpful in adding and removing tags for specific customers on their details pages. All the customer tags are also visible from any customer details page. Also, it can be filter customers by tag on the Customers page. |
| Blog post | You can add and remove tags for a specific blog post on its details page, at the same time, filter blog posts by tag on the Blog posts page as well. |
How to use tags in Shopify
Now, it’s the part that you want to understand more: How to use Shopify tags. There are four sections that I want to present:
How to use Shopify tags: Adding a tags
Look at the tags type above, you probably understand what types of tags can be added when you are creating or editing on your Shopify store. There is another helpful tutorial article that will help you understand more in adding tags on Shopify on Mobile and Desktop.
How to use Shopify tags: Remove a tag
A tag is totally removable from products, transfers, orders, draft orders, customers, or blog posts in case you want to make a change of it. Follow these steps below:
Step 1. Open the specific element
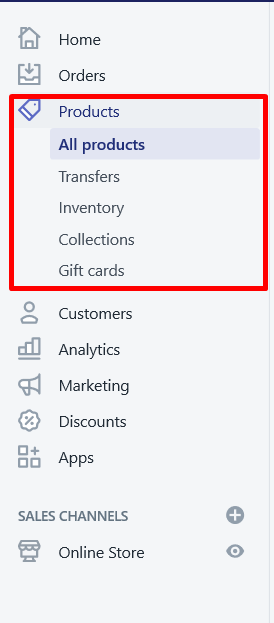
From All product, select one element. They can be the product, transfer, order, or draft order, customer, or even blog post details page in your Shopify store.

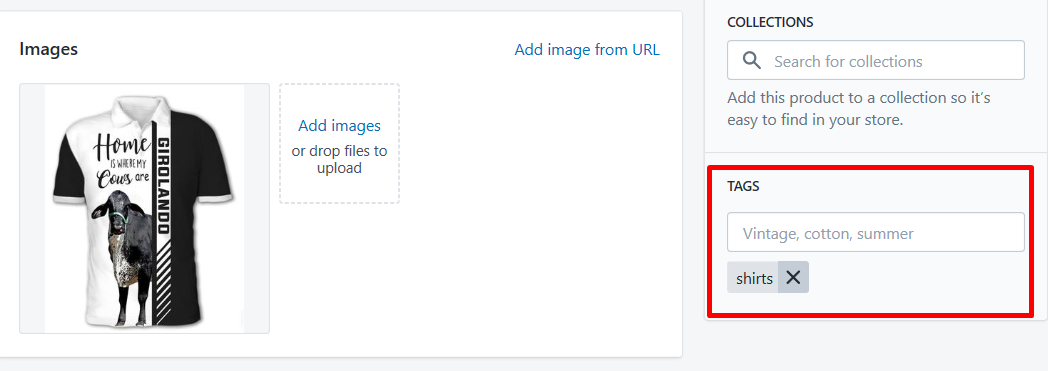
Step 2. Click the ‘x’ button
When you see the x icon that lies beside the name of the tag that you want to delete, click that button, the tag will be removed straight away from the specific product, transfer, order, draft order, customer, or blog post.

Step 3. Click Save
All you need to do now is to click Save
Using the View all tags option
Also, there is another way of removing a tag from the full list that appears by clicking the View all tags option on the product, transfer, draft order, or customer details page:
- Firstly, navigate to the Tags section and click
View all tags. - Secondly, just click on the
xbutton lies beside the name of a tag you want to remove. - Finally, hit a click on
Apply changes.
How to use Shopify tags: Search by tag
In order to search for a tag available on your product, transfer, order, draft order, customer, or blog post on Shopify, you just need to:
Step 1: Enter the name of the tag
In the search bar, just type the name of the tag that you want to search for.
Step 2: See the matching results
Then, there will be a list of results shown up, you just need to look at them and then select a result to view it in detail. And you are done!

By doing this, you can find your result more quickly as the search tool will return any results matching the tag. In case a tag has been already created, it isn’t added to anything, there will be no searching results appear.
How to use Shopify tags: Filter by tag
There are many relevant tags available for you to filter as the lists of your Products, Transfers, Orders, Draft orders, Customers, and Blog posts pages. All you need to do is:
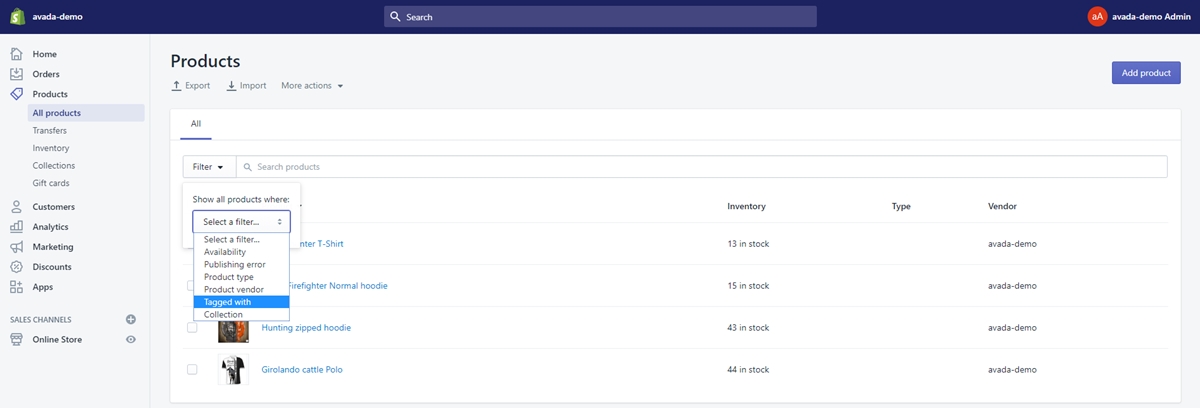
Step 1: Click on the drop-down menu
To apply a filter, you need to click on the drop-down menu on the relevant page.
Step 2: Select the Tagged with the option to filter

Look under Select a filter... option, you will see the Tagged with button to filter. Just click on that.
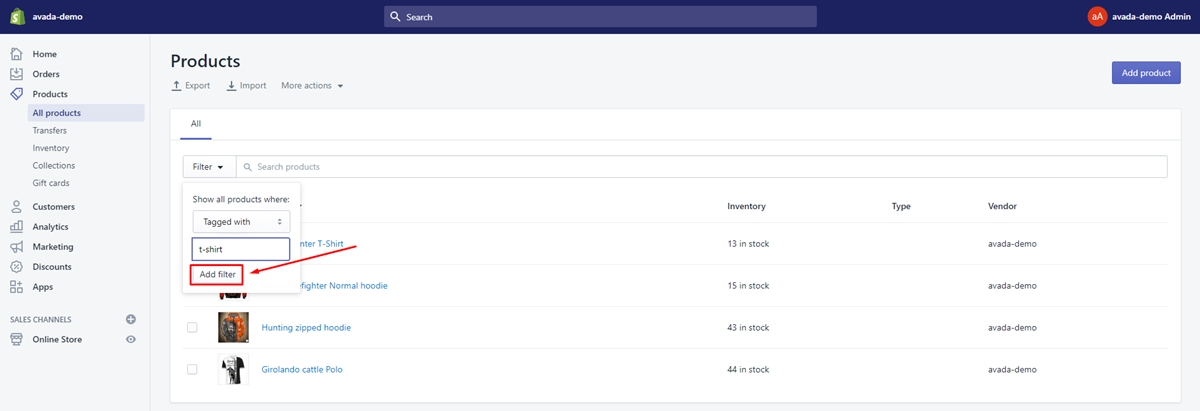
Step 3: Type the name of the tag
It’s your job to enter the name of the tag you want to use as a filter.
Step 4: View the list of items
From here, you need to hit a click at the Add filter button to view a list of items with that tag.

- Note: Remember that when you apply more than one filter to a list, the filters that match all will show up in the filtered list. The one that doesn’t match one or more of the filters will not appear here.
Conclusion
That’s not all, there are multiple ways to use tags as well to help you stay organized like creating an automated collection using tags or filtering with tags when you are creating a link to a collection in your online store navigation and so on.
No matter which way you utilize your Shopify tags, we all agree that tags make it easier for you to generate automated collections and stay well-organized while working in Shopify. I really hope the article above has helped you understand more about tags and how it is used. Follow the tutorials and see your results! And don’t forget to visit AVADA more regularly to get more help for your Shopify business.
Related Posts:


