
How to Configure Tax Settings in WooCommerce
By Sam Nguyen

Any online business cannot survive without working on taxes. This is to say, configuring tax settings is one of the most important things to do if you want to run your online store, especially WooCommerce stores. By setting up your taxes properly, your business is legal to sell products and services with adhering to your area or country’s legal obligations. Hence, you can avoid unexpected situations involving tax laws, and you could protect your business as well.
If the procedure of calculating tax calculation to follow your country’s legal obligations is becoming complicated or you do not have enough knowledge in implementing this task, go with us on this guide. We will help you have an in-depth into how to configure tax settings in WooCommerce. This quick and straightforward guide will assist you in following in detail the steps to take your WooCommerce store to the next level. Now, let’s get started!
How to configure tax settings in WooCommerce
In this section, you are required to follow every step strictly to better understand how to accomplish this task. Everything will be simple, and no effort is required to do it. Our instructions will be the easiest for you to understand and follow.
Step 1: Enable taxes
In order to configure your tax settings in WooCommerce, the first and foremost thing to do is to enable taxes. In doing so, you will go to the settings tab “General” to enable it.
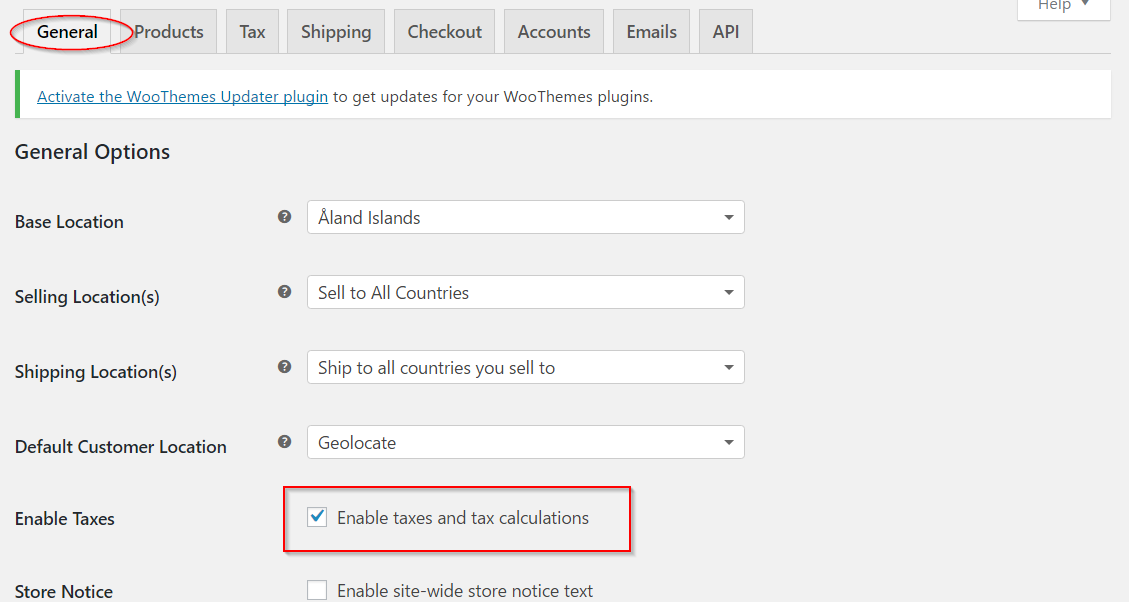
This action aims at creating a different tab for taxes in your WooCommerce settings. So, if you want to approach this tab, you can be able to navigate to the section “WooCommerce” in your dashboard and choose the sub-tab “Settings” before clicking on “Tax”.
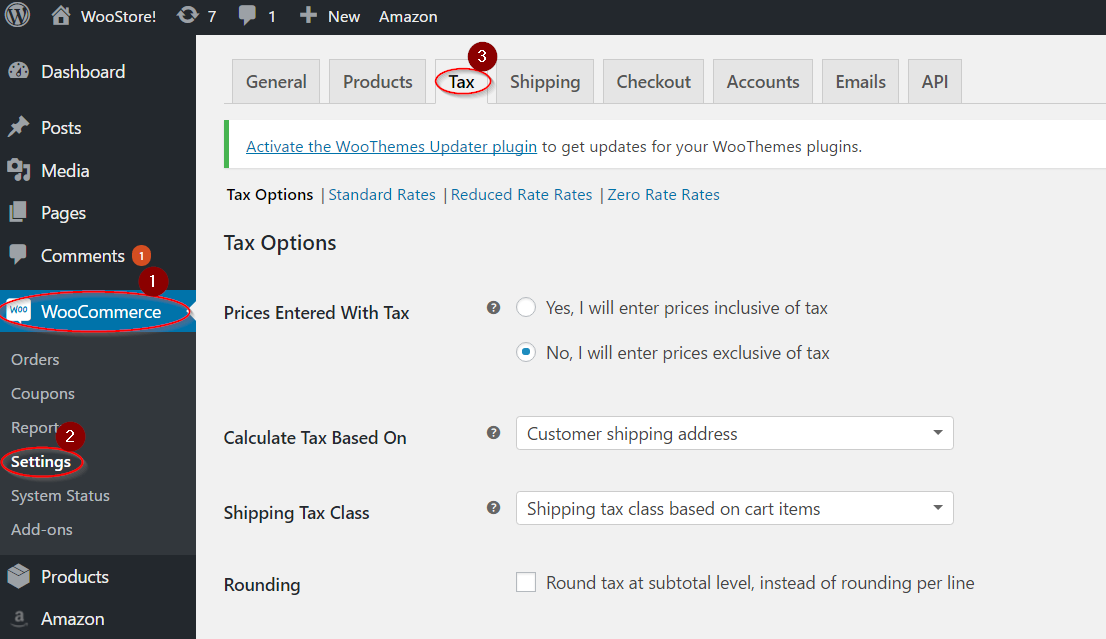
Then you can notice that your tab “Tab” will look like the following screenshot.
Step 2: Work on tax options
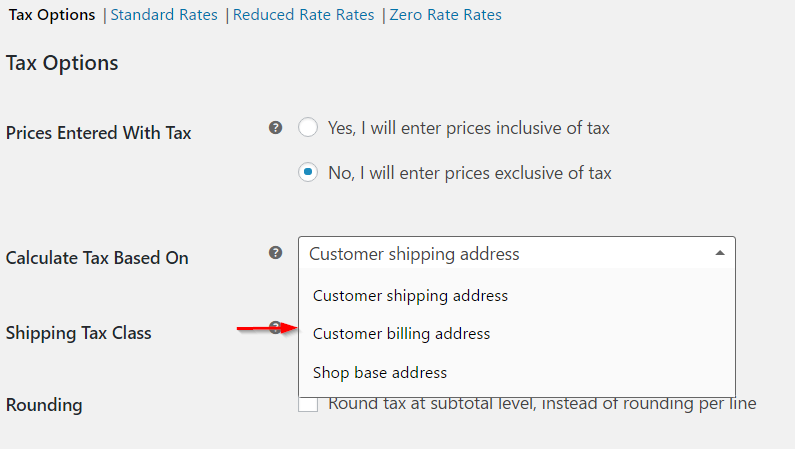
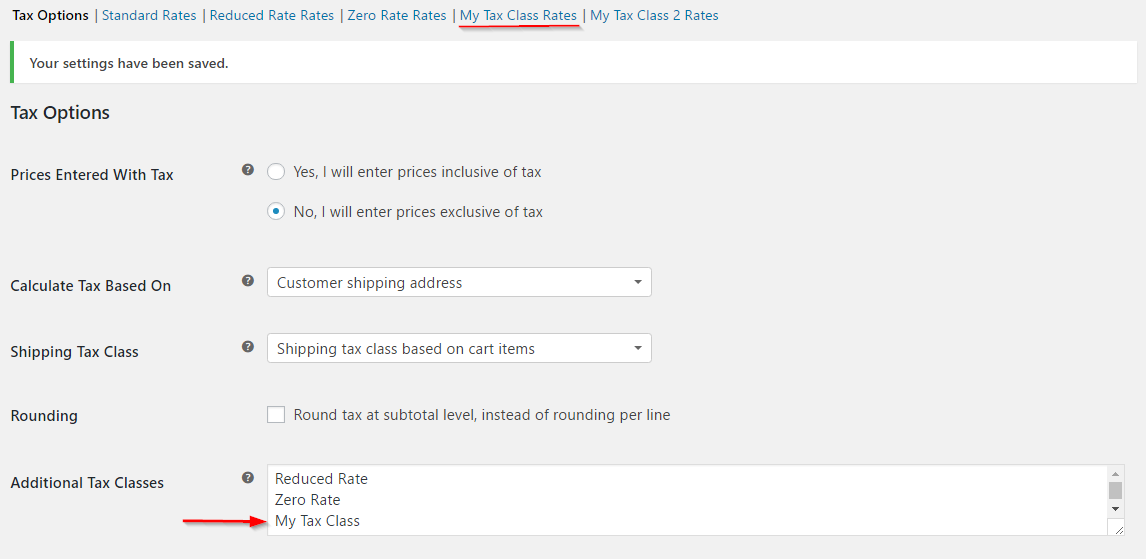
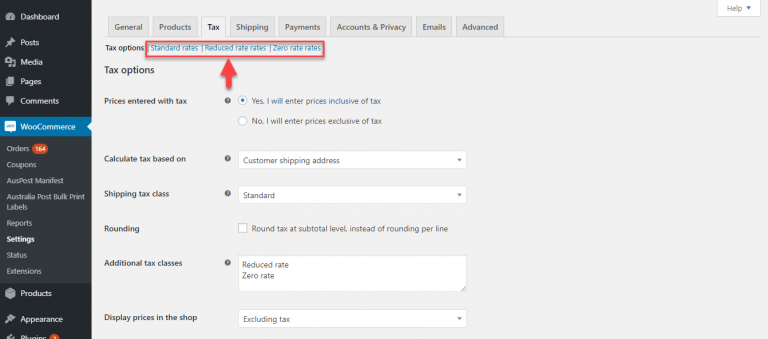
The second step is to work on tax options. To execute this step, the requirement is that you have to make up your mind on how you will input the price for the store’s products and items. There comes with two options in which the radio button will be there, and you could be able to select to keep the exclusive or inclusive prices of tax. In case, your decision is to accompany with the first option, your product prices that are input are about to be exclusive of your tax. In this situation, you are supposed to make a calculation of the tax as the extra price component while checking out.
The second option helps to decide on the location where you will configure your tax settings form. There are three options from your dropdown menu for you to select from. These options are customers’ shipping addresses, customers billing addresses, and shop base addresses. The options will be in the below screenshot.
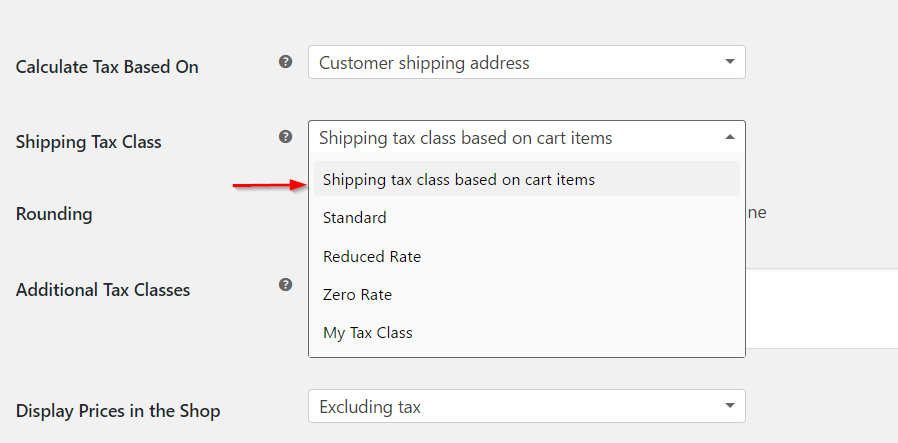
When it comes to shipping tax class, it is a vital section that you should pay much attention to. This kind of setting will determine how you could define the class of shipping tax in your WooCommerce store. In most cases, the shipping tax classes are determined by your cart’s items. This means that when your visitors to your store add one product or item that is influenced by a separate tax rate, then the shipping tax, in this case, is calculated with that similar rate.
What is more, it is possible for you to select the default one where the class for shipping tax will be based on your cart items. If the tax jurisdiction is not allowable for this, you could choose a different tax class. You could also choose a suitable option from your dropdown menu. In case you have set up a customizable tax class already, you could also notice this among the options in your dropdown menu.
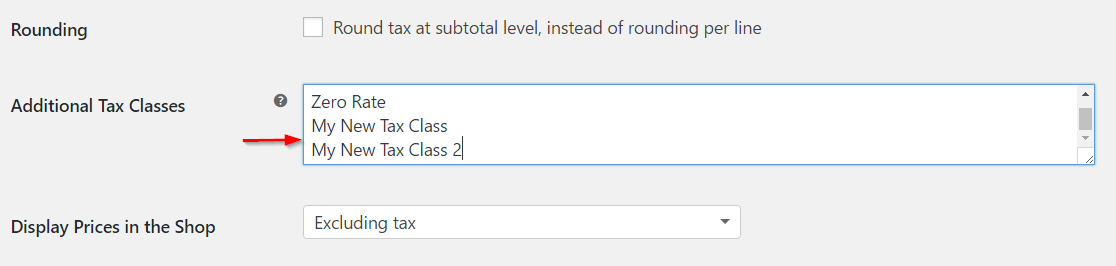
There exists one checkbox where the cart’s tax rounding will be determined. You could also tick that checkbox in case you are fond of rounding your tax at the sub-total level instead of the default one for each line option.
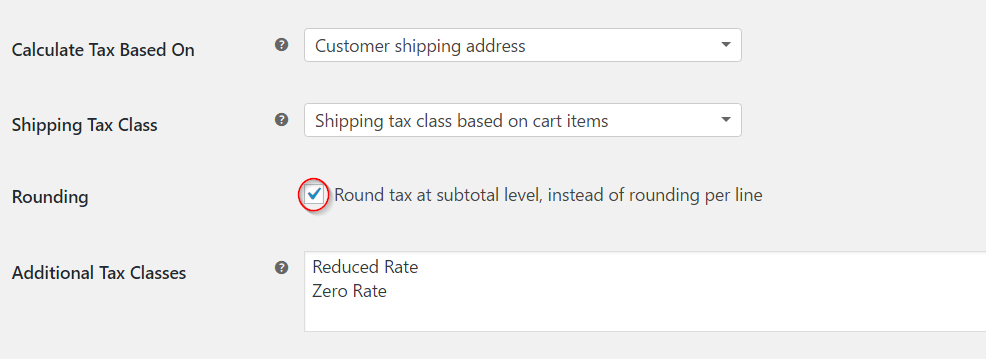
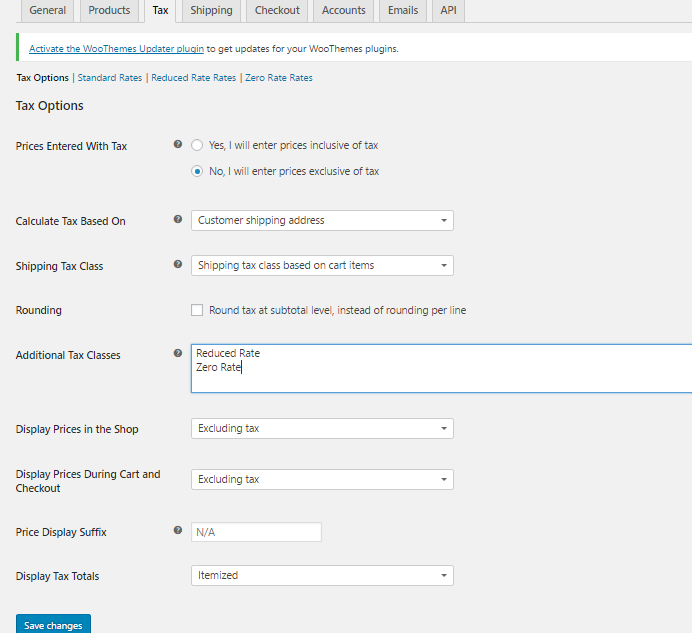
Moreover, it is possible for you to create extra classes for tax based on the tax requirements. Besides the default option called Standard Rate, the two extra classes for the tax that WooCommerce offers are “Zero Rate” and “Reduced Rate”.
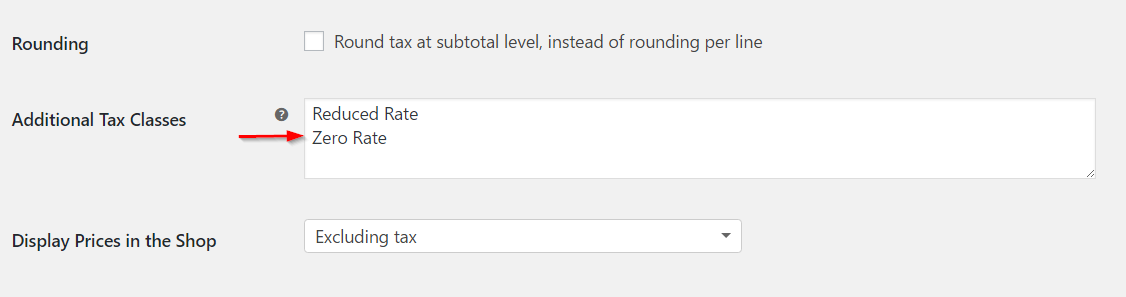
If you are keen on creating a brand-new tax class, it is time to fill in the names for each line in the below text field.
After you are done creating as well as saving the created tax classes, they can be exhibited as the tab at the beginning of your screen.
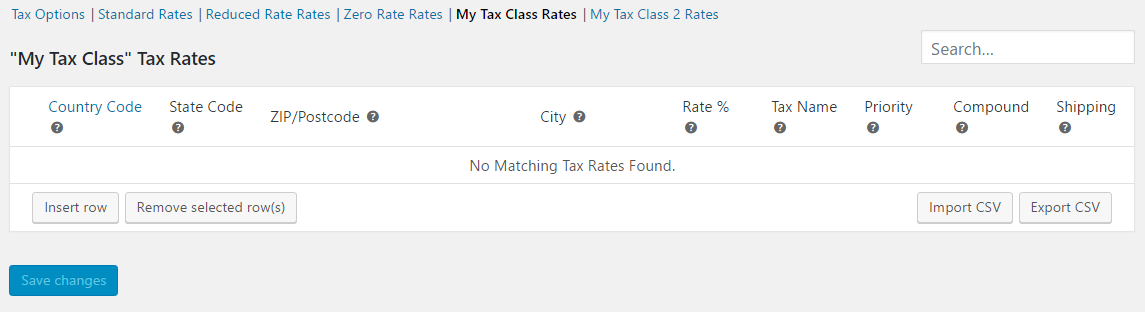
Furthermore, you can also get an opportunity to set up the tax rate for the tax class that you have created above. You need to do in this section to click the name, then enter all the necessary data. In myriad setups, the shipment tax classes will be inherited from which item or product is delivered. For example, when a lessened rate item like baby clothes is shipped, the reduced rate will apply.
In terms of displaying prices in your store, there come two different settings in which you could make up your mind on if prices can be displayed exclusively or inclusive of tax. And they can be displayed on the store’s front-end. They will be “Display prices in the Shop”, coupled with “Display price during cart & checkout”. The option of displaying prices in your store will determine how the price will be exhibited in your catalog/store. When you are here, your task is to hit on “Excluding tax” or “Including tax” in accordance with your preference.
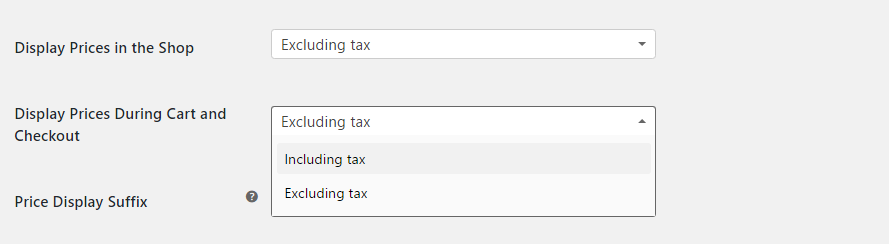
By choosing “Prices Display Suffix”, you can display one short text right after your product prices. This is something such as Inclusive or exclusive of VAT. Moreover, you are also capable of alternating the display of your product price as inclusive or exclusive of tax with the use of one of the two ways: {price_excluding_tax} or {price_including _tax}.
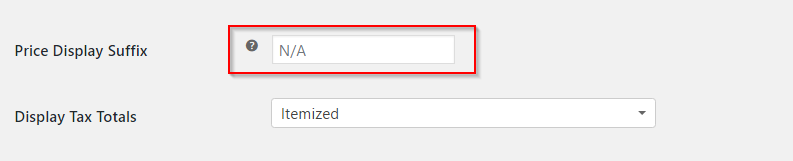
Finally, you could also be able to set how you can display the total tax during checkout. To be more specific, you can choose to display various taxes that are clubbed altogether, or each tax will be listed as one separate item. In this situation, you could select “Itemized” or “As a single total” from your dropdown menu.
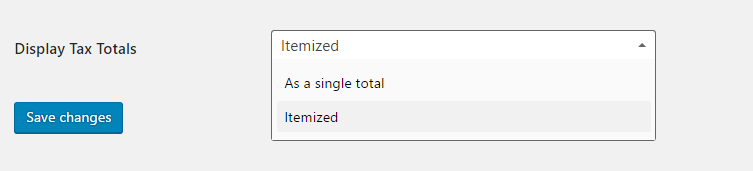
After you have finished updating your settings, remember to hit on the button “Save changes”.
An important bonus point involves general knowledge that you need to have when it comes to tax calculations. To help you understand deeper, follow us with some more steps in this part and you will be equipped with how to do it effortlessly.
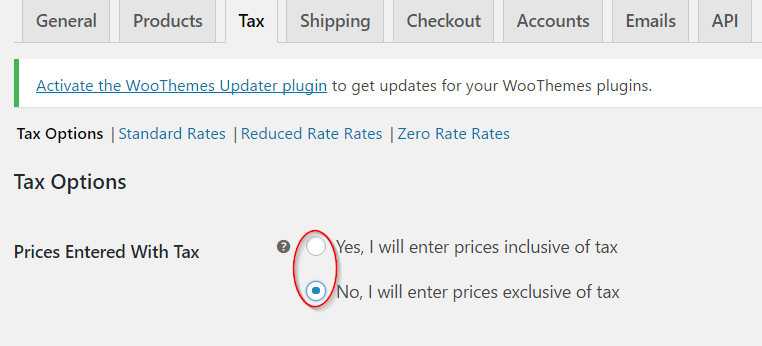
- Prices that are entered with taxes
As you could notice, this option seems to be the top priority when it comes to controlling the tax in your WooCommerce store. The reason is that it will determine how you can input the prices for your product later on. The option “Yes, I’ll enter price inclusive of tax” indicates that every catalog price will be input with the use of the based tax rate in your store. Let us cite an example to help you have an overview. In the United Kingdom, you will input the prices for your products as inclusive of a 20 percent tax rate. You then fill in the price for your product of £9.99. This will include £1.67 tax. Then one consumer in this country will pay the amount of £9.99 as confirmed, and another consumer in America will have to pay only £8.32.
On the other hand, the option “No, I’ll enter the price exclusive of tax” refers to the catalog prices that are needed to be exclusive of tax. With the above example, a shop in the UK needs to fill in 8.32 regarding the product’s price. Then, 20% will be the tax to be applied during checkout and the payable amount will be £9.99.
You can follow the calculation of tax for your tax-inclusive price as the following: Tax amount = price – (price/ ((tax rate %/100) + 1)).
And the calculation of tax for your tax-exclusive price will be: Tax amount = price * (tax rate % /100).
Step 3: Set up tax rates
The second step helps you configure general options of tax. Now, it is time to set up the tax rates for your WooCommerce store.
As you may know, every separate tax rate you are going to install is visible, like the separate tabs on the screen below. You can navigate to one of your rates in order to build different tables. Let us take an example for you to understand. When you hit on the rate Standard, you could be able to encounter the separate tax rates that have been installed in myriad rows. Here, you could even add or get rid of rows if you need.
Now, let’s check how you could be able to set up the brand-new tax rate. In doing so, you must hit on the button “Insert Row” for getting started.
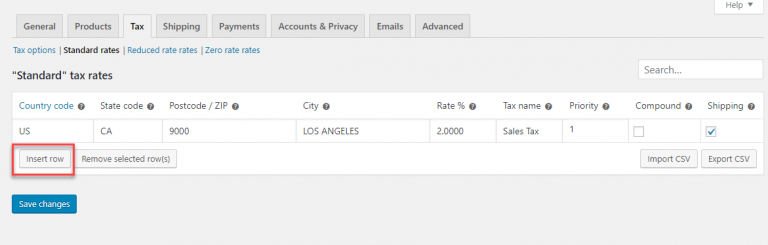
In this case, you can notice an extra row where you could define your tax rate. And you could begin filling in the necessary information with the below-detailed explanation.
- Country code
When it comes to the country code, the requirement is that you need to specify your country code with 2 digits. In case you do not fancy specifying one single country, it is possible for you to leave this section blank.
- State code
State code bears a resemblance to the above-said country code. You are also required to fill in a two-digit state code in the appliable area. In case you also do not fancy specifying this single state, you could leave this section blank like the country code section.
- Post/Zipcode
The field Post or Zipcode is where you need to enter your tax region. In entering the zip codes for one region, you can apply some simple ways. If you fill in myriad zip codes, you can separate each of them with one semicolon. This section also lets numeric ranges as well as wildcards for the postcodes.
To be more specific, you could add the value of “90*” with a view to applying rates of tax to every zip code that starts with 90. Likewise, you could also come with a range such as 90001…..900009 to apply the rate of tax to every zip code that comes within this range.
- City
In terms of the city field, you should specify the cities or cities in which your tax rate will be applicable. Moreover, you can also choose myriad cities that will be separated with the use of a semicolon. Like the above fields, you could leave this section blank as well if you want to apply your tax rate to every city under a state or a country.
- Rate
This field will be where you could specify the tax rate for the applicable tax within four decimal places. For instance, if you are keen on setting up a 10% tax rate, you have to fill in 10.0000 or with a 12.5% tax rate, 12.5000 is what you need to enter in this field.
- Name
It is possible for store owners to enter one name for their tax rate. You could name it VAT, Sales Tax, and so on.
- Priority
Configuring the tax rates also allows you to select a priority as regards this tax rate. In this section, you are supposed to specify only the matching tax rate as per priority. In case you are working on various rates of tax for a similar area, you then need to install a separate priority for every rate.
- Compound taxes
If you prefer the rate that you’re specifying to be applicable with priority compared to other tax rates, you should choose this checkbox. For example, when you have one extra tax on the particular jurisdiction together with your conventional sales tax. Then, this option for compound tax will determine if this extra charge will be calculated depending on the price for the product alone or containing the price for the product along with conventional sales tax.
- Shipping
In case you want this rate to be applied to the shipment charges, the thing is that this checkbox should be chosen as well. If this has been checked, then the rate can be applied to the price of your products as well as the shipment charges. In case of being unchecked, then the rate can be calculated depending on the price of your product alone.
After you are done entering every required value in every field, you could save what you have made recent changes for your tax rates to be applicable for consumers from the region that is specified.
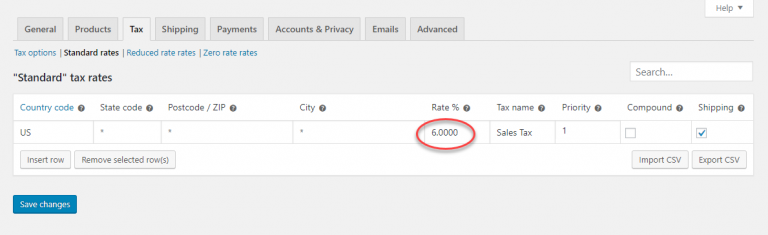
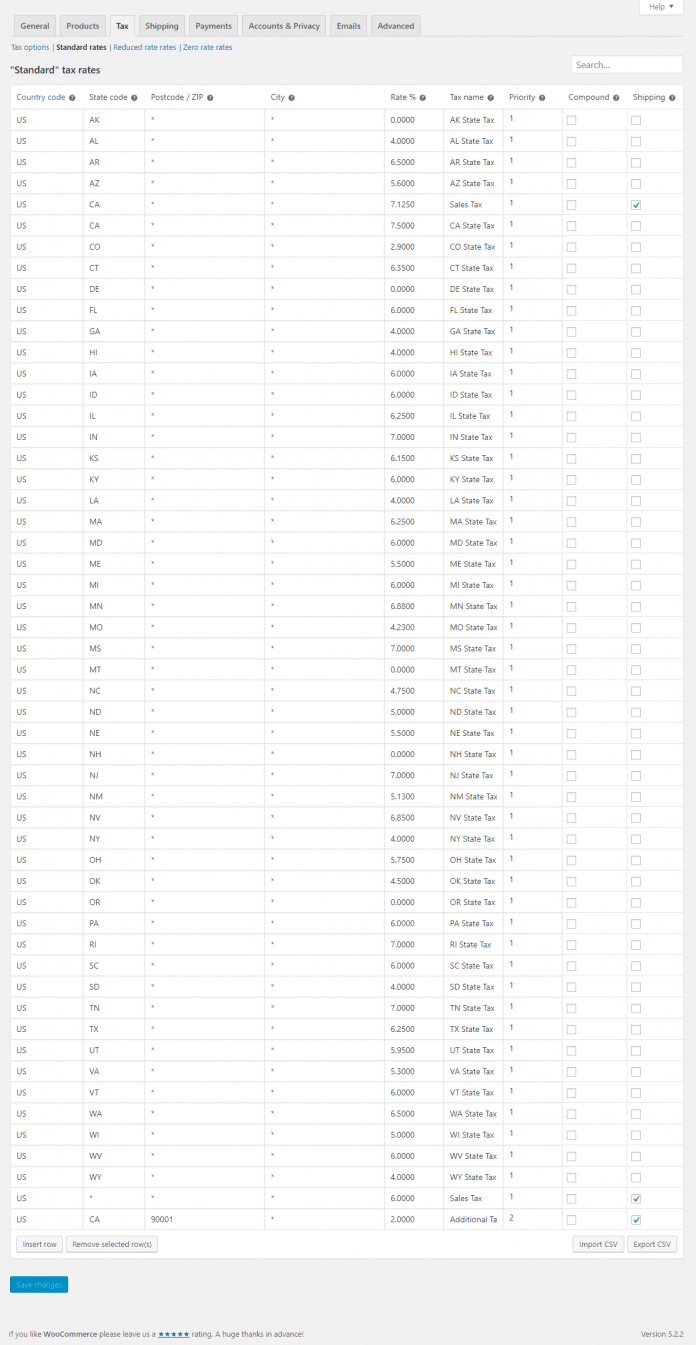
To help you have an in-depth into how this works. Here is a real-world example for you. Let’s assume that a WooCommerce store needs to install separate tax rates for his/her consumers from many different regions. When you are fond of charging a 6% tax rate across America, then it is possible for you to set your tax rate like the below screenshot.
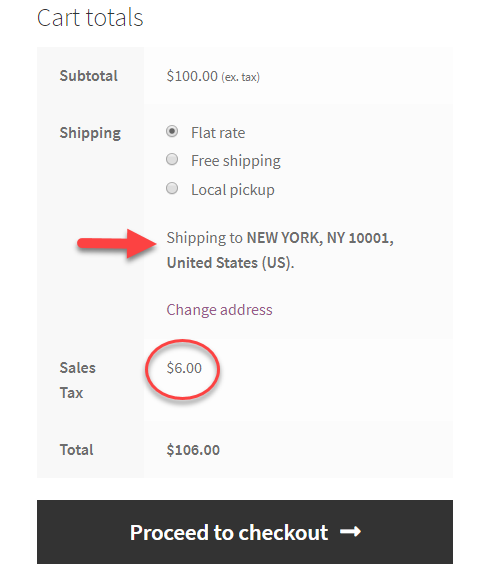
As you could notice on your cart page, in case you enter an address in the US, this kind of rate will be applied.
Now, let’s see how we set another charge for a state. Let’s say, you prefer to set up a 7.125% rate of tax for California, then you should set this as “Priority 1”.
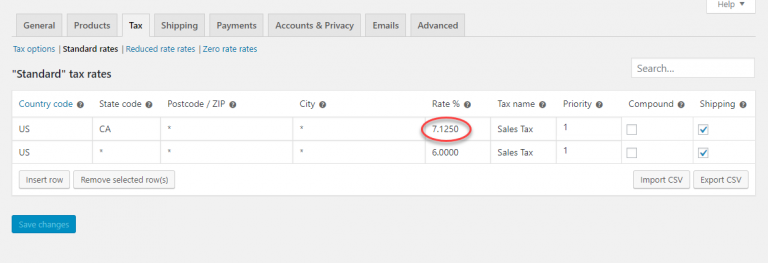
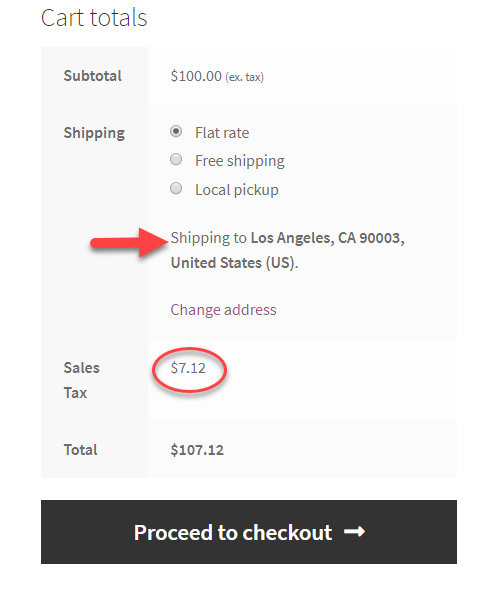
Every address in California has a sales tax rate of 7.125% while common America has this of 6%. In case one customer is about to fill in California as the address, this tax rate can be applied rather than the 6% rate applied for the US. Your customers could check it on the page Cart.
Another example is that sometimes you fancy setting up one extra rate for a zipcode or city only. And here is how you could keep this in control. It is advised to set one extra tax rate of two percent for the 90001 zip code, then set this as “Priority 2”.
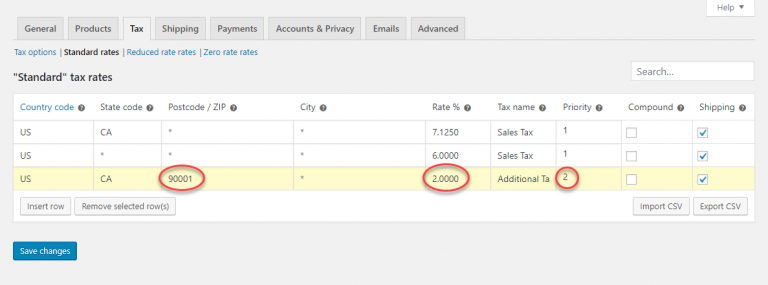
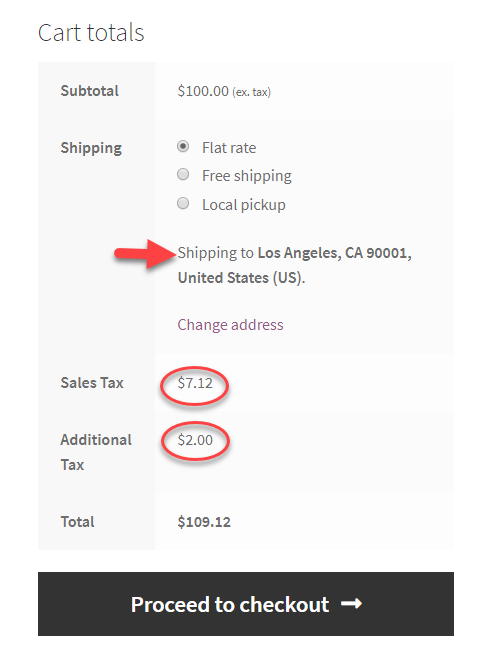
In case your customers try to check out when filling in this kind of zip code, then the extra tax of 2% can be applied together with your sales rate of tax for California (7.125%).
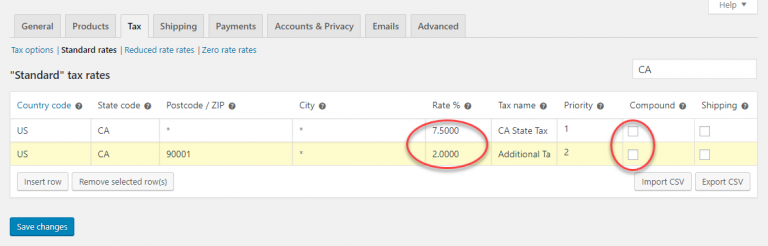
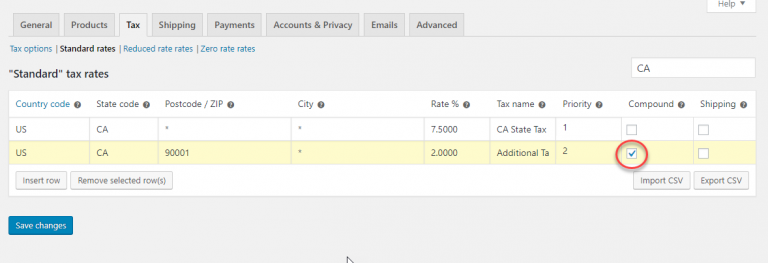
One more example will be taken to help you understand how complicated the tax will be charged. When it comes to the 90001-zip code, there will be two different applicable taxes. The conventional state tax in California, coupled with an extra 2% tax. The first and foremost thing you need to do now is to untick the below compound checkbox.
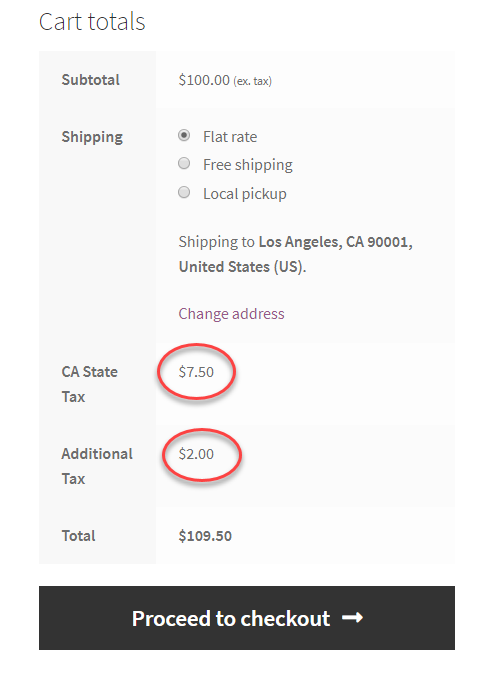
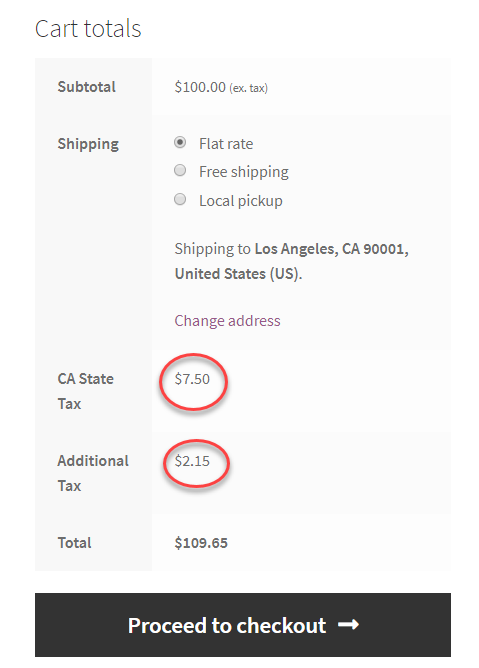
Then, let’s take a look at your Cart page, you could see that both taxes are individually applied, depending on the cost of that product. 7.5% sales taxes of $100 will be $7.5 and 2% additional tax of $100 will be $2.
So, what happens if you keep the compound field checked for your extra tax. It will be indicated in the below screen.
The extra tax will be charged based on your compound rate by calculating state tax plus the product price ($100 plus $7.5) rather than only $100. Therefore, the taxes in this situation will be calculated as: State tax will be $7.5 (7.5 % of $100) and the additional tax will be $2.15 (2 % of 107.5).
- Shipping tax
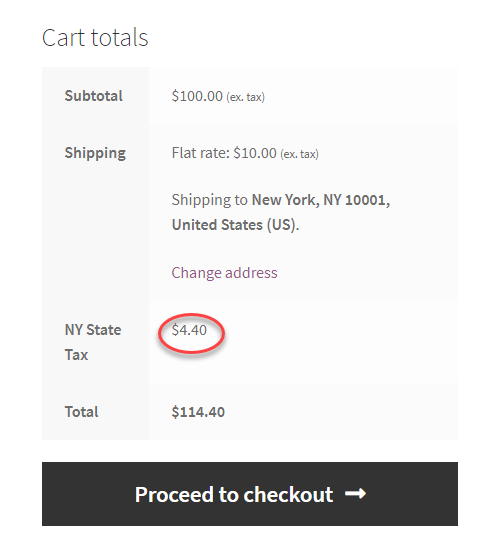
Do you wonder how the shipment tax will be calculated and applied? Follow us on another real-world example with setting up the state tax in New York without the tax that is applied on shipment.
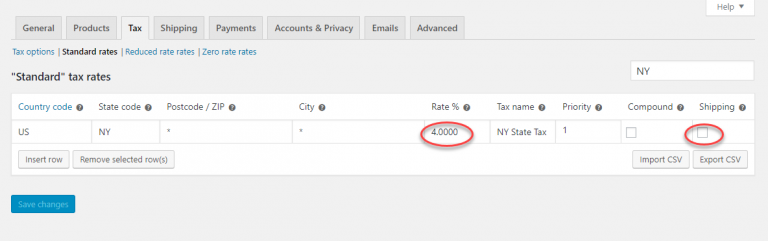
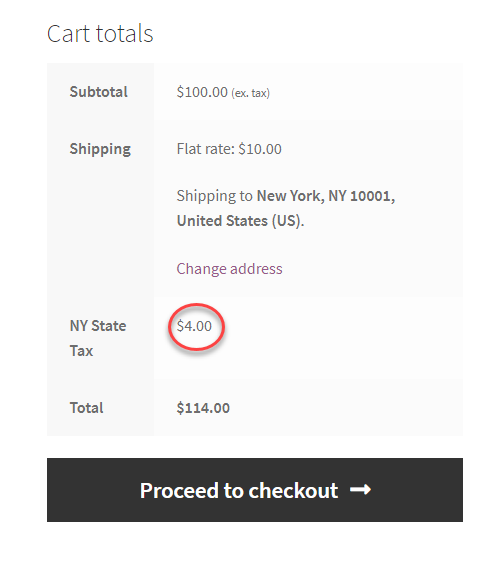
In case one consumer in New York buys one product or item and adds it to his/her cart, the tax will be applicable only with the price of that product or item ($100) while inapplicable on the shipment cost ($10). This means that the tax accounts for only $4, which is calculated by 4 % of $100.
Now, what you have to perform in this section is to tick the below checkbox for applying the tax on shipment.

On your cart, you can notice the rate being changed accordingly.
Step 4: Further configuration
In the above step, you have understood how to work out tax options as well as tax rates. However, the configuration of tax setups does not stop there. There are several things you should keep in mind in order to be good at your store’s tax setup. Keep scrolling down and you will find the following things helpful.
- Export and import tax rates
Do you know that you can import and export the tax rates by using the CSV file? In implementing this tax rate within your WooCommerce store, you only need to press the button “Import CSV”, then specify your file path and name.
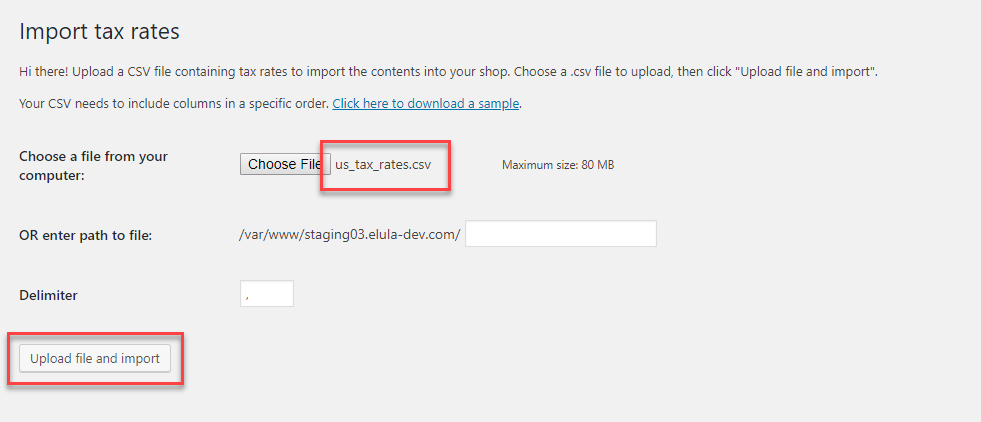
After that, the rates of tax in that CSV file would be uploaded. In case you need to apply various tax rates, a greater option is to import tax rates.
- Delete tax rates
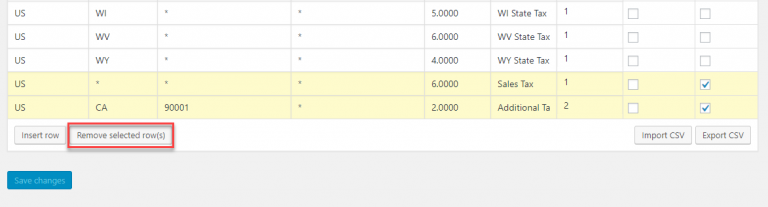
There are several times you want to remove a particular tax rate from your WooCommerce store. You might be confused a bit about how to do it exactly because you have multiple tax rates already specified within your online store. Do not worry! You can set up the tax rates, but you could also delete them as well. It is super simple to accomplish this task.
In deleting any tax rate, your task is to head to that tax rate to select the rows you are about to delete. For example, the rows to be deleted will be highlighted below. You will then hit the button “Remove Selected Rows” to delete chosen tax rates.
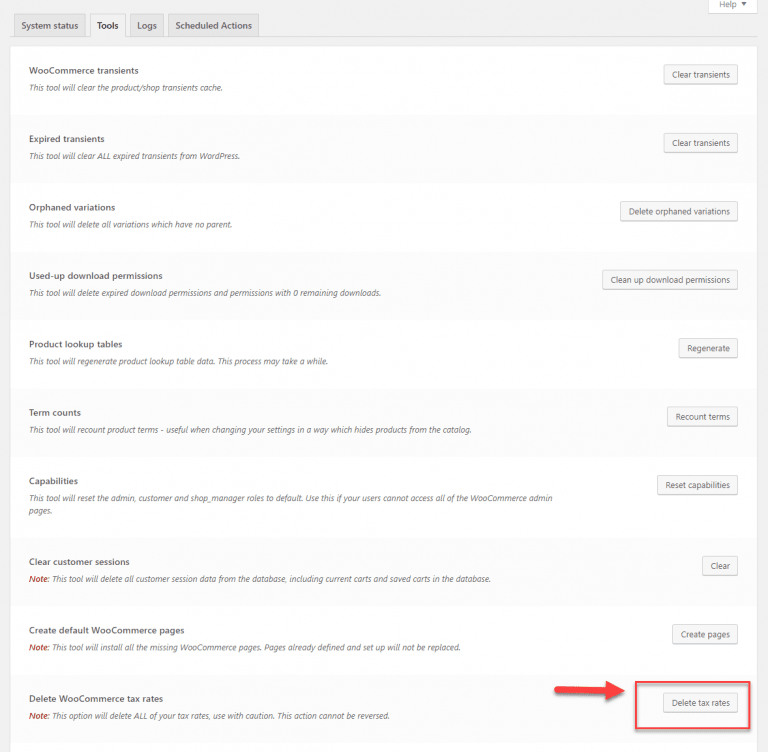
What is more, it is also possible for you to get rid of all tax rates with just one click. To do this, you will need to head to your “WooCommerce” where the section “Status” will be chosen, then hit on “Tools”. Next, you will proceed to the field “Delete tax rate”. In this section, you can delete all the tax rates.
- View the tax reports
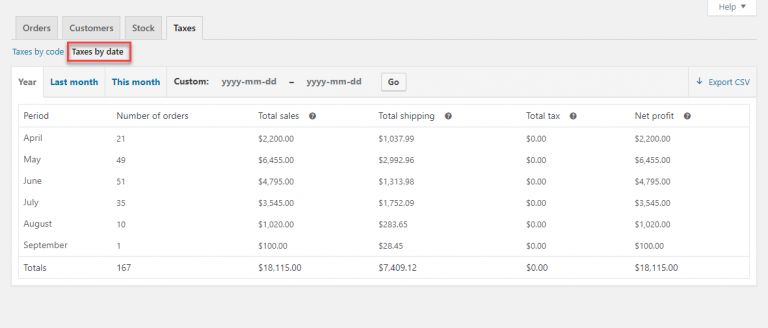
Do you want to view your tax reports? It is obvious that tax reports will give you an overview of everything relevant to your taxes. So, by viewing the tax reports, you can study their actual situation. You could view this kind of report by code or by date. In case, you are keen on viewing this report by date, you need to head to “WooCommerce”, click on “Reports”, then “Taxes” before choosing “Taxes by date”. This activity assists you in viewing the tax reports determined by a chosen timeline.
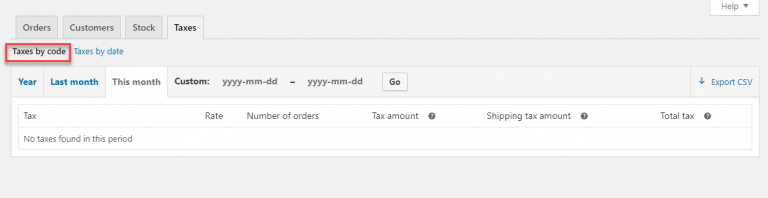
Moreover, it is also possible for you to view your report on other tax types that you’re charging. This means that you will view tax reports by code.
There is nothing quite like customizing some more interesting options with setting up your taxes depending on specific parameters.
- Apply the taxes based on order subtotal
It is possible for you to apply the particular tax rate based on your order subtotal. In this case, a code snippet will be used for accomplishing the task. With this code, you are capable of specifying which kind of tax rate you are going to apply when this order subtotal will be under $100 or equal to $100. The good news is that you could be able to modify the amount and the tax rate according to the specific requirement of your store.
add_filter( 'woocommerce_product_tax_class', 'big_apple_get_tax_class', 1, 2 );
function big_apple_get_tax_class( $tax_class, $product ) {
if ( WC()->cart->subtotal <= 100 )
$tax_class = 'Special Tax Rate';
return $tax_class;
}
- Apply the taxes based on the role of the user
This activity also requires you to work with the code snippet. For example, if you want the tax rates for the role of user “Customer” to be applicable, the below code is a perfect one. Likewise, you could also apply a certain rate for specific user roles in your WooCommerce store. Especially, you could also change user roles, coupled with tax rates as per the requirement of your store.
<?php
/**
* Apply a different tax rate based on the user role.
*/
function wc_diff_rate_for_user( $tax_class, $product ) {
if ( is_user_logged_in() && current_user_can( 'customer' ) ) {
$tax_class = 'Special Tax Rate';
}
return $tax_class;
}
add_filter( 'woocommerce_product_tax_class', 'wc_diff_rate_for_user', 1, 2 );
The bonus point is that for various WooCommerce store owners, determining the real-world tax amount that is collected has become a worrying problem. It is quite complicated for online merchants because consumers in any online transaction could come from every corner of the world. There is no denying that overseas governments are taking multiple initiatives intending to collect taxes based on customers’ locations. So, you are highly recommended to acquire more knowledge involving applicable taxes as well as collecting tax accordingly could become an exhausting matter for any eCommerce store owners.
In the US, some states with economic thresholds require merchants in any eCommerce platform with transactions annually above a specific value, to pay as well as collect sales tax. Particularly, in some states, SaaS-based products are applied taxes as well. How about Canada? You might know that Quebec also has the economic threshold to mandate eCommerce merchants to pay state tax in case their online businesses exceed a specific amount. When it comes to European Union countries, eCommerce merchants who want to sell their products to European Union countries are required to collect applicable VAT to a certain country. With each invoice generated for every European Union citizen, you need to collect, apply, as well as remit the tax applied.
If you have customers living in India, every digital transaction to these Indian consumers will be bound by GST 18%. In India, there does not exist an economic threshold. And in order to sell to customers in this country, you are required to register, coupled with collect GST. Nevertheless, this does not apply to B2B transactions because its tax compliance will bind the buyers. If it is Japan where you sell products and items, you should bear in mind that this country has the annual economic threshold for eCommerce merchants in order to collect sales taxes. Hence, if you want to sell there, you should also collect taxes too.
Top 3 plugins to configure tax settings in WooCommerce
When it comes to using plugins for customizing any activity and function in WooCommerce, it is always one of the smartest and quickest solutions of all time. Plugins have brought about multiple benefits to help store owners improve the performance of their online stores. And it makes no exception to configuring tax settings in WooCommerce. For most eCommerce store owners, determining the tax amount that is exactly collected is always a headache. But with plugins, they can now handle everything easily and effortlessly. However, among tons of plugins out there, you might feel a bit confused to figure out which the best one for your store is. Follow us in this part and we will offer you a list of the top three cherry-picked plugins to configure tax settings in WooCommerce.
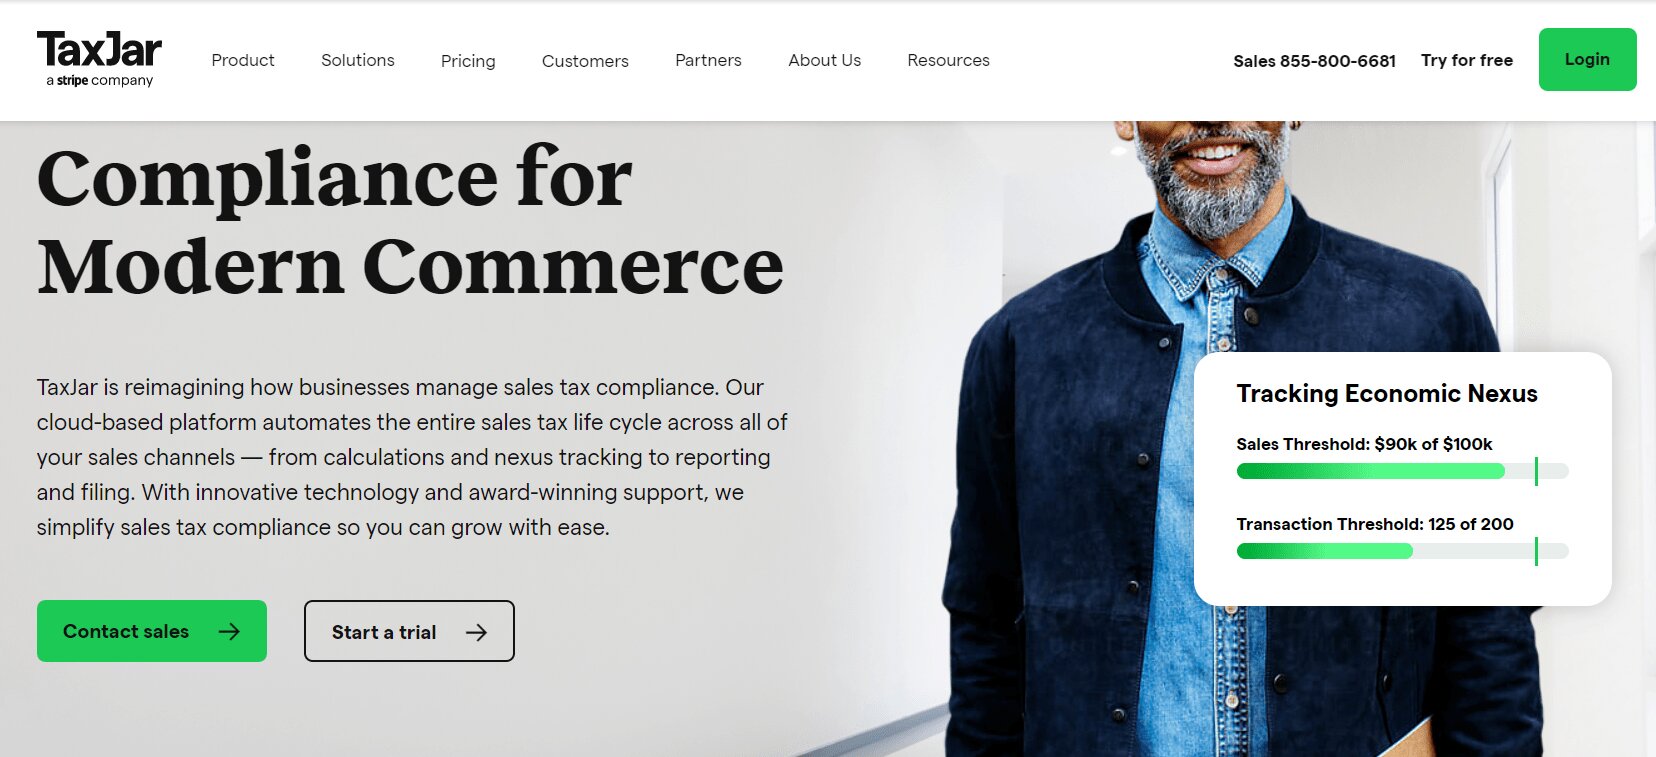
1. TaxJar
The first well-known plugin in this field is TaxJar. It has a reputation for being a powerful tool for helping you automate the calculation of sales tax. What is more, the plugin does a perfect task in providing store owners with the features for filing and reporting. It even integrates with your stores effortlessly. Then, you could be able to connect this plugin to your cart in WooCommerce or some selling channels, including marketplaces. It also comes with the reports for finishing your returns fast and effectively. In case you wish to file your returns automatically, it will be a helping hand. With the help of TaxJar, the entire life cycle of sales tax will be automated, thus the compliance of sales tax can be simplified to help your business develop with ease.
Main features
-
Minimize the risk of missed deadlines and errors involving taxes
-
Assist store owners in selling across channels with minimum effort
-
Calculate exact sales taxes instantly at checkout with the use of up-to-date rates as well as address validation
-
Help to get up-to-date and detailed reports on sales tax and sales due or collected by jurisdiction or state
-
Save your time as well as lessen errors by submitting returns, coupled with remittance automatically to every jurisdiction
Pricing: Start at $19 each month
2. Quaderno
The second not-to-be-missed plugin to help you handle tax easily is Quaderno. It will assist you in connecting your store, shopping cart, and payment gateway easily, thereby managing tax-related aspects efficiently. Quaderno works great to automatically calculate the required sales tax for every customer as they are making an order in your WooCommerce store. What is more, there is nothing quite like monitoring tax compliance, thereby giving you alerts if you exceed the tax threshold. And you could be able to approach simple reports to make the tax filing easier. Now, Quaderno is here and handles everything at your fingertips.

Main features
-
Avoid wasting time on handling taxes, thus taking back management of your online store
-
Be able to integrate with your favorite platform, payment processor, and shopping cart harmoniously
-
Offer the secure APIs for accessing sales data to automate the process of sales tax within seconds
-
Come with bulletproof security to help customers feel confident when buying in your shop
-
Automate the accurate calculation of tax based on sale type as well as the location
Pricing: Start at $49 each month
3. Taxify
The third recommended plugin for configuring tax settings in your WooCommerce store is Taxify. A plugin is an ideal tool for calculating hassle-free tax. Even regular tax rule changes can not bother this great plugin. Do not worry anymore if you are afraid of the complexity of tax compliance. Taxify is here to assist you in updating regular rule changes timely. You could also be able to approach the automatic calculation of the tax and returns in more than 14000 tax jurisdictions. So, do not hesitate to have a companion with it to get rid of the burden of adhering to increasingly complex tax obligations.

Main features
-
Save time, resources, and money in dealing with complicated tax obligations
-
Provide store owners with award-winning software to offer a great and comprehensive solution
-
Handle sales tax complications for not only medium but also small-sized businesses
-
Enhance the operational effectiveness by stopping wasting time, thus helping you concentrate on your business-critical responsibilities
Pricing: Start at $47 each month
Conclusion
In short, the tax settings within WooCommerce have not complicated themselves. The complexity lies in tax rule compliance for various jurisdictions. This has caused a lot of confusion for myriad WooCommerce store owners. This is to say, in case you’re selling your products or items to other locations across the world, configuring tax settings will be prioritized. There is nothing difficult in accomplishing this task just by following the above steps. Then you can do it yourself successfully. Hope you find it helpful and stay tuned for our pro eCommerce cherry-picked tips in the future.


