
How To Configure W3 Total Cache With WooCommerce Store
By Sam Nguyen

Users frequently comment on how quickly our site loads. Everyone wants to know the trick to a quick-loading WordPress site. If you’re going to speed up your website, one of the first things you should do is install a caching plugin. W3 Total Cache is one of the best plugins for this purpose. While WordPress users widely use the plugin, navigating the settings (15+ choices in General Settings alone) might be intimidating for newcomers. However, if done correctly, it can improve site performance.
Today’s tutorial will show you how to configure W3 Total Cache with the WooCommerce store. We’ll also teach you how to use W3 Total Cache in conjunction with a CDN provider to make your site load even quicker. Most bloggers utilize WooCommerce for a narrow piece of their website and consider caching the bulk of their website with W3 Total Cache. W3TC’s settings specificity makes it a perfect plugin for expert users and developers that desire complete control over their online stores. So, let’s dive in!
What is W3 Total Cache?
W3 Total Cache is the most powerful and comprehensive WordPress quality improvement measures plugin. Many renowned websites, like AT&T, Mashable, Smashing Magazine, WPBeginner, and millions more, have trusted it. W3 Total Cache enhances your site’s user experience by boosting server speed, caching every component of your site, shortening download times, and offering transparent content delivery network (CDN) integration.
W3 Total Cache (W3TC) enhances your site’s SEO and user experience by improving website speed and decreasing load times via the usage of technologies such as content delivery network (CDN) integration and the most current best practices. For over a decade, millions of publishers, web developers, and web hosts have relied on W3TC as the only web host agnostic Web Performance Optimization (WPO) framework for WordPress. It is the all-in-one solution for boosting your WooCommerce website’s performance.
How to configure W3 Total Cache with WooCommerce store
Step 1: Install W3 Total Cache
Before installing W3 Total Cache, delete any other caching plugins. If you do not do this before installing the plugin, it will have problems when activated. Navigate to your WordPress admin panel and select Plugins > Add New. If you search for “W3 Total Cache,” you should see results similar to the one below:
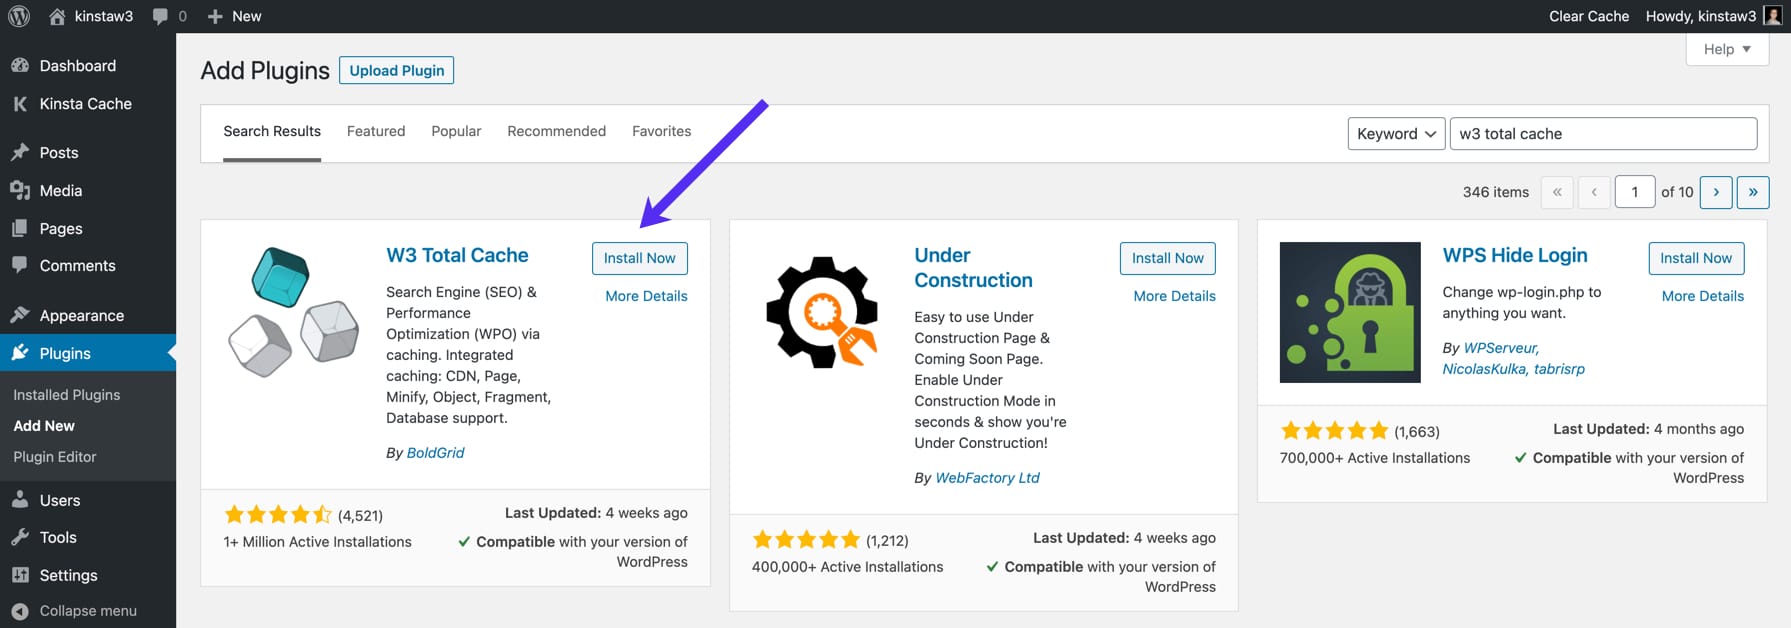
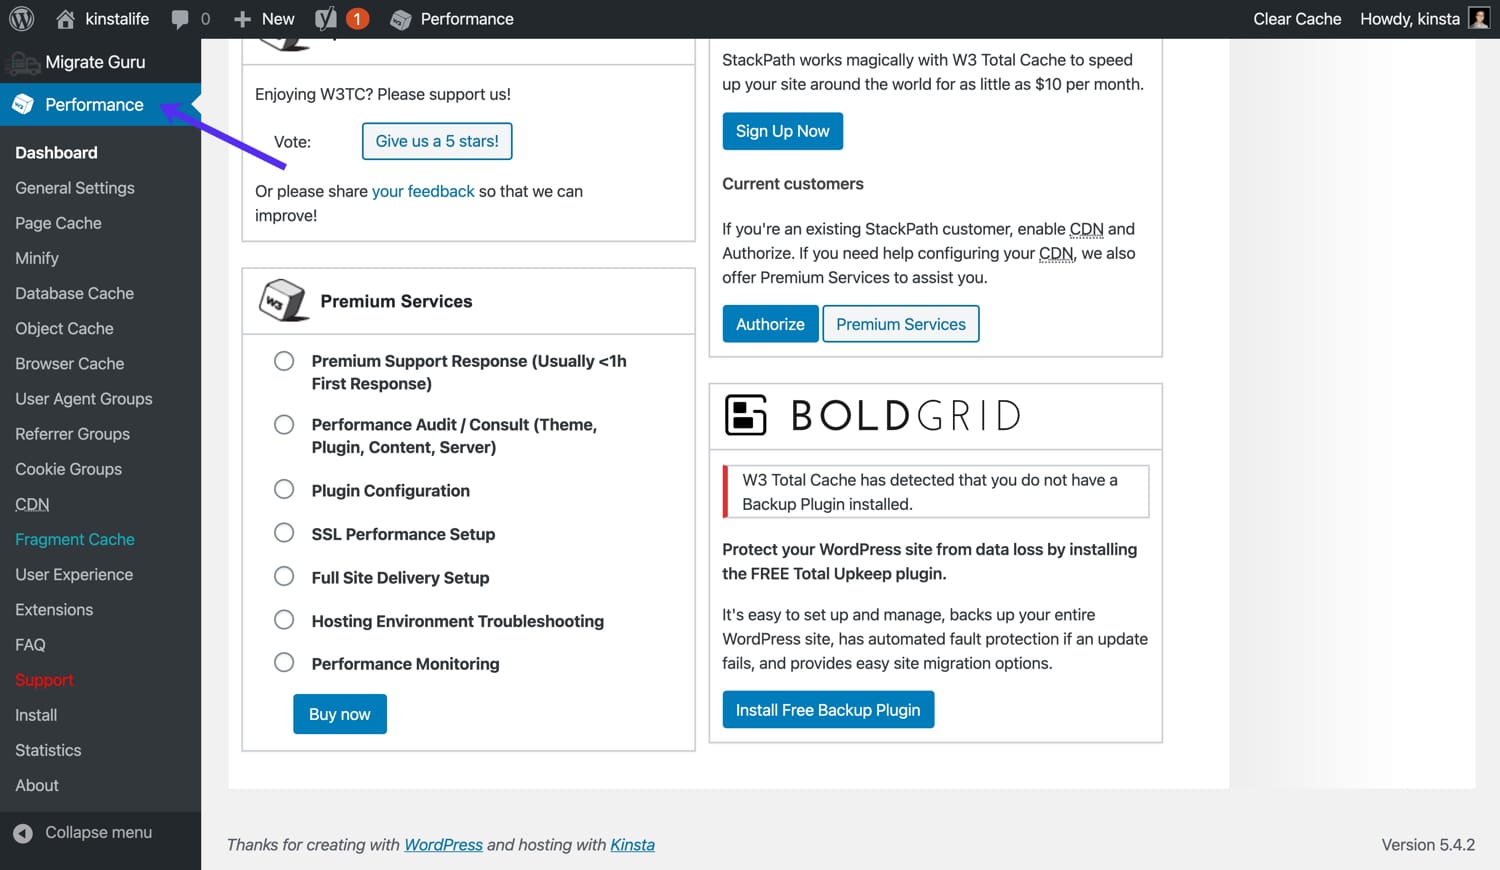
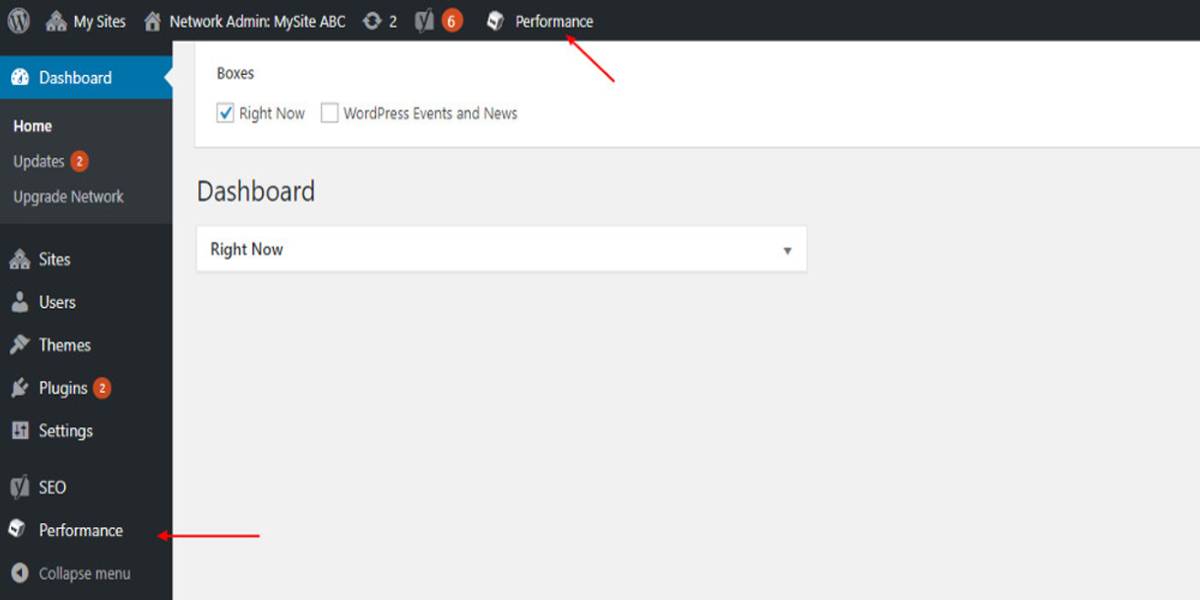
Install the plugin by clicking the Install Now button and then activating it. After activating W3 Total Cache, a “Performance” tab will appear in the sidebar of your WordPress admin panel. By selecting the “Performance” option, you’ll have access to several submenus, including “General Settings,” “Page Cache,” “Minify,” and others.
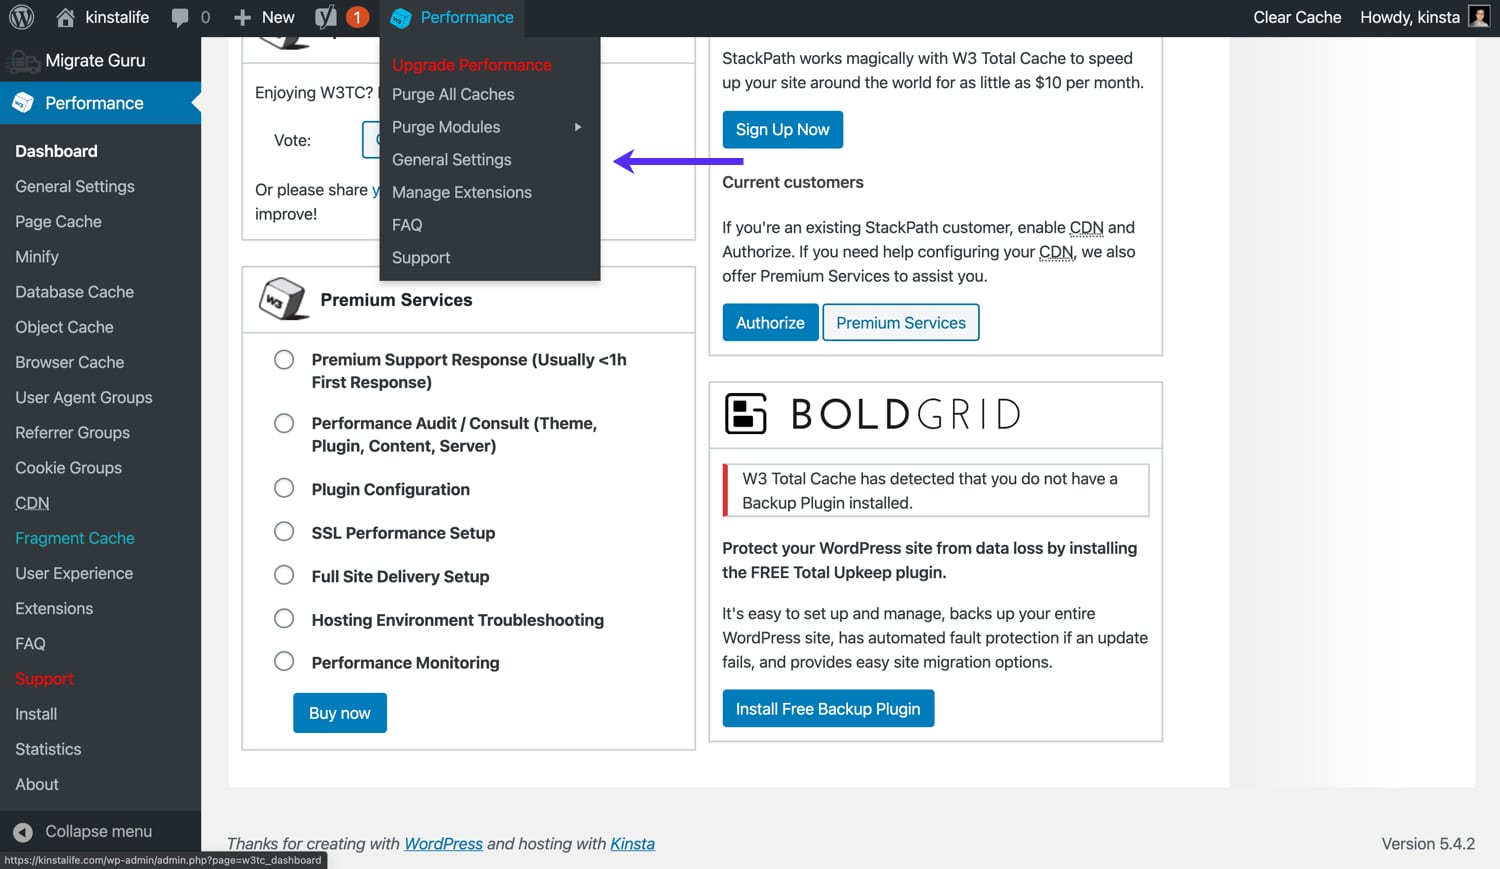
W3 Total Cache settings may also be accessed via your WordPress admin toolbar’s “Performance” option.
Step 2: Purge W3 Total Cache
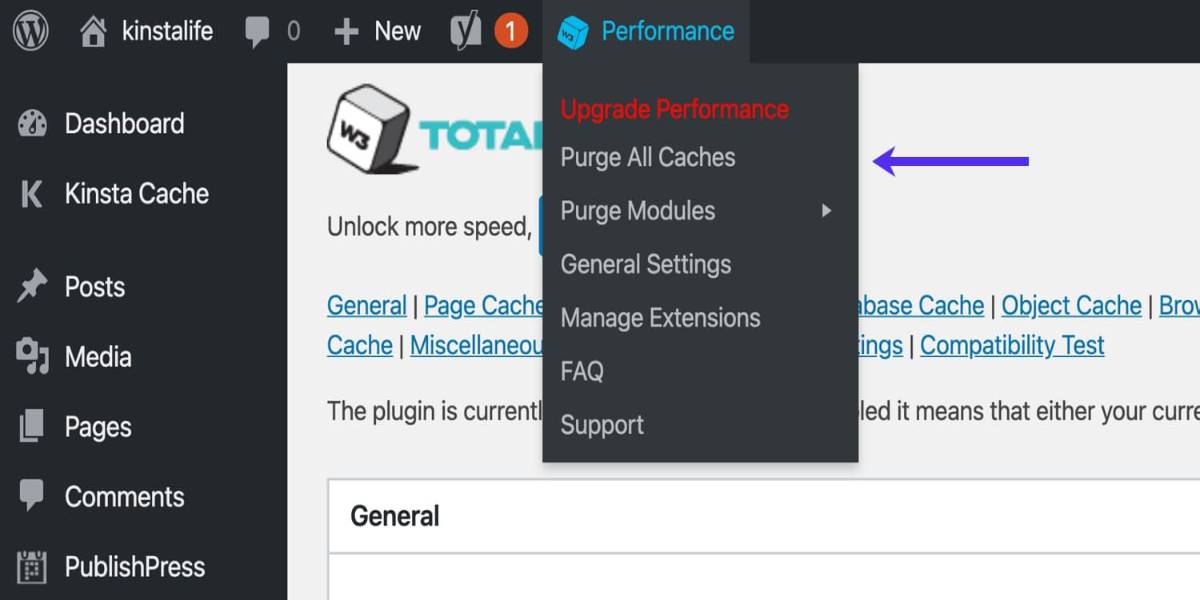
Before we get into configuring W3 Total Cache, let’s go through how to purge or remove your cache. You’ll find two purge choices if you hover over the “Performance” tab in the admin toolbar:
- Purge All Caches – purge all caches at the same time.
- Purge Modules – purge a particular cache (e.g., minified assets, page cache, object cache, etc.).
Step 3: Configure the main dashboard
A new item called Performance will be added to the toolbar and the menu on your WordPress dashboard.
Click on Performance on your dashboard sidebar and explore through the plugin menu to get a sense of all the different feature areas.
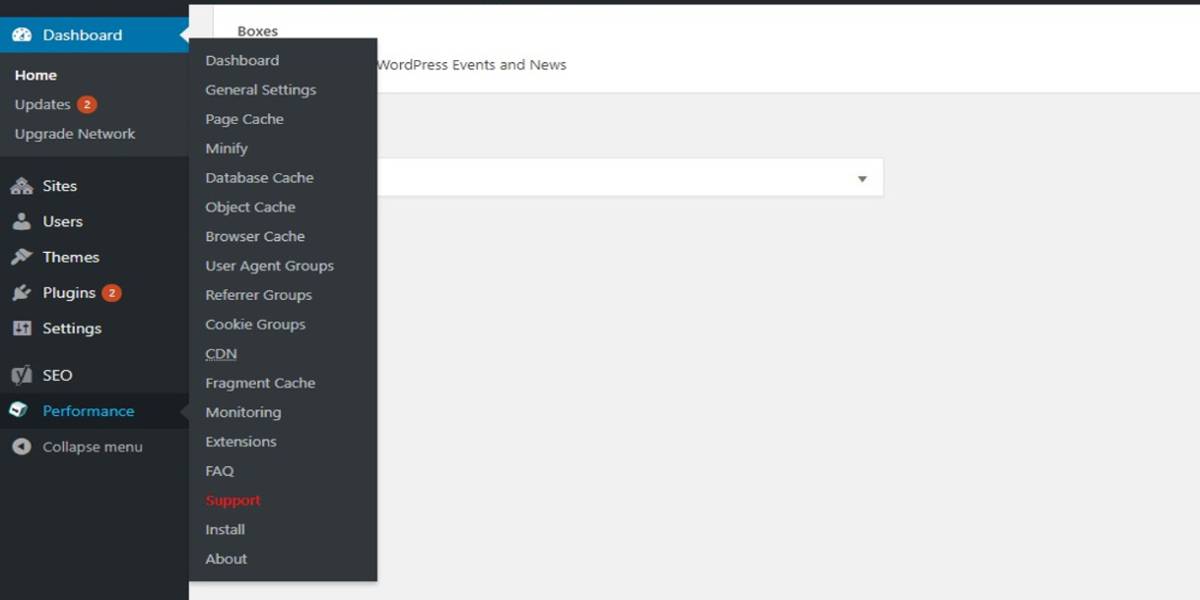
That long list might seem intimidating, but the good news is that you may not have to deal with many of them, primarily if you use shared hosting. The dashboard is where you may clear cache modules and verify plugin-server compatibility.

To begin, click the Check Compatibility button. The outcomes show what the plugin can and cannot accomplish with your current server setup. Based on the results, you may activate plugin options and determine whether you want extra server support for specific settings.
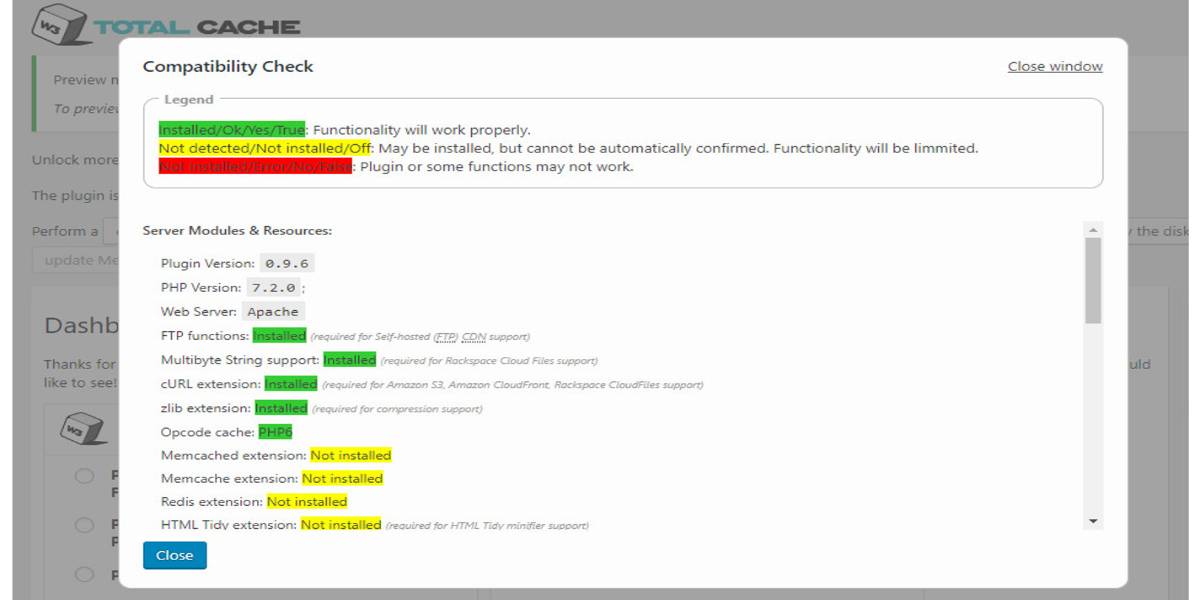
You’re unlikely to be able to resolve any compatibility concerns with shared hosting. That’s alright – don’t worry about it! Let’s get started configuring.
Step 4: Configure the general settings
Because W3 Total Cache is a powerful plugin, it includes a plethora of capabilities. This might be either a good or a terrible thing. These alternatives are a gold mine for those who know how to use them. These settings may be difficult and perplexing for most novices. We’ll go through each of these settings in depth so you can correctly configure W3 Total Cache. Let’s start with the General one.
General
Preview mode allows you to test changes before they go live. The modifications may be viewed in a different browser, but they will not take effect until you deploy them.
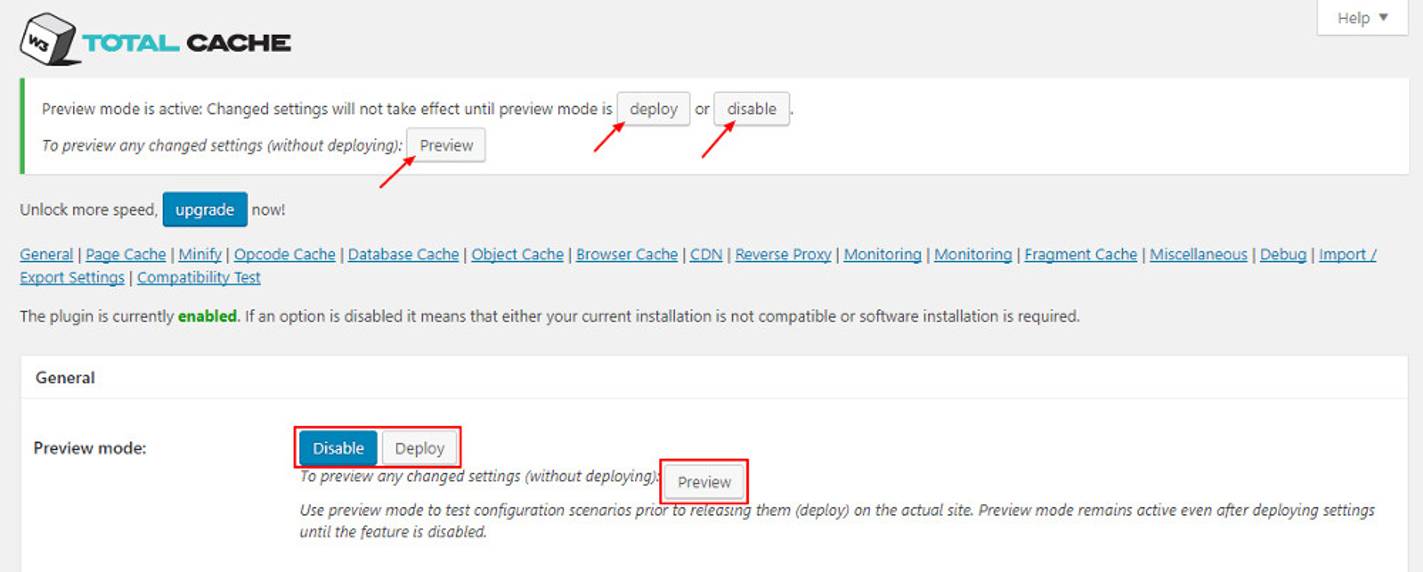
It’s a good idea always to utilize Preview mode first since functionality like minifying can occasionally ruin your site.
Page cache
Page Cache will be the first feature you see on this screen. It is in charge of producing static cache pages for each page load, so it is not loaded dynamically with each page load. You will notice a significant reduction in load time if you activate this. To show how Page cache works, look at the image below:
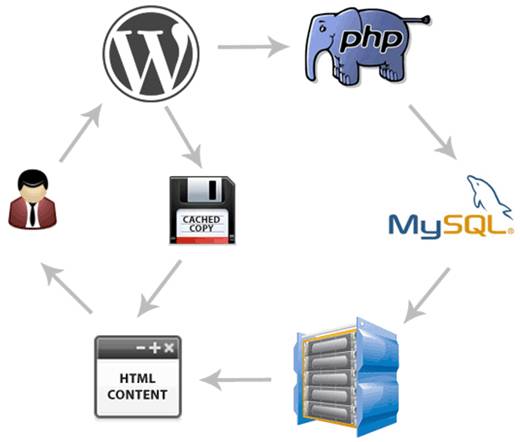
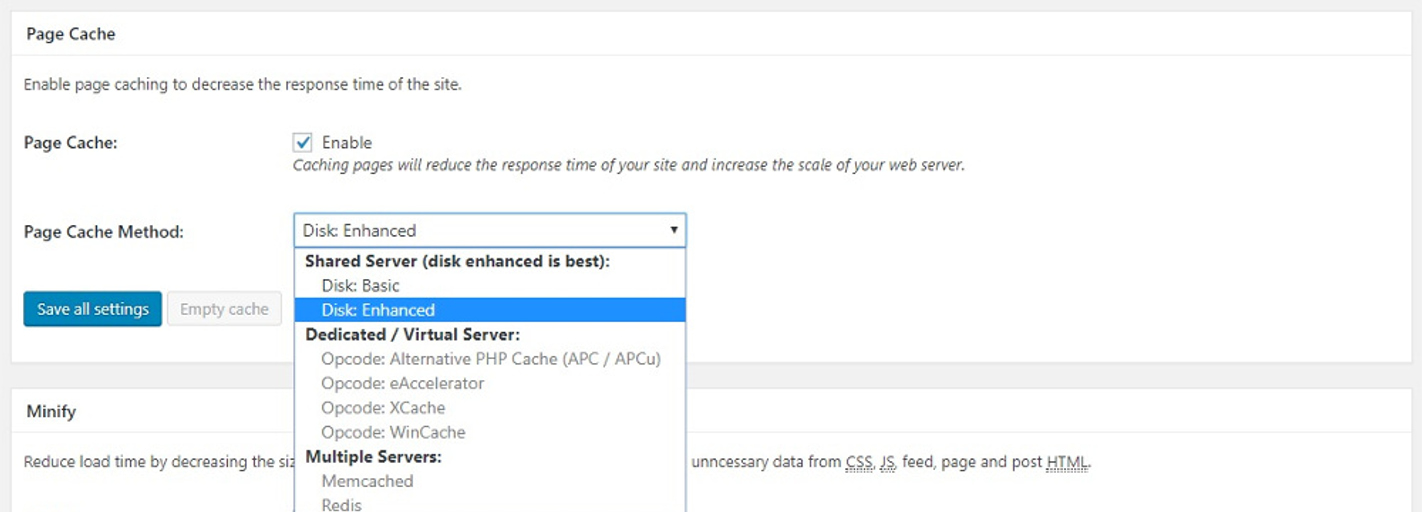
Every request to your WordPress site is rendered in real-time by default. Dynamic rendering is appropriate for some types of websites, such as eCommerce businesses or discussion forums. However, adding a page caching layer to blogs, news sites, and other sites that do not require dynamic content can enhance speed and reduce server traffic. This is the plugin’s control section. However, it’s simple to set up — simply tick the Enable box and choose Disk: Enhanced as the method.
Opcode cache
Since WordPress is a dynamic CMS, PHP programmers are consistently generating code in the background. Opcode caching helps speed up your site by making subsequent requests that require the same code quicker by keeping compiled PHP code.
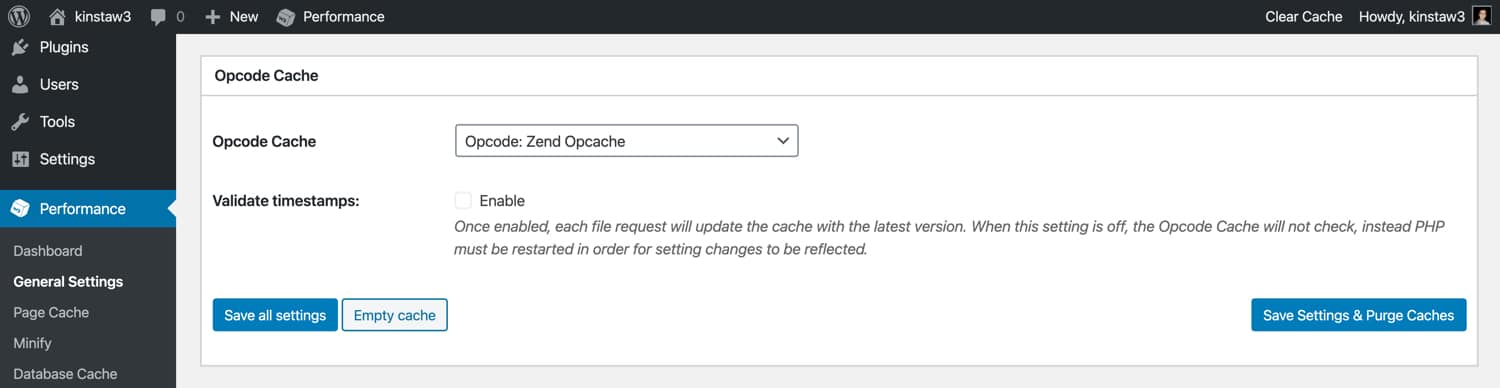
You don’t need to enable an Opcode caching layer in W3 Total Cache if your site is hosted on Kinsta, Bluehost, or Hostinger. On all live environments, they activate OPcache, an opcode cache. On staging environments, OPcache is deactivated to guarantee that generated PHP code is not cached and does not interfere with site development and debugging. If your server does not support Opcode caching, we recommend that you enable it in W3 Total Cache. Keep in mind that the opcode cache feature is only accessible in the Pro version.
Minify
By deleting unneeded whitespace, you may lower the total size of your site’s pages by minifying your HTML, CSS, and JavaScript elements. Enabling W3 Total Cache’s “Minify” function and picking the “Auto” option for “Minify Mode” will be enough for most WordPress sites.
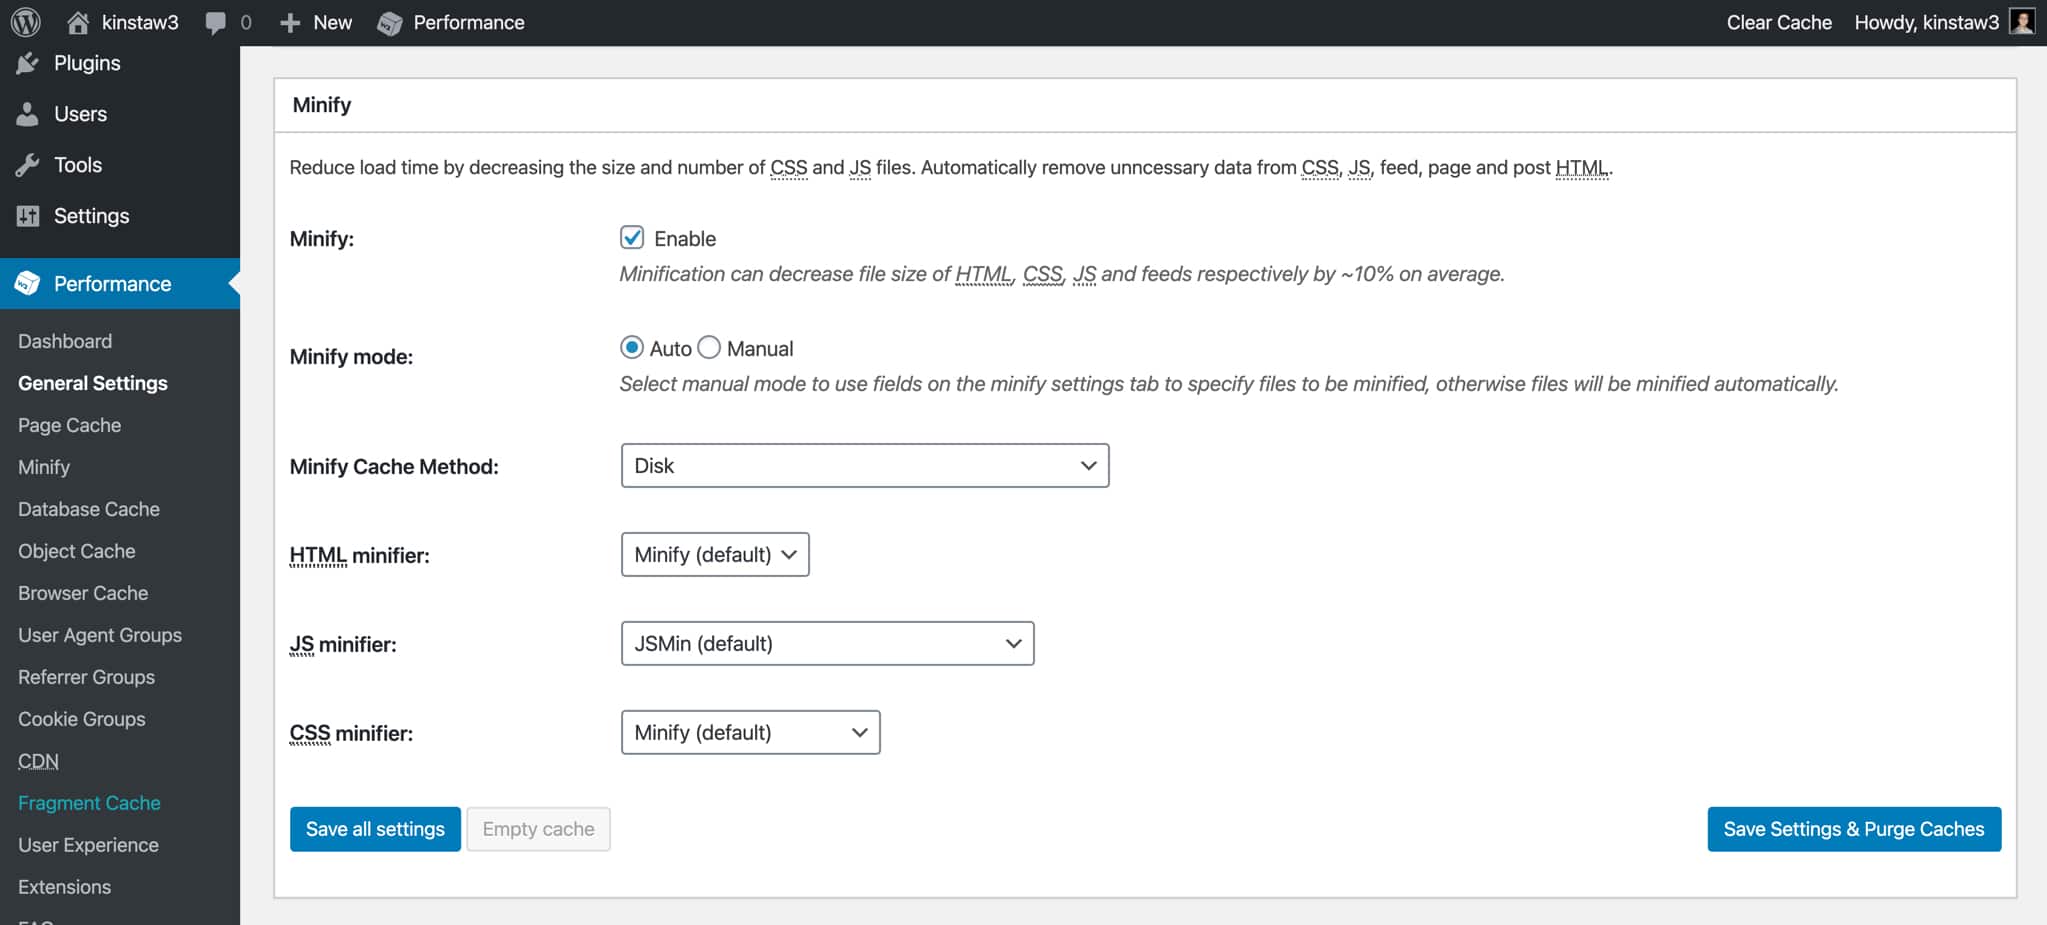
In rare circumstances, minifying assets might damage CSS or JavaScript code, resulting in noticeable problems on the website. We recommend collaborating with a developer to identify the elements creating problems if you observe strange issues on your site after minifying purchases. Following that, you may utilize the “Minify” functionality in manual mode to skip minification for specific CSS and JavaScript files.
CDN
CDN refers to a network that allows you to offer static material from numerous cloud servers rather than just one hosting server. This will enable you to minimize server load and increase the performance of your website. MaxCDN, Amazon S3, Rackspace Cloud, and Amazon CloudFront are all supported by W3 Total Cache.
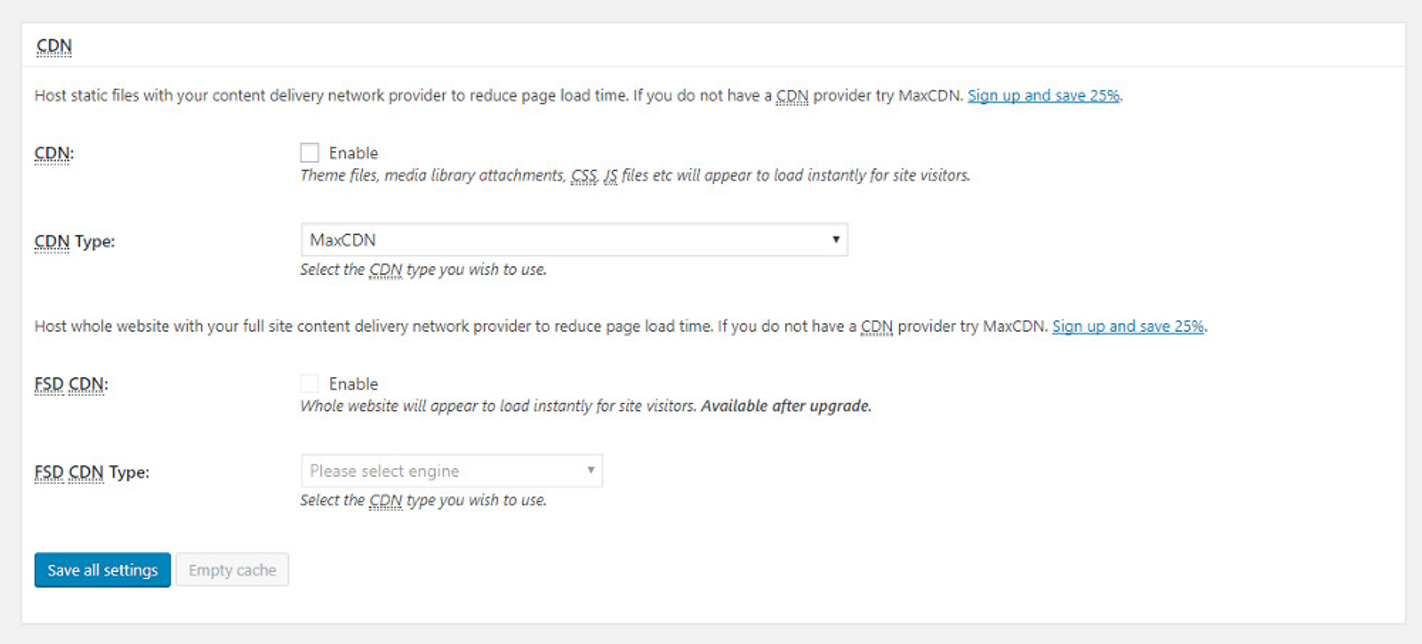
This section only applies to sites that now use or plan to use CDN. If you anticipate utilizing a CDN, we recommend MaxCDN. Enable this if you’re utilizing a content delivery network (CDN). Consult your CDN’s support for instructions on entering the information, as the procedure varies depending on the CDN.
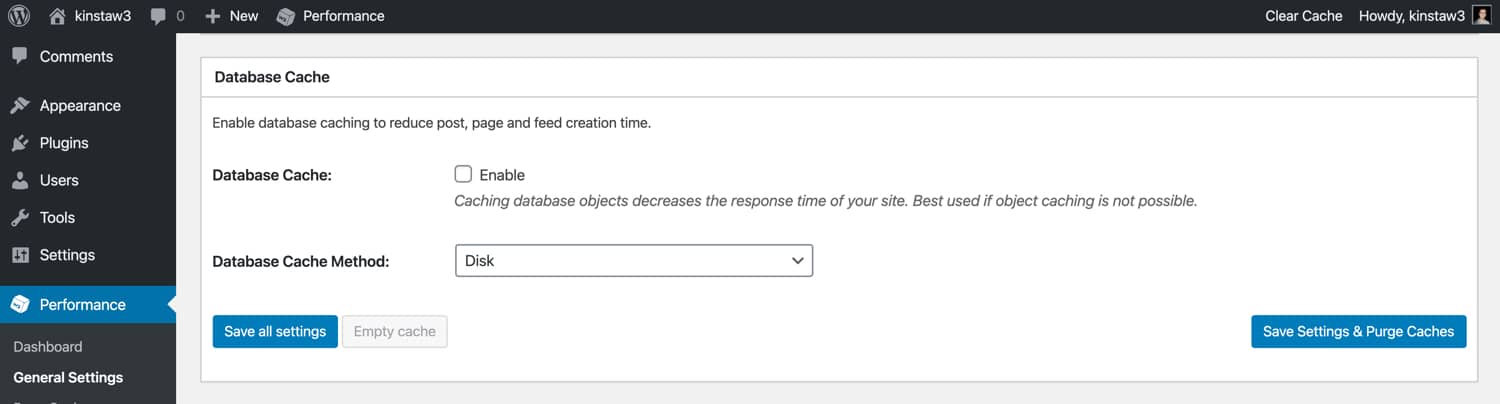
Database cache
By caching SQL queries, database caching minimizes server demand. This reduces the time to query the database (which may not be a lot for smaller sites). When we first started utilizing it, it appeared to put a lot of strain on our server. The host advised everyone to turn it off. Instead, they enabled the built-in SQL caching for all users. Again, you should utilize this option at your discretion. You may experiment with it to see how it affects your site’s load time. If the impact isn’t severe enough, simply turn it off. For shared hosting accounts, most hosts do not suggest this.
Browser cache
When a person views a website, their web browser saves all pictures, CSS files, JavaScripts, and other static files in a temporary folder to improve the user experience. When the same user returns to the previous page, it will load substantially faster because the static files are now in their browser cache. This instructs browsers to save a duplicate of the page, reducing calls to your website. You should unquestionably enable this option.
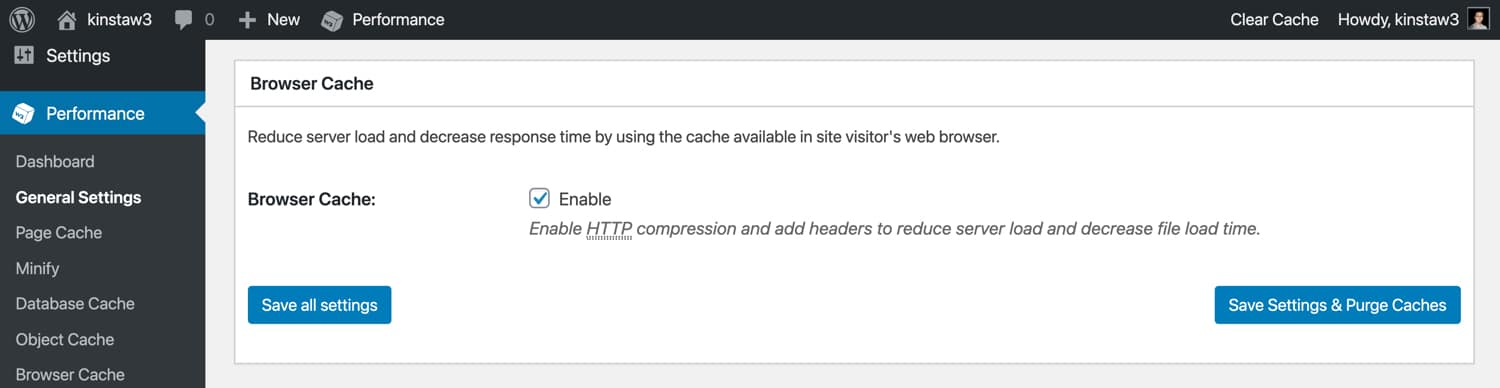
The Browser Cache option in W3 Total Cache limits the duration of the Browser Cache. Given that you don’t alter your logo every day, having static assets like that cached for 24 hours isn’t bad. Simply choose Enable under Browser Cache and click the Save all settings button. After you’ve done that, go to the Performance > Browser Cache page for further options. When you save the settings, all of the settings on that page will take care of themselves.
Object cache
An object cache in WordPress saves the results of performed database queries. WordPress does include an object cache. However, it only stores data for a single page load. This enables more efficient page rendering by ensuring that a page load does not waste CPU resources doing identical database queries.
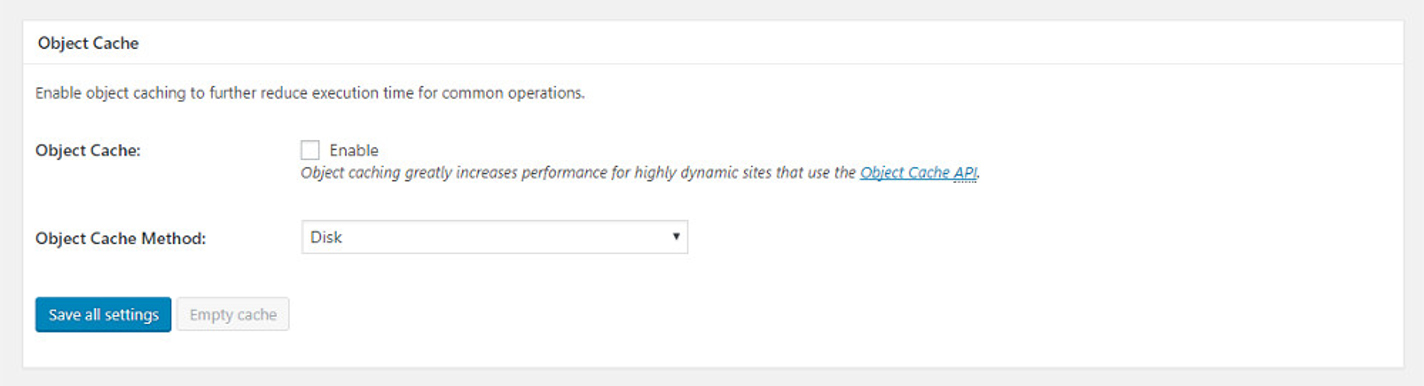
While WordPress’ default object cache is unquestionably helpful for efficiency, an object cache that preserves data between page loads is much better! The “Object Cache” feature of W3TC installs a custom caching script in your /wp-content directory and modifies WordPress’s object cache behavior to keep data persistently (across multiple page loads). Object caching can also consume a lot of server resources. Thus it’s best to leave it deactivated on most shared hosting plans.
Miscellaneous
W3 Total Cache also offers a few more options that you may change. You may enter your Page Speed API key in WordPress to display a Google Page Speed dashboard widget. There is now the option to show the Page Speed rating for each page on your WordPress site in the menu bar.
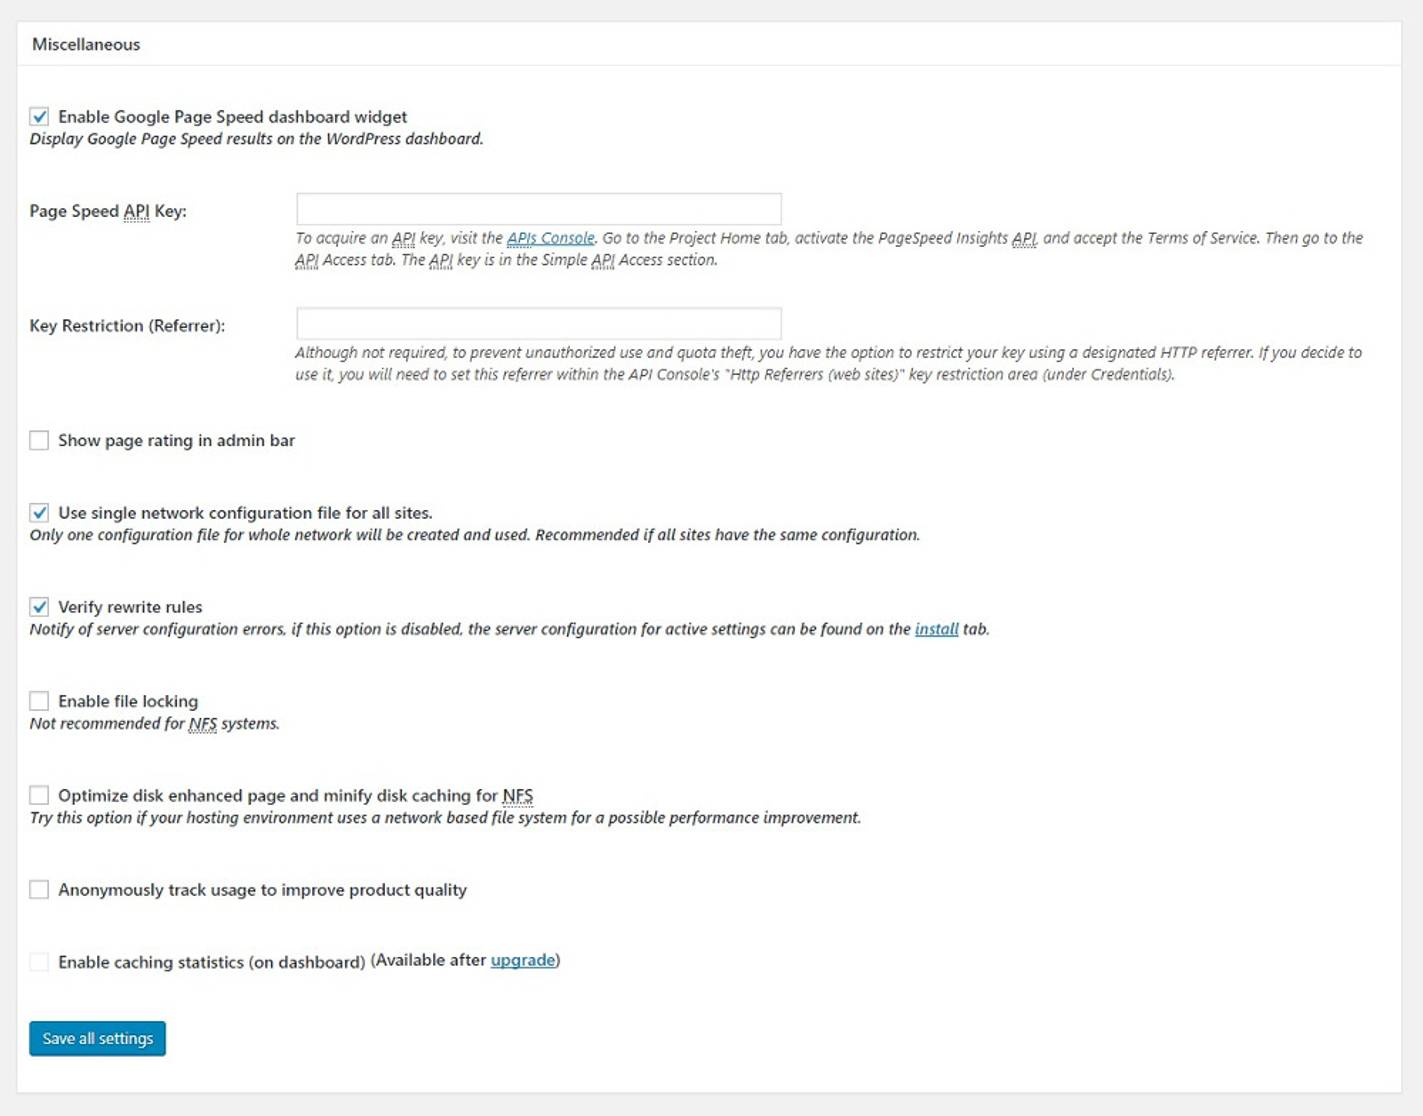
Other parameters, such as “NGINX server configuration file path,” “enable file locking,” and “optimize disk enhanced page and minify disk caching for NFS,” should be left alone unless you have a compelling need to modify them.
User Experience
You may enable lazy loading, deactivate emojis, and disable the wp-embed.js script using W3TC’s “User Experience” optimization. To allow faster loading time, we recommend activating lazy loading on your WordPress site. If you aren’t already utilizing browser-native or plugin-based lazy loading, we prefer W3 Total Cache.
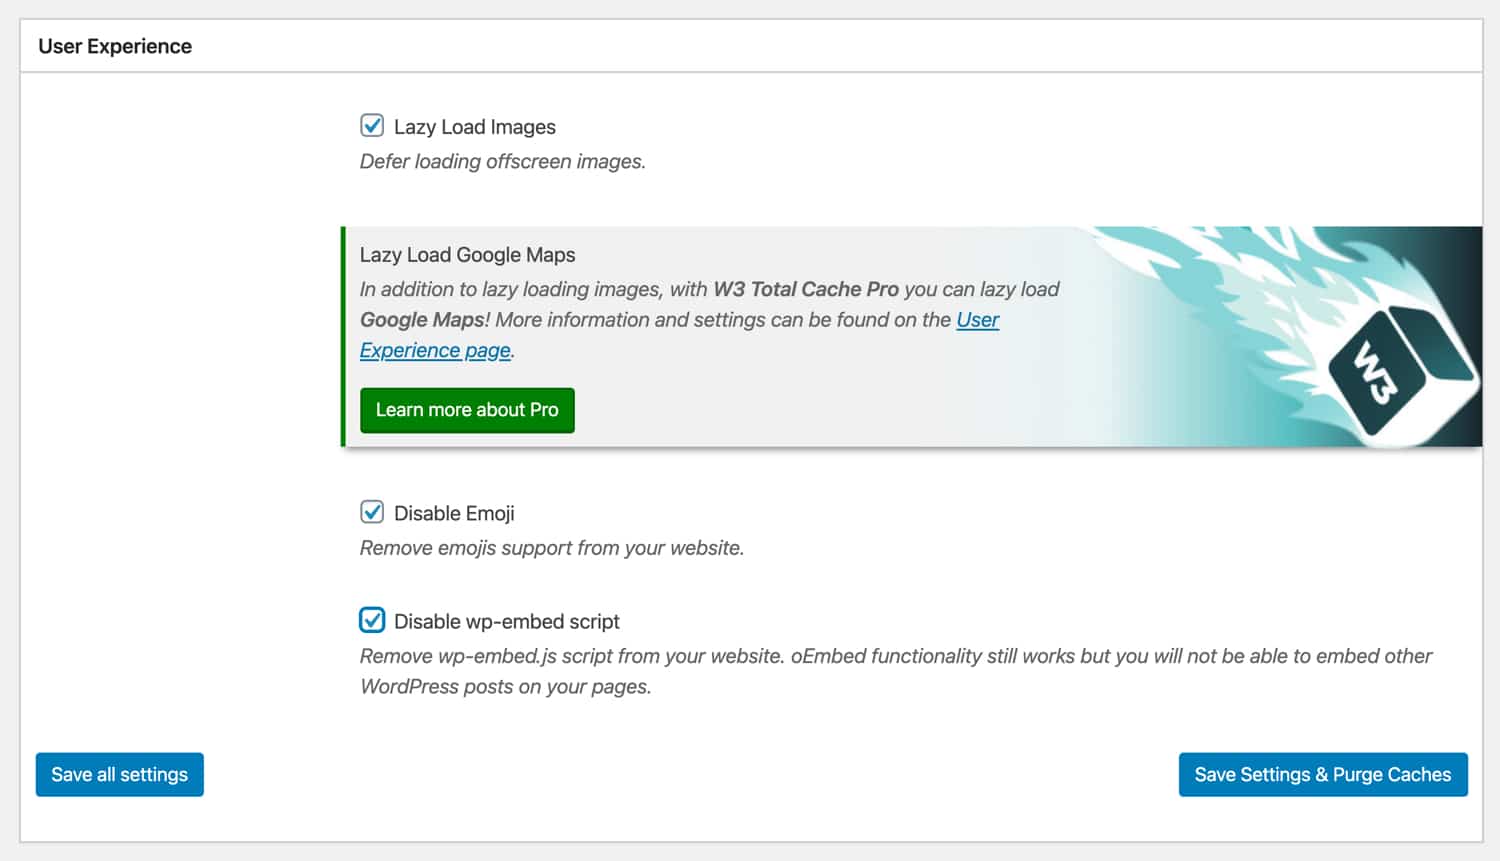
In today’s world, most operating systems provide emoji functionality. As a result, if you’re not a significant emoji user, you might wish to disable WordPress’ built-in emoji script. Using W3TC to delete wp-emoji-release.min.js will save you an HTTP request and 10KB on page loads. Similarly, if you don’t integrate WordPress posts, you may use W3 Total Cache to deactivate wp-embed.js. Disabling this script does not affect the Embed capability, which allows you to embed YouTube videos, SoundCloud streams, and other content.
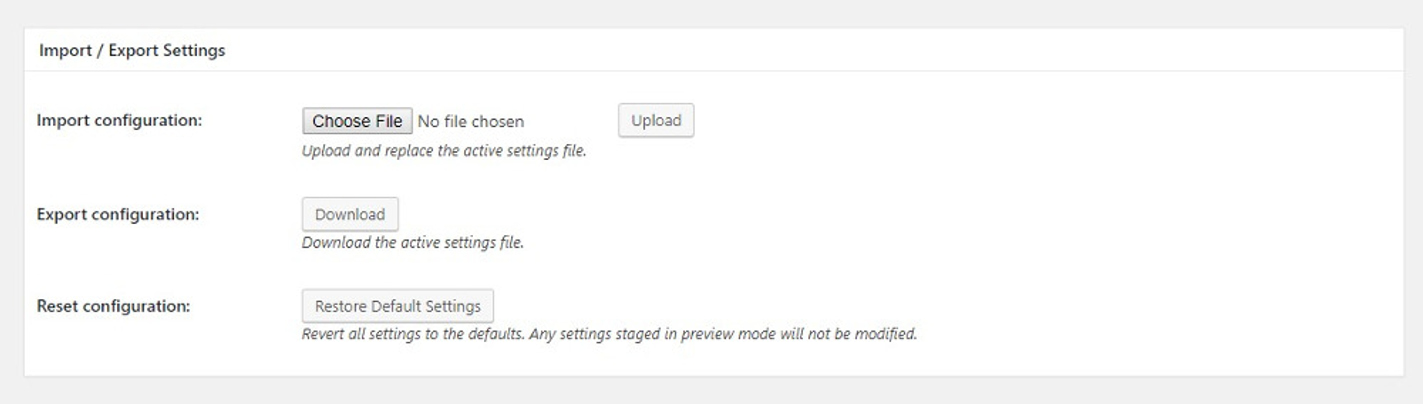
Import and export
After you’ve done customizing your settings, you may backup your setup by using W3TC’s “Import/Export” option. Because W3 Total Cache includes many options, exporting a full backup is helpful for peace of mind. Furthermore, it enables you to effortlessly reproduce your unique W3TC setup across different sites without the need for a manual setting.
Debug
W3 Total Cache offers a helpful “Debug” option that allows you to deactivate particular cache layers and optimization settings if you’re investigating a problem on your site. If you detect a visual issue on your site, for example, you may set debug mode for the “Minify” option, which will put HTML comments into your page’s source code to assist you in troubleshooting.
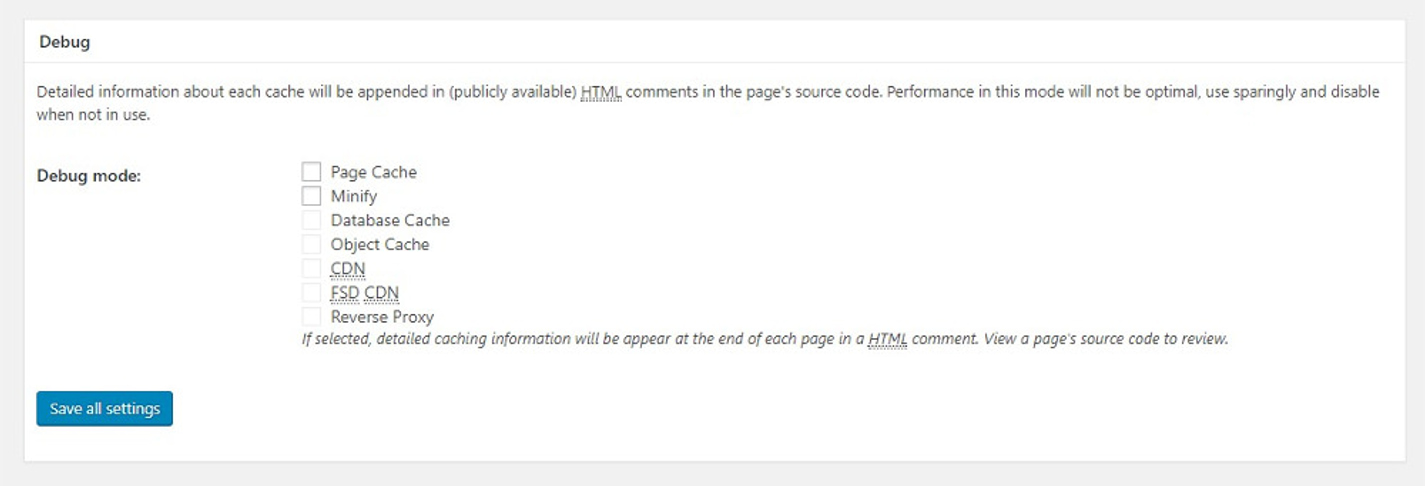
We recommend only using the debug mode functionality in a staging environment or during low-traffic hours because it places additional strain on your server resources. Also, remember to turn off debug mode once you’ve completed troubleshooting!
Step 5: Customize the W3 Total cache settings
Page cache
Let’s look at the “Page Cache” options in W3 Total Cache. After activating the various settings under the General Settings Tab, you may fine-tune the enabled parameters by selecting the appropriate item from the plugin menu:
General
Configure it as shown in the screenshot:
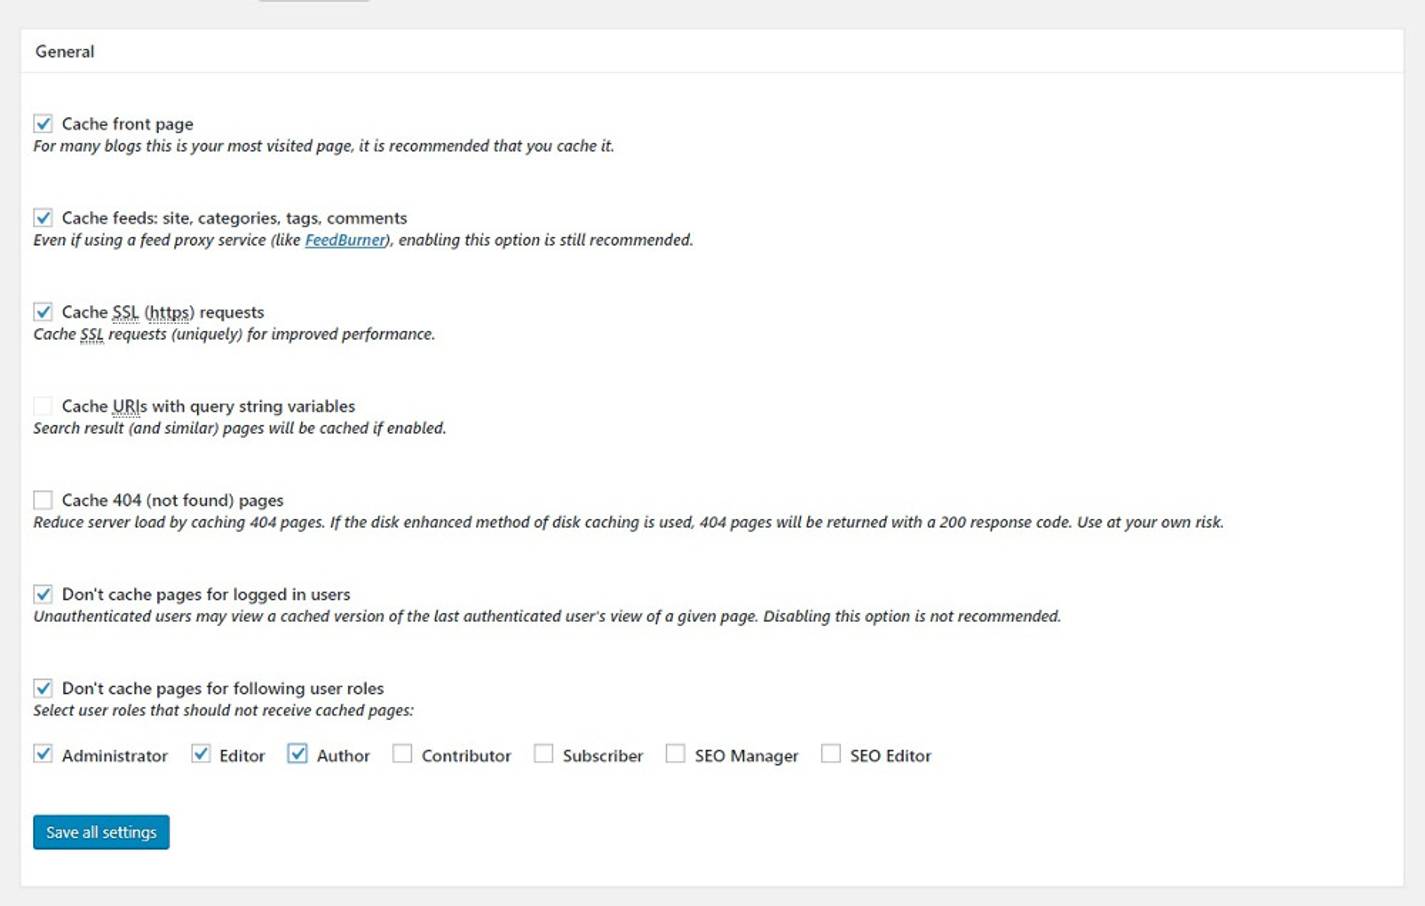
- Cache Front Page: The front page of most websites is often the page that receives the most traffic. As a result, we recommend that you enable this setting.
- Cache Feeds: WordPress creates a variety of RSS feeds that allow third-party apps and services such as Feedburner to show your site’s information. While RSS isn’t as popular as it once was, we nevertheless suggest that you enable it.
- Cache SSL (HTTPS Requests): Enabling this feature may improve speed if your web server does not impose HTTPS for all incoming requests. There is no need to activate this if you are already mandating HTTPS at the webserver level.
- Using Query String Variables to Cache URIs: A query string is a field appended to the end of a URL (for example, /?version=123). Query strings are frequently used in WordPress to request and show specific data from your database. Because the objective of a query string is to ask for a unique version of a page, we suggest leaving this disabled unless you have individual query strings that you want to cache.
- Cache 404 (Not Found) Pages: By default, W3TC disables this option. If you choose the “Disk Enhanced” page caching approach, this is most likely due to caching behavior. 404 pages provide a 200 response code when that option is enabled. We recommend checking this setting with your cache settings to see if it’s compatible. 404 pages should ideally return 404 response codes. Thus we suggest testing it with your caching configuration to see if it’s consistent.
- Don’t Cache Pages for Logged In Users: We suggest that this option be enabled. Typically, logged-in individuals are working on page updates. Users would have to clear the cache regularly if caching was allowed to notice page changes.
- Don’t Cache Pages for Certain User Roles: This option allows you to skip caching for specific WordPress user roles. This option does not influence cache behavior if the “don’t cache pages for logged-in users” feature is activated.
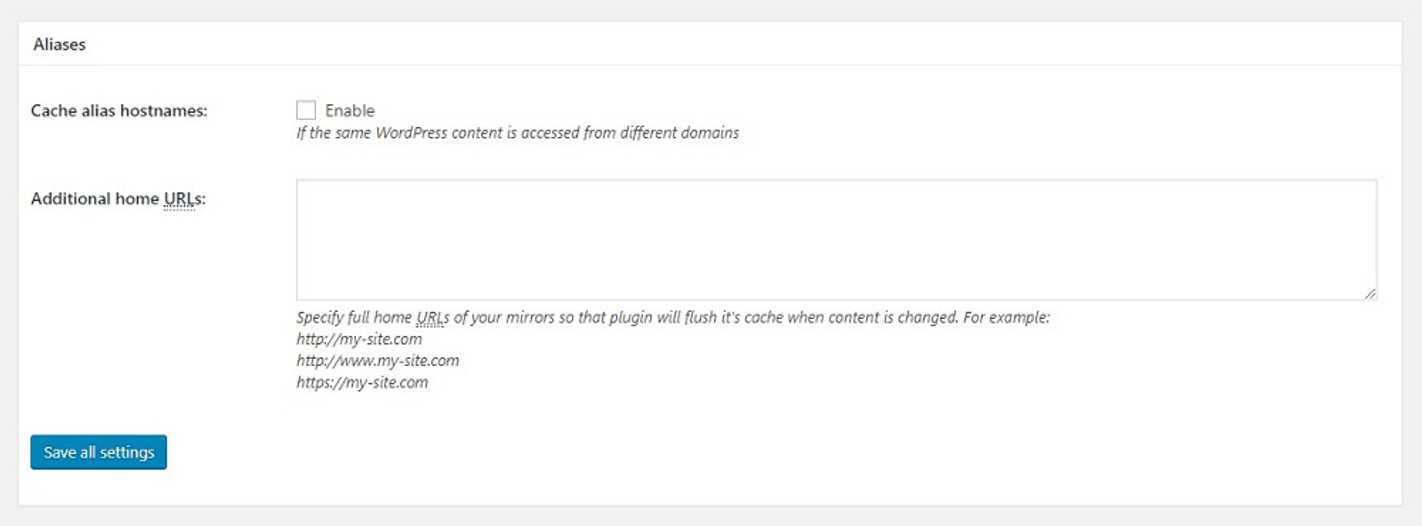
Aliases
The “Aliases” function of W3 Total Cache allows you to cache identical WordPress information available on various websites. We do not suggest that you enable this feature. Suppose your WordPress site is available via several domains (for example, domain.com and www.domain.com). In that case, it’s best to put up a 301 redirect rule to divert requests to your primary domain to avoid Google and other search engines penalizing you for duplicating content.
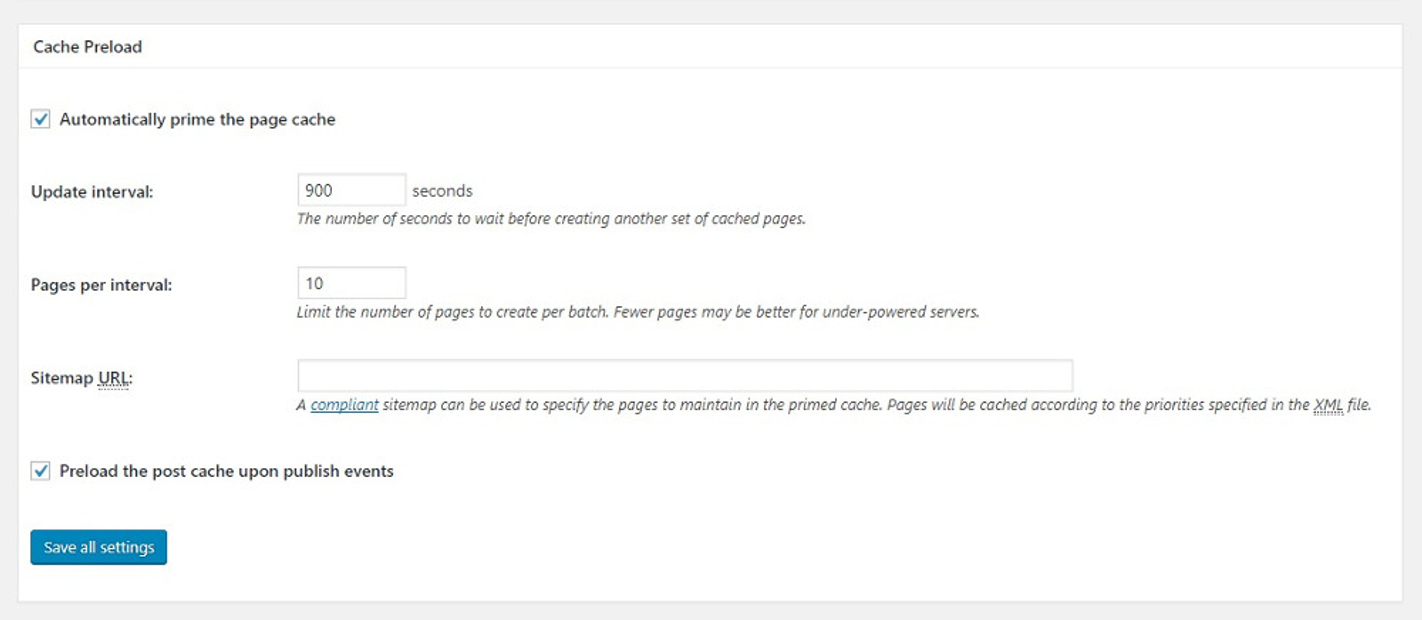
Cache Preload
The “Cache Preload” functionality analyzes your sitemap and sends requests to your site’s pages to preload the page cache. If you wish to activate cache preloading, W3TC allows you to define a sitemap URL, update interval, and many pages per interval. We advocate eliminating cache preload for most sites since it might generate server resource spikes that outweigh the possible speed advantages. To decrease the possibility of CPU spikes, make sure you don’t set the “update interval” and “pages per internal” too high.
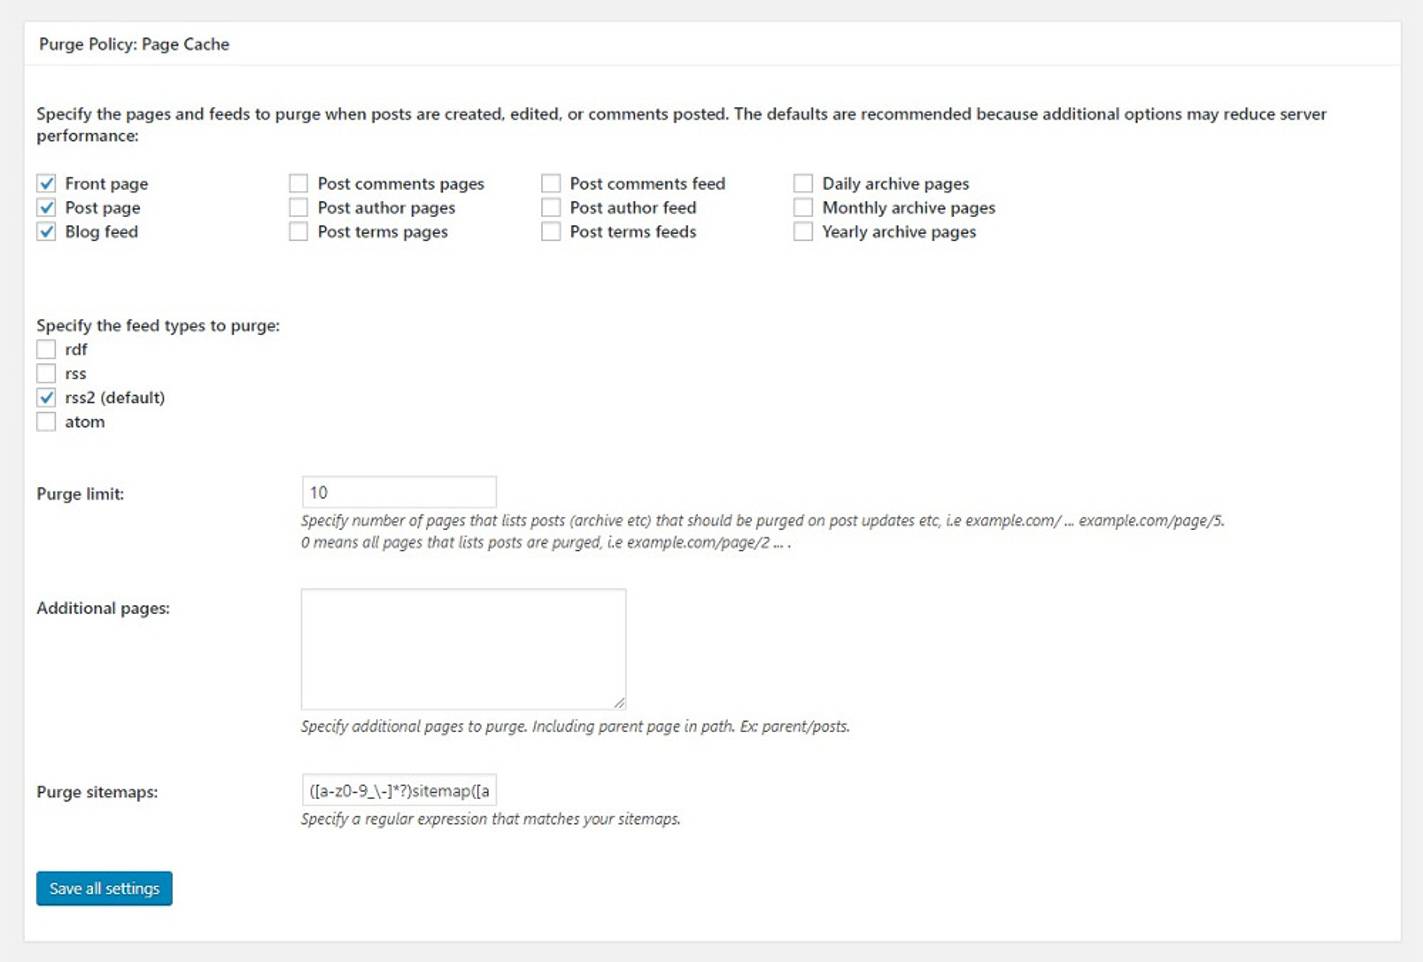
Purge Policy
The “Purge Policy” feature of W3TC allows you to select which pages and feeds you wish to purge when postings are made or updated automatically. Most sites should be fine with the default settings (main page, posts page, and blog feed). There are several methods available for adding more pages to the purge policy.
Advanced
You may adjust a range of parameters under W3TC’s “Advanced” page cache options, such as “approved query strings,” “rejected user agents,” granular cache bypass settings, and more. For example, if you want to configure W3 Total Cache never to cache posts in a specific category or tag, you may do so under the “Advanced” settings.
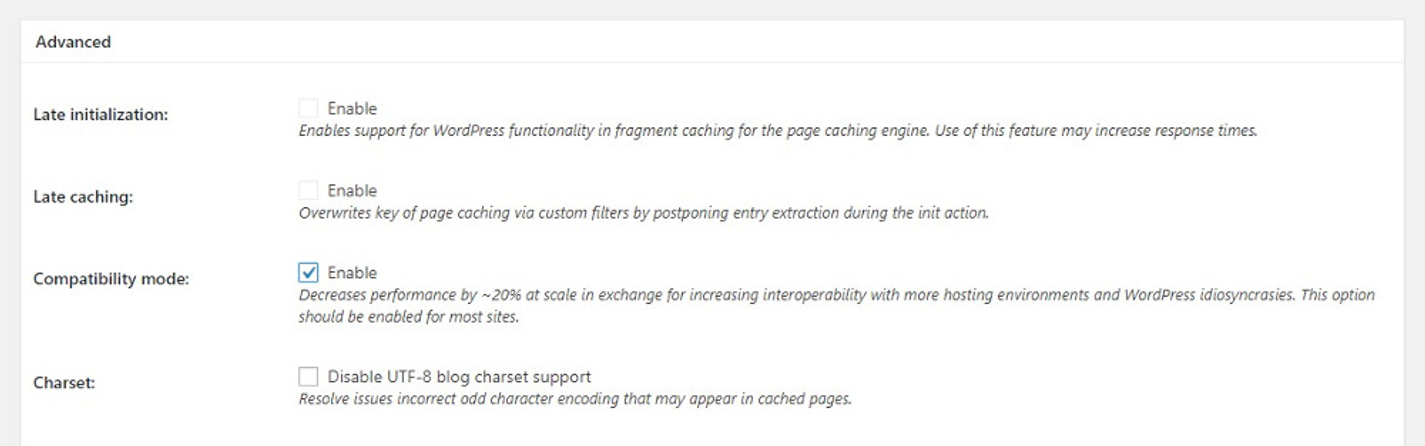
We cannot give “suggested settings” since these settings might be highly site-specific. That being said, if you want to change a very particular feature of your site’s page caching behavior, certainly check out the advanced settings.
Minify
Let’s now look at W3 Total Cache’s “Minify” options. There’s not much to do here because we’ve enabled the Minify auto option in the General preferences.
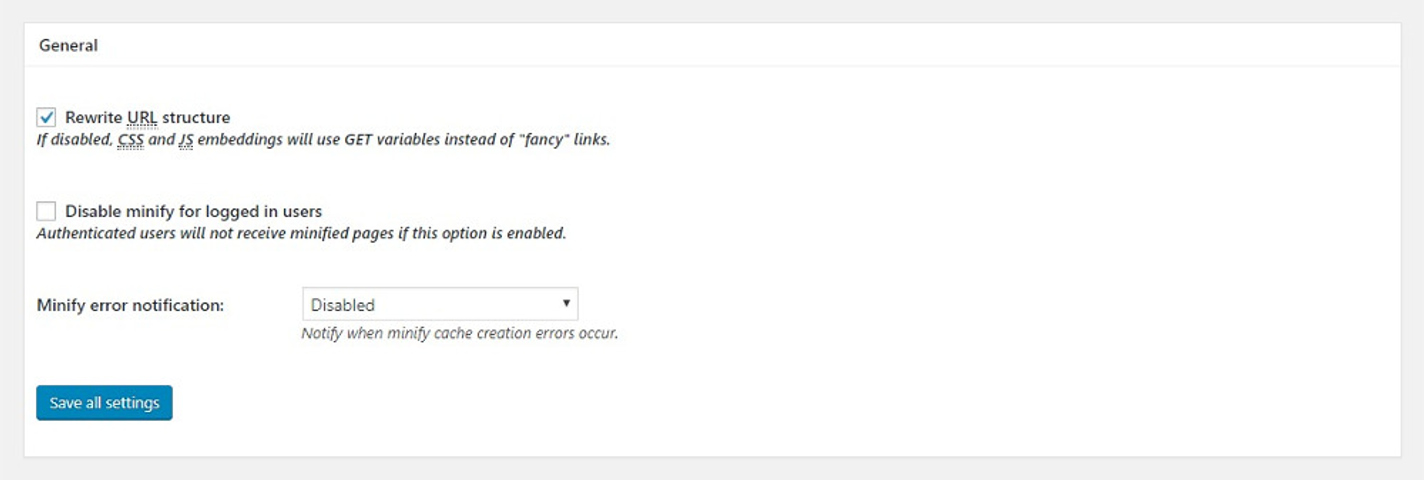
General
Rewrite URL Structure - This option changes how minified assets’ URLs are structured. We recommend that you keep it enabled so that your URLs seem “clean.” Disable Minify for logged-in Users - Disabling minification for logged-in users may be helpful while troubleshooting or debugging. Otherwise, we recommend leaving this option turned off.
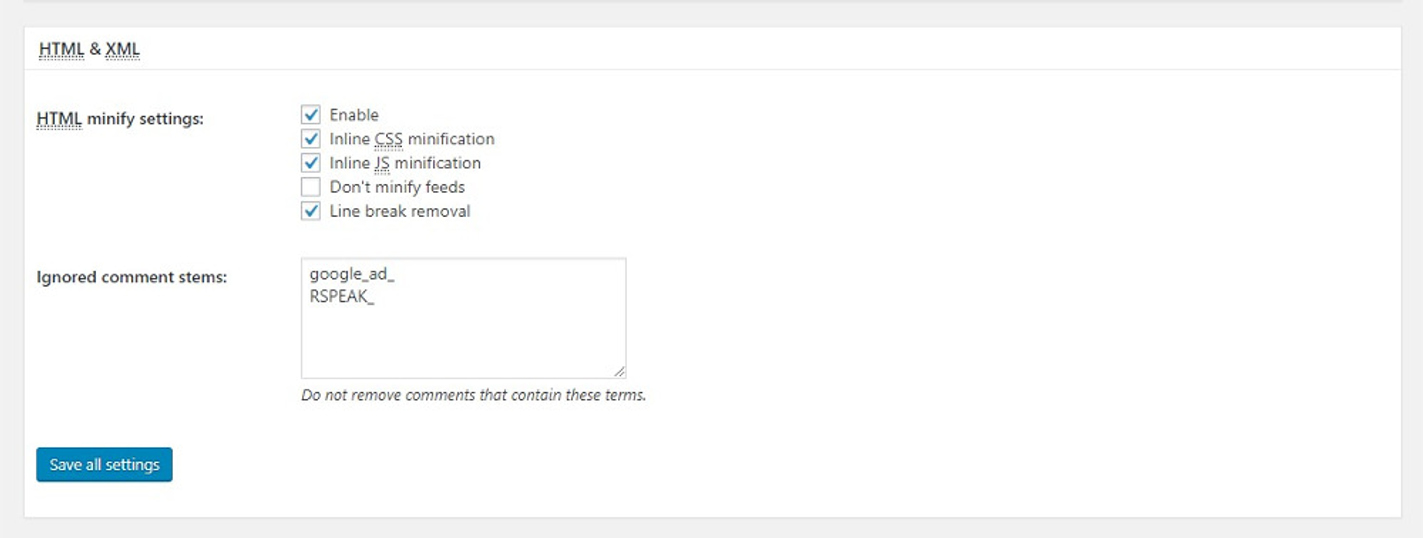
HTML and XML
HTML minification parameters can be configured in the “HTML & XML” section:
- Inline CSS minification: To remove whitespace in inline CSS, we recommend activating this option.
- Inline JS minification: Enabling this option removes whitespace from inline JavaScript. JS minification may result in a code error in some instances. If allowing this option breaks the functioning of your site, deactivate it.
- Don’t minify feeds: We recommend that this option be turned off. Because RSS readers and other similar services only use feeds, minifying feeds isn’t essential.
- Line break removal: By default, this option is off, and we do not recommend activating it to guarantee that your site renders correctly.
JS and CSS
JavaScript minification parameters may be configured under the “JS” section:
- Area Operations: This option allows you to choose the “embed type” for minified JavaScript. You can select “blocking,” “non-blocking,” “non-blocking using async,” and “non-blocking using defer” for JS files before and after. While non-blocking loading methods usually result in faster performance, they are not fully compatible with all JavaScript applications. Furthermore, the terms “async” and “defer” have quite different applications. As a result, unless you are familiar with the peculiarities of non-blocking JavaScript, we advocate utilizing the default “blocking” technique.
- Minify or Combine Only: For JavaScript, you have two optimization options. When you pick “Minify,” your JS files will be merged and minified. If you choose “Combine Only,” the combined JS file will not be minified. If you’re having minification problems and don’t want to troubleshoot to figure out which script is causing the issue, picking the “Combine Only” option may help.
- HTTP/2 Push: Enabling this setting may help you minimize page load time if your server supports HTTP/2 Server Push. HTTP/2 Server Push sends files to visitors ahead of time before they are requested. Because Server Push is frequently misused, we recommend conducting appropriate testing before activating this option in a production environment. Server Push is not suitable for essential JavaScript files, and you should consider if the benefits exceed the disadvantages of fetching JS files straight from a visitor’s browser cache.
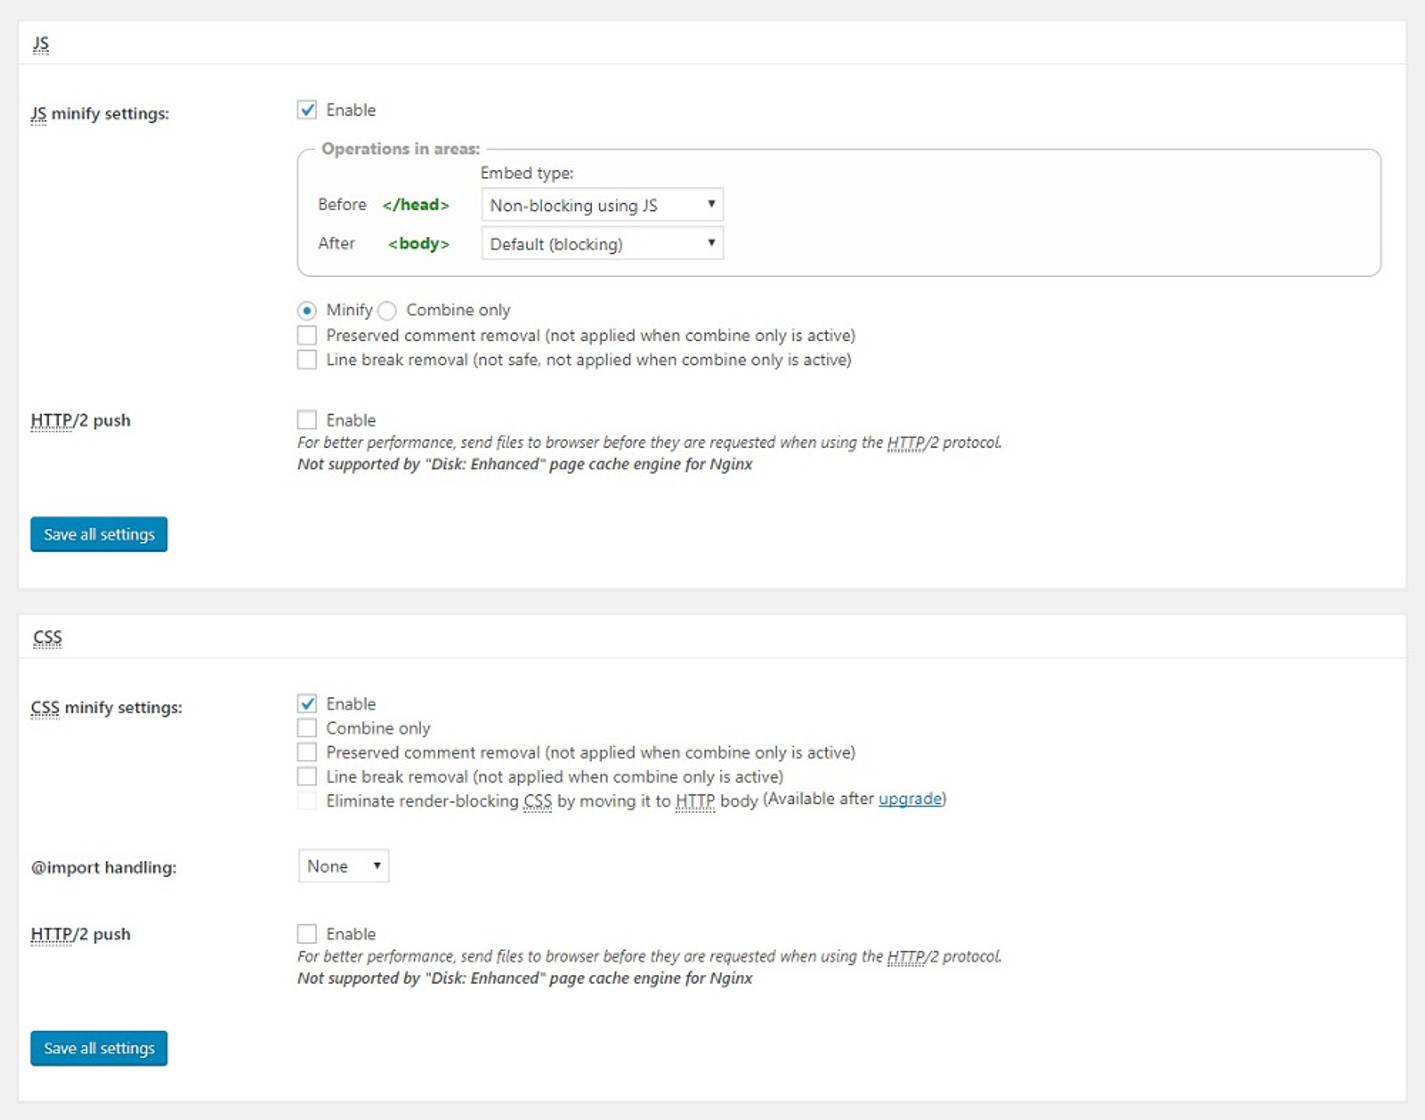
CSS minification options may be configured in the “CSS” section:
- Combine Only: Unlike JavaScript files, CSS seldom suffers from minification difficulties. As a result, we do not recommend activating “Combine Only.”
- Preserved Comment Removal: This option eliminates CSS comments. To decrease file size as much as possible, we recommend activating this option.
- Remove Line Breaks: This option eliminates line breaks from CSS files. We urge that you enable this option as well. Disable “Line Break Removal” if you have any display difficulties after activating it.
Advanced
The “Advanced” section includes a few more options for customizing minification behavior:
- Update External Files Every: W3TC allows you to set the interval between CSS and JS file updates. Your materials will be downloaded and minified every 24 hours if the default option of 86400 seconds is used. Set a more extended period if your site does not update regularly.
- Garbage Collection Interval: This parameter determines how frequently expired cache data is discarded. The time zone is set to 24 hours by default. We propose reducing the “Garbage Collection Interval” if your site lacks storage space.
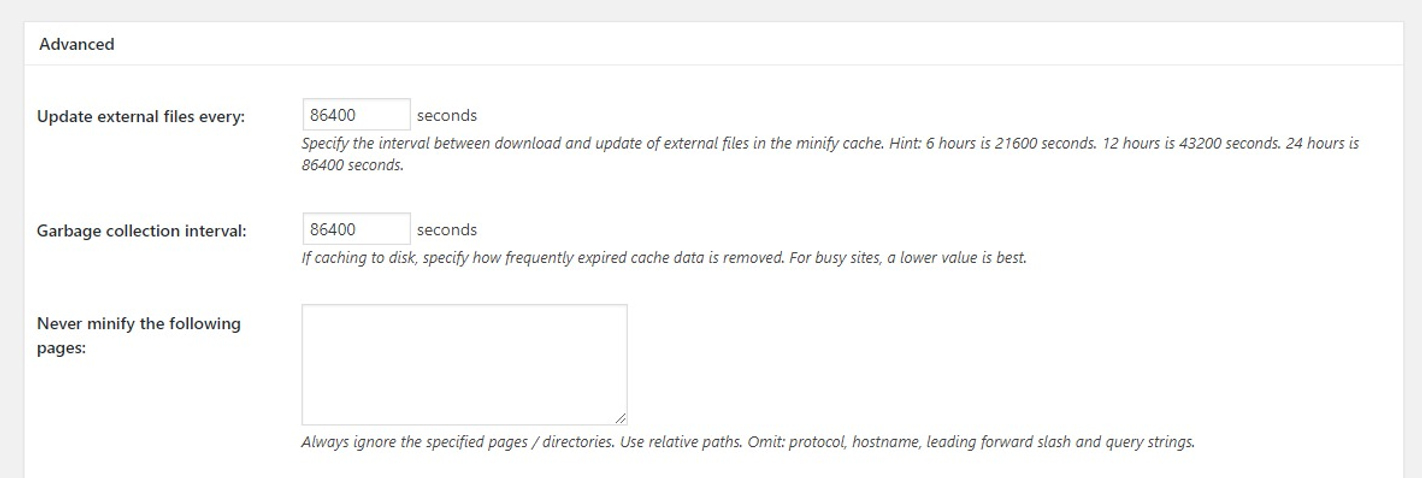
The majority of the “Advanced” section offers input options for specifying asset files that should never be minified. A “Rejected User Agents” parameter also allows non-minified files to serve specific user agents. Finally, you may integrate external asset files in W3 Total Cache’s minification process.
Browser cache
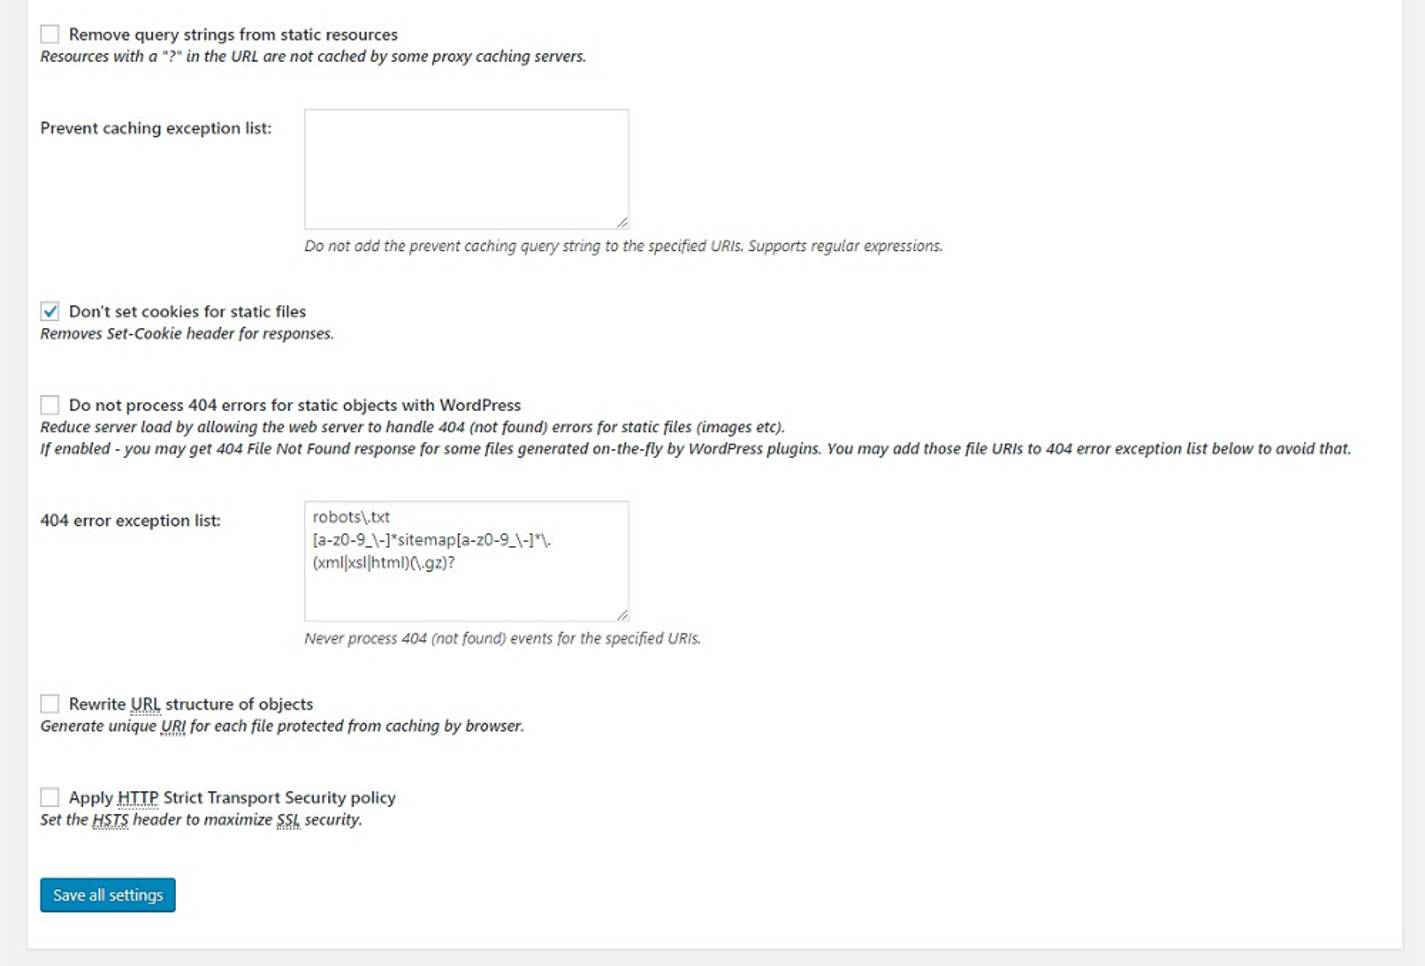
Most WordPress hosting already has good browser caching headers in place on the web server. If your host does not, or you wish to tweak browser caching behavior further, W3 Total Cache can help. The default settings for the “General,” “CSS & JS,” “HTML & XML,” and “Media & Other Files’’ categories under “Browser Cache” settings are appropriate for most WordPress sites. Because this page has so many options, we recommend consulting with a developer before adjusting browser caching behavior. That being said, there are a few crucial options to be aware of when it comes to browser caching.
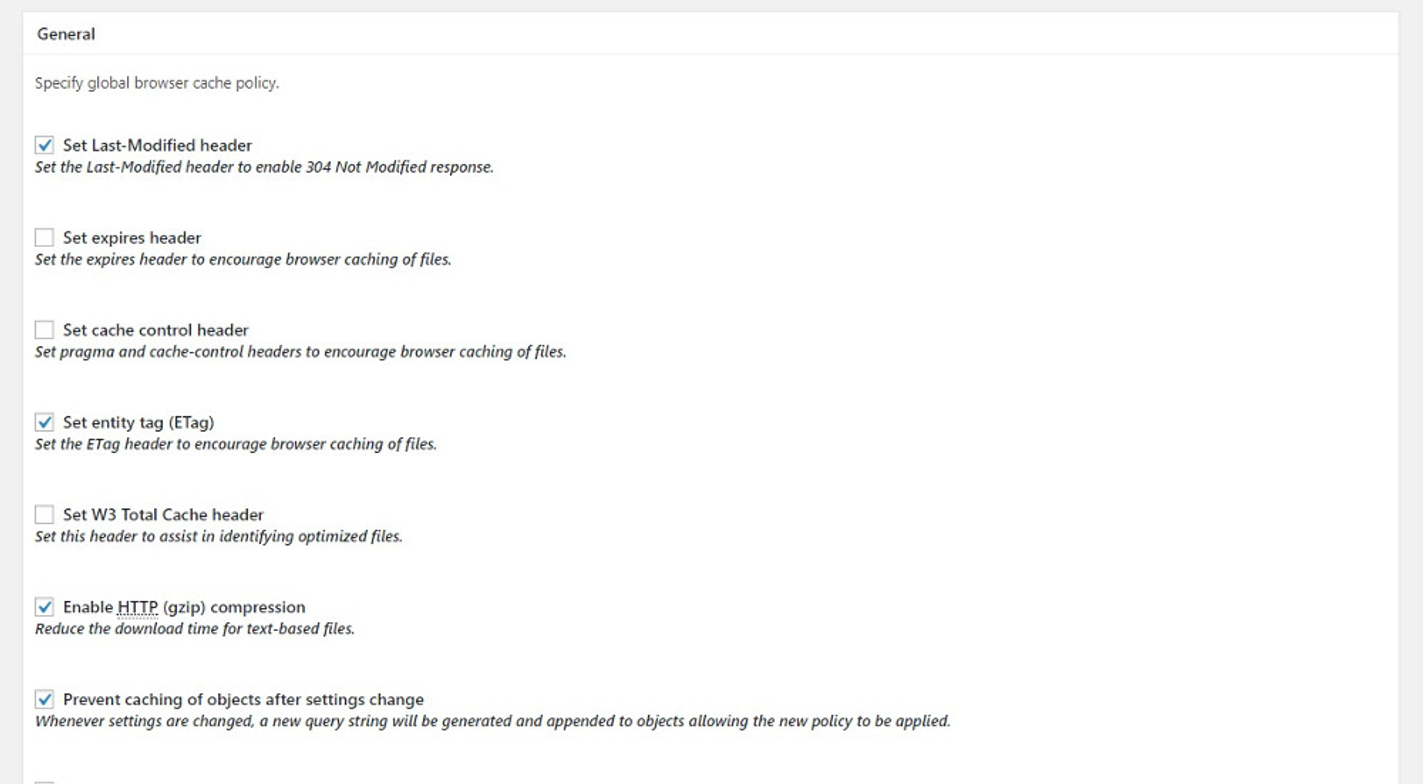
The “Browser Cache” options page includes some security header settings such as Content Security Policy (CSP) and X-XSS Protection. We always recommend working with a trained developer to go through these settings because erroneous setups might directly influence your site’s user experience. For example, enabling the HSTS header without an appropriate SSL certificate and HTTPS settings may render your site unreachable. Also, make sure that Set Last-Modified Header is enabled. Enable gzip compression to compress text files and images. Prevent object caching after making changes so that browsers may detect freshly cached files.
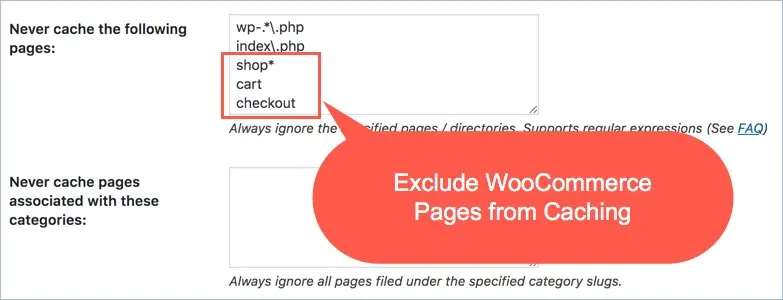
Step 6: Eliminate WooCommerce pages from caching
If W3TC breaks your product pages, consider excluding them from caching. To accomplish this, go to Performance > Page Cache settings and scroll down to the “Advanced” section. There will be a text box that says, “Never cache the following pages.” Enter all of your WooCommerce pages to be excluded from caching here. To remove all WooCommerce-related sites, utilize regular expressions and wildcards such as shop, cart, checkout, and product.
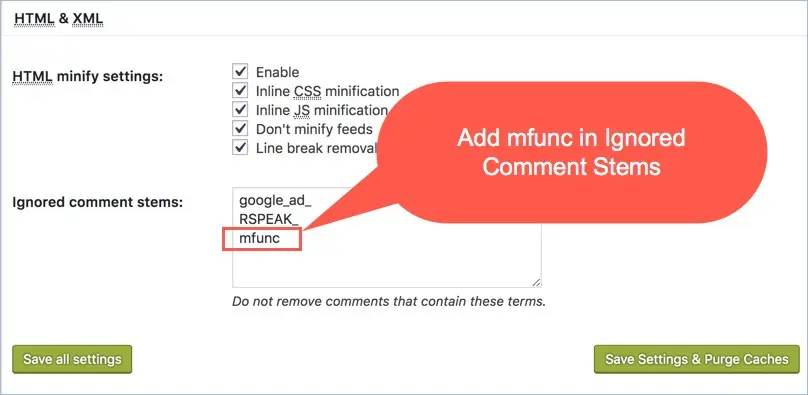
Step 7: Configure HTML minification
Indeed, you may cache the product pages because minification settings are usually the ones that crash your site. Deactivate the minification settings, but without them, you will get several pages of speed-related problems in the Google PageSpeed tool. As a result, you have no choice except to enable the minify options in W3TC or utilize an extra plugin for this purpose. When you configure the minify settings in W3TC, go to the Performance > Minify menu and enter “mfunc” in the “Ignored comment stems” text box under the “HTML & XML” section. This will guarantee that the WooCommerce page works correctly with W3TC.
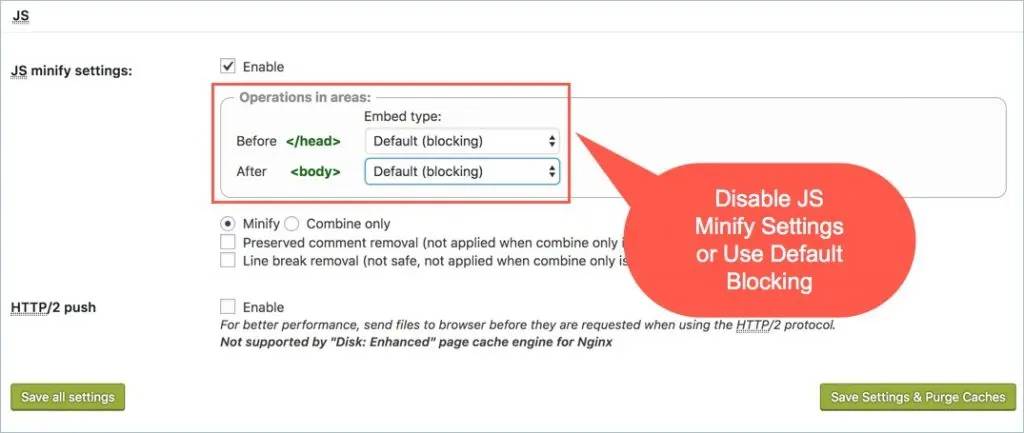
Step 8: Disable JS minification
When WooCommerce scripts are minified and merged, they cause the product pages to break. Also, the shopping and checkout pages may not function properly. You may disable JS minify in W3TC settings in this circumstance. If you still wish to enable JS minify, be sure to select “Default (blocking).” This will cause the “Eliminate render-blocking JavaScript and CSS” issue to appear in Google PageSpeed Insights. However, if you have well-designed and functioning sites that load quickly, this should be OK.
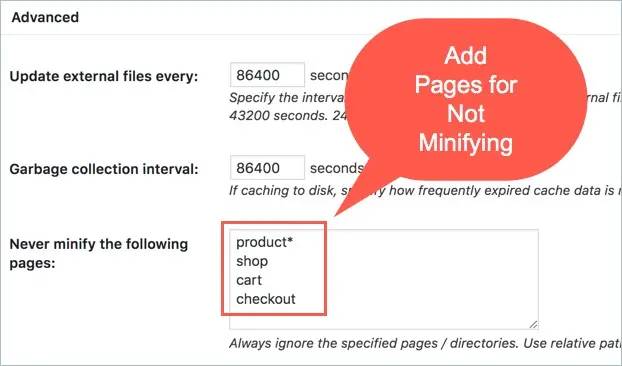
Step 9: Exclude Pages from Minifying
This is a similar option to removing all WooCommerce pages from caching in that you may exclude all WooCommerce pages from minifying. Go to the Performance > Minify menu and then to the “Advanced” section. Fill in the “Never minify the following pages” text box with WooCommerce-related pages. You may exclude pages such as shop, cart, checkout, and product.
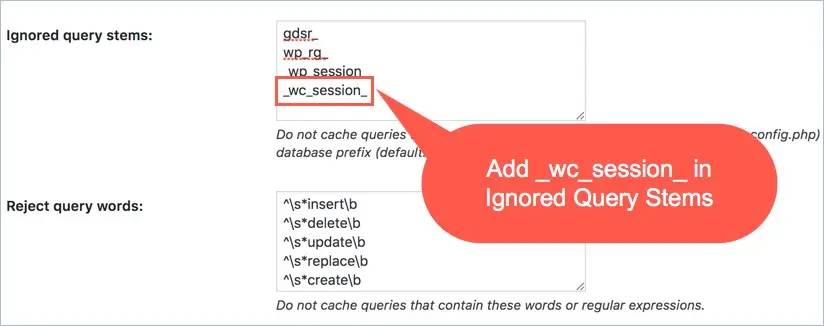
Step 10: Add wc_session in DB caching
Generally, DB caching and object caching cause plenty of issues in addition to speeding up your site. W3TC makes these two changes optional in the Performance > Install menu. If you continue to use WB caching, be sure to include “wc_session” in the “Ignored query stems” text box in the DB cache configuration.
Additional settings from the W3 Total Cache Settings
User-agent groups
W3 Total Cache’s “User Agent Groups” function is quite powerful if you need to divert traffic depending on a user’s device type. For example, if a person views your site from a mobile phone, you may arrange it to display a different theme. Similarly, if your mobile site is hosted on a separate subdomain, you may redirect them to a whole other area.
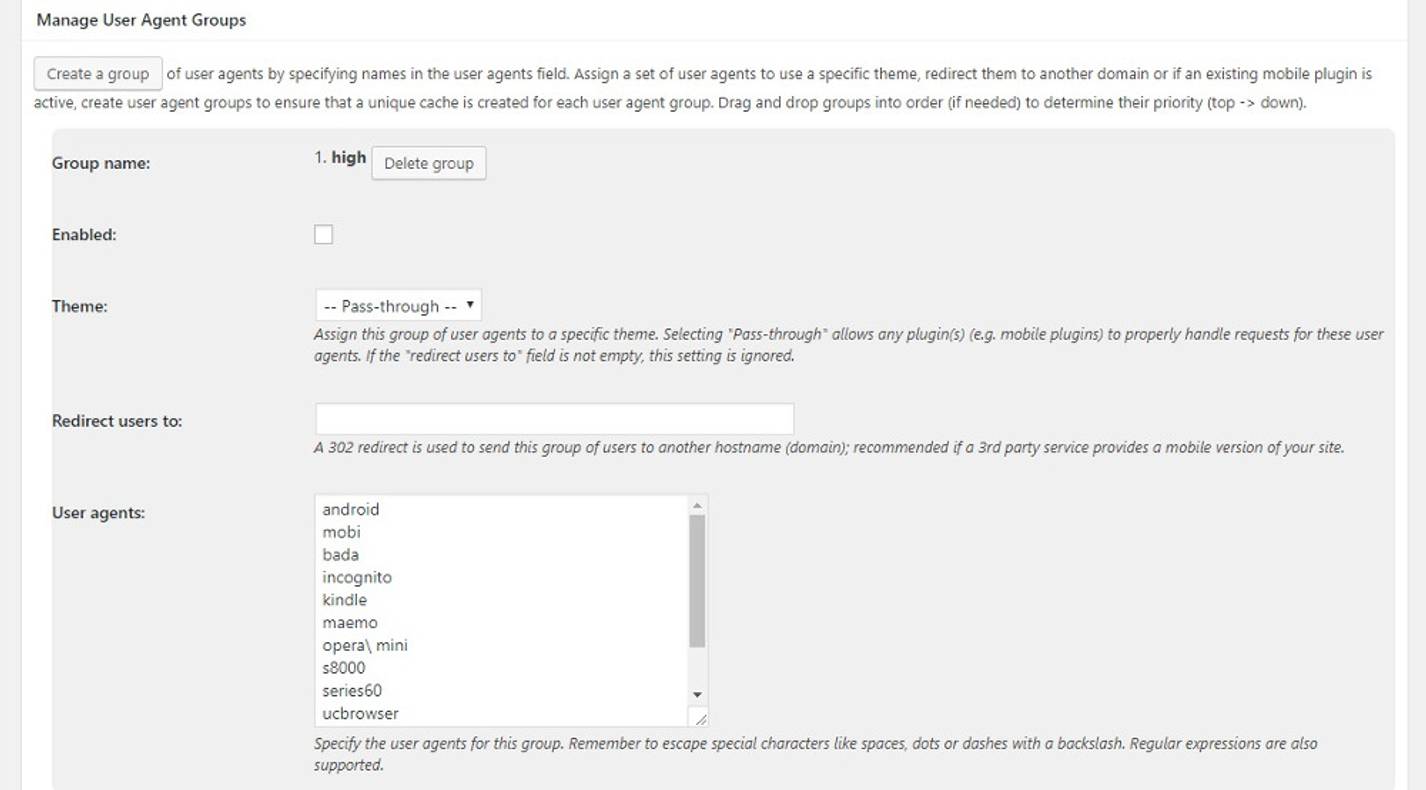
We don’t see many usage scenarios for this functionality in the age of responsive web design. Instead of depending on numerous themes or a mobile-only subdomain, the recommended approach nowadays is to make your site responsive from the start.
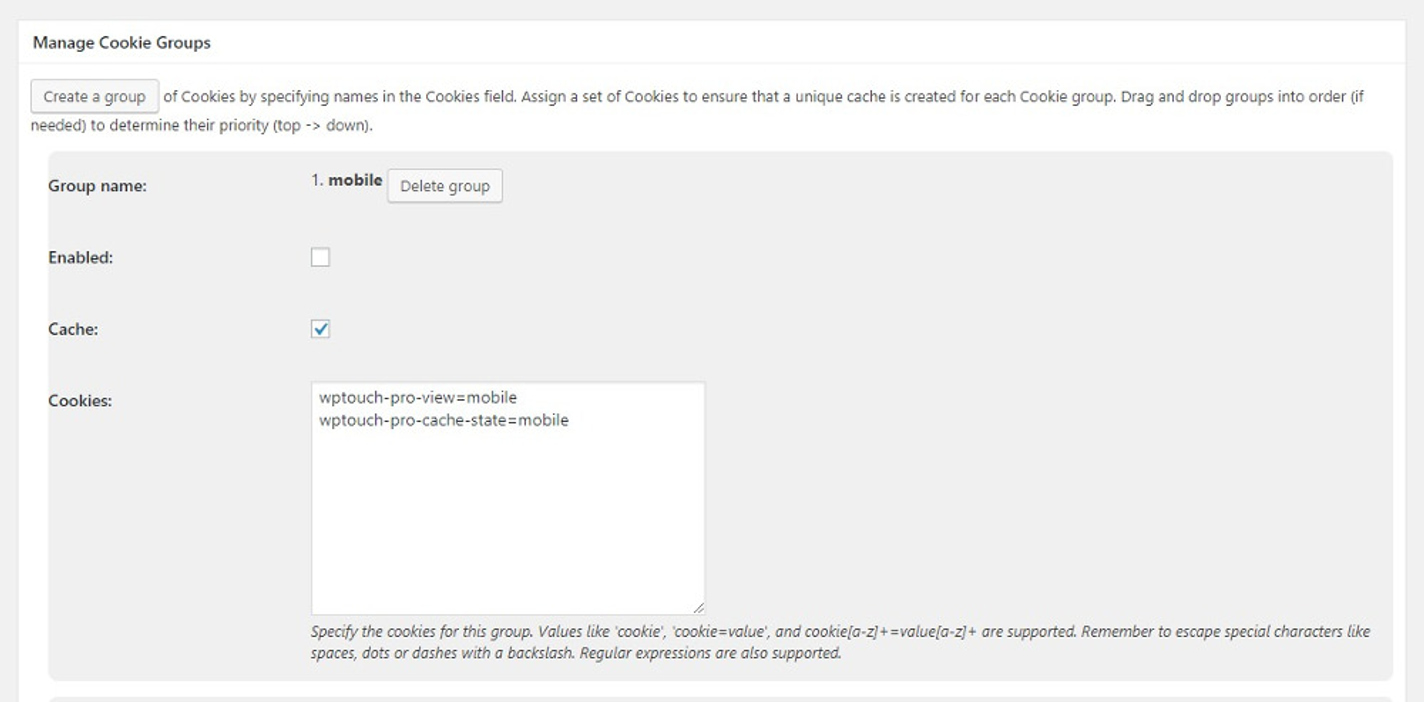
Cookie groups
“Cookie Groups” is the next caching group that W3 Total Cache supports. This feature allows you to build distinct caching buckets and actions based on the cookies in a request. Like “User-Agent Groups”, most sites will not require a specific cookie-based caching setting. If your site requires cookie-based caching, we recommend collaborating with a developer to implement it properly.
Manage referrer groups
With “Referrer Groups,” you may create custom caching behavior depending on a request’s HTTP referer in W3 Total Cache. For example, you might construct a referral group of search engines and tailor caching behavior to requests from only those domains.
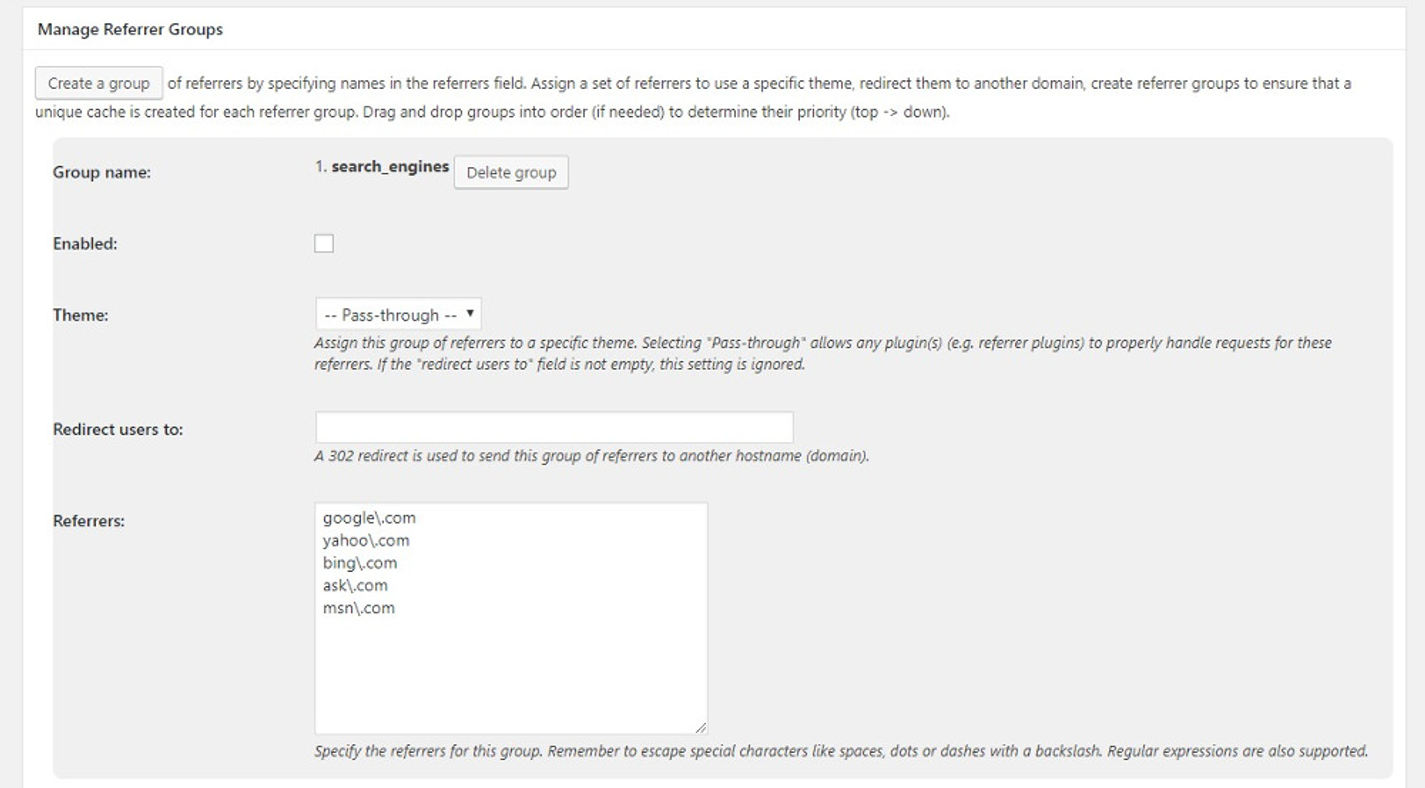
The “Referrer Groups” function, like the “User-Agent Groups” discussed above, allows you to redirect requests to a different website. We don’t advocate establishing referrer groups for most WordPress sites because they aren’t required.
Conclusion
Making WooCommerce pages run effectively with the W3 Total Cache plugin will be a challenging task. As previously said, this makes sense when you have a smaller shop connected to a more extensive blog or content site. We strongly advise people who are still not convinced by the notion of CDN to give it a try. CDN collaborates with your web host to reduce server load and improve site speed.
We hope this article will help you understand how to configure W3 Total Cache with the WooCommerce store. As you can see, the W3 Total Cache plugin has a plethora of options and settings. W3TC provides everything you need to improve the speed of your WordPress site, from page caching to asset minification. Therefore, taking advantage of it to peak your sales is a wise choice!


