
How to Add Cost of Goods Sold in WooCommerce
By Sam Nguyen

Gaining high profits is the final goal of every online brand nowadays. It is a must and an encouragement for them to maintain their website in the long run. This is another explanation of the need to balance between the revenues and multiple types of cost, including producing, inventory, shipping, and even taxes. If you are dealing with the same issue, we got your back!
This article will inform you of WooCommerce cost of goods sold, their advantages, and focus on How to add cost of goods sold in your WooCommerce store. Keep reading to find out more!
What is Cost of goods sold and their importance

Cost of goods sold, also known as COGS, are costs connected to items sold or costs associated with inventories that you purchase to sell to customers. COGS are a component of the income statement, which includes the cost of purchasing inventory and distributing it to customers as well as the expenses of manufacturing the products or providing the services. To make a profit, the cost of products sold must be less than the revenue the company earned during the reporting period.
Calculating the Cost of goods sold is based on the following formula, where the starting inventory will be added with purchases throughout the period, then subtracting the ending inventory: Cost of Goods Sold = Beginning Inventory + Purchases – Ending Inventory
By grasping information about your online store’s cost of goods sold, you can quickly plan for the future as well as think of the solutions to several potential problems related to your revenues. Plus, thanks to the help of COGS, online merchants can determine which is their best and worst selling products and concentrate more on the marketing effects for them.
How to add WooCommerce cost of goods sold on your website?
Now that you know how to calculate the WooCommerce cost of goods sold, it might be time-consuming to manually perform the task, especially if you are handling many customers. That is the reason why you need the tutorial on adding COGS to your website!
With this outstanding plugin of WooCommerce, your problems are solved. No more beating around the bush, let’s get started:
Step 1: Install the plugin
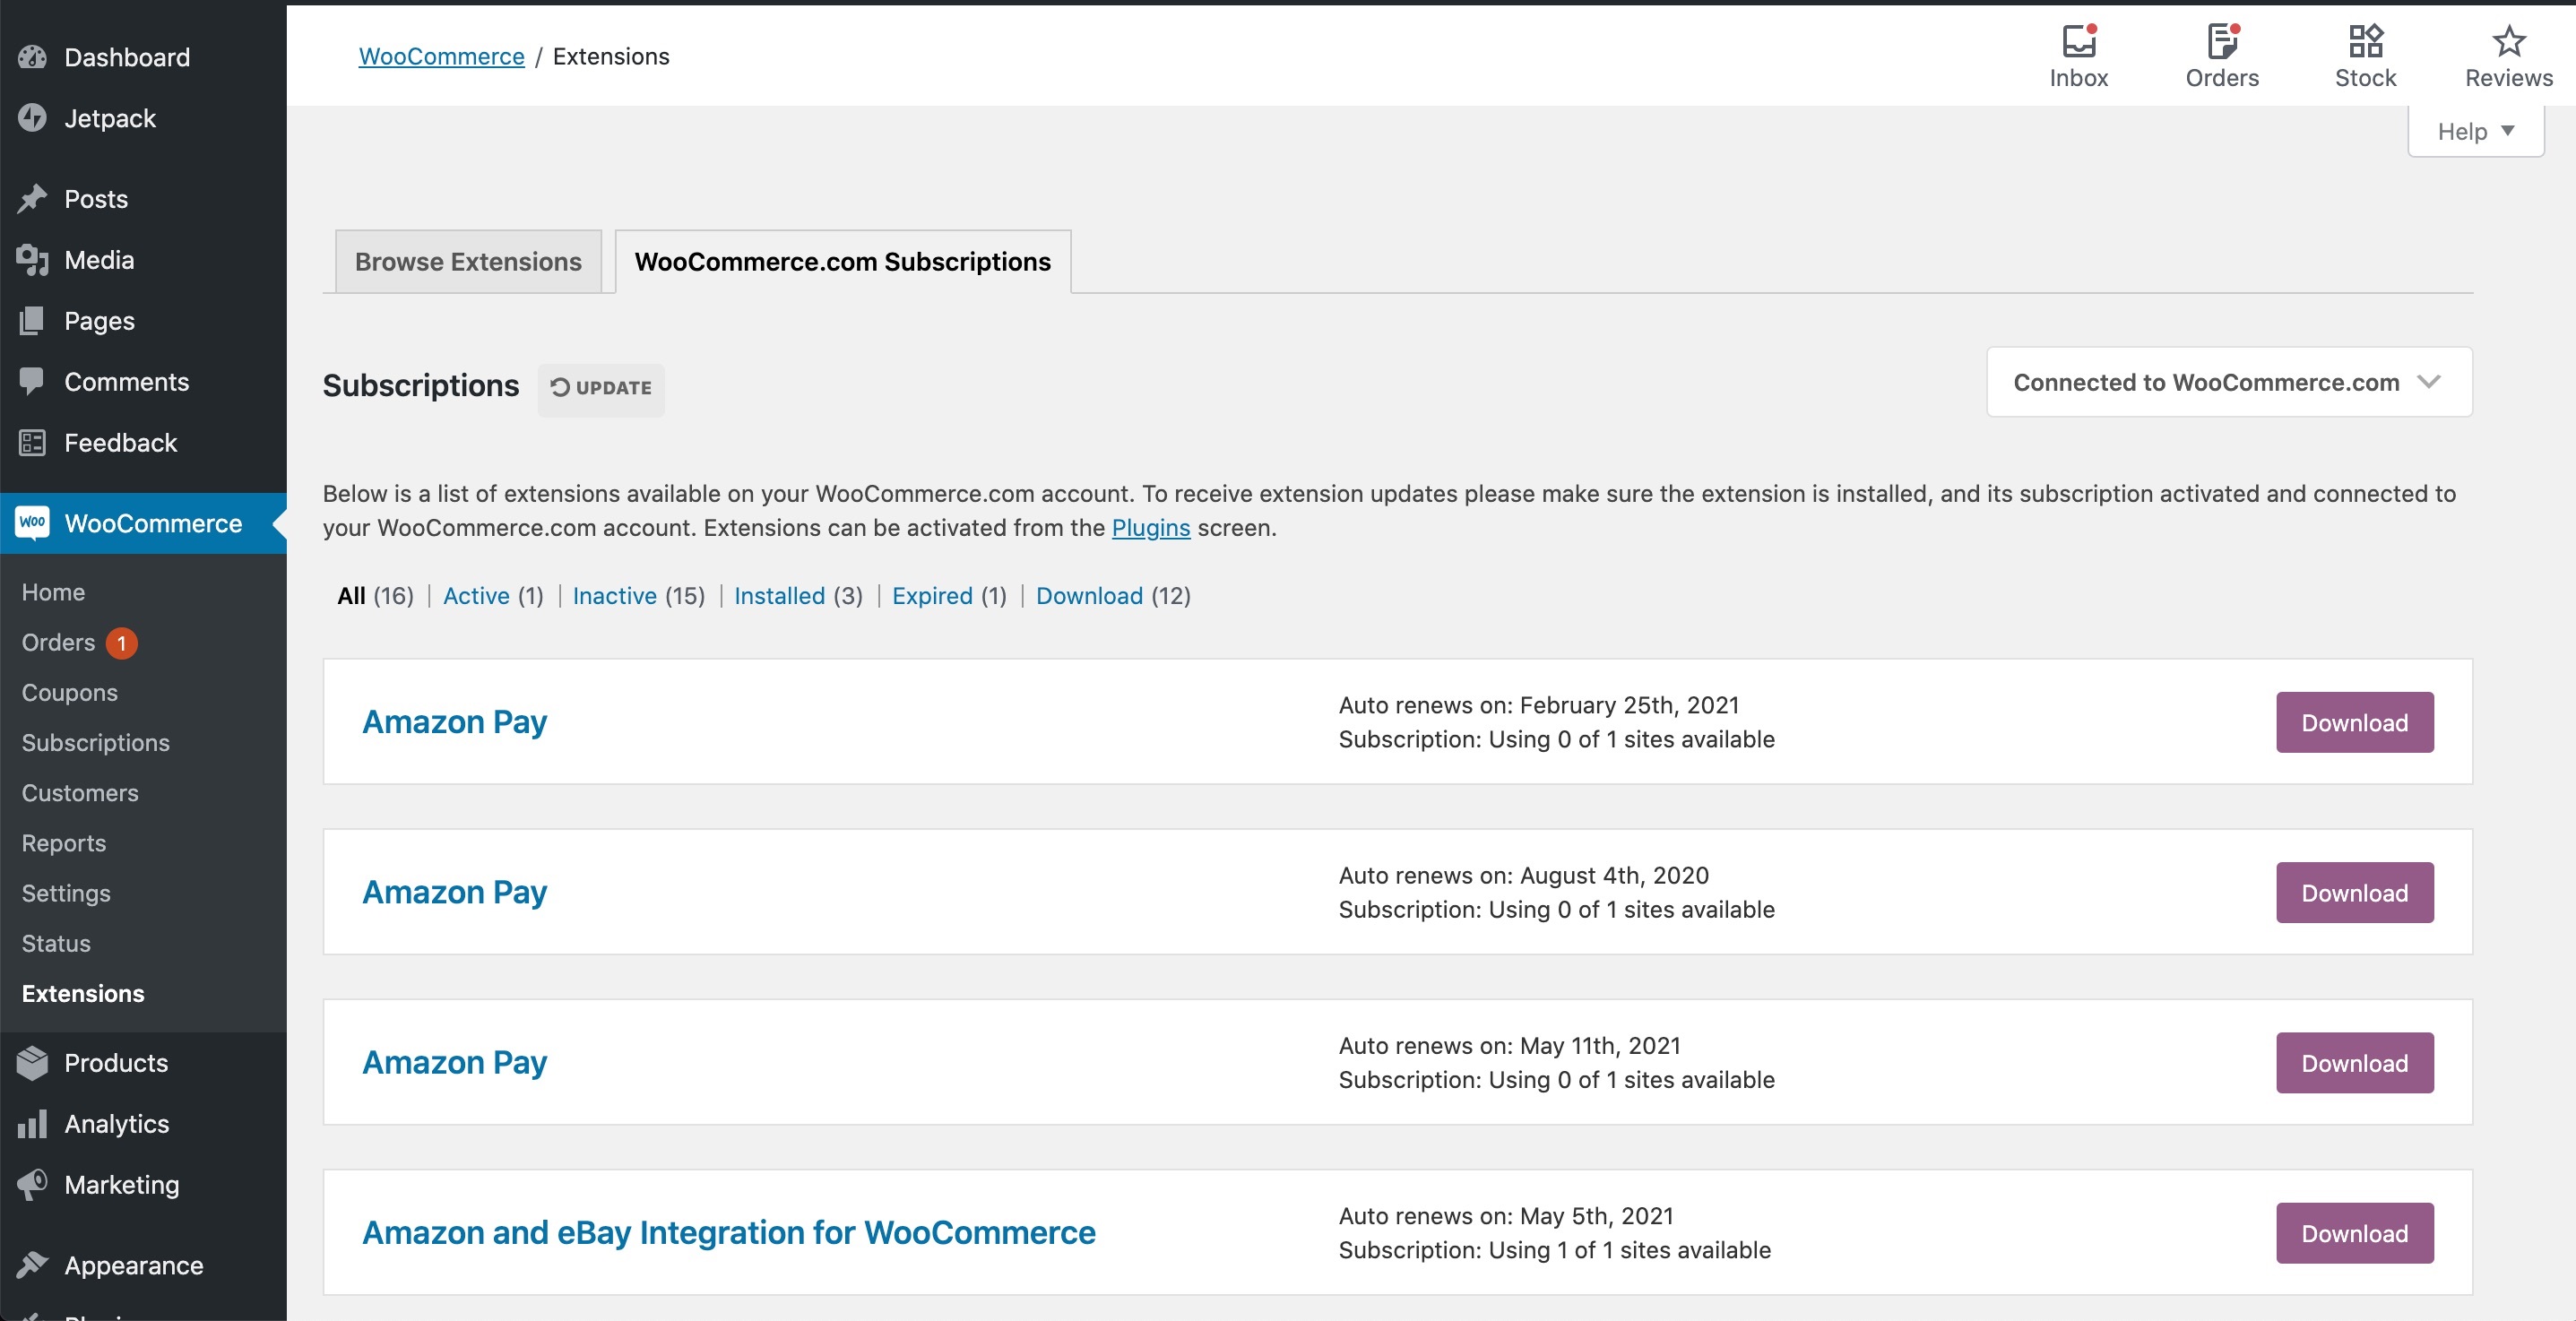
We start with something easy first, just navigate to the WooCommerce > Extensions > WooCommerce.com Subscriptions from your Dashboard and click on the “Download” button next to the icon of the extension:
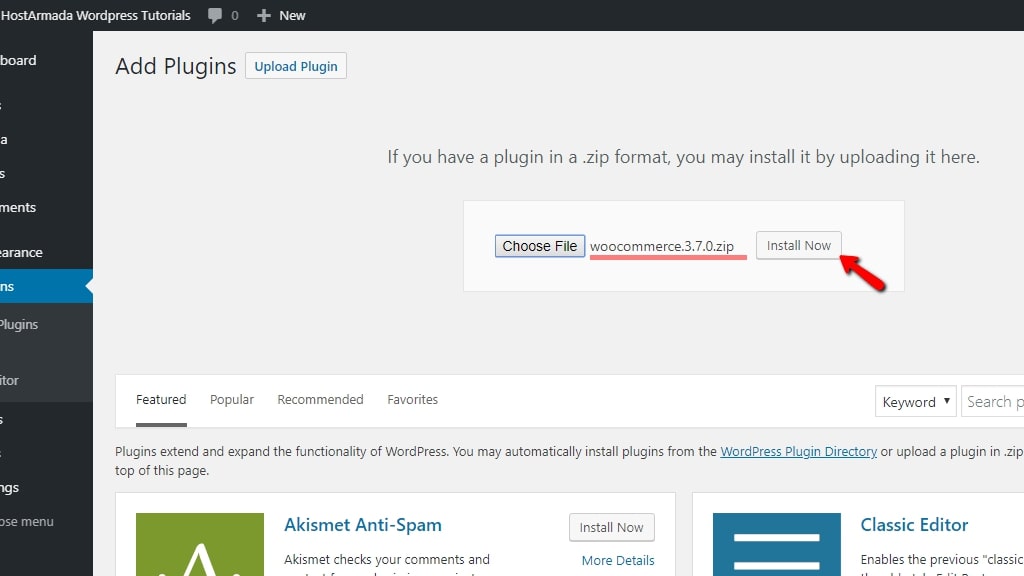
Once you have done that, the system will download the plugin file to your device. Next up, go to Plugin > Add New and “Choose file” to upload the file that we have just downloaded:
Finally, continue to place your mouse on “Install Now” and “Activate” buttons to make use of the application!
Step 2: Change the settings
It’s time to configure the plugin so that it matches well with your online store. When you go to WooCommerce > Settings > Products > Inventory, you can check out all of the fields that have been defaultly excluded from your income such as Checkout Fees, Shipping Costs and Taxes. Therefore, tick or untick the box if you want to calculate any of them, too:
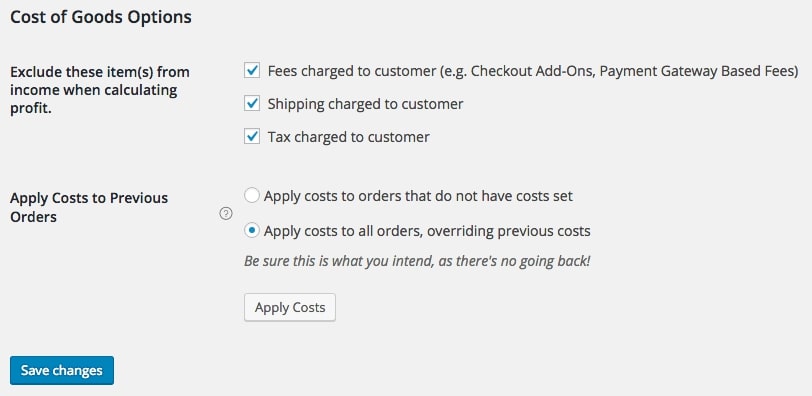
It is recommended that you leave all of these settings just the way they are, because normally the reports on WooCommerce cost of goods solds do not include them.
Don’t forget to “Save changes” before moving on to the next step!
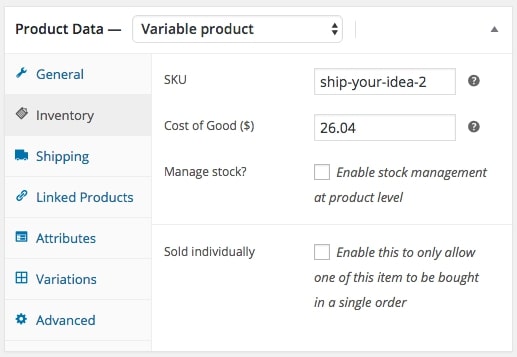
Step 3: Adding the cost for products
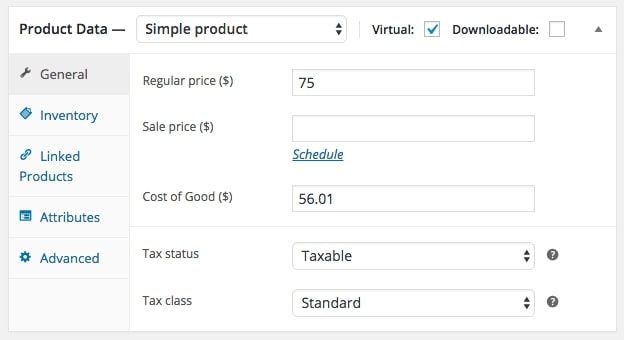
While editing the product information, you can check out the “Cost of Good” field and fill out the price for them. Remember, this is the solely cost of producing the item, which means do not add up the shipping and taxes before adding the price:
If you want to make adjustments to bulk products simultaneously, click on the “Bulk Edit” action on your Product View section. In this way, you can add a fixed fee for all of the selected goods and then change the percentage of variations for them:
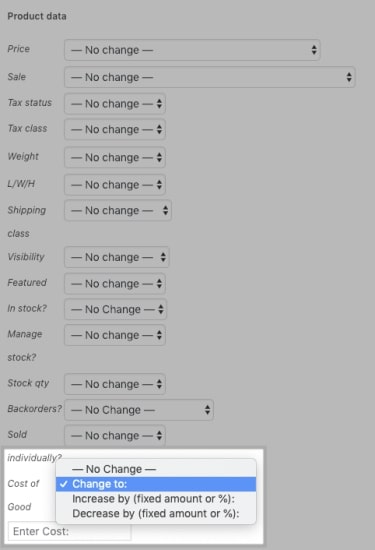
Also, the product variations are enabled to be added with a default cost:
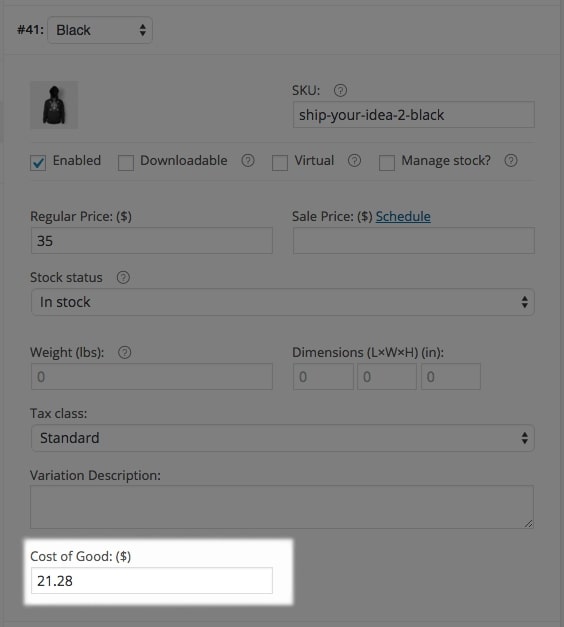
Or another way to do so is separately customize the price for each variation at once:
Step 4: Applying to previous orders
If you would like, you may add the cost of goods to orders that you’ve already made. Once you install the extension and assign a cost to each product, you may apply these charges to orders which have never had a cost assigned to them. When an order is received, the costs of the relevant goods are deducted so that you can immediately see your profitability.
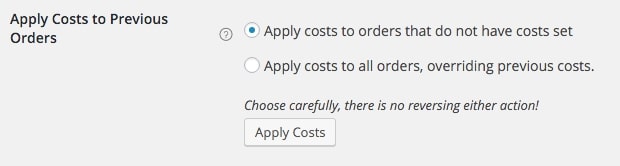
You must opt to override any related expenses before any previous charges are affected. We generally don’t suggest using this option unless you have a good reason to do so.
Step 5: Checkout the reports
The great thing about using WooCommerce cost of goods sold plugin is their numerous types of reports. By going to the WooCommerce > Reports, you can find out that all the numbers have been automatically transferred into reports, such as:
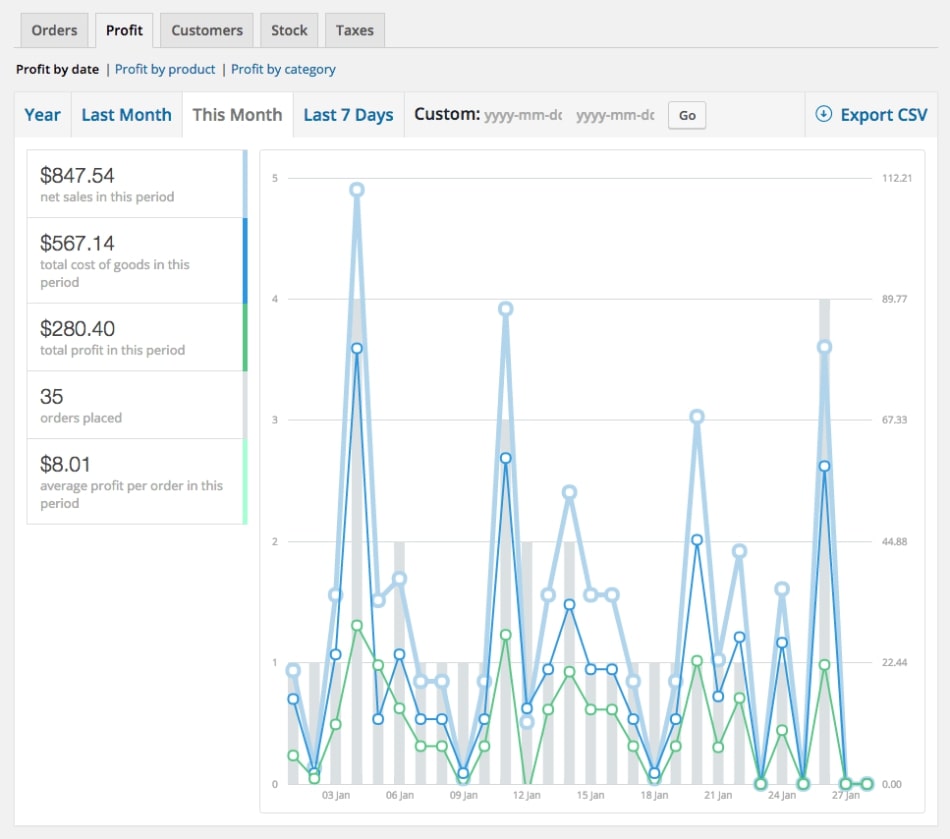
You may view your net sales (minus any excluded expenses), total cost of goods, total profit, and the average profit per order for the chosen time period when you use the Profit by Date reports:
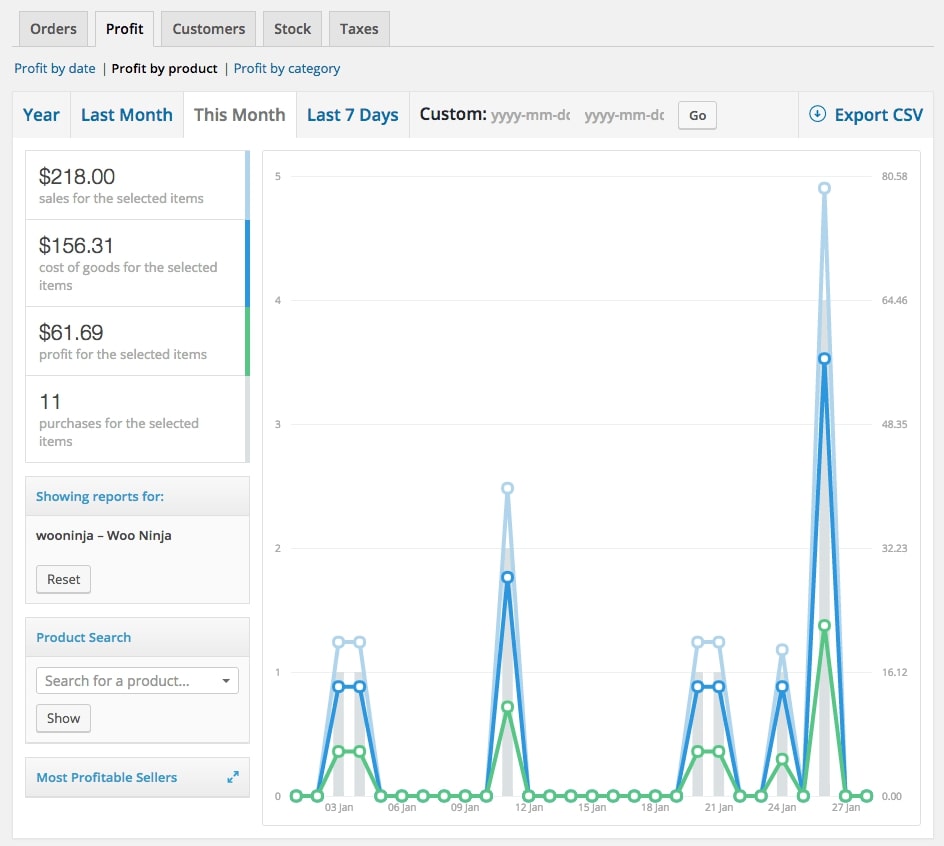
By generating all possible Profit by Product reports, you may determine your net sales (i.e. sales less expenses you’ve omitted), total costs, total item profit, and total item purchases for the time period chosen:
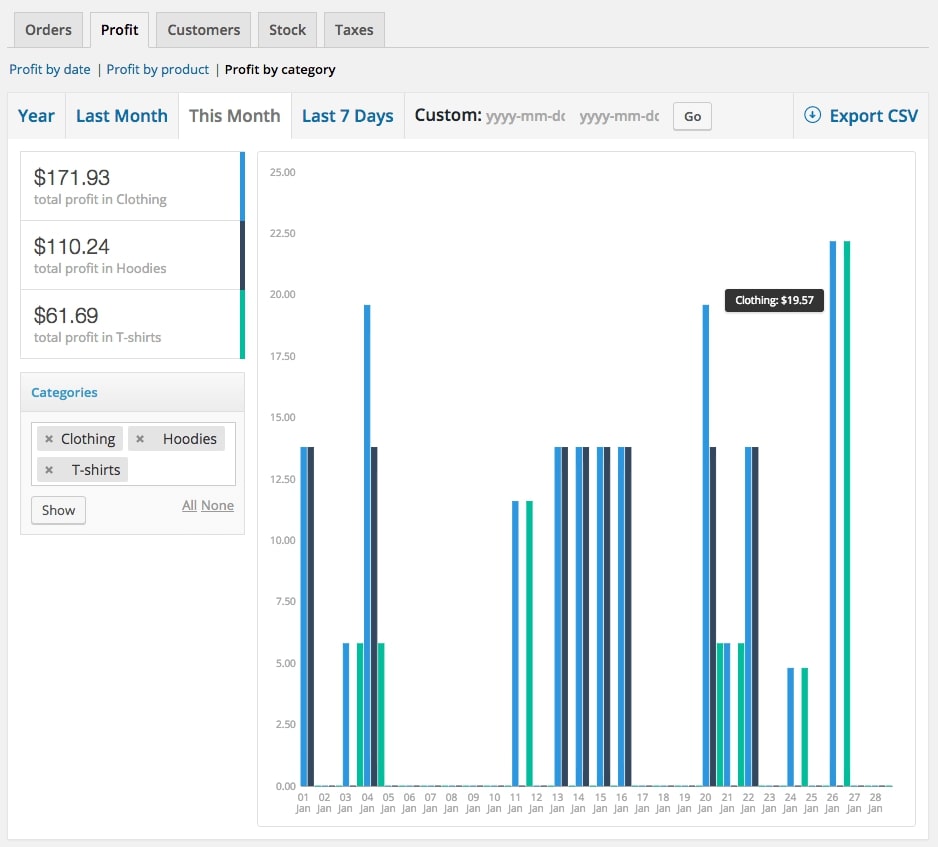
Then, we have the Profit by Category reports which illustrate the statistics related to your selected category in a specific time period:
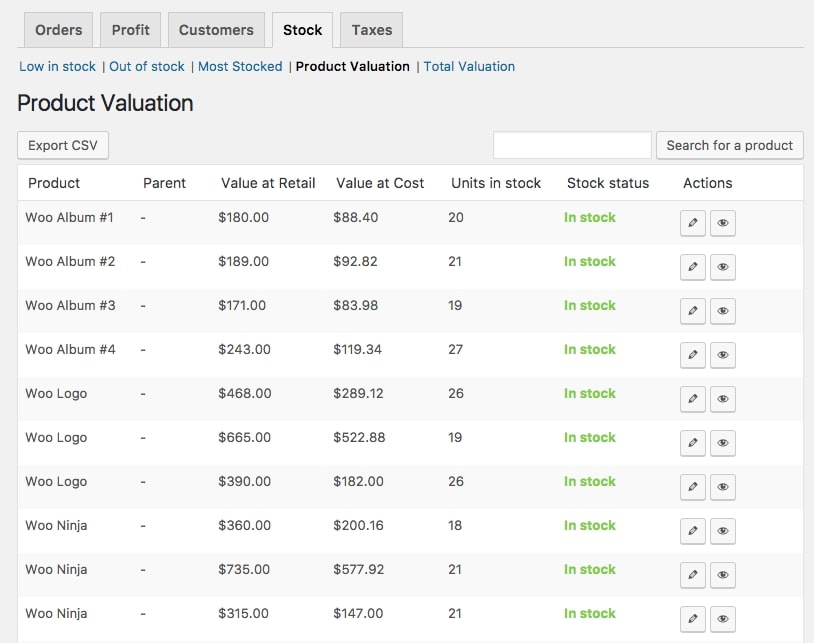
Alternatively, Product Valuation reports in the WooCommerce > Reports > Stock > Product Valuation might also be helpful when it comes to the inventory valuation at retail price, the total value of the products as well as stock units:
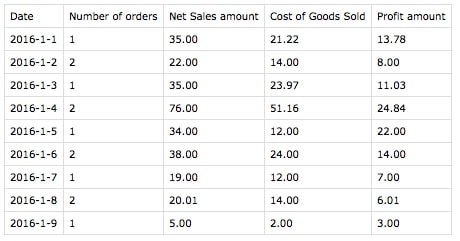
Last but not least, not only can you view the mentioned reports on your WooCommerce dashboard but also export them into a CSV file. The data reported in the file includes dates, cost, sales and even number of orders. All you have to do is click on the “Export to CSV” button located on the top right of the charts:
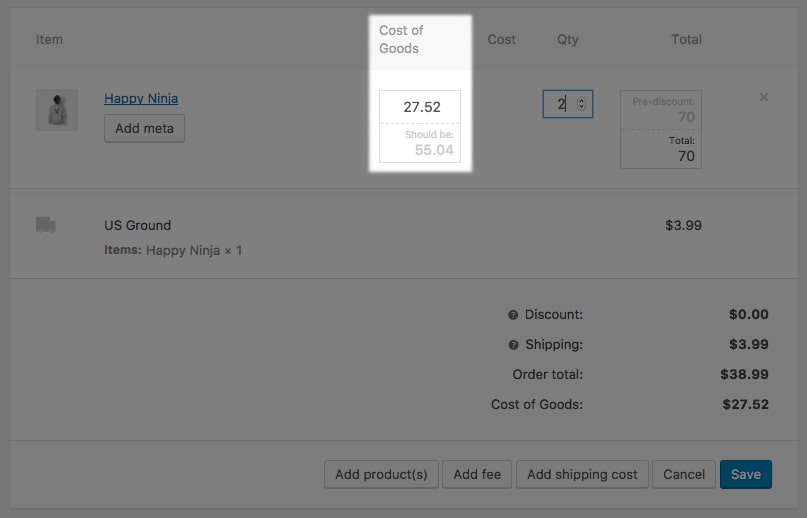
Step 6: Editing Cost of goods
When you may modify an order before payment is complete, the cost for the line item will also be modifiable. When changing the “Cost of Goods” value, you are modifying the overall cost of the line item (product cost x quantity bought):

There’s one more thing you need to be aware of is that it will not immediately update if you change the amount of a line item. Because in this instance, you’re doing something like refunds, when product cost is not necessarily equal to cost/ quantity.
Conclusion
In a nutshell, we hope that our article has cleared your thoughts on the necessity of WooCommerce cost of goods sold and How to add cost of goods to your WooCommerce store using a plugin. It depends significantly on you to decide whether this feature is helpful or not, but after all, there is no perfect recipe for building a successful online business. So, why don’t give it a try and see the result?


