How to Customize a Product Page With Beaver Themer in WooCommerce?
By customizing the product page in your WooCommerce store, merchants can easily modify the store to match with the newest and build a great impression for your store. And, the best resolution for developers is to use the Beaver Themer.
So, what is Beaver Themer? And how to customize the product page with Beaver Themes, All will be clarified in this post.
What is Beaver Themer?
Along with Beaver Builder, Beaver themer is an extension created for WordPress plugin which offers users a variety of features that cannot be done on Beaver Builder. Via it, users are able to create and edit headers, footers, link shortcodes from an element to others.
On Beaver Builder, merchants are provided with three pricing plans with different features, which are:
- Agency: $399
- Pro: $199
- Standard: $99
Why should people use Beaver Themer to customize their WooCommerce Product Page?
Edit content with no shortcodes: To edit the content on WordPress by Page Builder, merchants have to use shortcodes that confuse multiple merchants since not everyone has knowledge of coding. However, with Beaver Themer, users can freely edit the content without shortcodes. So, even when the Beaver Builder is deactivated on WordPress, no content will be lost.
-
Offer plenty of tutorials and supports: Just by several keywords on Google or Youtube, you can find tons of videos guiding people to use Beaver Themer better. More than that, you can get support from many other sources for Beaver Themer users like forums, Slack groups, Facebook groups, newsletters, etc.
-
Customize the page easily: By default, WordPress enables users to customize different parts of their website within the template. However, with the combination of Beaver Builder and Beaver Themer, you can customize easily outside of the theme elements offered. Especially, there is hardly any usage of code in the building process, so that anyone can create their own site without any obstacles.
-
Offer advanced design features: With Beaver Themer, users will be offered multiple advanced features which enable them to customize the page with ease. Particularly, if you have knowledge of HTML, CSS and other modules, you can create the site exactly as you want.
How to Customize a Product Page With Beaver Themer in WooCommerce?
Step 1: Install the plugin
NOTE: To customize the product page with Beaver Themer in WooCommerce, you need to install Beaver Builder (only the premium version) in advance.
First, access the website of Beaver Builder and download Beaver Themer to your devices.
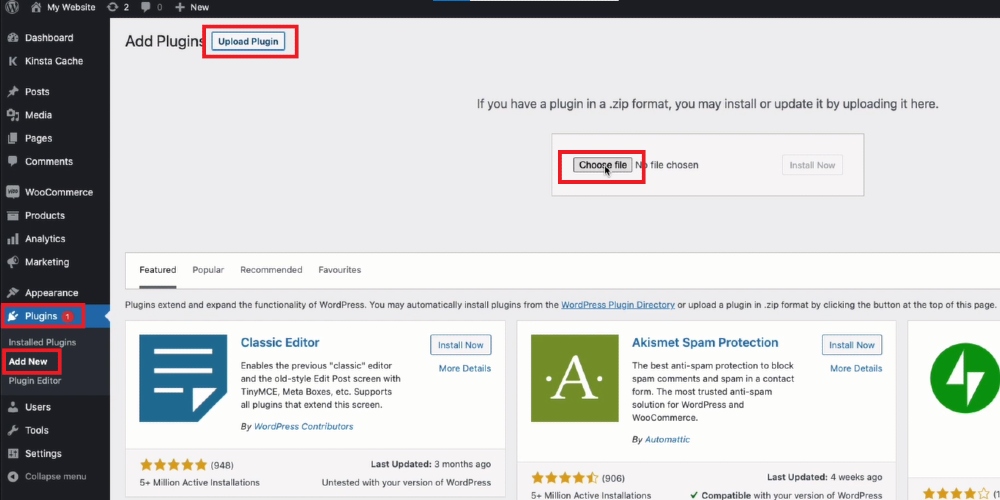
Then, log in to your WordPress account and go to the dashboard. There, open Plugins and select the Add New button to upload the file of Beaver Themer you have just downloaded.

After the installation process is done, the Install button will turn into Activate. Click on it and you can move to the next step.
Step 2: Add new themer layout
After activating, a section named Beaver Builder will appear on the screen; open it.
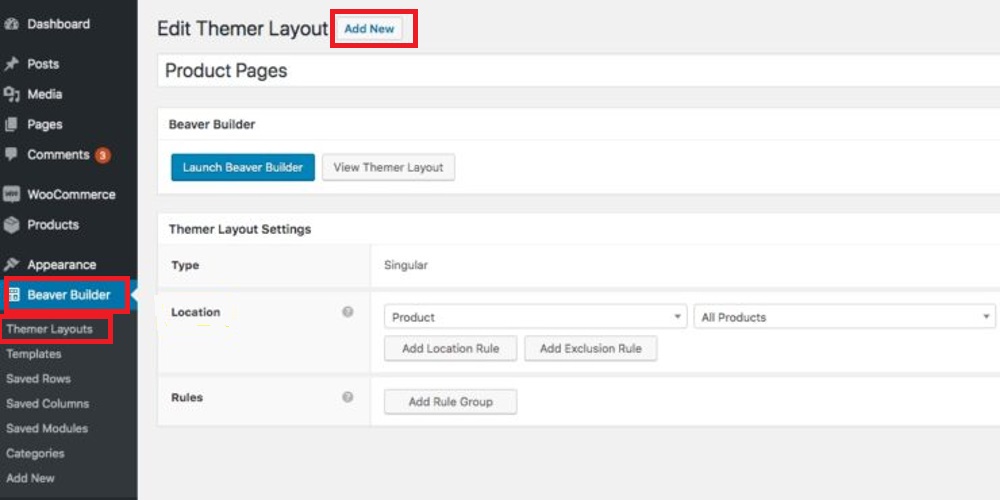
In Beaver Builder, select Themer Layouts and click on Add New to add a new theme layout for your store.

Then, a new window will be displayed on the screen, you can add the name and locations you want in the Title and Location field and in Layouts choose Singular.
Afterwards, click on Update to save changes.
Step 3: Select template
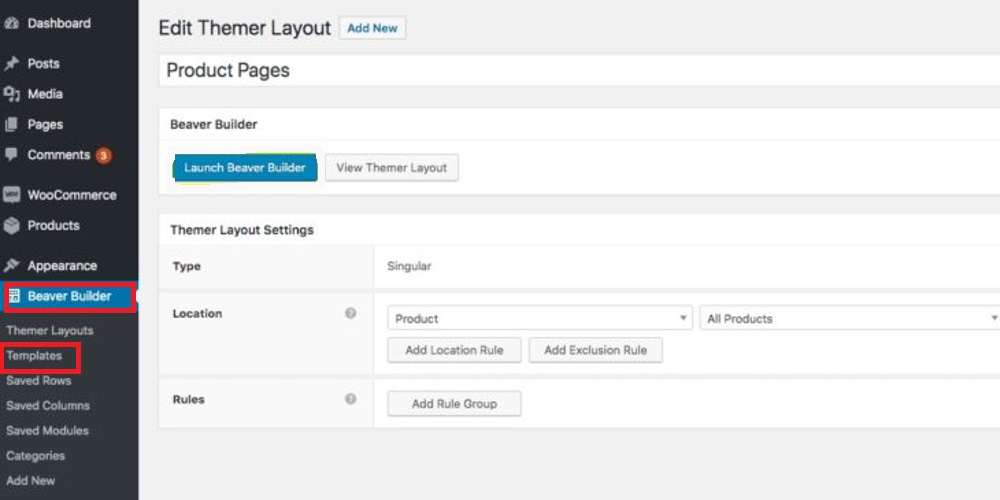
Come back to your WordPress dashboard and navigate to Beaver Builder.
Next, you will be redirected to a new window; choose Templates. Since you want to customize a product page with Beaver Themer, so click on templates labeled Product

Step 4: Customize the product page
Now, you can start customizing your product page with Beaver Themer. Via it, users are allowed to add, delete, and move rows, columns, and modules.
When you are satisfied with the template, click on Done button and you will see a list of buttons on top of the screen like Discard, Draft, Publish, and Cancel.
Click on Publish to upload this Beaver Themer to your WooCommerce store
Final thoughts
In conclusion, it can be seen that Beaver Themer is a powerful tool for the eCommerce store owner to customize the product page with ease. With these four steps, anyone, even the freshers, can soon be satisfied with the changes they have made.


