WooCommerce Extended Coupon Features FREE Guide
Coupons have become an essential aspect of online marketing, and you can now find them on nearly every shopping platform. If you run a WooCommerce store, you might want to consider giving your customers a discount. However, WooCommerce lacks many essential coupon functionalities, and you may need to use a plugin to create more creative coupon offers.
In this article, we’ll give you a comprehensive guide on one particular plugin, WooCommerce Extended Coupon Features Free .
Let’s get started!
About WooCommerce Extended Coupon Features Free
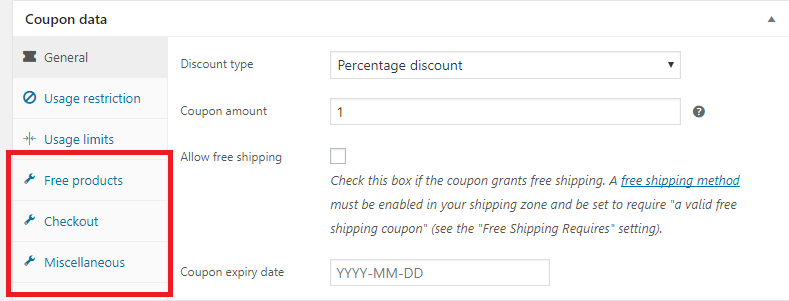
WooCommerce Extended Coupon Features FREE is a highly recommended plugin that was created by Soft79. This plugin allows you to extend the functionality of WooCommerce coupons as well as set up automated discount rules. It’s simple to use, and the functionality is nicely incorporated into the WooCommerce Edit Coupon panel.
Benefits of Using the WooCommerce Extended Coupon Features Free Plugin
To begin with, the WooCommerce Extended Coupon Features Plugin is completely free, so you won’t have to pay anything to make use of all of its features.
Second, the plugin assists you in boosting sales and increasing customer loyalty. To meet their conversion goals, most online businesses now employ coupons and discounts. By 2022, digital coupon redemptions are estimated to total more than $90 billion.
Finally, the plugin has a number of fantastic coupon features that you can utilize to create these offers, which we’ll be showing you in the next part.
Main Features of WooCommerce Extended Coupon Features Free
- Create discounts that will be applied to a customer’s cart automatically if certain conditions are achieved.
- Extended coupon restrictions
- Restrict coupon by shipping method
- Restrict coupon by payment method
- Restrict coupon by customer credentials or customer role
- Restrict coupon by combinations of products (e.g. buy both A and B and get 20% off!)
- Restrict coupon by amount of matching products (e.g. buy three products from category C and get a free product!)
- Apply coupon using an URL
How to Install WooCommerce Extended Coupon Features Free to Your Store?
Step 1: Download the plugin
First of all, you need to download the plugin from this link: https://wordpress.org/plugins/woocommerce-auto-added-coupons/
Step 2: Upload the plugin
Next, you have to upload the plugin in the /wp-content/plugins/ directory, or you can go to the menu New Plugin and install it automatically in WordPress.
Step 3: Activate the plugin
Now that you’ve installed the plugin, just simply activate it through the Plugins menu in WordPress.
How to Use Features of the WooCommerce Extended Coupon Features Free Plugin?
This section will provide you with an overview of how to utilize the plugin’s main features. Let’s take a look at all of the tabs and fields that WooCommerce Extended Coupon Features adds to the WooCommerce Coupon Management pages.
1. Additional usage restrictions
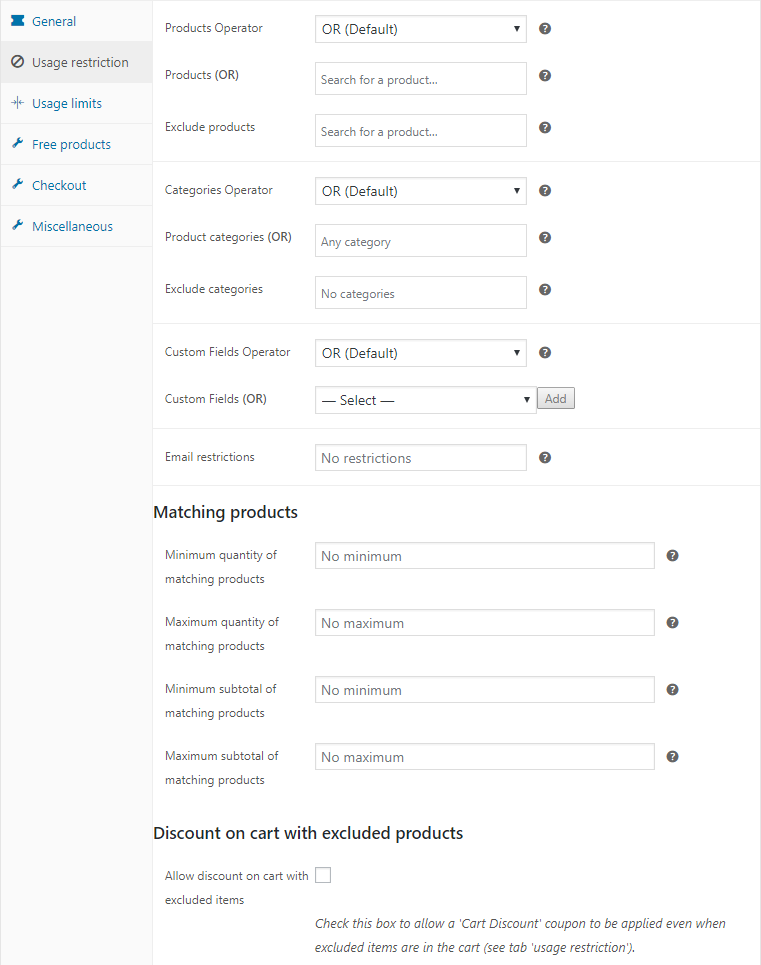
The Usage Restriction tab of the coupon edit page has a few new features. Extra rules that function alongside the Products, Exclude products, Product categories, and Exclude categories rules can be configured here.
- AND Products (not OR)
A coupon is valid by default if just one of the selected products is in the shopping cart. Check this box if all of the products listed on the Usage Restriction page must be in the cart to verify the coupon. On the Usage Restriction tab, the term ‘OR’ or ‘AND’ is shown next to the Products field.
- AND Categories (not OR)
Suppose a product from any of the selected categories is in the cart, the coupon is automatically validated. Check this box if the coupon must be validated with products from ALL of the categories listed on the Usage Restriction page. On the Usage Restriction tab, the words ‘OR’ or ‘AND’ are presented next to the Products field.
- Minimum/maximum quantity of matching products
If the number of products meeting the product or category limits (on the Usage Restriction page in the cart) is within this range, the coupon will be valid. If no product or category limitation is provided, the total quantity of all items in the cart will be utilized.
- Minimum/maximum subtotal of matching products
If the total value of the products that fit the product or category limitations (under the Usage Restrictions tab in the cart) is within this range, the coupon will be valid. If no product or category restrictions are specified, the total value of all items in the basket will be applied.
It’s worth noting that the difference between this option and the General tab’s ‘minimum/maximum spend is that the subtotal of all the goods in the cart is compared on the general tab.
2. Free Products
In the Free products field, on the Free products tab, you can enter one or more products that will automatically be added to the cart when the coupon is applied. When the coupon expires, the product will be deactivated automatically.
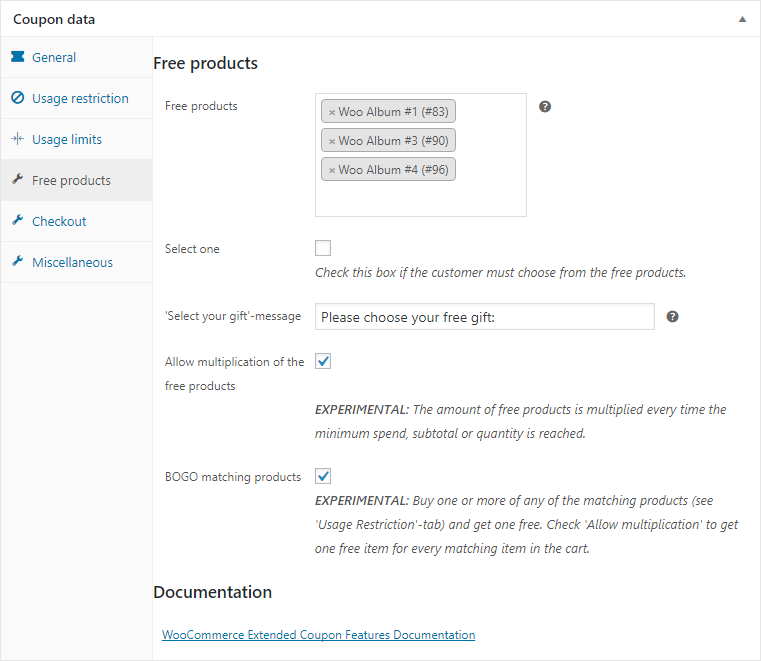
If the Select one checkbox is ticked, the customer will be required to select one (or more) of the selected products on the cart or checkout page. The customer can also select the desired variations of a variable product. You can also change the displayed message.
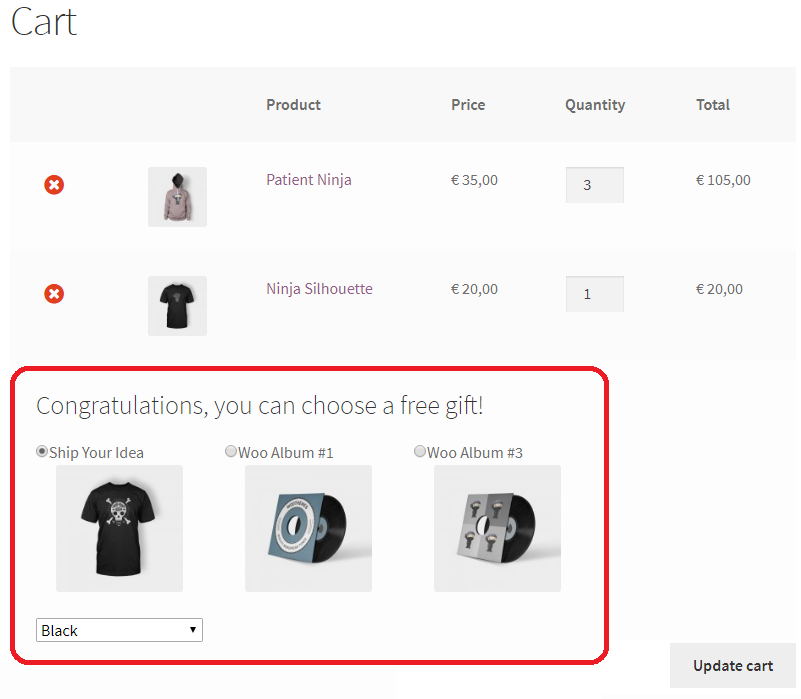
If you want to change the visual appearance of the product selection, create a subfolder woocommerce-auto-added-coupons-pro in your themes directory, copy and alter the files templates/cart/select-free-product.php and templates/checkout/select-free-product.php in here.
When the option Allow multiplication of free products is checked, the number of free products is multiplied each time the minimum spend, subtotal, or quantity is met. The free items will be added three times to the cart if the minimum purchase is $50 and the consumer has $160 worth of products in the cart.
3. Checkout
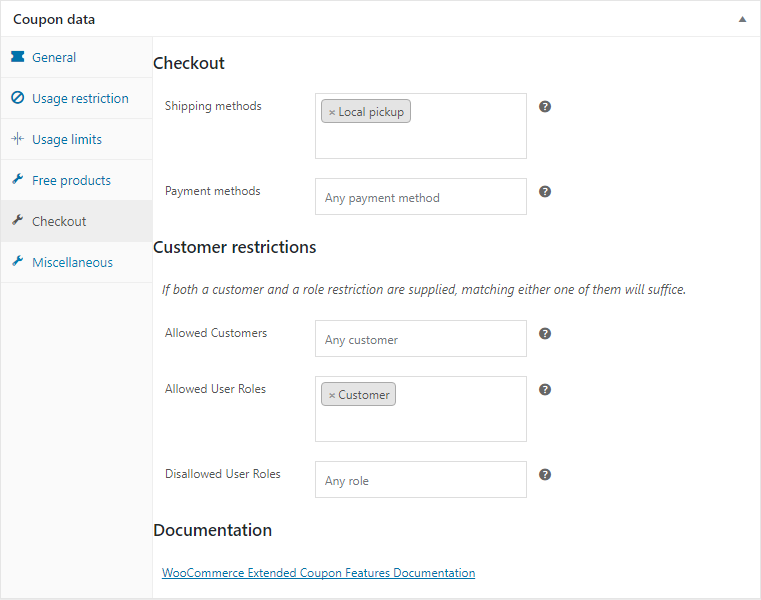
Restrictions can be set on the Checkout tab that will only be active when the consumer begins checkout.
- Shipping methods
If the consumer chooses one of these delivery options, the coupon will be valid.
- Payment methods
If the consumer chooses one of these payment methods, the coupon will be valid.
- Customer restrictions
Allowed customer: The coupon will only be valid if the customer is logged in and in this list when you enter one or more customers here.
Allowed user roles: If you put one or more user roles here, the coupon will only be valid if the consumer belongs to one of them (e.g. Wholesale buyer or Guest).
Disallowed user roles: If the consumer does not have any of these user roles, the coupon will not be valid (e.g. Wholesale buyer or Guest).
4. Miscellaneous
- Auto coupon
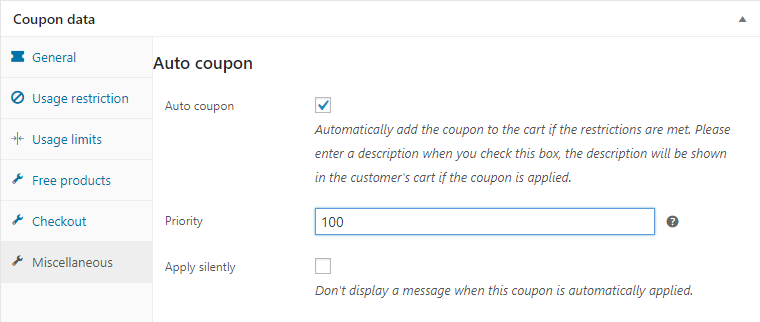
Simply click the “Auto coupon” checkbox on the Miscellaneous page to transform a coupon into a discount rule. When selecting this option, it’s critical to provide a coupon description, as this will be displayed to the customer.
And this option is enabled, when the discount’s requirements are satisfied, the discount will be added to the cart automatically, and the description will be shown to the customer and on the cart page. The discount will be withdrawn from the cart whenever the circumstances are no longer satisfied, such as when the consumer removes an item from the cart.
- Apply silently
The discount will not be applied with a ‘Discount applied’ notification when this option is ticked.
- Coupon by URL
You may now quickly build a link that applies a coupon to the user’s cart, possibly in combination with a product.
If the consumer visits the url, when the coupon’s criteria are not yet satisfied or the cart is empty, the coupon will not be applied; alternatively, the following notice will appear: “Coupon will be applied once it’s conditions are met. Once the conditions of the coupon are met, it will be applied automatically.”
How to Create an Automatically Added Coupon?
Step 1: Create a coupon
To begin with, from your WP admin dashboard, you need to go to Coupons to create a new coupon. Then give it a name, for example, “auto_coupon1” so that it will be easy to recognize the auto coupons.
Step 2: Set up the coupon
Next, you have to set up the coupon. Here make sure to enter a description for the coupon and also set usage restrictions.
Step 3: Choose Auto Coupon
Now go to the tab Miscellaneous and check the box Auto Coupon.
And that’s all the basic steps you need to take to create an automatically added coupon.
Final Words
Yes, you’ve made it to the end of this article! Congratulations! We hope that our detailed WooCommerce Extended Coupon Features FREE guide has given you lots of useful information and helped you make the most out of this free yet high-quality plugin.
Please feel free to reach out to us via the comments section below if you have any questions. We would love to hear from you and help you out.
Thank you for reading and we’ll see you in the next post.


