How to Fix WooCommerce Blank Cart Page Issue
WooCommerce has enjoyed immense popularity to be a reputable platform for online stores to run their businesses. It will bring about myriad benefits for users with customization options, user-friendly features, and high security for online transactions. However, many store owners complain that they suffer from several unexpected issues while going through a considerable amount of time using WooCommerce. And one of the most common problems is the blank cart page.
This issue has resulted in undesirable experiences for both store owners and customers. Hence, it is urgent to find a solution for it. Do not worry! We have come up with some reasons along with blank.
Let’s get started!
Why is the WooCommerce cart page blank?
When you or customers add any product or item to the cart, it will display the item quantity on your cart page. However, there are some problems that cause this cart page to be blank. And there are probably two principal reasons as below:
-
Conflicts between themes and plugins: When your themes and plugins are incompatible with each other or even with WordPress and WooCommerce, it also causes the cart page to be blank.
-
Use the old version of WordPress and WooCommerce: In case WooCommerce and WordPress are not updated, there might exist an incompatible function. Hence, your cart page is also blank.
How to Fix WooCommerce Blank Cart Page Issue
Due to the above reasons, your blank cart page can cause uncomfortable feelings for users. Hence, keep scrolling down to see how you could fix this unwanted problem.
Step 1: Update WooCommerce and WordPress
As said above, the blank cart page issue might come from using the old version of WordPress and WooCommerce. That is why we need to update them to make them work well. Only by upgrading them, you could ensure a smooth operation of your site, thereby providing a unique shopping experience for customers.
- Update WordPress
There are some easy steps to help you update your WordPress. First of all, you will navigate to the WordPress site’s admin area. Then, proceed to the section “Dashboard” and choose the page “Updates”. After that, you will encounter a notice to inform you that there is an available WordPress’s new version. Keep ahead by hitting on the button “Update Now” for initiating the update.
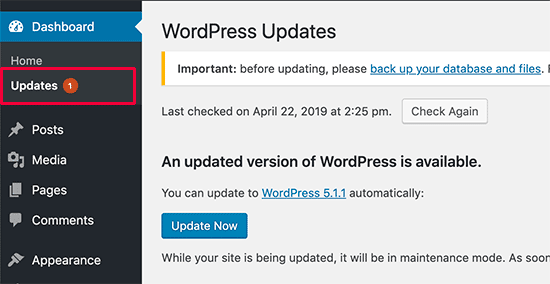
When you are done, your WordPress fetches the most updated version and gets it installed for you. You are able to check its update progress that is displayed on the screen. While it is updating, WordPress tends to put your website in the mode of maintenance.
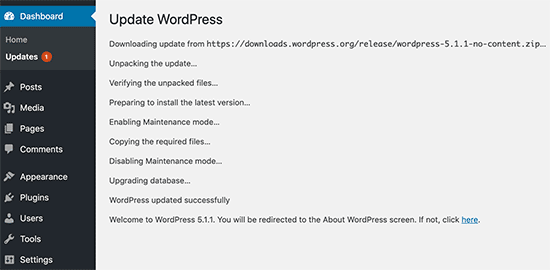
Your users could be able to see your site. Nevertheless, you cannot install themes or plugins while your upgrade is being carried out. After you have finished your update, you can be taken to the welcome screen of your WordPress. Based on each release, it is possible for you to look at the page that comes with an explanation of what is new in your WordPress, along with the features that you might try.
- Update WooCommerce
Besides updating WordPress, it is also necessary to update WooCommerce as well. Before you implement the upgrade process, you are suggested to backup your site. One of the easiest ways is to use SFTP for moving on to the folder “wp-content” to execute the backup of plugins as well as themes.
In order to achieve updates, you will need to penetrate your “WooCommerce”, choose “Extensions” before clicking on the section “WooCommerce.com Subscriptions”. You should also rest assured that your WooCommerce store gets connected to the WooCommerce.com account. Now you are supposed to update the database of WooCommerce. It will start this process with a view to matching the version of the plugin that you have updated or installed. The database aims at storing, containing, or organizing your pages, posts, orders, and products. This kind of notice could be illustrated in case you have updated or upgraded WooCommerce.

Step 2: Disable plugins, excluding WooCommerce temporarily
When you move to this step, you should be certain that you are using the latest version of WooCommerce and WordPress. And you could proceed to disable plugins temporarily, excluding WooCommerce. It could take you time to implement this step. However, it is an efficient procedure to figure out which plugin is causing your cart page to be blank.
There is a vital thing you should bear in mind is that you need to deactivate all plugins without disabling WooCommerce. To perform this, you will head to the section “Plugins” and select “Installed Plugins”. After that, you might be able to encounter the checkbox that is on the top of the plugin list. Here, choosing all plugins is a must-do thing to deactivate them. You will move on to open the menu “Bulk Actions” to choose “Deactivate”. One more time, remember to exclude the WooCommerce plugin. Then, it is a must to disable chosen plugins by hitting on “Apply”.
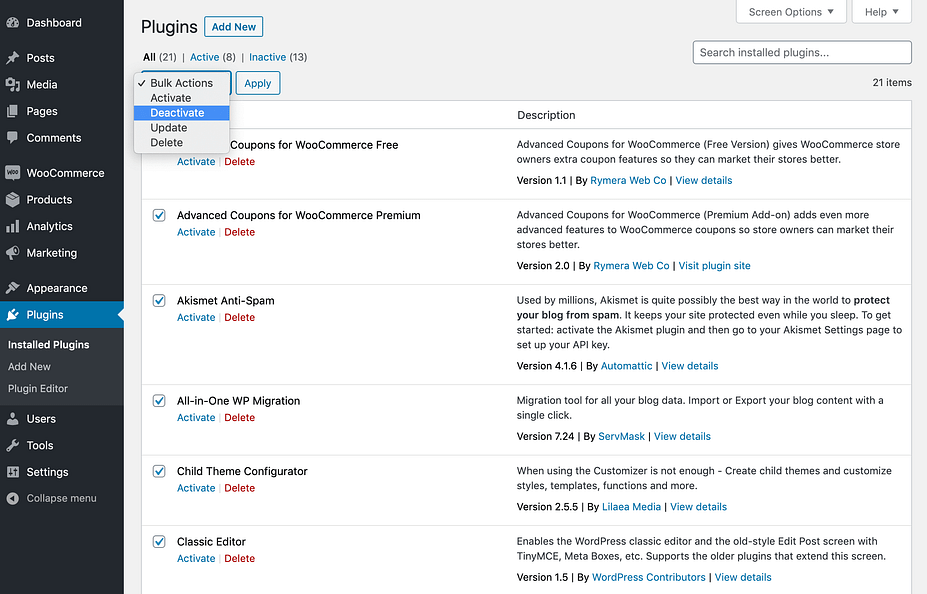
When it is completed, it is time to check to see whether your cart page is back-functioning or not. If yes, you will keep going with reactivating each plugin for checking your cart page one more time. It is essential to repeat this procedure for re-activating all plugins separately. It is effective for you to identify the existing guilty plugin.
After that, you can figure out which plugin is causing the conflict. Then, that guilty plugin should be immediately substituted or updated. Then, test the cart page again to make sure everything is okay.
Step 3: Check out the WooCommerce status system
When you have found which plugin causes the conflict and resolve it. It is time to check out your WooCommerce status system. In this step, the requirement is that you need to rest assured of a proper setting of the WC pages. In the other words, the WC pages should be set correctly. And your cart page will include the right shortcode as well as is available. Moreover, do not forget to make sure your theme contains no out-of-date template overrides.
What is more, you could access your “WooCommerce”, choose “System Status” and click on “Tools”. Here you could troubleshoot the issues related to the blank cart page by choosing “Clear all sessions”. But remember to read through consequences, coupled with instructions before hitting on those buttons.
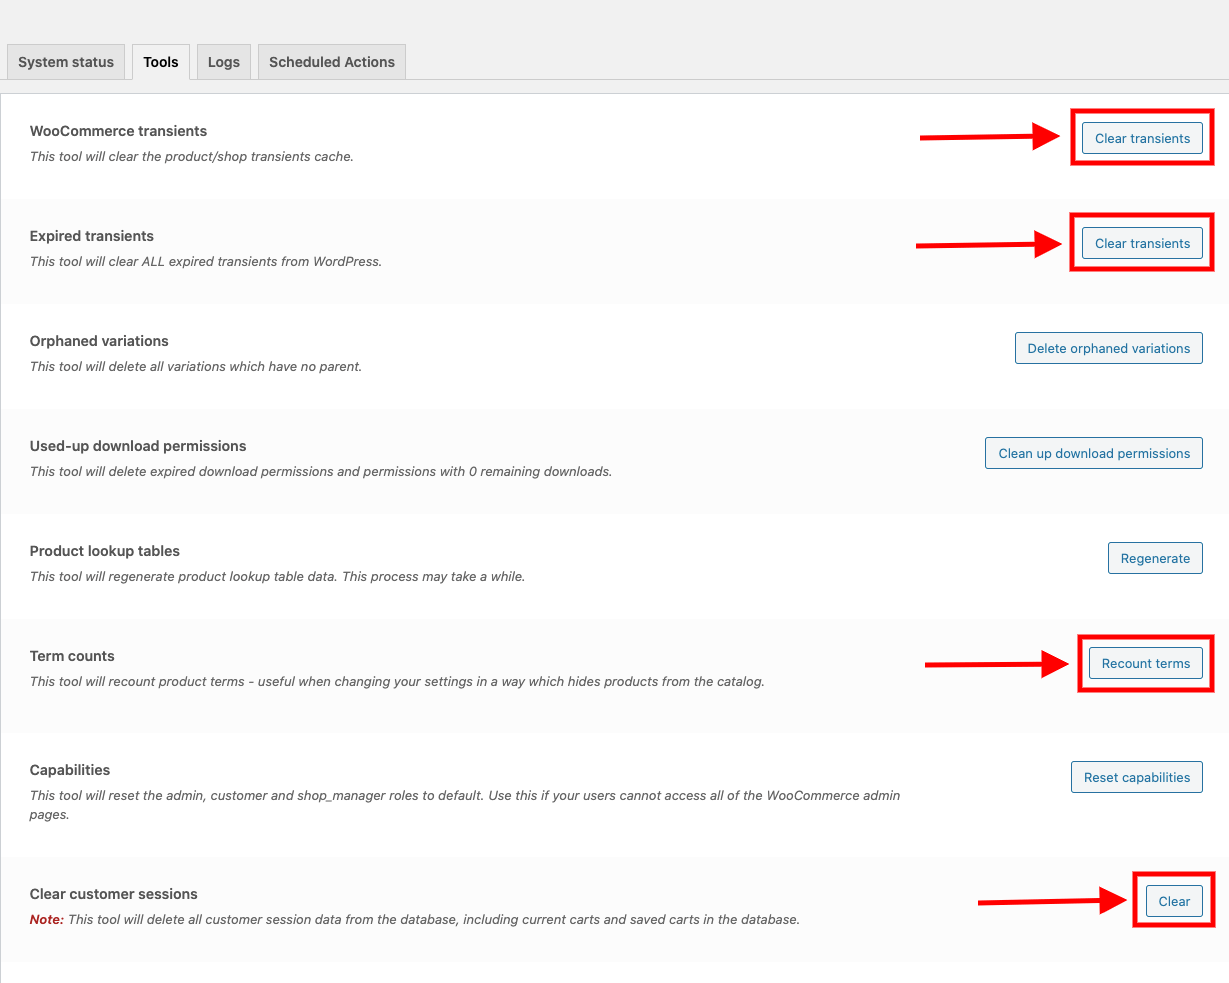
One more important thing to do is to save the permalink. In doing so, you will be supposed to head to your “WordPress” and choose the section “Settings” before clicking on “Permalink”. Here, you will select “update” or “save”
Step 4: Make sure the endpoint URLs contain no spaces
Besides checking the system status in WooCommerce, you should also make sure the endpoint URLs contain no spaces. In implementing this step, choosing “WooCommerce” first is what you need to do. Here, it is necessary to click on “Settings” and “Advanced”. Next, you can encounter “Checkout Endpoints”. In this section, you need to scrutinize the attributes that are below this section as well as rest assured that your endpoints contain no spaces.
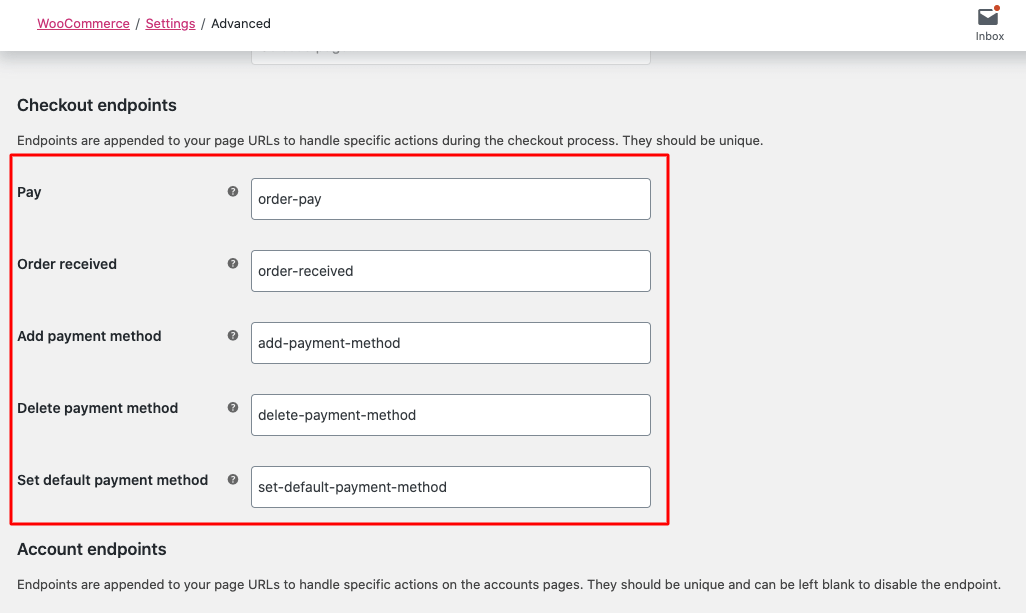
Step 5: Set up the cache
It is a must to remember that My Account, Checkout, and Cart pages should not be cached due to the display of dynamic content. Hence, in case the cache plugin for your WordPress is due to several reasons caching those WooCommerce pages, then your cart will be shown as blank. That is why you should pick up a compatible WooCommerce cache plugin to allow you to add the cache exclusion URL.
Conclusion
In short, there are a lot of undesirable problems that could happen anytime and anywhere on your WooCommerce site. As a result, you should equip yourself with must-know tips or guides to deal with them. Only by doing so, you could make your WordPress and WooCommerce run smoothly with no issues.
Today, you might cope with a blank cart page, but you might have to encounter a lot more complicated issues than now. Hence, stay tuned for more useful tips and tricks! Hope you could be interested in this piece of article and share it with those who are concerned.


