How To Integrate WooCommerce with Genesis
One of the greatest ways to create a stable and fast-running eCommerce site is to integrate WooCommerce with the Genesis Framework. This technique provides a very basic design and a rock-solid coding base to help you better use your eCommerce site. The Genesis Framework does, however, have several peculiarities due to its design. In this article, we’ll guide you through the most critical parts of the installation and customization procedure for your online shop.
You’ll be able to tweak headers and footers on your new WooCommerce installation to match your corporate identity using the strategies outlined in this article, you’ll know which method will help you run WooCommerce efficiently with Genesis (and other themes), and you’ll know how to integrate WooCommerce into your own child theme based on the Genesis Framework. We’ll go over the top three methods for integrating WooCommerce with Genesis.
Benefits of Integrating WooCommerce with Genesis Themes
The Genesis Connect for WooCommerce plugin is a plugin that allows you to integrate WooCommerce with the Genesis Framework and Genesis child themes in a seamless manner. This is accomplished using specially built templates that show WooCommerce products within Genesis child themes, allowing access to regular Genesis capabilities including layout and SEO choices, as well as full compatibility with the Genesis Simple Sidebars and Genesis Simple Menus plugins.
This plugin replaces WooCommerce’s built-in shop templates with Genesis-ready equivalents, namely the single-product.php, archive-product.php, and taxonomy.php templates required to show the single product page, main shop page, and Product Category and Product Tag archive pages.
You can install your own versions of these layouts in your child theme’s WooCommerce folder and alter them as much as you like to allow easy modification and ensure that your customizations are not lost when the plugin is updated. You can also develop your own taxonomy-taxonomy.php and taxonomy-taxonomy-term.php templates in the same directory, which this plugin will detect and utilize to show your shop’s Product Category and Product Tag archives. To learn more about the naming criteria for taxonomy templates, see the Template Hierarchy.
The plugin also makes Genesis Simple Sidebars and Genesis Simple Menus compatible with WooCommerce.
How To integrate WooCommerce with Genesis
Method 1: Using The AlphaBlossom Method
This method was discovered on Tony Eppright’s AlphaBlossom blog. He describes a way for constructing the markup of WooCommerce pages that eliminates certain WooCommerce activities and replaces them with Genesis-based HTML. This method is considerably better than utilizing the above-mentioned plugin because it provides a lot more information about what’s going on.
A number of theme accessibility fixes are available in the WooCommerce documentation. Hooks is the first way we’ll discuss. All of the code snippets below should be placed to your active Genesis child theme’s functions.php file.
Step 1: Add WooCommerce Support
You announce that your Genesis child theme supports WooCommerce with this line of code. The irritating error notice will be removed from your admin area as a result of this.
function ehi_kioya_wc_theme_support() {
    add_theme_support('woocommerce');
}
add_action('after_setup_theme', 'ehi_kioya_wc_theme_support');
Step 2: Remove WooCommerce Breadcrumbs
Delete WooCommerce breadcrumbs and have them automatically replaced with Genesis breadcrumbs to preserve a consistent look and feel throughout your entire website.
To accomplish so, use the following code:
add_action('init', 'ehi_kioya_remove_wc_breadcrumbs');
function ehi_kioya_remove_wc_breadcrumbs() {
    remove_action('woocommerce_before_main_content', 'woocommerce_breadcrumb', 20, 0);
}
Step 3: Manipulates to WooCommerce Wrappers and Layouts for Genesis Integration
To adjust Wrappers and Layouts for intergrating WooCommerce with Genesis, you should use this code:
// Add WooCommerce support for Genesis layouts.
add_post_type_support('product', array( 'genesis-layouts', 'genesis-seo'));

// Remove the WooCommerce sidebar. Genesis sidebar will be used instead.
remove_action('woocommerce_sidebar', 'woocommerce_get_sidebar', 10);

// Unhook (or remove) WooCommerce wrappers.
remove_action('woocommerce_before_main_content', 'woocommerce_output_content_wrapper', 10);
remove_action('woocommerce_after_main_content', 'woocommerce_output_content_wrapper_end', 10);

// Hook (or replace them with) new functions with Genesis wrappers.
add_action('woocommerce_before_main_content', 'ehi_kioya_theme_wrapper_start', 10);
add_action('woocommerce_after_main_content', 'ehi_kioya_theme_wrapper_end', 10);

// Opening wrapper. Before the WooCommerce loop starts.
function ehi_kioya_theme_wrapper_start() {
    do_action('genesis_before_content_sidebar_wrap');
    genesis_markup(array(
        'html5' => '<div %s>',
        'xhtml' => '<div id="content-sidebar-wrap">',
        'context' => 'content-sidebar-wrap',));
    do_action('genesis_before_content');
    genesis_markup(array(
        'html5' => '<main %s>',
        'xhtml' => '<div id="content" class="hfeed">',
        'context' => 'content',));
    do_action('genesis_before_loop');
}

// Closing wrapper. After the WooCommerce loop ends.
function ehi_kioya_theme_wrapper_end() {
    do_action('genesis_after_loop');
    genesis_markup(array(
        'html5' => '</main>',
        'xhtml' => '</div>',));
    do_action('genesis_after_content');
    echo '</div>';
    do_action('genesis_after_content_sidebar_wrap');
}
Step 4: Replacing The Genesis Sidebar With A Custom One
After you’ve added all of the above code to your WooCommerce store, it should look fantastic. However, if you have a sidebar, you’ll notice that it still uses the Genesis sidebar. You should normally replace that sidebar with a custom sidebar for WooCommerce pages.
To do so, go to the WooCommerce developers’ website and download the WooCommerce WooSidebars plugin.
After installing and activating this module, go to Appearance » Widget Areas to design and configure your replacement sidebar. The instructions after that are very self-explanatory.
Tony’s technique is distinctive in that he keeps the Genesis hooks in place. Other plugins that rely on them will continue to work regularly on WooCommerce pages. The code will work with custom WooCommerce template files in addition to the plugin listed above. In this tutorial, we’ve copied all WooCommerce templates to the Genesis Sample theme folder so that the child theme may use them.
Method 2: Installing Genesis Connect for WooCommerce
You’ll see a notice inviting you to install a plugin named Genesis Connect for WooCommerce as soon as you return to the WordPress admin area after installing WooCommerce. This plugin is required and essential for utilizing WooCommerce with Genesis, as the theme foundation has a number of hooks and filters of its own. WooCommerce doesn’t understand some Genesis capabilities out of the box, therefore merely copying the WooCommerce template files into the theme folder won’t work.

Step 1: Install and activate the plugin right from the WP Admin area
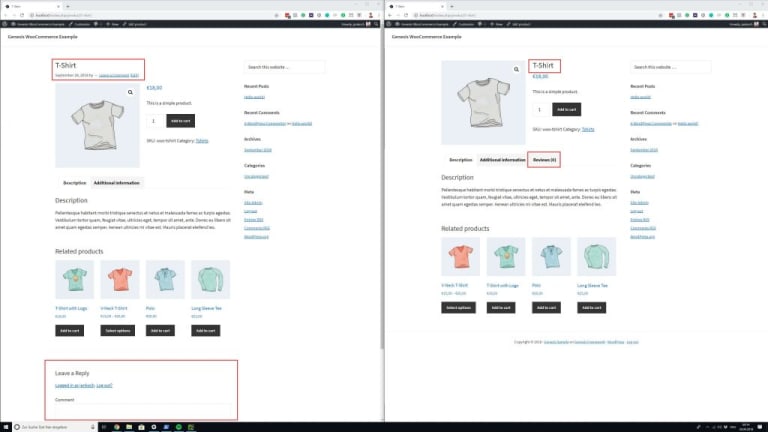
The plugin can be installed straight from the WP Admin area. After installing and activating the plugin, the layout of the detail page changes considerably. Below is a side-by-side comparison. Without the Genesis Connect for WooCommerce plugin installed, the product descriptions layout is shown on the left side. On the right, the plugin is installed and functioning.

Four major changes have been implemented, as you can see from the highlighted areas:
-
Instead of being on top of the image, the title is now placed beside it.
-
The metadata for the publication date and author are no longer available.
-
The Reviews tab on the left side has been missing; it has now been included (the Reviews are enabled in WooCommerce settings).
-
The comments section has been removed.
Step 2: Customize the WooCommerce templates
Using overrides, you can edit files in a way that is upgrade-safe. Copy the template to the /Woocommerce/ directory in your theme, preserving the same file structure but excluding the /templates/ subdirectory.
You’ll also want to use the add theme support function in your theme’s functions.php file to specify WooCommerce theme support.

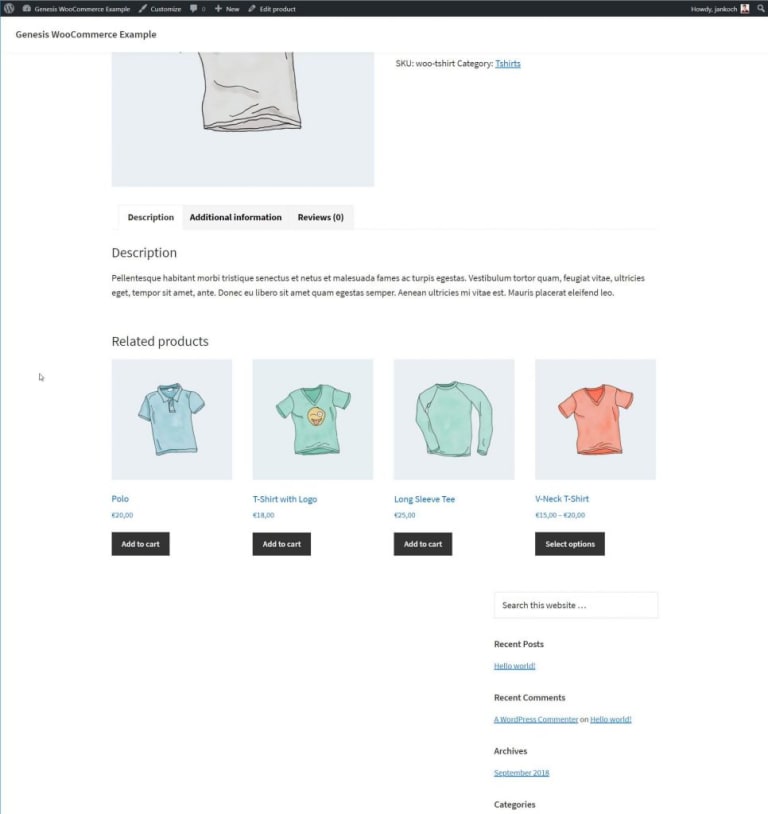
The sidebar has been moved below the product, and the section holding the product information is now full width. This is because one of the primary drawbacks of utilizing the Genesis Connect plugin is that it may use outdated WooCommerce template files.
You should be alright utilizing the Genesis Connect for WooCommerce plugin if you don’t plan on building your own WooCommerce configuration files or merely want to utilize custom template files for emails and other non-frontend-related layouts. If you wish to alter the WooCommerce templates, nevertheless, you should consider solution 2 for connecting WooCommerce with the Genesis Framework.
Method 3: Using BeardedGinger Method
Josh Mallard’s method is quite basic. Regardless, it works flawlessly. You can adjust the layout of your site and incorporate WooCommerce in only three simple steps.
Step 1: Add a new function
Add the following statement to your theme’s functions.php file to create a new function.
function woocommerce_setup_genesis() {
  woocommerce_content();
}
Step 2: Create a new file in child theme directory
To create a new file called woocommerce.php in child theme directoryfile, add the following code:
<?php
/**
 * WooCommerce Template
 *
 * Template used for all WooCommerce views for your site
 *
 */

//* Remove standard post content output
remove_action( 'genesis_loop', 'genesis_do_loop');

//* Add WooCommerce content output
add_action( 'genesis_loop', 'woocommerce_setup_genesis' );

genesis();
This template will be applied to all of your WooCommerce pages. The default loop is removed and replaced with WooCommerce content.
Step 3: Declare WooCommerce support
Declare WooCommerce support in your functions.php file.
//* Declare WooCommerce Support
add_theme_support( 'woocommerce' );
Conclusion
Every option has benefits and drawbacks. You can use one of the three methods described above to Integrate WooCommerce with Genersis which will improve your WooCommerce online store. If you don’t want to mess with the functions.php file, you can use the plugin. Using a plugin is a terrific way to get a quick solution. Actually, with two lesser projects, you should use this choice.
If you want to study more about WooCommerce or have an issue with your WooCommerce store, AVADA is a great place to start.


