How to Improve Order Fulfillment Process in WooCommerce
The process of order fulfillment has become an integral part of the success of any online business, especially WooCommerce stores. This is to say; any store owner should pay more concentration on establishing a professional system with a view to fulfilling every order accurately and quickly. Therefore, this reduces the risk of losing revenue as well as customers.
If you are running a WooCommerce store and getting into trouble with the fulfillment process, then this article is for you. Now, let’s accompany us in this piece of article and we will guide you on how to improve the order fulfillment process in WooCommerce. After that, you could reduce mistakes and costs that can be the result of unexpected issues.
Why does the order fulfillment process in WooCommerce need improving?
We need to deeply understand what we can get from the improvement of this order fulfillment process in your store. In doing so, we could know its importance and take action as soon as possible to meet the expectations of customers to increase the shipping speed, coupled with reliability.
-
Lessen the mistakes and costs: When the process of order fulfillment is enhanced, mistakes, as well as charges involving the fulfilling process, can be lessened significantly. Therefore, you can streamline and examine the whole fulfillment process well.
-
Build a strong brand and value: With an enhancement of the order fulfillment process, mistakes will be reduced, and the delivery process will be faster, thereby increasing the reliability of your WooCommerce store.
How to improve the order fulfillment process in WooCommerce
Now it is time to get into how to improve the order fulfillment process in WooCommerce. We will suggest using the five most important tips below to take the process of order fulfillment to the next level. We will mention different plugins or extensions to help you accomplish the task in each piece of advice. So, read each of them carefully and apply them to your store.
1. Keep your customers well-informed
The first and foremost thing you should take notice of is to keep your customer well-informed. It is undeniable that making your customers be aware of all the up-to-date information throughout the process of order fulfillment is necessary. As shown by research, up to 83 % of customers are fond of communicating regularly about orders. The reason is that they will be kept informed, thus managing their delivery dates to their expectations.
This activity has helped store owners to retain existing customers and attract new ones. If the fulfillment could take longer than the date initially anticipated, customers who are informed of this late arrival in advance will not feel angry. Instead, they can see that your store and professional one and keep returning for future orders.
In order to keep your consumers informed during the entire fulfillment process, you are advised to use the WooCommerce Shipment Tracking extension. Using this extension is a straightforward way to communicate delivery information with consumers.
Step 1: Install and activate the extension
Let’s start the process of using this extension by installing and activating it. You need to navigate to the WooCommerce dashboard to download it.
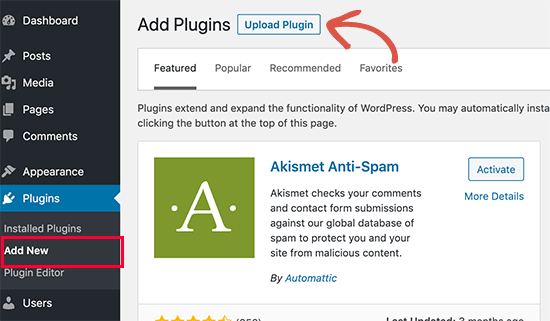
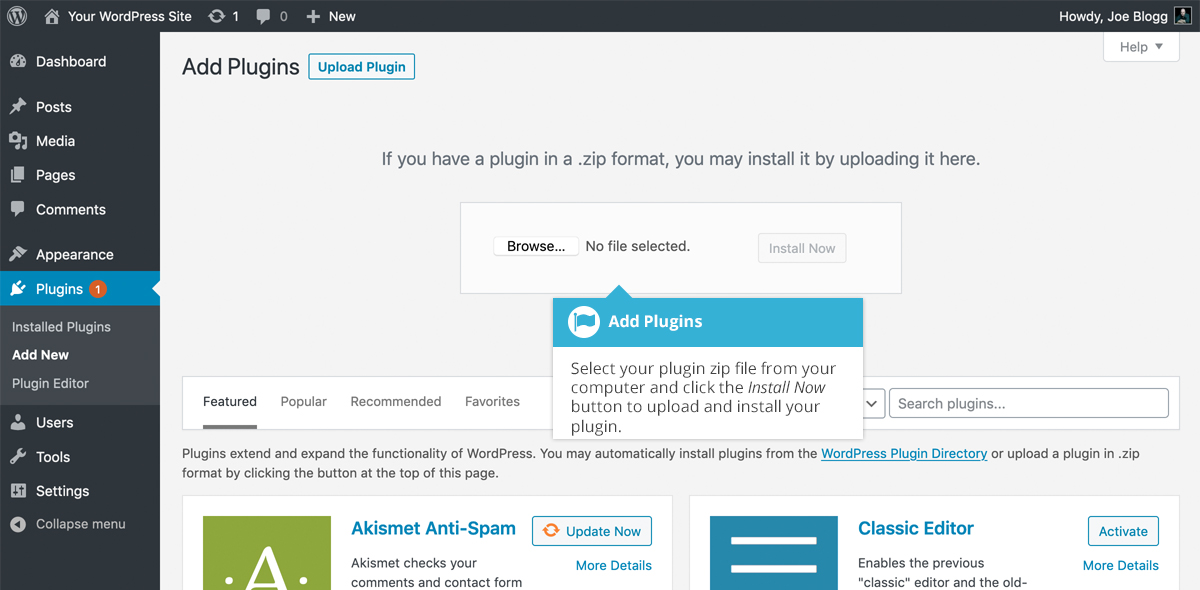
After that head to the section “Plugins” and click on the option “Add New” to implement to “Upload” it. In this situation, you will choose the download Zip file. After all, click on the button “Install Now” and get it activated.
Step 2: Add details of tracking to customers’ order
When the plugin has done installing and activated, you will need to go to the pages “Edit orders” where you encounter the panel “Shipment Tracking”. This is used to add some details of tracking to orders. Next, you could notice information of tracking that appears in the transactional emails as well as the account of customers.
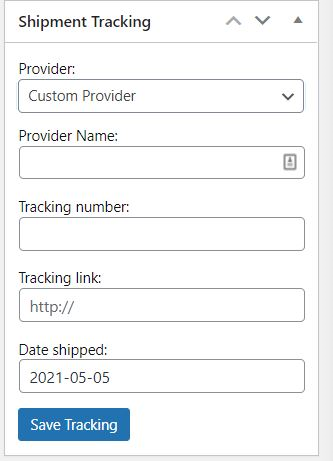
There is a piece of good news that this extension will support store owners with up to 16 delivery carriers. If you add your tracking number to the supported provider, it will generate the tracking link automatically. In case there is no provision to be listed, you could choose the section “Custom Provider”. In such situations, you are required to provide one tracking link.
Move on to the next step by adding the tracking information by using wc_st_add_tracking_number. For example, you are capable of using the function below:
if ( function_exists( 'wc_st_add_tracking_number' ) ) {
wc_st_add_tracking_number( $order_id, $tracking_number, $provider, $date_shipped, $custom_url );
}
In case, you are not keen on changing the carrier every time you want to add your tracking details, you can apply the below hook for changing your default provider. With the application of woocommerce_shipment_tracking_default_provider, you could do it effortlessly. Check out the below example of how you could add the hook to the functions.php; then your default provider will be changed to USPS.
add_filter( 'woocommerce_shipment_tracking_default_provider', 'custom_woocommerce_shipment_tracking_default_provider' );

function custom_woocommerce_shipment_tracking_default_provider( $provider ) {
$provider = 'USPS';
return $provider;
}
The extension is also helpful in providing one REST API that could assist you in creating, viewing, and modifying tracking details. The following example will display a request of creating a shipping tracking:
POST /wp-json/wc-shipment-tracking/v3/orders/645/shipment-trackings
In case you use one customer provider, it is a need to include a tracking link like below:
curl -X POST https://example.com/wp-json/wc-shipment-tracking/v3/orders/645/shipment-trackings \
    -u consumer_key:consumer_secret \
    -H "Content-Type: application/json" \
    -d '{
  "custom_tracking_provider": "Custom",
  "custom_tracking_link": "https://example.com?q=%1$s",
  "tracking_number": "12345678"
}'
2. Keep your store organized
Besides keeping your consumers well-informed, one more not-to-be-missed tip is to keep your WooCommerce store organized. Regardless of the shapes and sizes of your store, staying organized rests assured that any logistics operation will run smoothly. Then, it is necessary to define as well as document the workflows of the whole fulfillment process.
There is no denying that it will be much simpler to keep your store organized when you can automate. This is to say automation will help to get rid of manual inputs and simplify every process or even the tasks you want to monitor.
To help your store stay organized, we recommend using the extension WooCommerce Order Status Manager to keep your WooCommerce store organized. With the ability to construct order statuses within WooCommerce stores, you could make use of this plugin to make some necessary modifications of the order statuses to have better control of the fulfillment workflow.
Step 1: Install and activate the extension
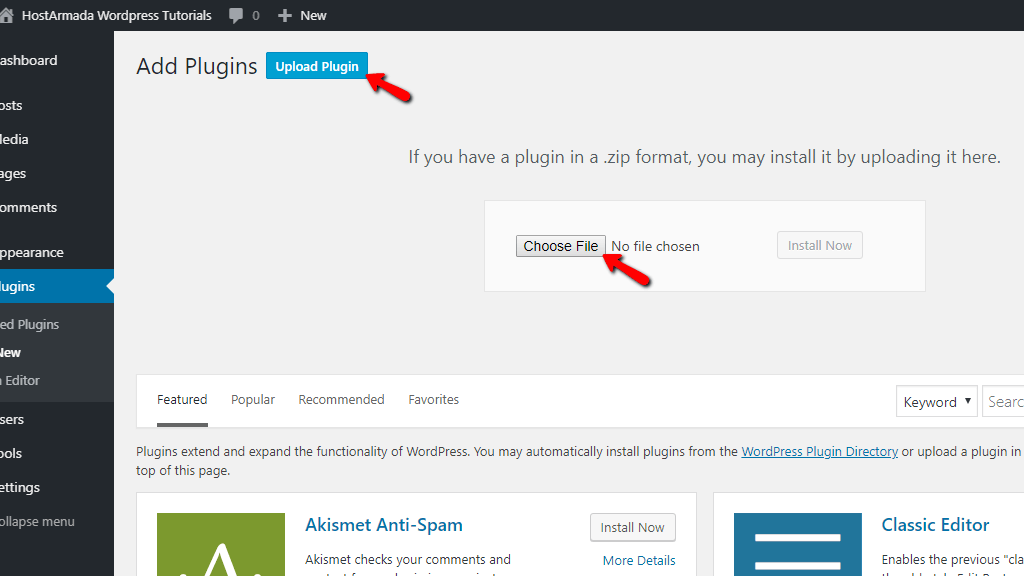
To use the extension, it needs installing and activating first. And it is simple to do so. As it is an extension from WooCommerce so you can download it from the dashboard of your WooCommerce. Now, it is time to head to the section “Plugins” where you can notice the option “Add New” and select “Upload”. Here, choose the downloaded ZIP file before hitting on the button “Install Now” as well as “Activate”.
Step 2: Configure custom statuses
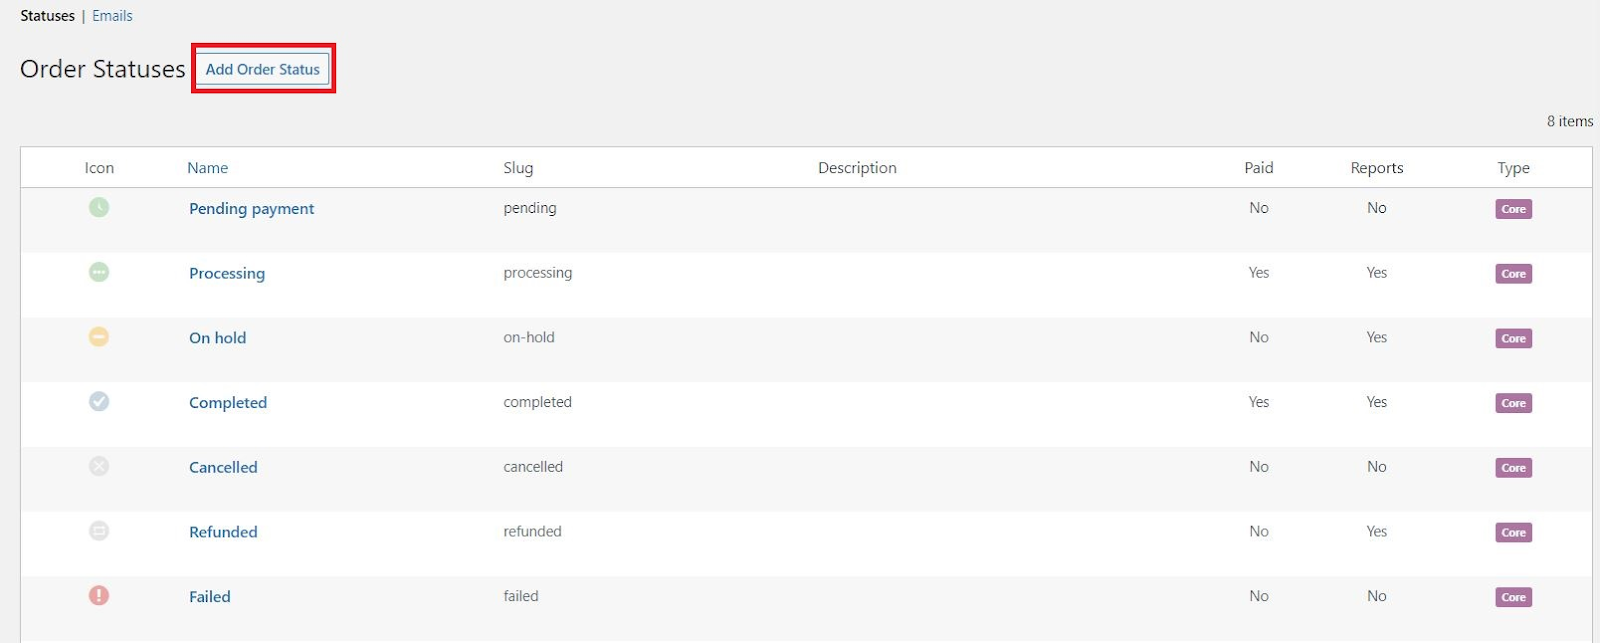
If you want to check the custom statuses, you can go to your WooCommerce and choose the list “Orders”. Next, you could be able to apply them with bulk actions and order actions for processing orders effectively. In creating one new status of the order, just simply head to “WooCommerce” where you could select “Settings” and “Order Statuses”. Then, do not hesitate to choose the button “Add Order Status”. When you are here, you could implement the configuration of custom statuses.
In terms of the “Next Statuses”, it is possible to specify what statuses will follow your statuses throughout the order flow. What is more, action buttons allow you to enable your custom status to be moved through the succession of the “Next Status”. Those buttons will be added to the “Order” list of your WooCommerce.
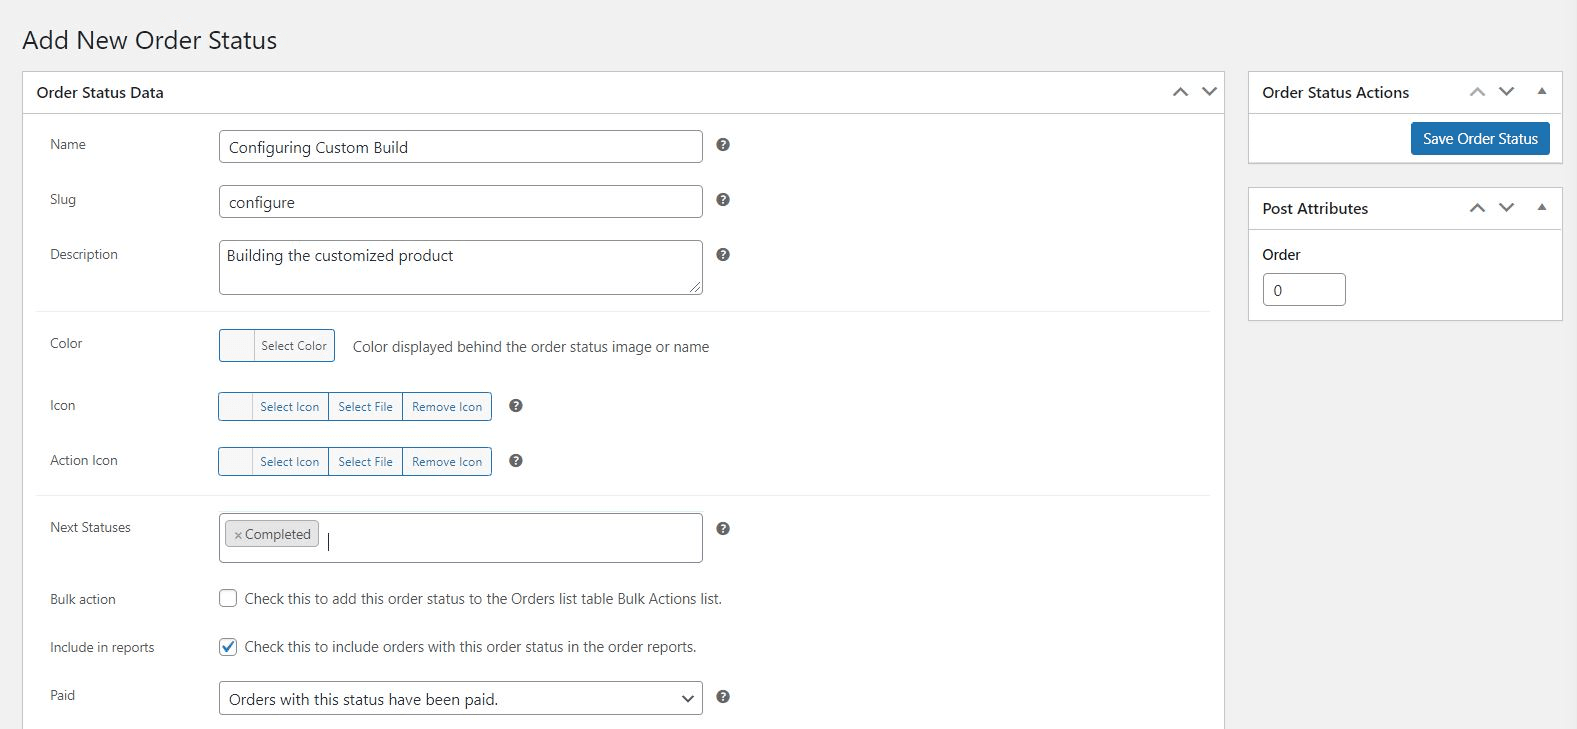
Moreover, you are also supposed to specify if orders of your custom status are paid or not. By choosing “Order with this status has been paid”, then your status will be treated as “Completed” or “Processing” orders. In case, you make up your mind to select “Order with this status requires payment”, then this status will be treated as status “Pending Payment”. This means that consumers have such links as “Cancel” and “Pay” for orders in their accounts.
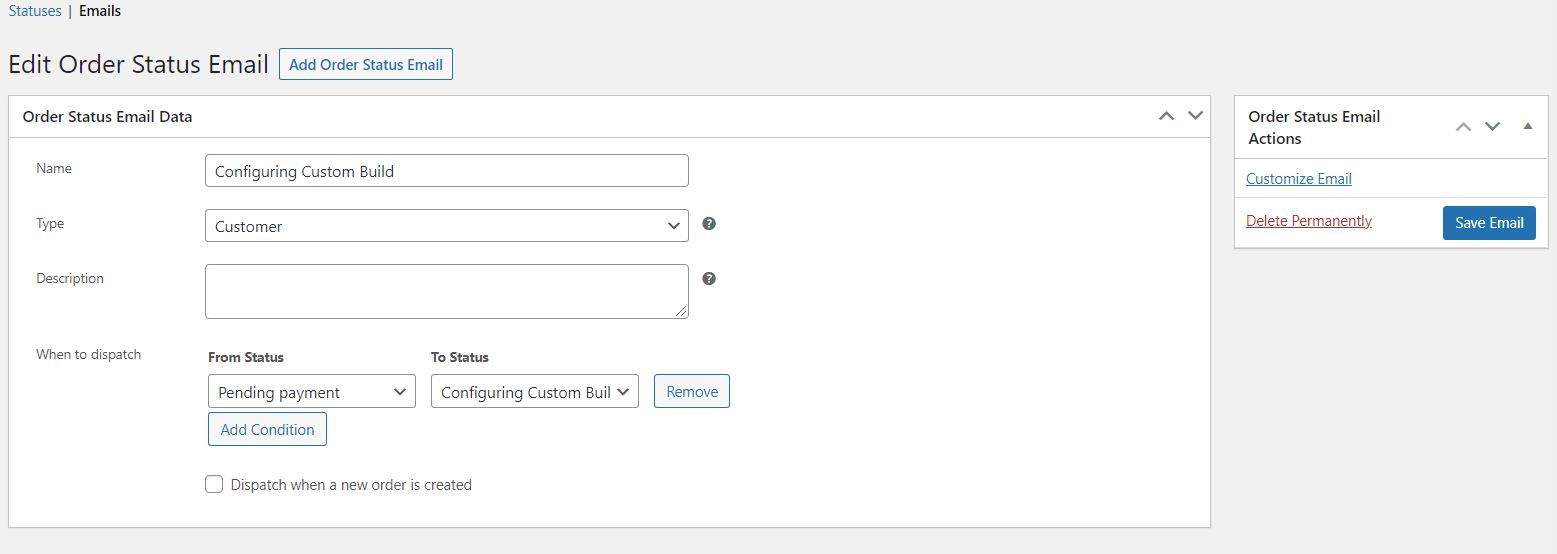
As soon as you have added custom statuses, it is possible for you to create some emails that aim at being automatically sent for changing order statuses. Now, you need to navigate to your “WooCommerce” to select the section “Settings” before hitting on “Order Statuses” then choose “Emails”. Here, you can be able to notice every email notification that you’ve created. Proceed to the next step by pressing the button “Add Order Status Email” in order to create your new email.
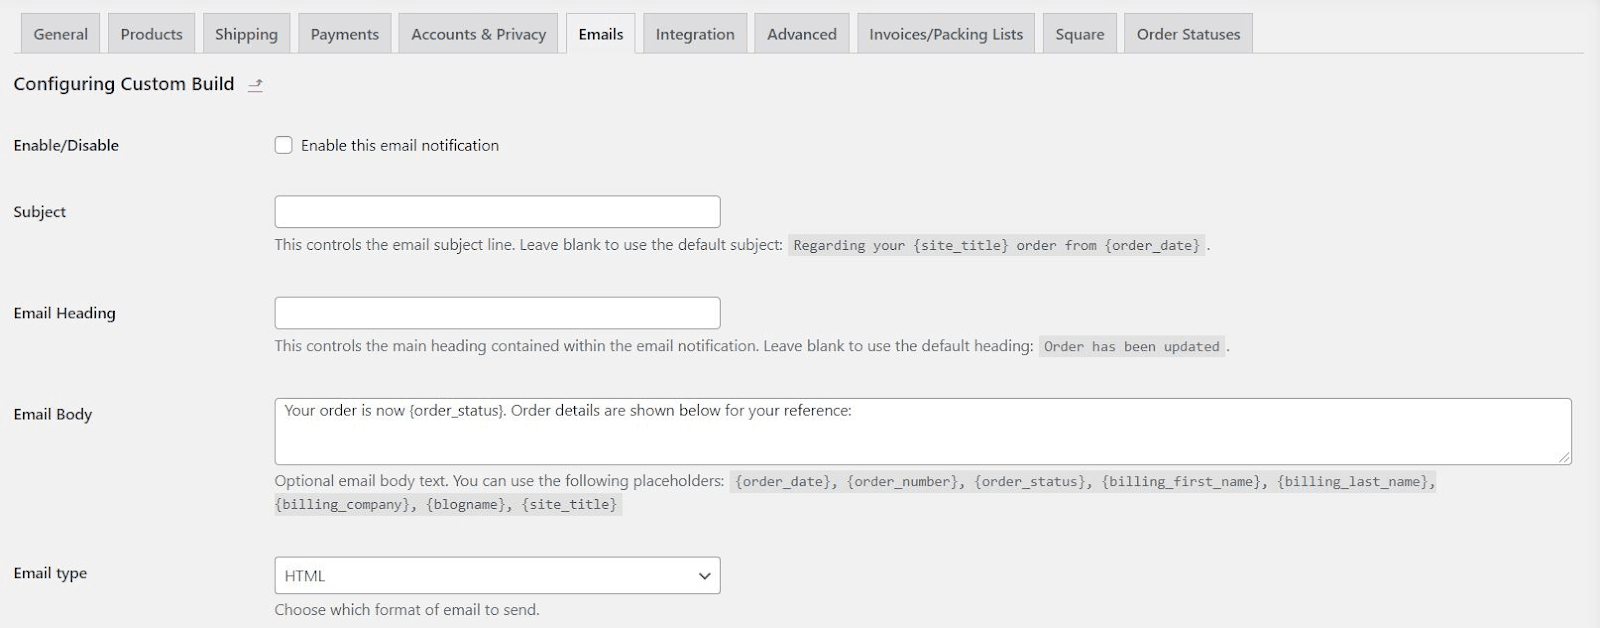
After finishing the configuration of your email settings, it is time to edit the content as well as enable it. In doing so, you will head to your “WooCommerce” where the section “Settings” is chosen, and then click on “Emails”. Here, you can encounter the message that you are fond of editing. On another page, you could set your email heading, email body, and subject line. What is more, you could also choose if you are about to enable your message to be in plain text or HTML.
In case you need to execute the customization of the template, you are recommended to use the standard hooks in WooCommerce to edit email content. This way will ensure the accomplishment. Here you could encounter the action list in your template file named woocommerce-order-status-manager/templates/emails/customer-order-status-email.php. Moreover, there exist some available filters to help you customize your emails.
Let us take an example. It is possible for you to apply the below filter with a view to overriding your email body. And the filter is apply_filters( “wc_order_status_manager_order_status_email_body_text_{$this->id}”, $this->format_string( $this->body_text ), $this->object );.
3. Apply a streamlined pack and pick process
The application of a streamlined pack and pick process to improve order fulfillment has promised good results. This will speed up the logistics process, along with enhancing order accuracy. To be more specific, it also lowers the costs in case you can reduce the labor amount needed for finding and packaging the right items and products.
If you have more SKUs or sell a much larger quantity of products per order. Therefore, the pack and pick lists will become a key to enabling your process to go smoothly. This kind of list will function by informing warehouse staff of what product will be included in customers’ orders. And your team member could be able to start fulfilling that order as soon as it’s generated. If your WooCommerce store uses zone or batch picking, it is necessary to generate the pick lists effectively.
So, if you want to enhance the performance of your fulfillment process, you should use the extension WooCommerce Print Invoices and Packing Lists to make everything easier. Now, let’s get started with this extension and enjoy a faster and more accurate order fulfillment procedure.
Step 1: Install and activate the extension
The first thing to do with this extension is to get it installed and activated. Like the two above plugins, you also need to download WooCommerce Print Invoices & Packing Lists from the WooCommerce dashboard. Then, do the same as the installation and activation of other plugins in this article to activate it.
Step 2: Optimize your order pick/packing list
The next step is to optimize your order pick/packing list. Proceed to click on its documents icon to open one box that comes with an option for printing or emailing your lists. Once you have finished installing it, you can notice an action button appearing next to every order on your list “Orders” in WooCommerce. This extension helps support some bulk actions for speeding up the order fulfillment.
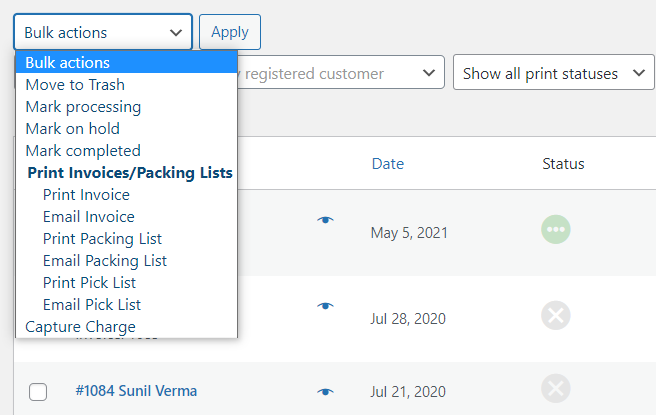
In the case of creating the picklist, you need to choose multiple orders, then execute this bulk action. One combined list is generated with every chosen item ordered by categories.
What is more, it is also possible to access any documents from the page “Edit order”. Your task is to open the dropdown “Order actions” menu where you are able to encounter the option for printing or emailing your packing list. Then, you might track what packing list has been created on the list “Orders” in WooCommerce. After that one checkmark would appear in a column named Packing List for the orders that belong to the created list.

One more thing you can benefit from this extension is its visual editor to customize your documents’ design. Thanks to it, you could add the header, logo content, and adjust the colors and typography. The settings that have been specified in your visual editor can apply to every document type. In the situation that you are keen on customizing a particular document type, you can add the CSS style by navigating to the section “Advanced” of the extension’s visual editor. See below you could know what the needed styles are to wrap every document type.
.woocommerce-pip.invoice { // invoice-specific CSS }
.woocommerce-pip.packing-list { // packing list-specific CSS }
.woocommerce-pip.pick-list { // pick list-specific CSS }
On the other hand, modifying the content that belongs to the pick/packing lists is what you can do. In doing so, you can go to your “WooCommerce” where you see the section “Settings”, then select “Invoices/Packing Lists”. Here, choose either “Pick List” or “Packing List”, then you can observe the options that let you edit the appearance of the list.
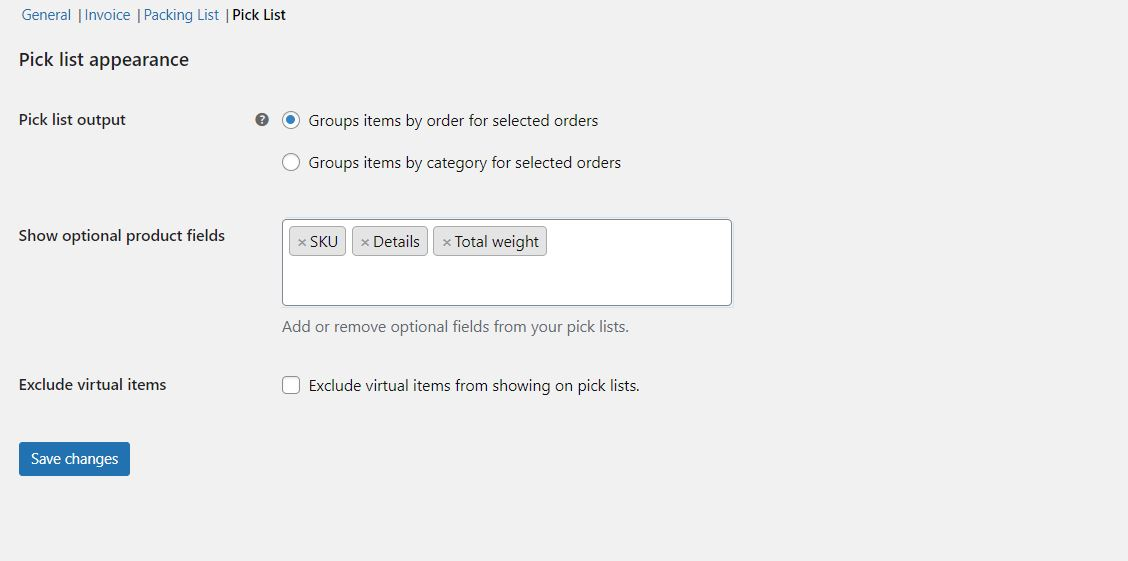
Furthermore, the setting “Picklist output” also rests assured that your list can be optimized for any picking procedure. If you want to apply the discrete picking, “Group item by order” should be selected to have products for the single order. If you tend to apply batch picking, “Group item by category” should be chosen. Then you can use the bulk picking list to enable like items to be grouped, thus making the picking easier.
4. Provide myriad shipping options
There is no denying that one of the best ways to enhance your WooCommerce order fulfillment procedure is to provide myriad shipping options. The reason is that flexibility in shipping methods will offer amazing delivery experiences for your customers. It is a tendency that customers prefer more choices when they need to choose shipping speeds and carriers.
According to a study, 17% of shoppers and customers state that multiple shipping methods play a key in eCommerce fulfillment. Multiple delivery options allow them to buy more, pay more, and have orders shipped faster. This is to say, you should take advantage of partnering with myriad shipment providers. Every major carrier has its strength, while a single provider does not promise to meet your needs and expectations. What is more, having more choices means that you could reduce your delivery costs.
In this article, we will guide you to provide multiple delivery methods with the use of the extension FedEx Shipping Method.
Step 1: Install and activate the extension
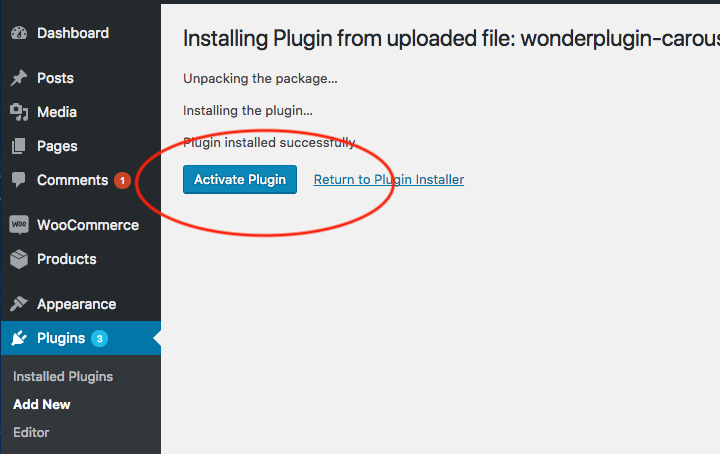
To enable this extension for later use, you just need to download the file ZIP from your dashboard in WooCommerce. Here, you will implement to upload the downloaded file by pressing on “Choose File”. Then head to your WordPress admin to find the section “Plugins” and click on “Add New”. After all, hit on the button “Install Now” as well as “Activate” to use.
Step 2: Create various shipping methods
This extension offers consumers rates that are at its cheapest. Moreover, you could utilize it to use the nominal adjustment as well as percentage adjustment for returned rates.
Keep ahead with going to your “WooCommerce” and choose “Settings”. When you are here, it is a need to select the section “Shipping” before clicking on “Shipping zones”. Your next task is to construct one new zone as well as choose “FedEx” to set it as your delivery method.

Another must-do step to accomplish the task is to click the link “FedEx” to complete your delivery option configuration. Moreover, the method of parcel packing will exert an effect on how the API calculates the rates. And there are two options.
-
Default: This means that items are packed individually. Each cart item will be sent to your FedEx API. Then, the quotes for each item will be combined in order to reach the final cost.
-
Recommended: This means that items are packed into boxes. To be more particular, items will be grouped into predefined boxes, then send to your API.
If you make up your mind to pack items into boxes, you could notice a table appearing with distinctive box sizes. Or you are also able to add the custom box sizes to your expectation.
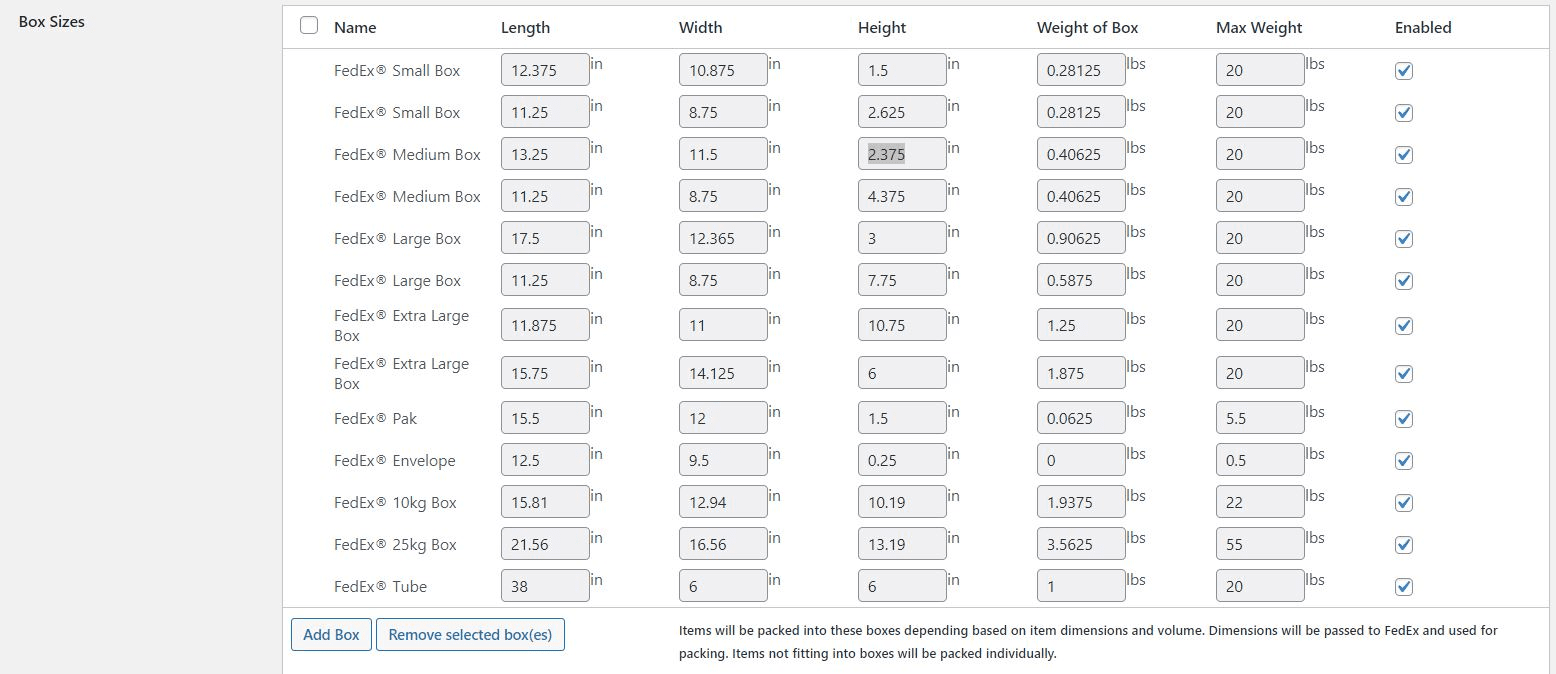
Scroll down a bit, you encounter a list of existing delivery options. When you are here, it is possible for you to rearrange the service orders, edit names, or set the price adjustment.

5. Manage your stock strongly
Our last advice for you to improve the order fulfillment process is to manage your stock strongly. This is very important because having an efficient system for your stock management promises to streamline your WooCommerce logistics operation.
Thanks to the accurate levels of inventory, you could prevent the situation of selling unavailable products or items. This is important as if you resist selling unavailable products, your store reputation will be damaged. In understanding deeply shopping behavior of customers, you could be able to satisfy them effortlessly. Therefore, you can avoid understocking or overstocking your products.
So, how to have strong management of your stock and keep it under your control. It is simple to do so. The extension Bulk Stock Management is here to assist you in accomplishing your task. This is a powerful tool to manage the inventory of your WooCommerce store. Now, with the help of it, you are capable of visualizing or modifying your stock levels quickly and efficiently.
Step 1: Install and activate the extension
You also need to download it by going to the dashboard in WooCommerce. Then, select the section “Plugins”, click on “Add New” and “Upload” for uploading the downloaded ZIP file. Keep pressing on “Install Now” then get it activated.
Step 2: Manage the stock
Variations, coupled with products will be listed with the stock status, quantity, and SKU. Hence, you could filter your products by stock status, type, and so on.

In updating your stock for myriad products at the same time, you can enter a new amount in the column “Quantity”. After you have done entering that new amount, the next thing to do is to open the menu “Bulk Actions” before selecting the section “Save stock quantity” and hitting on “Apply”.

What is more, another great advantage brought about by this extension is its ability to generate the stock report. To achieve this, you are required to hit on the button stock report that is on the top of your “Products”, then click “Stock Management”. After that, another page will appear to show you a table of such information as SKU, price, type, ID, stock quantity, and title for your products.

Moreover, the variations from products that have been deleted are still presented in your product interface. So, you could delete them by heading to your “WooCommerce” to select “System status” and keep clicking on “Tools” before hitting on the button “Delete orphaned variation”.
Conclusion
In short, improving the order fulfillment process should always be put on top priority. Only by doing so, the logistics operation of your WooCommerce store can become better and get roaring success. With the above five pieces of advice, you could apply them to your store and manage the order fulfillment procedure in a better way. Then, stock, inventory, customers satisfaction, organization, and pick/packing process are undoubtedly enhanced. Hope this piece of article is helpful for you. And do not hesitate to keep following us for more interesting tips in the future.


