How to Integrate WooCommerce with Xero
Considered as one of the best software for online accounting, Xero is the top priority of many businesses when looking for a platform to help them manage their finances effectively. You can easily connect your store with the bank, accountant, bookkeeper, and other applications, thanks to it.
So, how to integrate Xero with your WooCommerce, and why should we select it?
All will be solved in this post!
Benefits of Xero
- Save time: With Xero, you can save a lot of time by managing it at any time, on any device, even on your mobile phones. Also, it is equipped with various automation tools with high accuracy, which helps avoid implementing manual tasks.
- Manage your business effectively: Xero provides users with financial figures in real-time, allowing them to keep updated with the latest changes to make the smartest decisions. Moreover, it enables users to raise invoices or upload and expense receipts easily via the Xero app.
- Update the latest version automatically: Xero users do not have to update the software to keep up with the latest version since it will automatically update. Especially with the cloud software, users are even not required to install the platform to be able to use it
- Suit everyone: Xero is a user-friendly software for anyone. There are two ways for people to get access to this software which are via the website or the mobile app. Additionally, its design is easy to understand when all the necessary data of your store’s finances can be opened easily in the organisation menu.
- Integrate with multiple platforms: Xero collaborates with more than 500 products, so you can easily find solutions to help you manage your business better with Xero. There are multiple options for users, from emails like Gmail and Office 365 to inventory or industry-specific platforms like Vend or Shopify.
How to integrate WooCommerce with Xero?
Step 1: Install & activate the plugin
Download the zip file of Xero from its website.
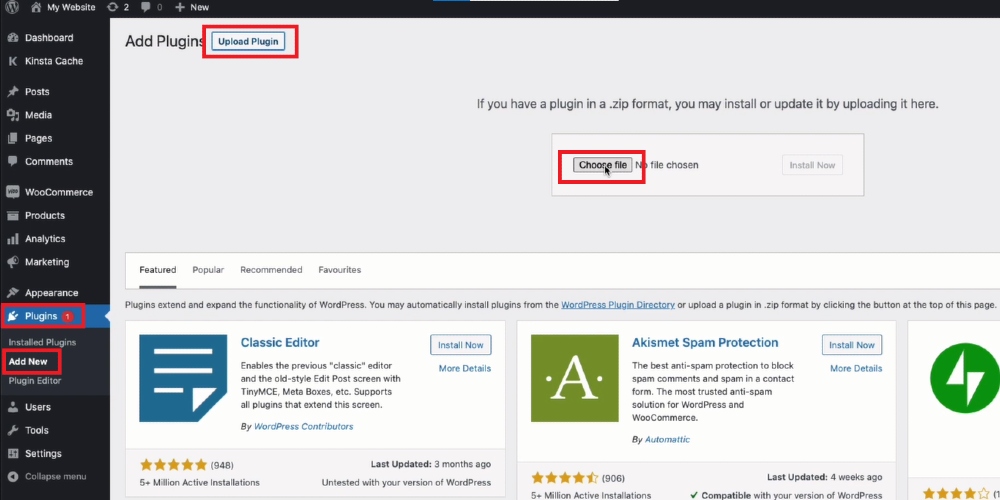
Then, log in to your WordPress account and go to the admin dashboard. There, navigate to Plugins and open Add New.
Click on the Upload button to upload the file of Xero you have just downloaded.

After the installation is finished, click on Activate to activate the plugin.
Step 2: Create a private Xero application
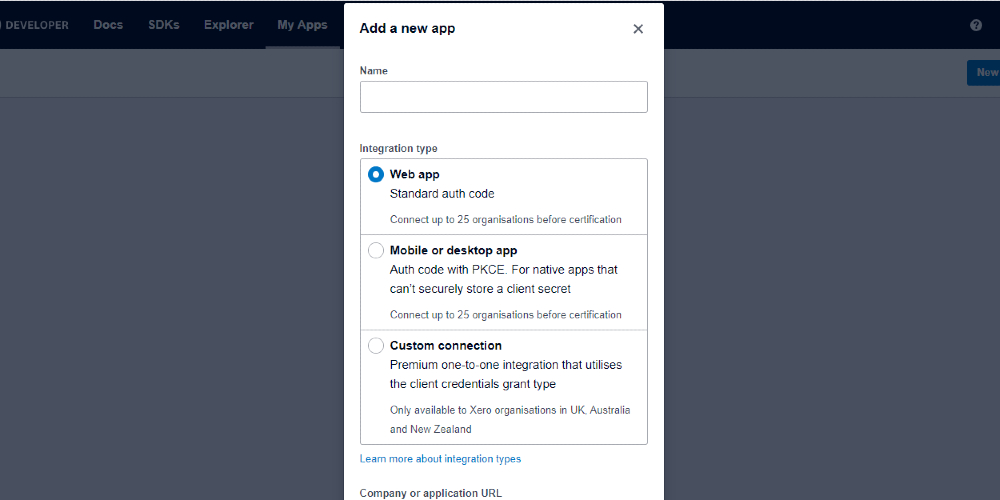
Log in developer.xero.com by your Xero account and go to My Apps. There, select New App to create a new app for your Xero account.
A new window will appear on the screen, and you need to select the integration style and enter the name, company or application URL, and OAuth 2.0 Redirect URI.

Click on Create app, and you finish the creation process.
Step 3: Connect WooCommerce with Xero
After creating an app on Xero Developer, a window of app details will be displayed on the screen, including the information you have just entered and the client ID.
Copy that id.
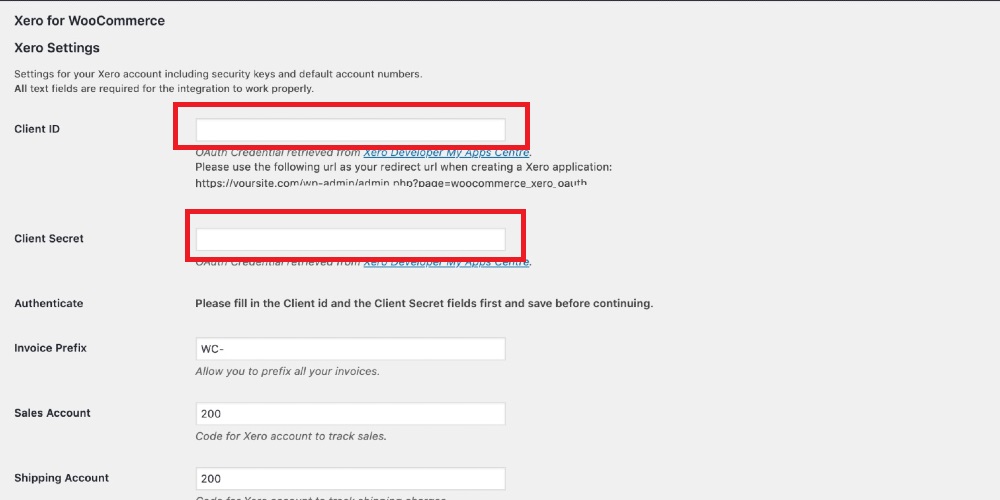
Then, come back to the WooCommerce Xero admin setting page and paste it to Client id.
Next, move to the tab of Xero Developers and select Generate a secret and you will see the secret generated for you, copy and paste it to the Client Secret in the WooCommerce Xero dashboard.

Save the changes, and you will see the Sign in with Xero, click on it, enter your email as well as password to log in to your Xero account.
Click on the Allow Access and then Connect button, and you finish connecting WooCommerce with Xero.
Final thoughts
It is not difficult to integrate Xero with WooCommerce, so read the instructions carefully, and you will certainly integrate your WooCommerce with Xero to exploit all the powerful features it offers. If there are any problems, please leave a comment below this post.


