How to Add Multiple Variations to Cart in WooCommerce
What do you do when shopping online?
Of course, the answer that the majority of people will choose is to add all the items they like to the cart before moving to the checkout process. And, if they like more than one item, they have to move back and forth between product pages multiple times. But, do you know that there is a resolution that allows customers to add all the products they like to cart at the same time?
In this way, merchants can help their customers save time for adding products to the cart and enjoy their shopping journey. It is the reason why nowadays, more and more eCommerce stores offer this feature to their customers.
With a view to helping entrepreneurs keep up with the latest changes, this post is created to introduce to WooCommerce store owners an instruction to allow visitors to select multiple variations in their store to cart as well as several best plugins for this feature.
How to Add multiple variations to cart via URL
Step 1: Open functions.php
NOTE: to protect your eCommerce store while you are making some changes, all the steps will be conducted in the WooCommerce child theme.
To do that, you need to openAppearance in the WordPress dashboard. Then, go to Themes, you will see the child theme next to your active storefront theme, click on the Activate button and now you can use the child theme.
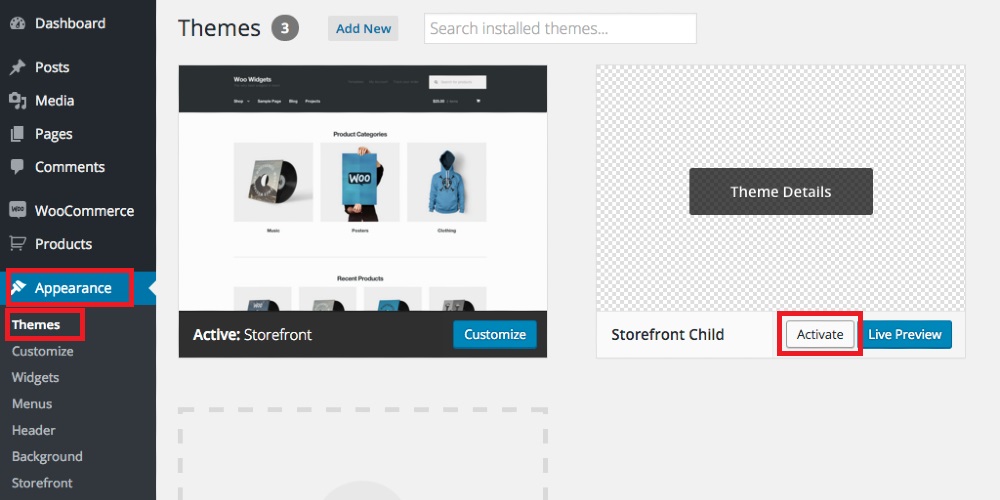
In your storefront child theme, open the file functions.php.
Step 2: Copy and paste the code to functions.php
At first, the function.php file in your child theme is empty, so you need to copy and paste this code to it.
function webroom_add_multiple_products_to_cart( $url = false ) {
	// Make sure WC is installed, and add-to-cart qauery arg exists, and contains at least one comma.
	if ( ! class_exists( 'WC_Form_Handler' ) || empty( $_REQUEST['add-to-cart'] ) || false === strpos( $_REQUEST['add-to-cart'], ',' ) ) {
		return;
	}

	// Remove WooCommerce's hook, as it's useless (doesn't handle multiple products).
	remove_action( 'wp_loaded', array( 'WC_Form_Handler', 'add_to_cart_action' ), 20 );

	$product_ids = explode( ',', $_REQUEST['add-to-cart'] );
	$count       = count( $product_ids );
	$number      = 0;

	foreach ( $product_ids as $id_and_quantity ) {
		// Check for quantities defined in curie notation (<product_id>:<product_quantity>)

		$id_and_quantity = explode( ':', $id_and_quantity );
		$product_id = $id_and_quantity[0];

		$_REQUEST['quantity'] = ! empty( $id_and_quantity[1] ) ? absint( $id_and_quantity[1] ) : 1;

		if ( ++$number === $count ) {
			// Ok, final item, let's send it back to woocommerce's add_to_cart_action method for handling.
			$_REQUEST['add-to-cart'] = $product_id;

			return WC_Form_Handler::add_to_cart_action( $url );
		}

		$product_id        = apply_filters( 'woocommerce_add_to_cart_product_id', absint( $product_id ) );
		$was_added_to_cart = false;
		$adding_to_cart    = wc_get_product( $product_id );

		if ( ! $adding_to_cart ) {
			continue;
		}

		$add_to_cart_handler = apply_filters( 'woocommerce_add_to_cart_handler', $adding_to_cart->get_type(), $adding_to_cart );

		// Variable product handling
		if ( 'variable' === $add_to_cart_handler ) {
			woo_hack_invoke_private_method( 'WC_Form_Handler', 'add_to_cart_handler_variable', $product_id );

		// Grouped Products
		} elseif ( 'grouped' === $add_to_cart_handler ) {
			woo_hack_invoke_private_method( 'WC_Form_Handler', 'add_to_cart_handler_grouped', $product_id );

		// Custom Handler
		} elseif ( has_action( 'woocommerce_add_to_cart_handler_' . $add_to_cart_handler ) ){
			do_action( 'woocommerce_add_to_cart_handler_' . $add_to_cart_handler, $url );

		// Simple Products
		} else {
			woo_hack_invoke_private_method( 'WC_Form_Handler', 'add_to_cart_handler_simple', $product_id );
		}
	}
}

// Fire before the WC_Form_Handler::add_to_cart_action callback.
add_action( 'wp_loaded', 'webroom_add_multiple_products_to_cart', 15 );


/**
 * Invoke class private method
 *
 * @since   0.1.0
 *
 * @param   string $class_name
 * @param   string $methodName
 *
 * @return  mixed
 */
function woo_hack_invoke_private_method( $class_name, $methodName ) {
	if ( version_compare( phpversion(), '5.3', '<' ) ) {
		throw new Exception( 'PHP version does not support ReflectionClass::setAccessible()', __LINE__ );
	}

	$args = func_get_args();
	unset( $args[0], $args[1] );
	$reflection = new ReflectionClass( $class_name );
	$method = $reflection->getMethod( $methodName );
	$method->setAccessible( true );

	//$args = array_merge( array( $class_name ), $args );
	$args = array_merge( array( $reflection ), $args );
	return call_user_func_array( array( $method, 'invoke' ), $args );
}
Step 3: Add multiple variations to cart
Open a new tab and log in to your WordPress dashboard. Go to Product and click on Edit to edit the product you want. There, you will see the product ID.
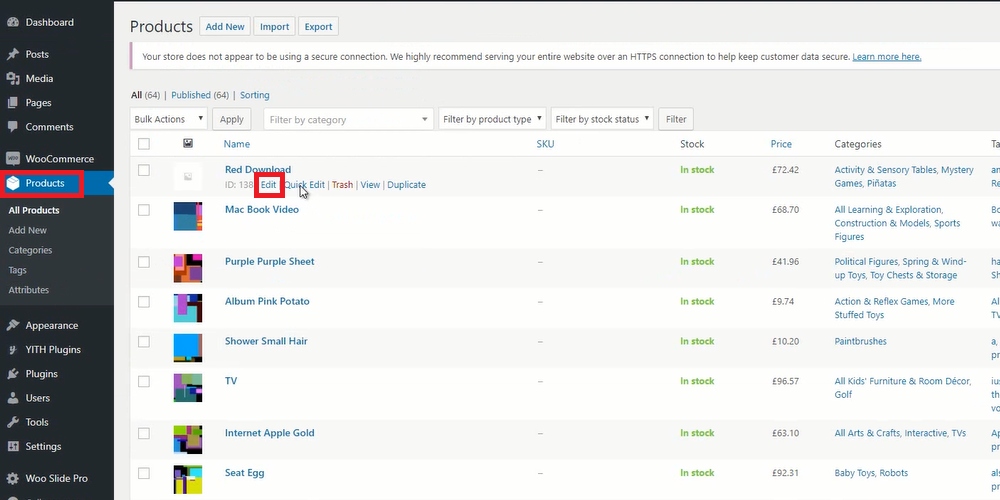
There are two ways to add multiple variations to the cart:
Copy and paste it after ?add-to-cart=. Then, add &quantity=3 if you want to add two same products to the cart at the same time. It is only for the same product ID
Copy and paste the product ID after ?add-to-cart=. This way can be used with both the same product ID and the different ones
How to Add multiple variations to cart via a third-party platform
Another way to add multiple variations to carts in WooCommerce stores is via a third-party platform. This post will guide you on how to use the plugin WooCommerce Product Table to add more than one product to the cart on one page. Let’s get started!
Step 1: Install WooCommerce Product Table
First of all, click on this link and download WooCommerce Product Table for your online store.
Then, login to your WordPress account and go to the dashboard. Select Plugins and open *Add new**.
Click on Upload to and choose the button Choose file to upload the zip file of WooCommerce Product Table Plugin you have just downloaded.
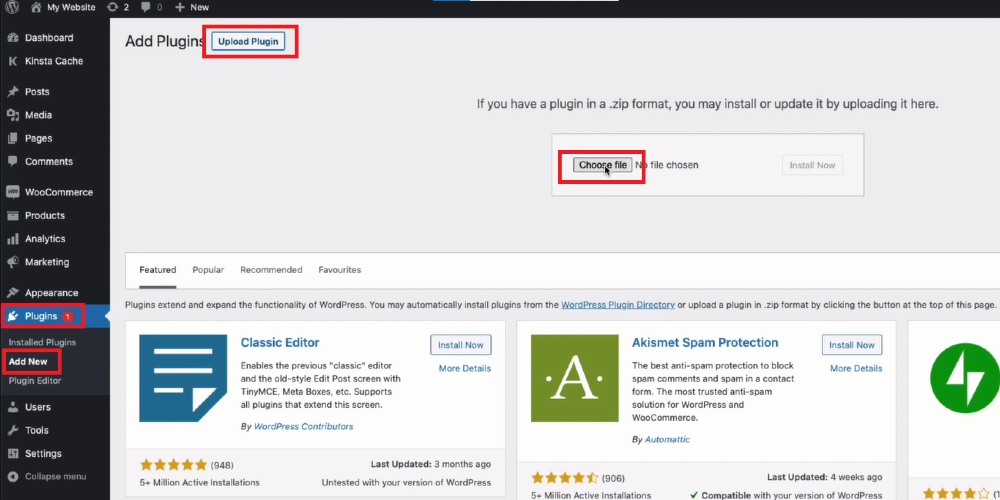
Step 2: Activate WooCommerce Product Table
Come back to Plugins and open Installed plugins to activate WooCommerce Product Table. There, find WooCommerce and click on Activate.
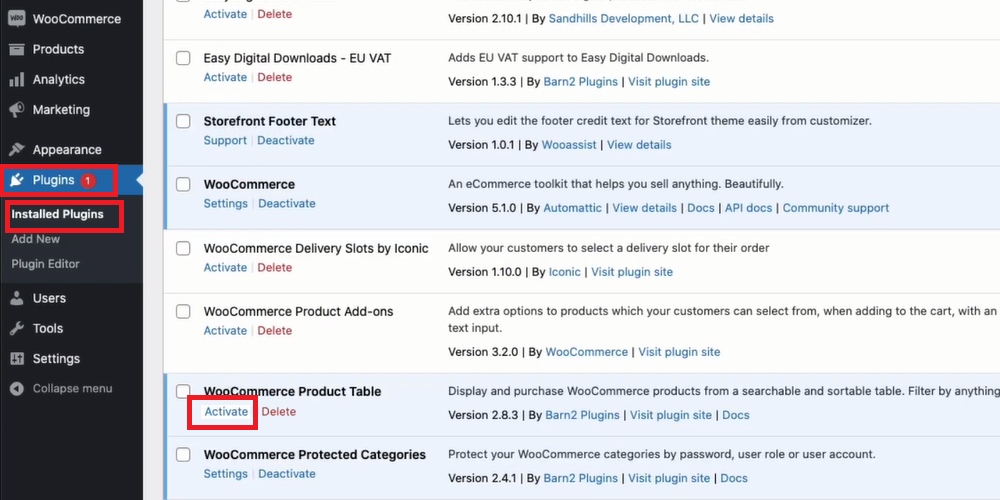
Step 3: Customize product table settings
After activating the extension, the part of Activate will turn to Settings, click on it.
Otherwise, you can come back to the WordPress admin panel, go to WooCommerce and open Settings.
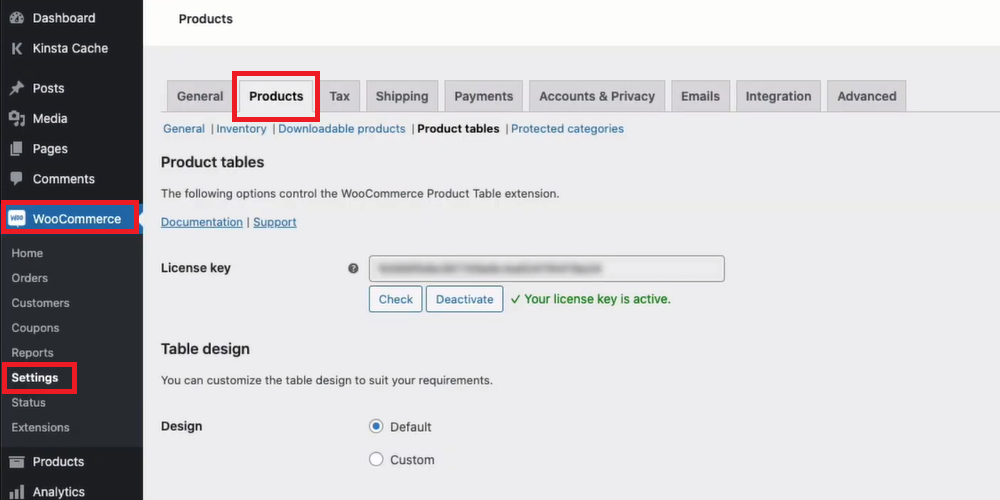
Open the Product tab, scroll down and you will see a part named Shop integration. It is the place that allows you to select which page will have the product table.
As you can see on the screen, the Shop page and *Product categories** are selected, so when visitors open your shop page or product categories, the product table will be displayed to them and they can add the items they want to cart with a couple of clicks.
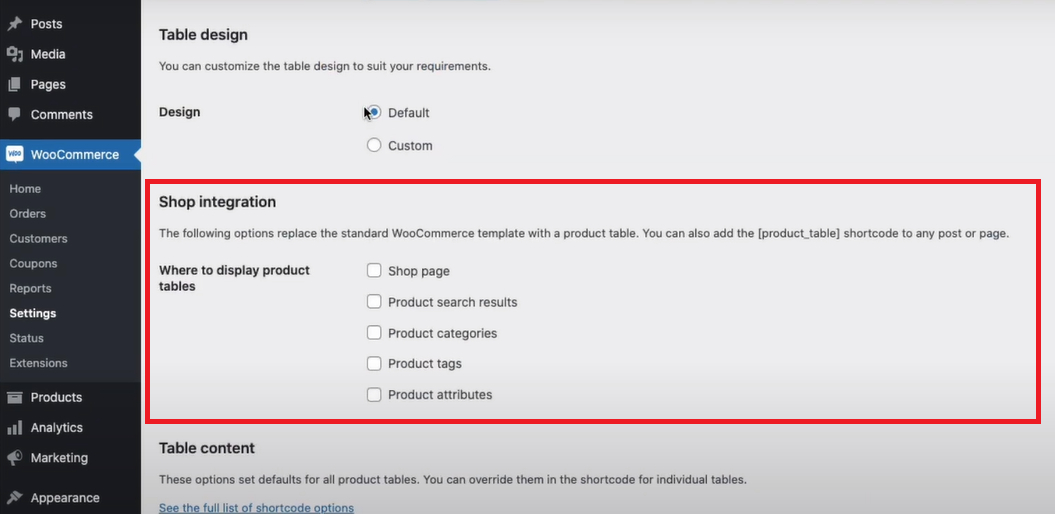
Of course, you are able to choose other pages to display the product table; what you are required to do is just to add the tick to its box.
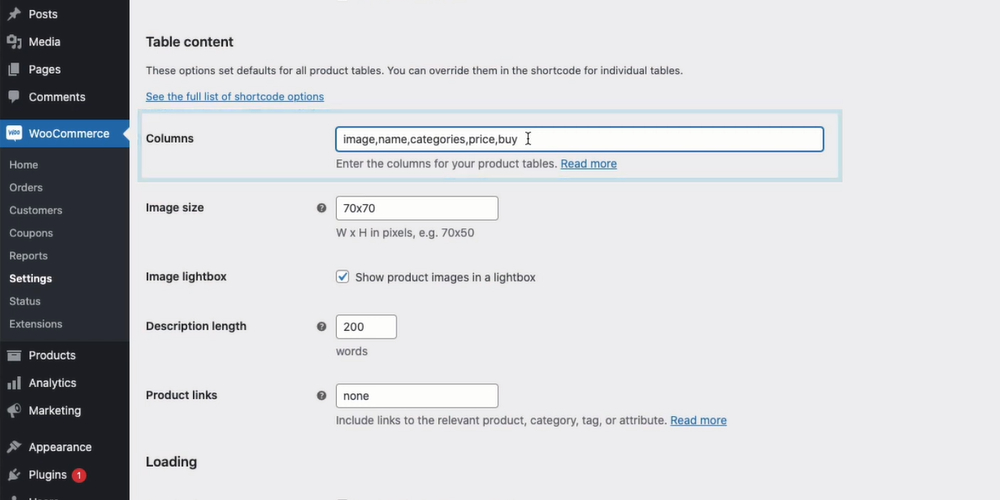
More than that, users are allowed to customize the table settings with this extension. Still in the Product tab, scroll down to the Table content section where you can make changes to elements in columns, table sorting, add to cart button, and so on.
Final words
In conclusion, by allowing customers to add numerous items to the cart at the same time, merchants can not only help customers save time but also increase their sales significantly. Hence, adding this feature to your eCommerce store is a smart idea for any merchant. From this post, you can see two popular ways to add multiple variations to cart in WooCommerce and hope that you can find the suitable option to add it to your store.


