How to Set up Recurring Payments for WooCommerce?
Recurring payments provide you with consistent cash flow and make it easier for your consumers to pay their invoices.
This article will walk you through the steps of how to set up recurring payments in WooCommerce.
Let’s get started!
Why Do You Need to Set up Recurring Payments in WooCommerce?
-
Recurring payment systems enable you to bill your clients regularly, often monthly or yearly.
-
Recurring payments ensure consistent cash flow for your company and make it easier for consumers to pay their invoices in an automated manner.
-
Having your own recurring payments system allows you to not only know how much your business makes but also track your customers’ behavior in your store using certain plugins.
How to Set up Recurring Payments in WooCommerce?
In this part, we will show you how to set up WooCommerce recurring payments using the plugin WooCommerce Subscriptions .
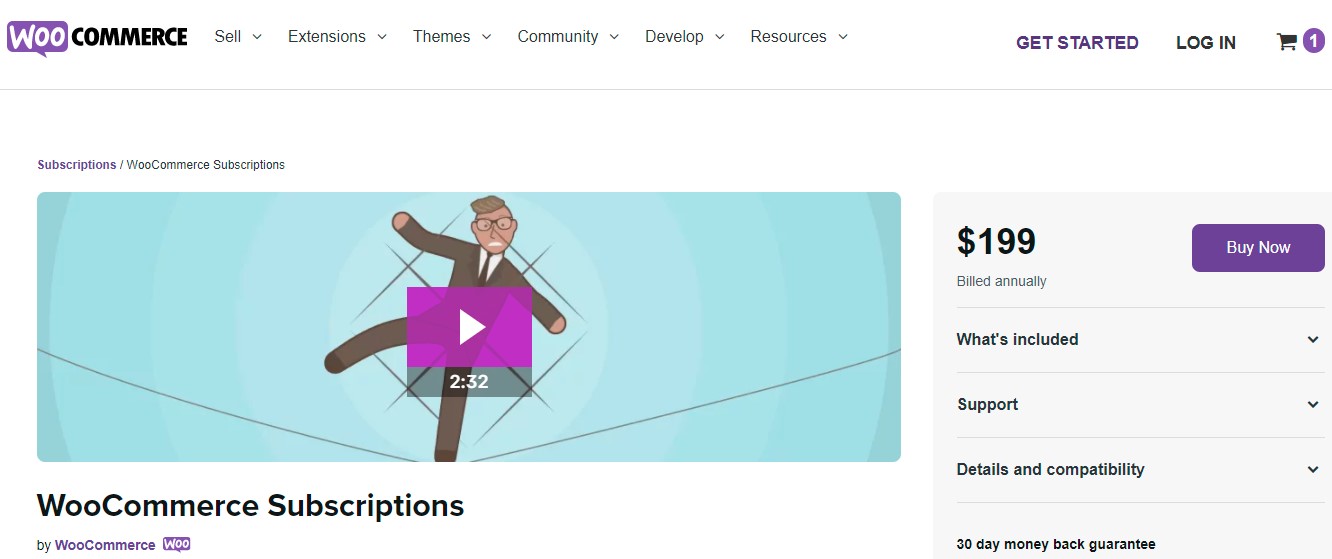
The WooCommerce Subscriptions plugin costs $199 per year and connects to various other WooCommerce plugins and extensions, including the Stripe, WooCommerce Payments, and Braintree extensions.
And here are four major steps that you need to take to set up recurring payments in WooCommerce.
Step 1: Install and activate WooCommerce Subscriptions
- Purchase and download the plugin from the official WooCommerce page by clicking on the button Buy Now.
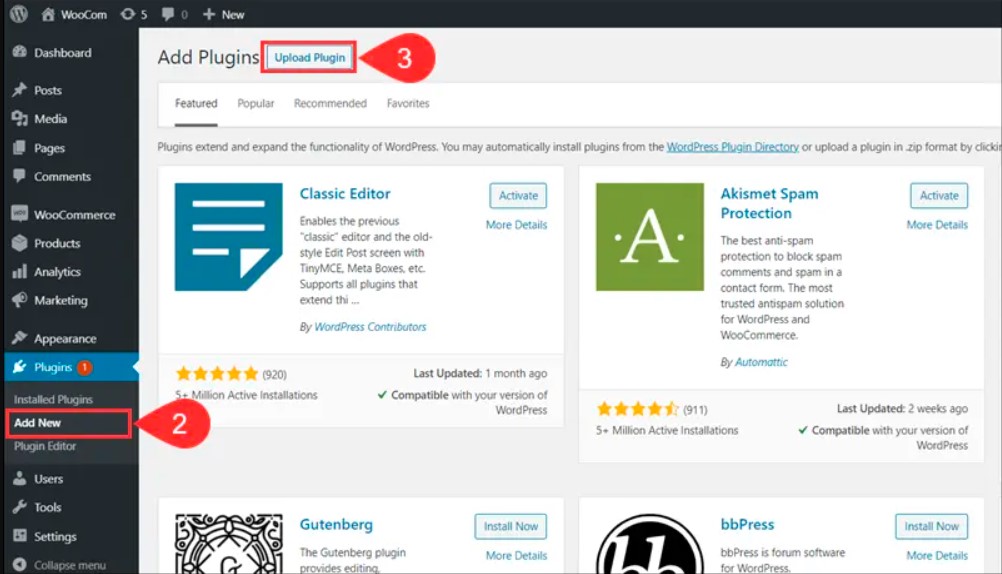
- Log in to your WooCommerce account. From the WP admin dashboard, go to Plugins > Add New > Upload Plugin.
-
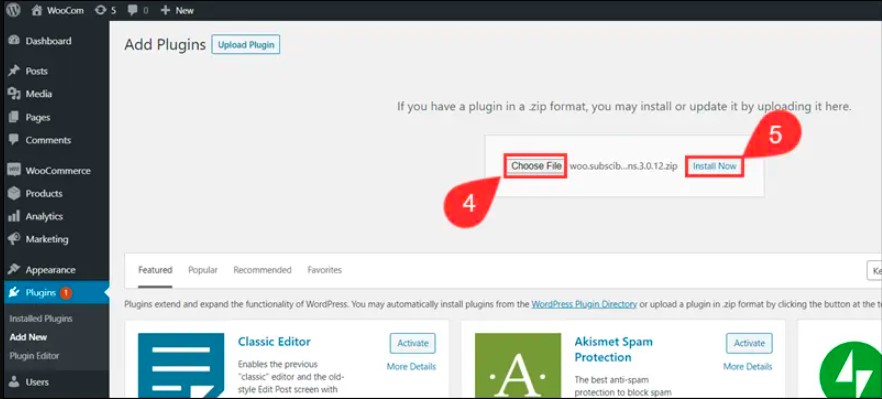
Click on Choose File and upload the zip file WooCommerce Subscriptions that you have just downloaded in 1.
-
Click on Install Now to start the installation.
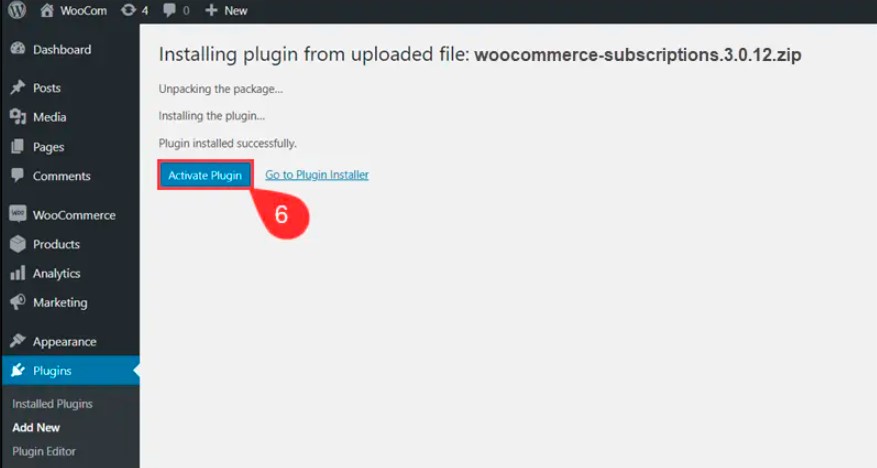
- When the installation is finished, you can click on Activate Plugin to start the activation.
Step 2: Create a subscription product
-
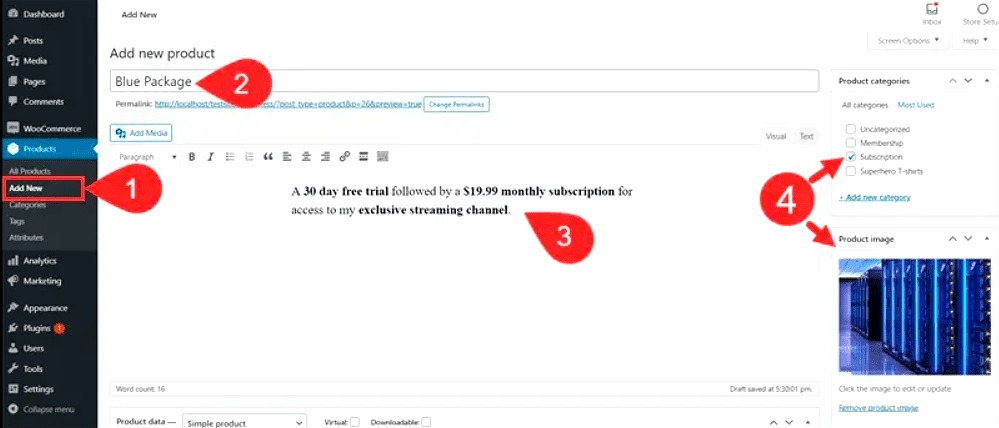
From the WP admin dashboard, go to Products > Add New.
-
Enter the Product name for the subscription. For instance, here we enter Blue Package.
-
Write a Description for the product.
-
Specify the category for the product under the section Product categories and also choose a picture to add in the Product Image section.
-
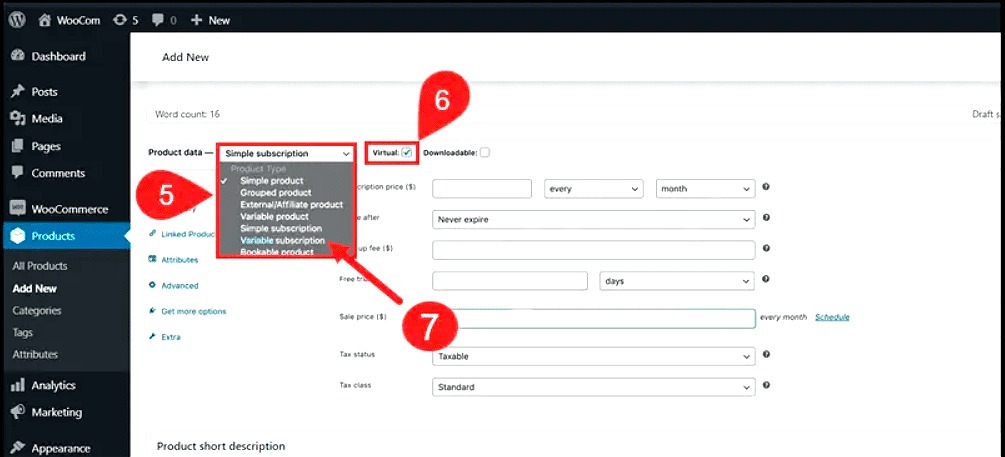
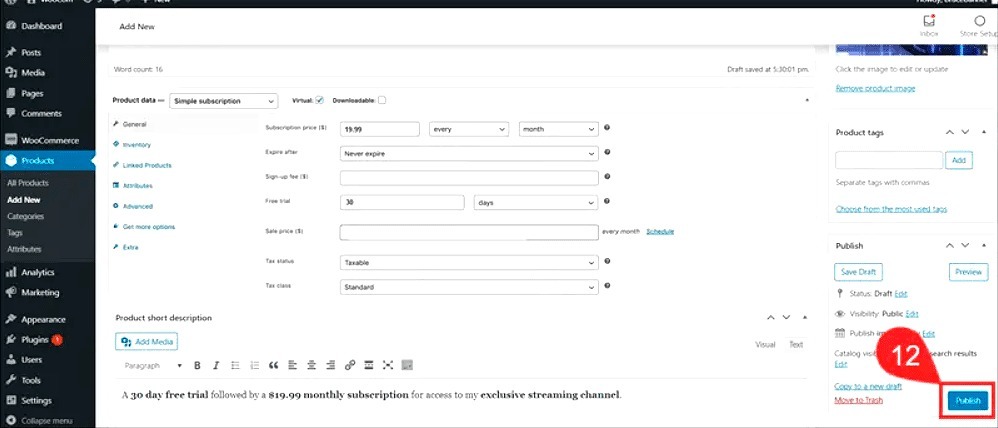
Move to the Product data section. From the dropdown menu of product types, choose Simple Subscription.
-
Define the subscription product as Virtual by checking the box like the image shows.
-
(Optional) You can also select the Variable Subscription option, enabling you to sell the same product in multiple tiers.
Customers, for example, can select from three tiers: Standard, Advanced, and Premium subscription packages for the same item.
-
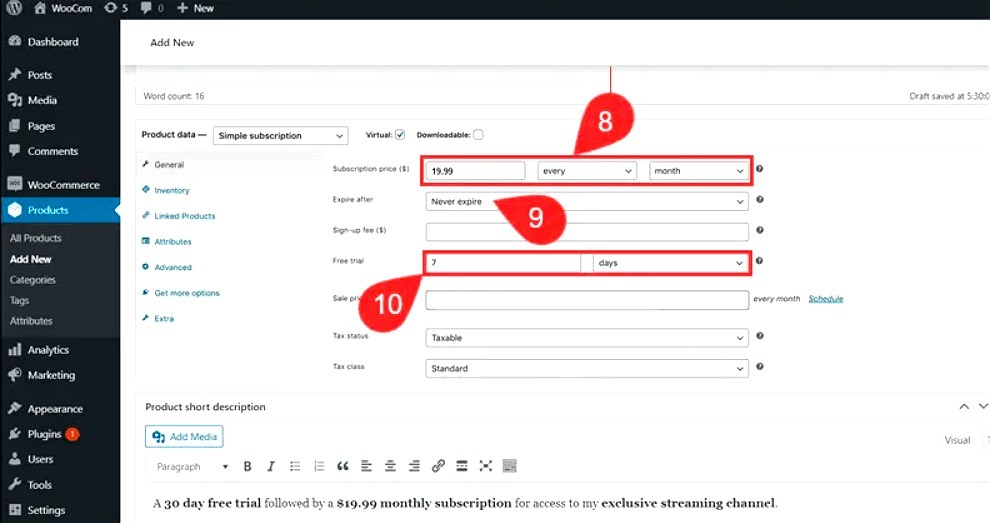
Under Subscription price, type the specific number and also specify whether it is a daily, weekly, monthly, yearly fee.
-
Select whether the subscription will expire after a specified number of recurring fees or set the setting to Never expire.
The option Never expire keeps the subscription valid until it is canceled.
- (Optional) You can choose to set a free trial period during which the consumer will not be charged.
- Write a brief description of the subscription in the Product short description section.
Then click the Preview option to see how the product will look on the website.
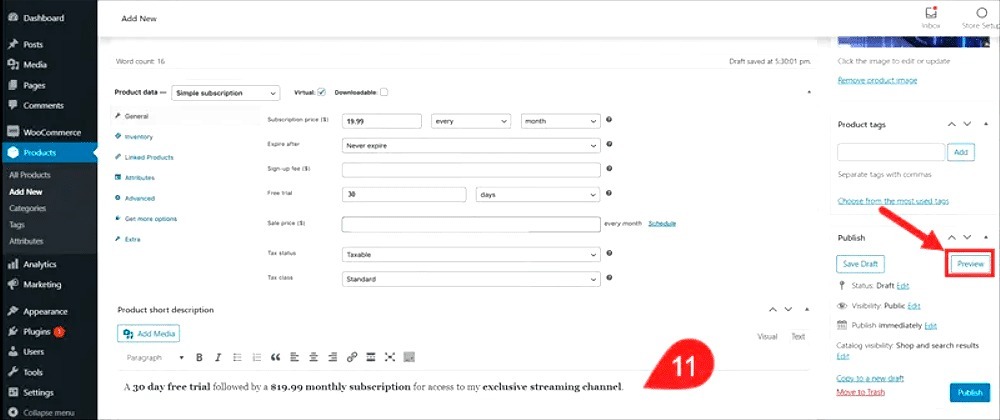
- To finish creating the product, click the Publish button.
It is important to keep in mind that the WooCommerce Subscription plugin administers WooCommerce subscriptions but does not charge customers. You must utilize a payment gateway that enables recurring payments to bill consumers automatically and regularly.
So let’s move on to step 3 and set up a payment gateway.
Step 3: Configure Payment Gateway
Automatic subscription payments are not supported by all payment gateways. On the official website, you can find a list of recurring payment gateways that WooCommerce supports.
Payment gateway extensions that are not on this list can also enable recurring payments in WooCommerce, however, complete integration may demand custom solutions.
As a result, you must download and install a suitable WooCommerce payment gateway plugin. After that, follow the steps below:
-
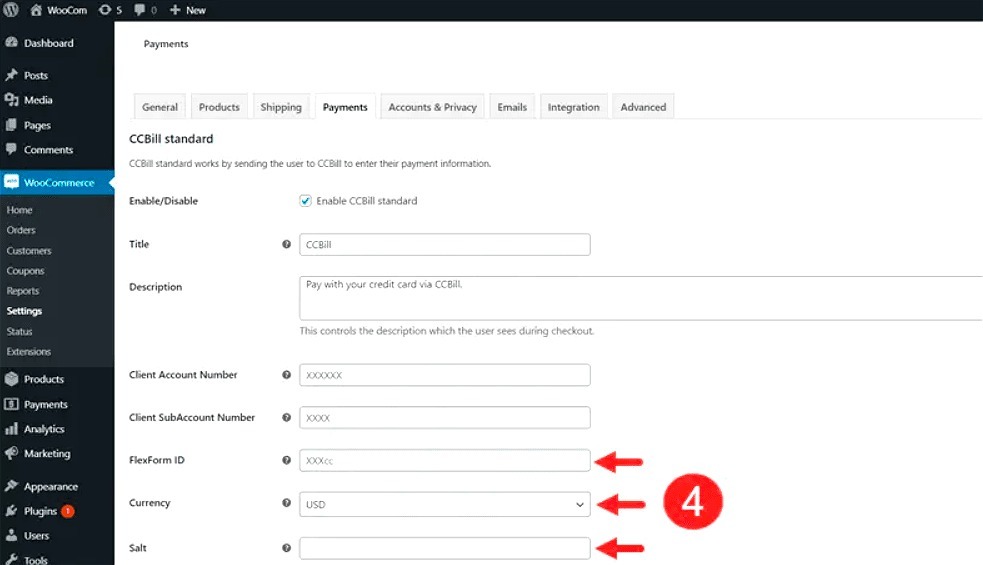
Navigate to Settings from the WP admin dashboard.
-
Proceed to the Payments tab.
-
Check that the payment method is enabled and then click the payment processor’s name you want to use for recurring payments.

- Now add the payment processor information, which includes *the payment form ID, an encryption key, currency, and other payment processor-specific information.
When accepting manual renewals in your store, gateways that only allow non-recurring payments, such as checks or ACH payments, can only be utilized for subscription purchases.
Step 4: Integrate WooCommerce Memberships with Subscriptions
By connecting a membership plan to a subscription product, you ensure that the membership remains active for the duration of the paid subscription.
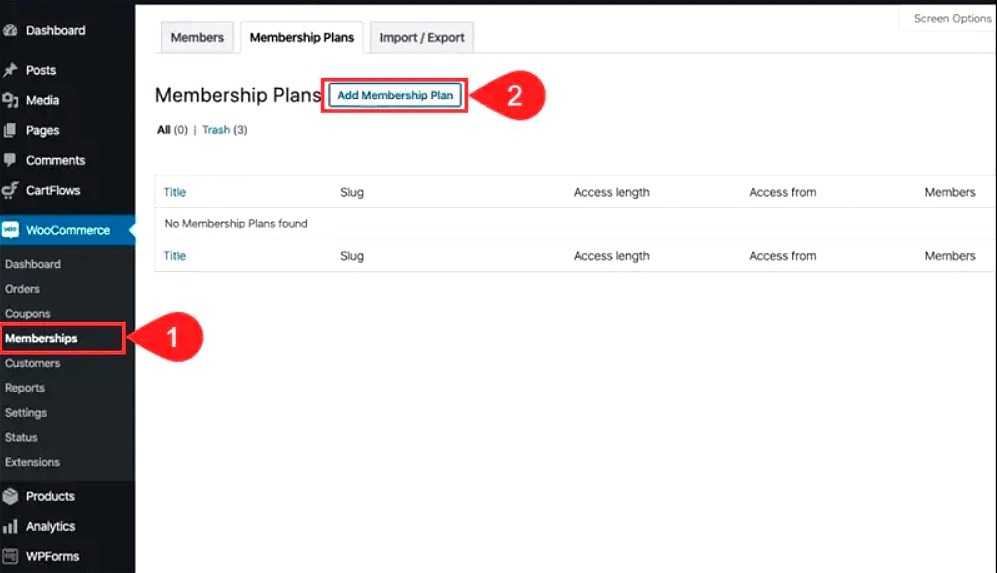
- Navigate to the WooCommerce > Memberships section.
- Then you have to select Add Membership Plan to establish a new plan or click on Edit to modify an existing plan.
-
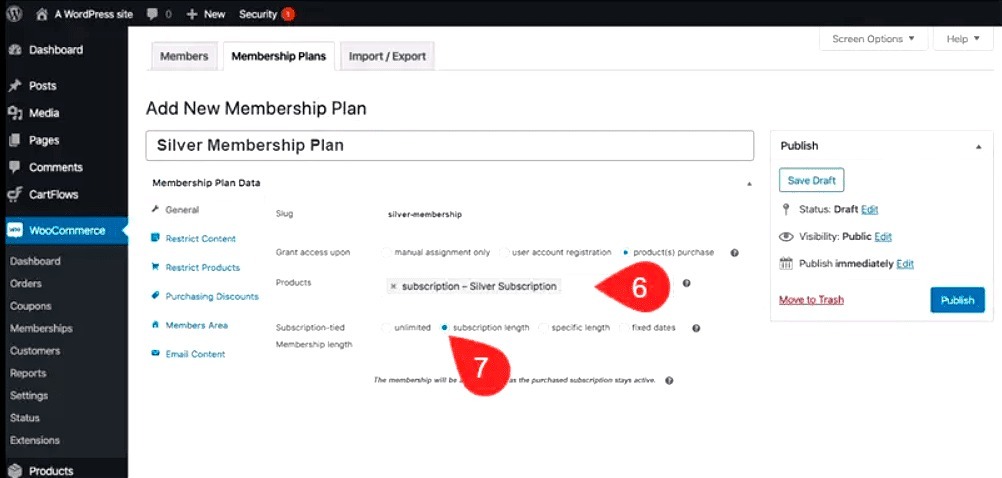
Now that you’re in the General section, you’ll need to give the membership plan a name.
-
Add a user-friendly URL slug under the section Membership Plan Data.
-
After that, you must assign the Grant access upon option to the product purchase.
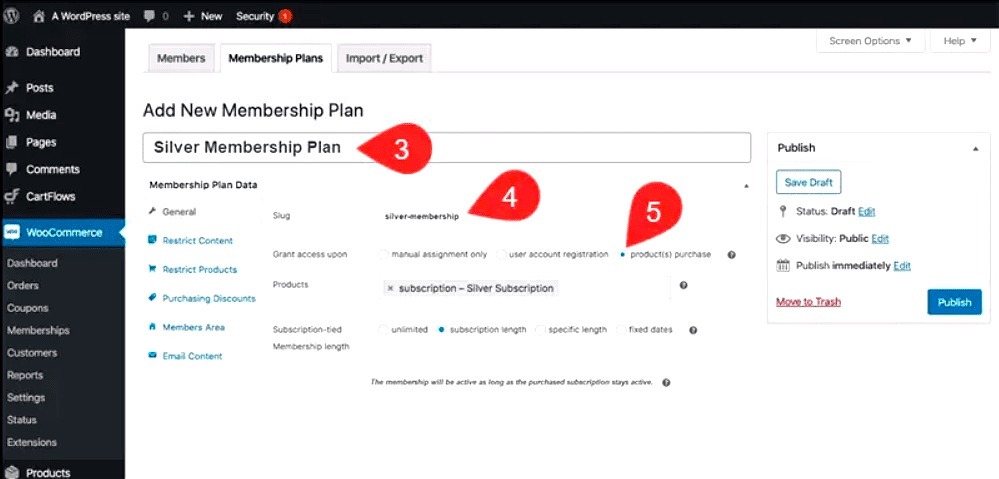
- In the Products section, you need to add the subscription product or products that you already established in the previous step.
Customers who purchase the subscription package will have access to the membership.
- Connect membership access to subscription billing by selecting subscription length from the Subscription-tied membership length setting.
-
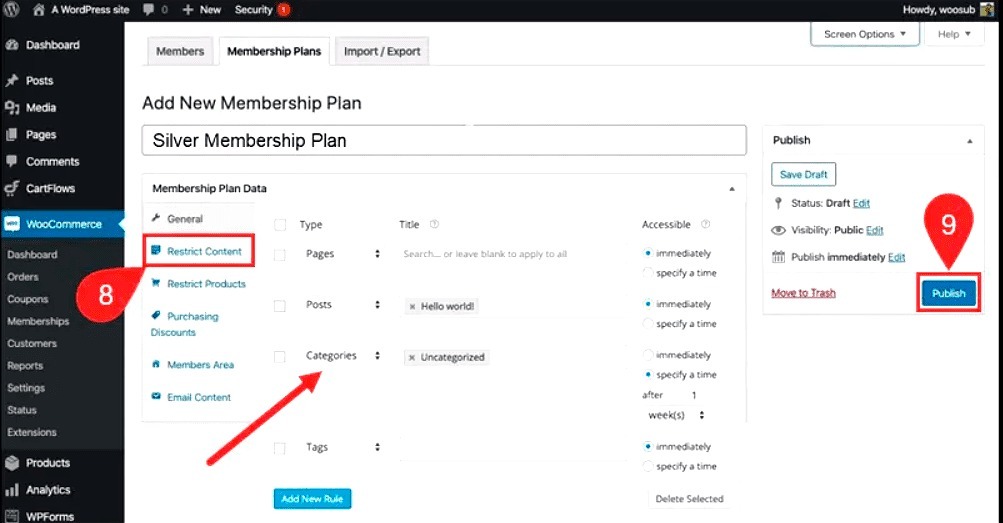
Now, move on to the Restrict Content tab. You must take the time to define access rules for pages, posts, and WooCommerce categories and tags.
-
Lastly, click on the Publish button to publish the membership plan associated with the subscription, or click on Save Draft to save it as a draft.
And that’s how you set up recurring payments for your WooCommerce store. Now, your customers can purchase recurring subscriptions from your store and access their memberships for the duration of the subscription.
2 Best WooCommerce Recurring Payment Plugins
In this part, we have compiled the three best WooCommerce recurring payment plugins that you should take into consideration.
1. Webtoffee WooCommerce Subscriptions
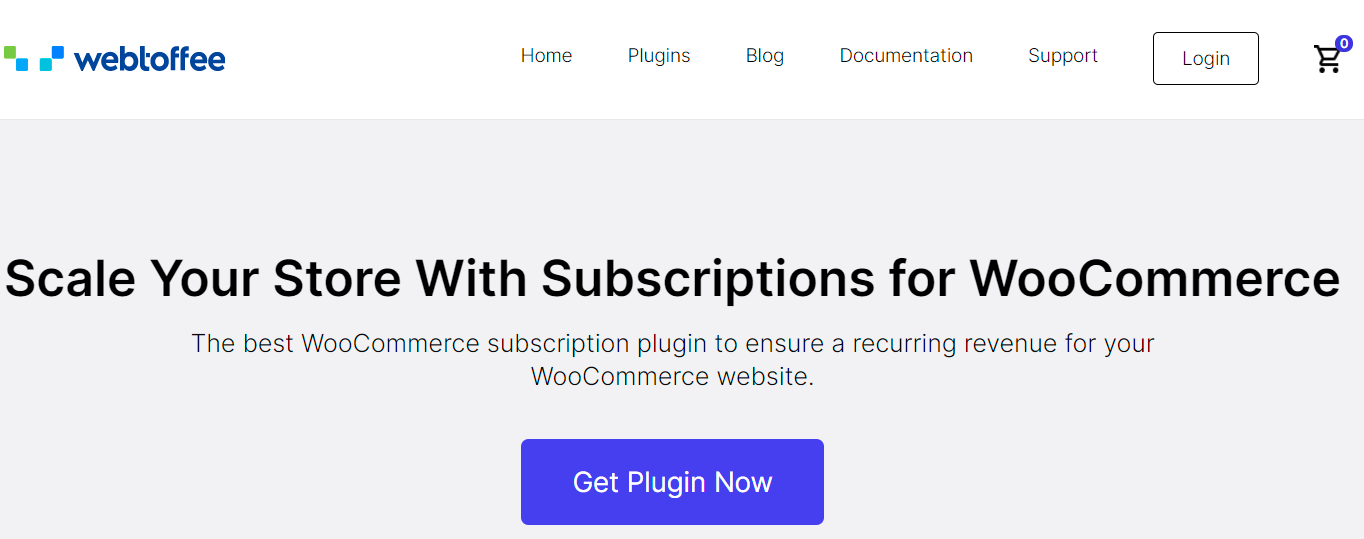
Webtoffee WooCommerce Subscriptions enables you to set up and manage recurring payments/billing in your WooCommerce store. The plugin includes all of the necessary features for a straightforward subscription. There are many subscriptions available, each with its price, duration, features, and monetary schedule.
All of the common payment methods are supported in this plugin. Customers can also be given a recurring discount voucher when they renew their membership on a regular basis.
Key Features
- Simple and variable subscriptions
- Set Free Trial and Sign Up Fee
- Manage Renewal Interval & Expiry
- Offer Recurring Discounts
- Stripe, PayPal Supported
- Email notifications
Pricing
The single site, 5 sites, and 25 sites licenses cost you $89, $129, $199 per year respectively.
2. Subscriptio – WooCommerce Subscriptions
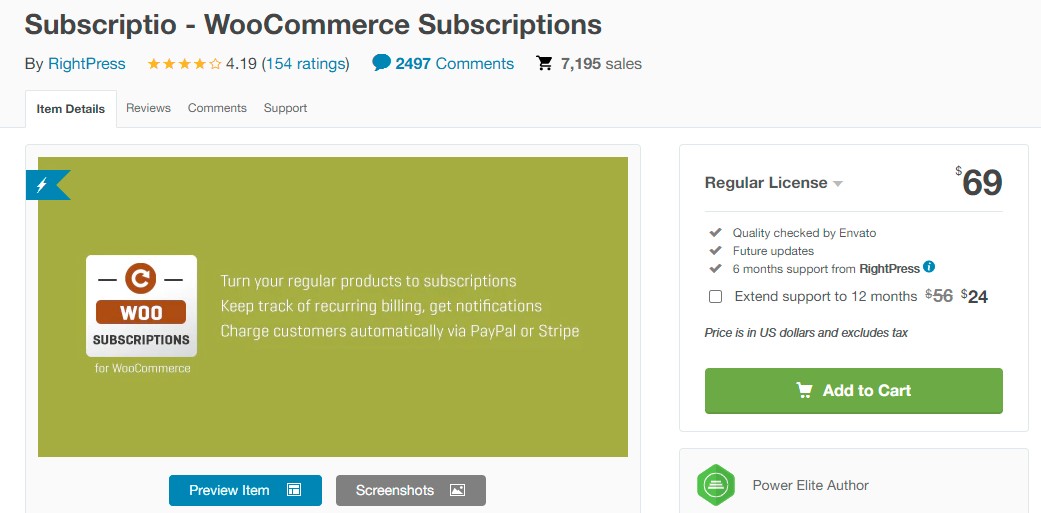
Subscriptio – WooCommerce Subscriptions is a powerful subscriptions plugin for WooCommerce users that allows them to sell subscriptions and activate recurring income features. It can be used to offer e-learning packages, online memberships, magazine subscriptions, and other services.
Subscriptio also allows you to choose the length of your membership, payment cycle, free trial period, and many other features.
Key Features
- All subscription-related actions are handled automatically
- Both simple and variable products can be turned into subscriptions
- Charge a one-off signup fee in addition to the recurring total
- Subscriptions can be paused, resumed, and canceled manually
- Purchase multiple subscriptions and any quantity of each subscription
Pricing
The regular and extended licenses are charged at $69 and $229 respectively.
Final Words
Setting up WooCommerce recurring payments is essential when it comes to running an online business. With the help of a dedicated plugin, we believe that you can easily complete the setup process.
We hope that this guide has provided you with a wealth of valuable information. If you have any questions on this topic, please leave them in the comments section.
Thank you for taking the time to read this post, and we’ll see you in the next one.


