How to delete the author's name in your theme in Shopify
Are you in need of removing the author’s name from blog posts? As always, blog posts are supposed to display the name of its author with other meta-data like category and date. Nonetheless, some owners of blogs just do not want to show the author’s name next to their blog posts. In this article, we are going to show you how to do that job.
Now, let’s take a look at our instructional writing on How to delete the author’s name in your theme to know more deeply about this topic.
How to delete the author’s name in your theme
The reasons why you should remove the author’s name {#the-reasons-why-you-should-remove-the-author’s-name}
By default, most themes do display a set of metadata on blog posts, which are published. Author and date are always prominent things most of the time. Also do categories and tags. they allow your readers to know more about authors who have created content on your blog. This information can, of course, be useful. However, there are still some certain reasons why you want to delete date and author. For instance, if multiple staff members have a collabrate on every blog post, then it might seem not fair to creadit just one staff member only for that work. Or, you may have several staff freelance writer or contributors who occasionally write articles, but you want to keep a consistent style and voice for your blog so removing the author’s name seem to be the best solution to the issue. Anyways, you are allowed to do it as an online website administrator.
How to delete the author’s name in your theme
For sectioned themes
Step 1:
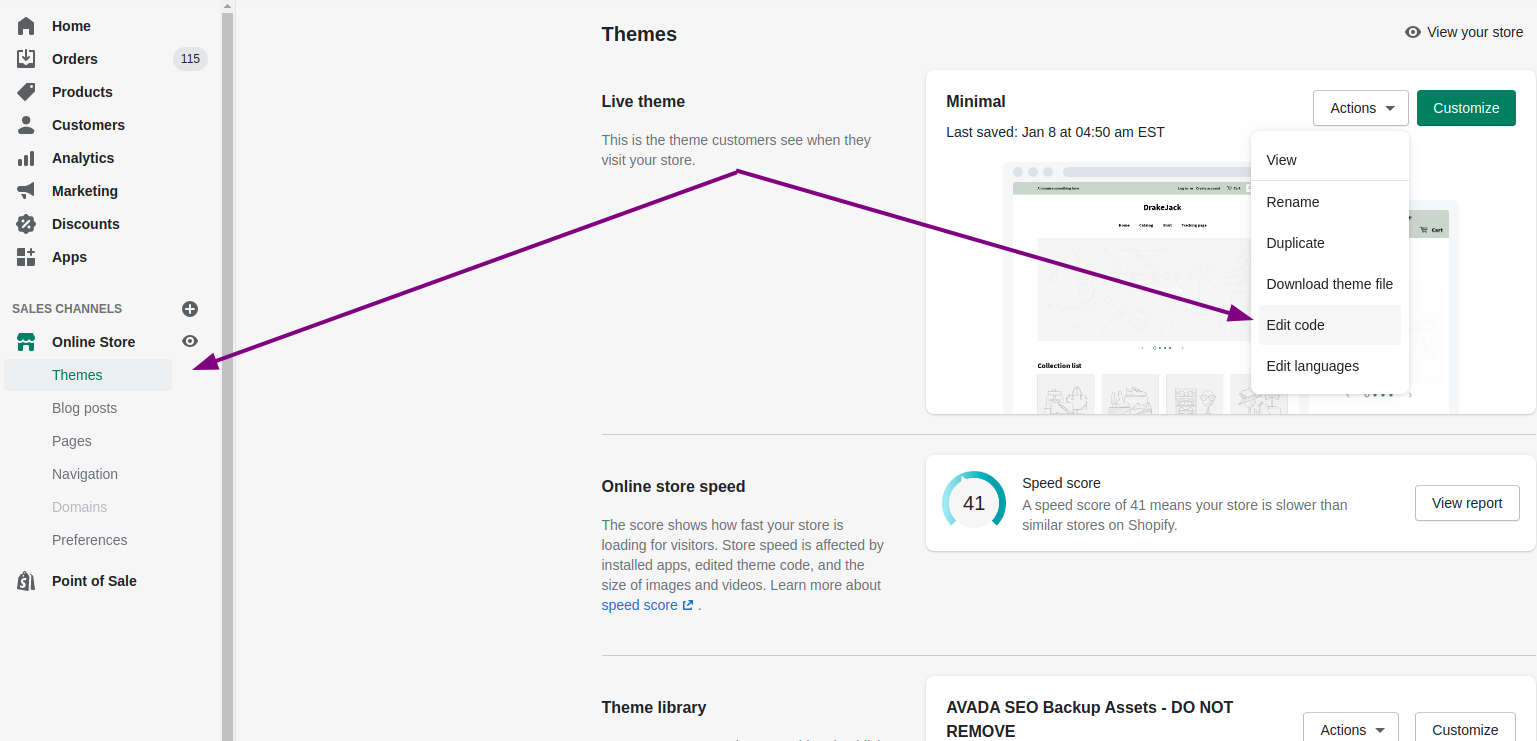
Go to Online Store > Themes from your Shopify Admin panel.
Step 2:
Look for the theme you want to edit and click Actions > Edit code.

Step 3:
In the Templates folder, tap blog.liquid.
Step 4:
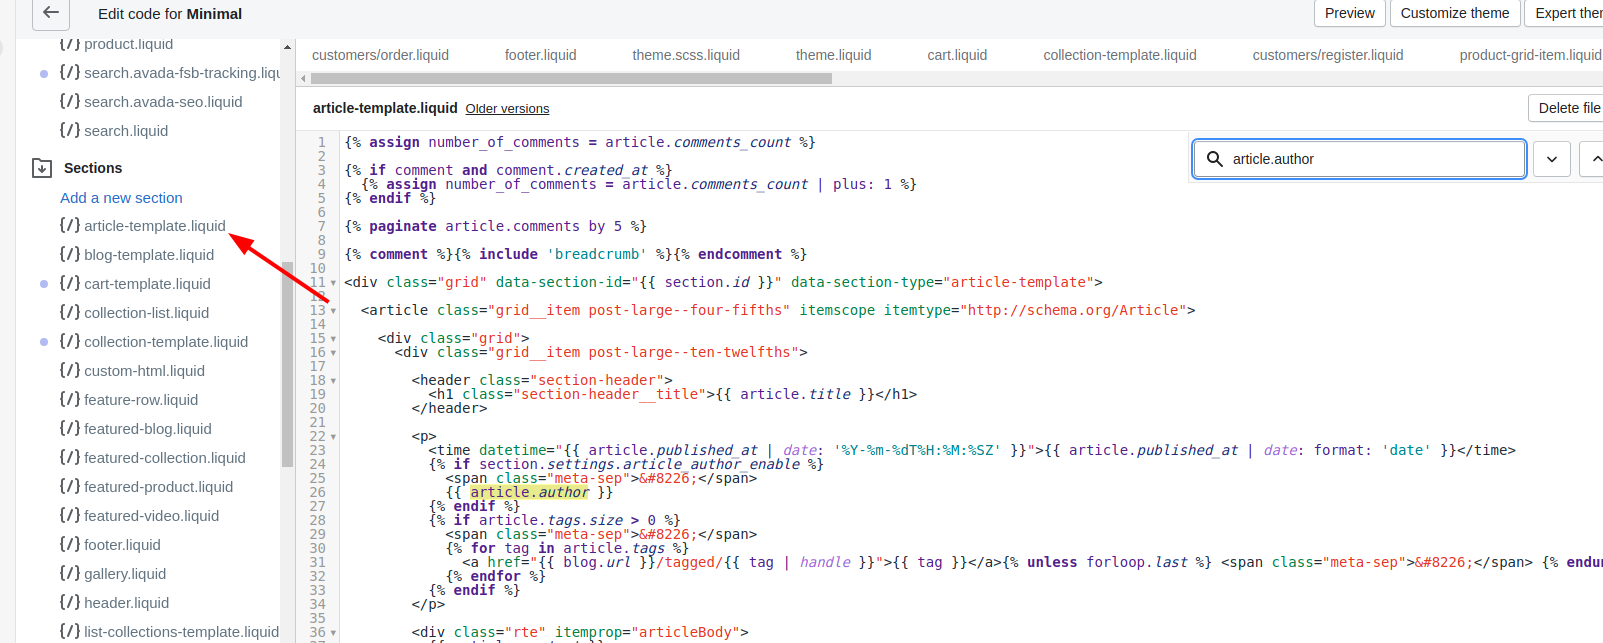
To locate this Liquid tag and remove it, you can use ctrl + F on a PC or command + F if you use a Mac:
{{ article.author }}
Regarding to Simple and Supply, the author and date do share the similar Liquid tag. To locate this Liquid tag and remove it, you can use ctrl + F on a PC or command + F if you use a Mac:
{{ 'blogs.article.author_on_date_html' | t: author: sam
In case you only want to keep the date visible, then replace the code above with this:
{{ date }}
Step 5:
Tap Save
###Step 6:
In the Sections folder, tap article-template.liquid. Regarding to Boundless, in the Templates folder, tap article.liquid.
###Step 7:
To locate this Liquid tag and remove it, you can use ctrl + F on a PC or command + F if you use a Mac:
{{ article.author }}
 Regarding Simple and Supply, the author and date do share the similar Liquid tag. To locate this Liquid tag and remove it, you can use
 ctrl + F on a PC or command + F if you use a Mac:
{{ 'blogs.article.author_on_date_html' | t: author: sam
In case you only want to keep the date visible, then replace the code above with this:
{{ date }}
Step 8:
Tap Save.
For non-sectioned themes
Step 1:
Go to Online Store > Themes from your Shopify Admin panel.
Step 2:
Look for the theme you want to edit and click Actions > Edit code.
Step 3:
In the Templates folder, tap blog.liquid.
Step 4:
To locate this Liquid tag and remove it, you can use ctrl + F on a PC or command + F if you use a Mac:
{{ article.author }}
Step 5:
Tap Save.
Step 6:
In the Templates folder, click article.liquid.
Step 7:
To locate this Liquid tag and remove it, you can use ctrl + F on a PC or command + F if you use a Mac:
{{ article.author }}
Step 8:
Tap Save.
Conclusion
Above is a guide on how to delete the author’s name in your theme. Deleting the author’s name will no longer be a difficult task for you if you read and follow all the instruction carefully. We hope that you find this guide useful and you can successfully finish this task.


