Display featured image on product page by editing your theme code in Shopify
Showcasing your products effectively is crucial for any Shopify store, especially when using non-sectioned themes. Many store owners struggle to display a featured image on their product pages, missing out on the opportunity to highlight their products’ best features. This guide focuses on how to display a featured image on a product page by editing your theme code in Shopify. Discover how to leverage your theme’s code to boost your Shopify store’s appearance and potentially increase sales.
Free 1:1 Shopify consultation & 30-day all-app trial FREE
- Shopify Plus Strategy and Consultation
- Personalized E-commerce Solutions
- Conversion Rate Boosting Techniques
- Inventory Management Hacks
What is the featured image?
To go deeper into details, we would like to get you to know that a featured image is a product image that belongs to the whole product, not to just any specific variant. For instance, if you are selling an item that has variants in several different colors, then you may have a featured image that can show many different color options in just a picture.
Please note that your theme may not show the price of the product until after the customer chooses a variant because this customization does prevent a variant from being selected by default. This is expected behavior since products with variants do not have a featured price. The price which is shown is determined by the variant that is selected.
How to display a featured image on a product page by editing your theme code for non-sectioned themes
Step 1:
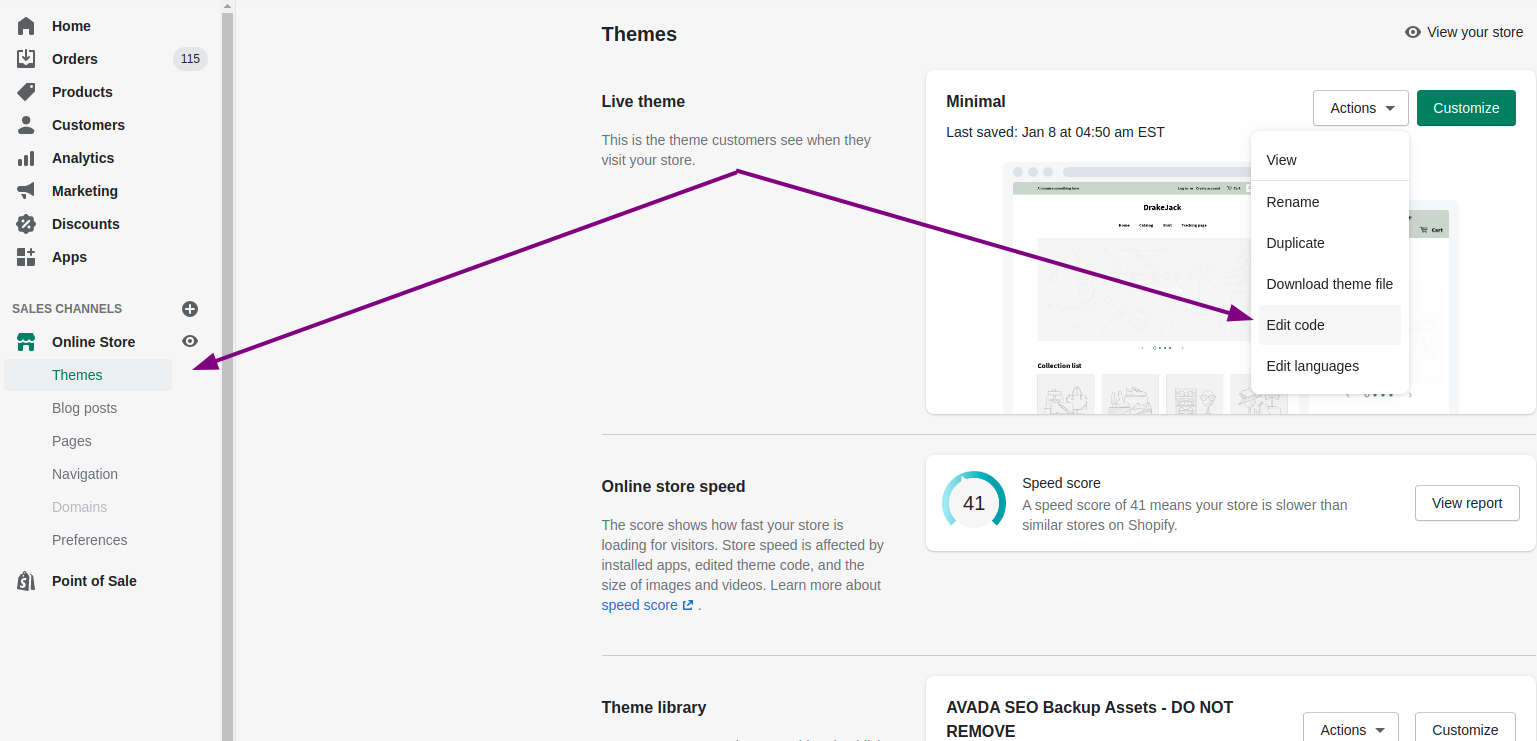
Go to Online Store > Themes from your Shopify Admin panel.
Step 2:
Choose the theme you want to edit and click Actions > Edit code.
 Note
Note
Please move to step 10 if you use the Brooklyn theme.
Step 3:
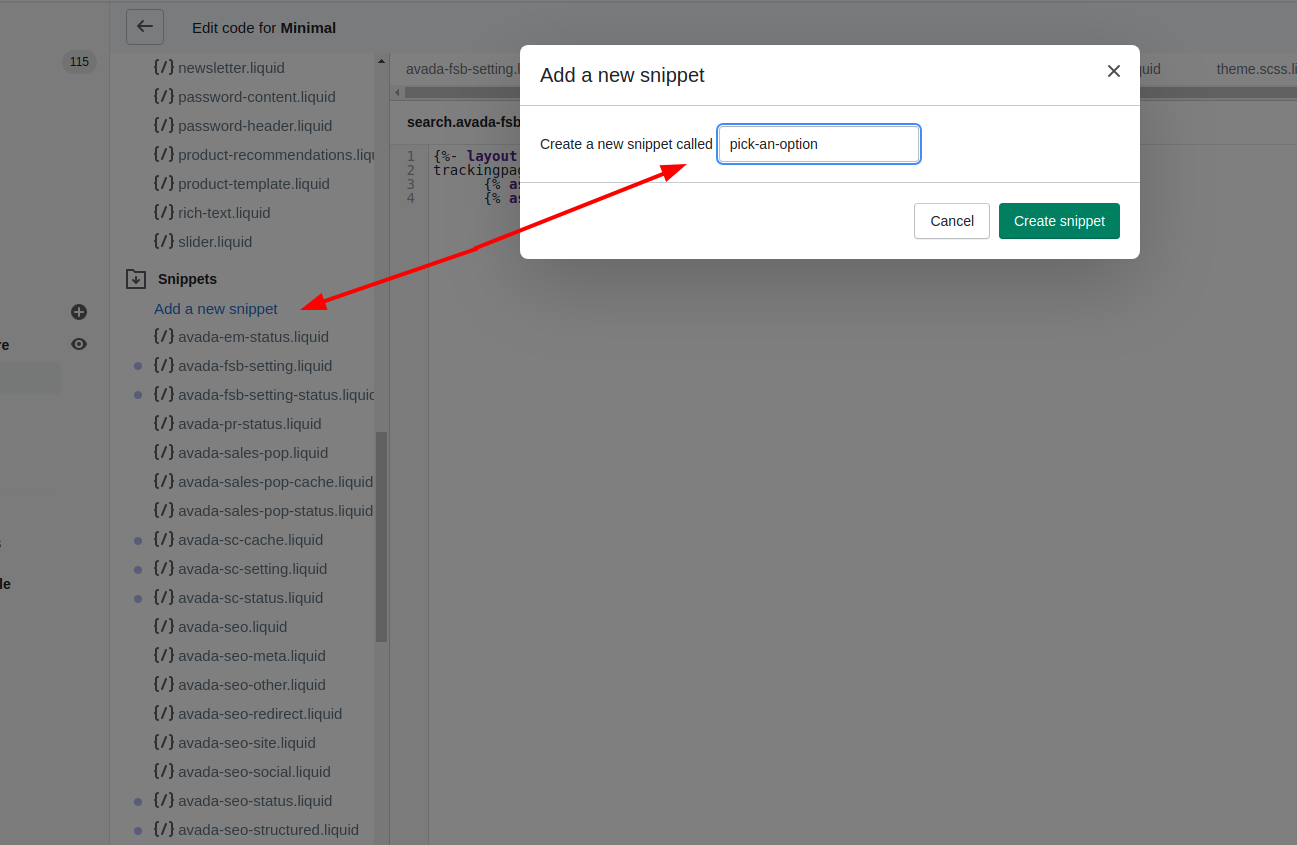
Click Add a new snippet in the Snippets directory.
Step 4:
Name your new snippet “pick-an-option”.

Step 5:
Paste this code hosted on GitHub in your new snippet file.
Step 6:
Choose Save.
Step 7:
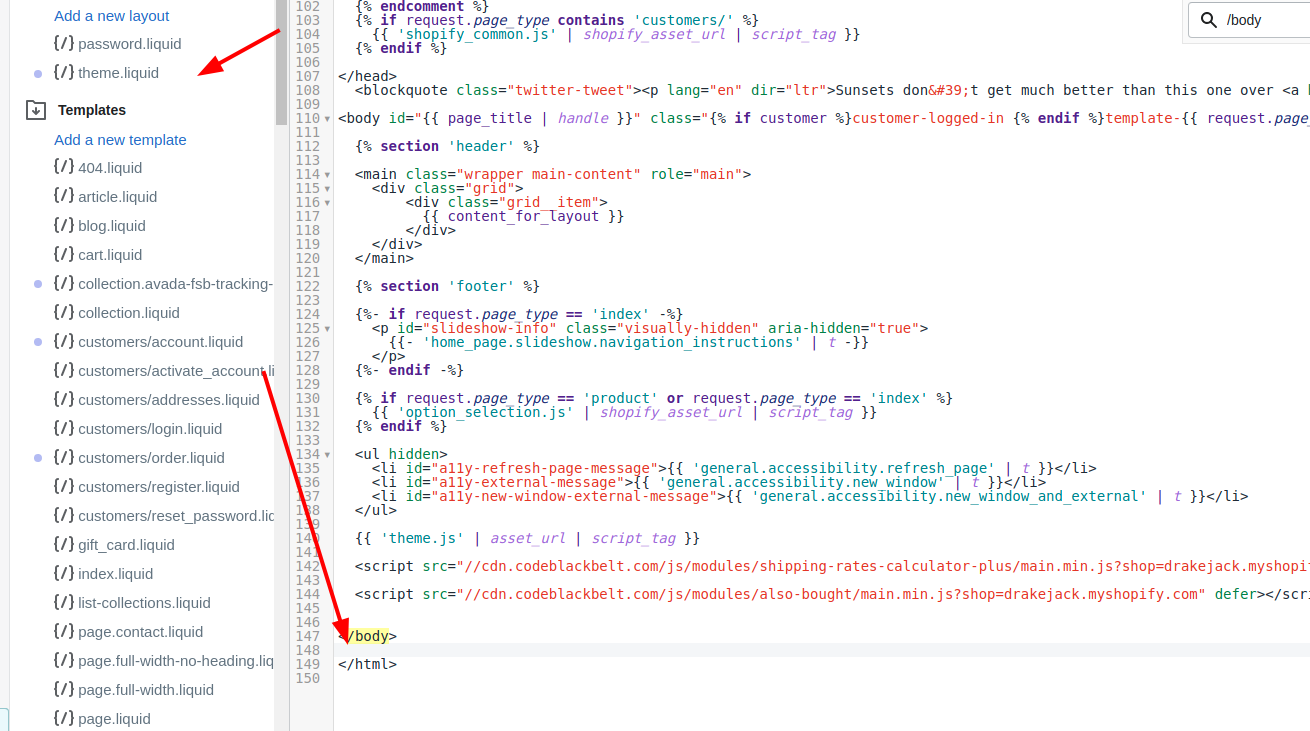
Choose theme.liquid in the Layout directory.
Step 8:
Search for the closing </body> tag near the bottom of the file. Paste the following code on a new line right above the closing </body> tag:

{% include 'pick-an-option' %}
Step 9:
Click Save.
Step 10:
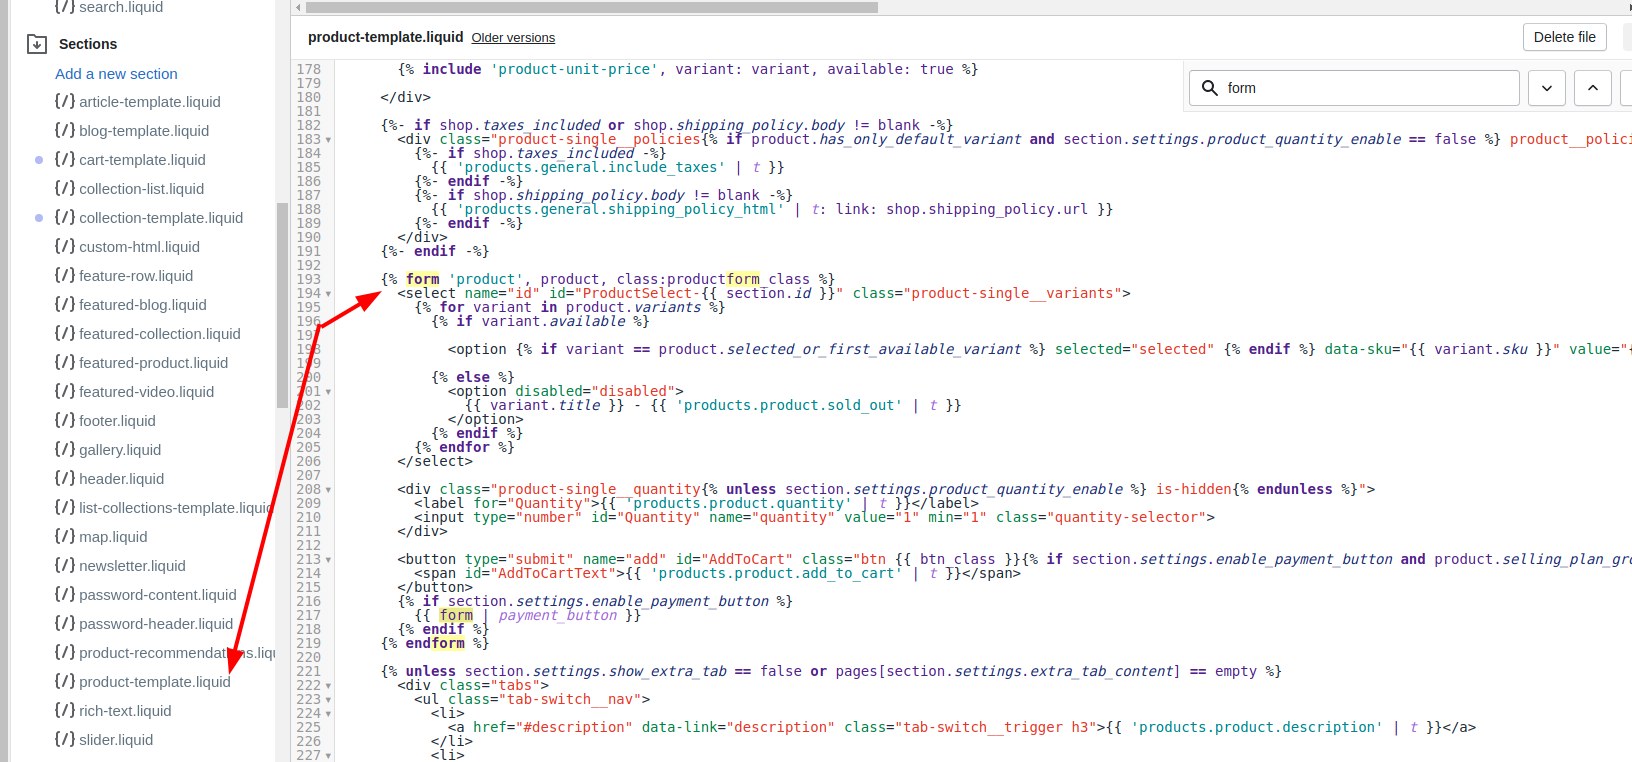
Search for the file which contains the Add to cart form. It will have an action attribute set to /cart/add.
It should be in one of these following files:
- the
product.liquidtemplate under Templates - the
theme.liquidlayout under Layout - the
product.liquidsnippet under Snippets - the
single-product.liquidsnippet under Snippets
Step 11:
Search for this code inside the form:
<option {% if variant == product.selected_or_first_available_variant %} selected="selected" {% endif %} data-sku="{{ variant.sku }}" value="{{ variant.id }}">{{ variant.title }} - {{ variant.price | money_with_currency }}</option>
or
<option {% if variant == current_variant %} selected="selected" {% endif %} data-sku="{{ variant.sku }}" value="{{ variant.id }}">{{ variant.title }} - {{ variant.price | money_with_currency }}</option>
And replace it with:
<option {% if forloop.length <= 1 and variant == product.selected_or_first_available_variant %} selected="selected" {% endif %} data-sku="{{ variant.sku }}" value="{{ variant.id }}">{{ variant.title }} - {{ variant.price | money_with_currency }}</option>
Step 12:
Find and replace the following code:
Minimal, Pop, or Supply
If you use Minimal, Pop, or Supply, search for all occurrences of this code:
{% assign featured_image = product.selected_or_first_available_variant.featured_image | default: product.featured_image %}
And replace it with:
{% assign featured_image = product.selected_variant.featured_image | default: product.featured_image %}
Other Shopify theme which are free
If you use any other Shopify theme, search for this code:
{% assign current_variant = product.selected_or_first_available_variant %}
And replace it with:
{% assign current_variant = product.selected_variant %}
Step 13:
Tap Save
How to display a featured image on a product page by editing a product page template for sectioned themes in Shopify
How to display a featured image by editing a product page template for Brooklyn
Step 1:
Open product-template.liquid in the Sections directory.


Step 2:
Look for the following code:
{% assign current_variant = product.selected_or_first_available_variant %}
And replace it with the code:
{% if product.variants.size > 1 %}
  {% assign current_variant = product.selected %}
{% else %}
  {% assign current_variant = product.first_available_variant %}
{% endif %}
Step 3:
Eliminate the code from inside the add to cart form:
{% if option.selected_value == value %} checked="checked"{% endif %}
Step 4:
Find the code with the opening <span> tag:
<span class="btn__text">
Then find tag for closing. Replace the code between the opening and the closing with this following code:
{% if variant or product.variants.size == 1 %}
  {% if product.available or product.variants.size == 1 and variant.available %}
    {{ 'products.product.add_to_cart' | t }}
  {% else %}
    {{ 'products.product.sold_out' | t }}
  {% endif %}
{% else %}
  {{ 'products.product.unavailable' | t }}
{% endif %}
Step 5:
Remember to click Save.
How to display a featured image by editing a product page template for Boundless
Step 1:
Look for the following code:
{% assign current_variant = product.selected_or_first_available_variant %}
And replace it with the code:
{% assign current_variant = product.selected_variant %}
Step 2:
Look for the following code:
selected="selected"
Remove the above code, together with the Liquid logic tags. The deleted code is:
{% if variant == product.selected_or_first_available_variant %} selected="selected" {% endif %}
Step 3:
Paste the following code at the bottom line.
<script>
var productOptions = [];
 {% for option in product.options %}
  var optionObj = {};
  optionObj[ {{ forloop.index0 }} ] = "{{ product.options[forloop.index0] }}";
  productOptions.push(optionObj);
 {% endfor %}
</script>
Step 4:
Remember to click Save.
How to display a featured image by editing a product page template for Debut
Step 1:
Look for the following code:
{%- assign current_variant = product.selected_or_first_available_variant -%}
And replace it with the code:
{% if product.variants.size > 1 %}
  {% assign current_variant = product.selected %}
{% else %}
  {% assign current_variant = product.first_available_variant %}
{% endif %}
Step 2:
Look for the following code:
selected="selected"
Remove the above code, together with the Liquid logic tags. The deleted code is:
{% if variant == product.selected_or_first_available_variant %} selected="selected" {% endif %}
Step 3:
If you use Debut, find this code:
{%- assign featured_image = product.selected_or_first_available_variant.featured_image | default: product.featured_image -%}
And change it into:
{%- assign featured_image = current_variant.featured_image | default: product.featured_image -%}
Step 4:
Paste the following code at the bottom line.
<script>
var productOptions = [];
  {% for option in product.options %}
  var optionObj = {};
  optionObj[ {{ forloop.index0 }} ] = "{{ product.options[forloop.index0] }}";
  productOptions.push(optionObj);
  {% endfor %}
</script>
Step 5:
Remember to click Save.
Conclusion
Displaying a featured image on your product page is a powerful way to enhance your Shopify store’s visual appeal and showcase your products effectively. By following the step-by-step guide provided, you can successfully edit your sectioned and non-sectioned theme code to implement this feature. Take action now to apply these changes to your Shopify store.
Remember, an engaging product presentation can significantly impact customer interest and potentially increase sales. As you continue to refine your online store, mastering theme customization techniques like this will prove invaluable in creating a more attractive and user-friendly e-commerce platform.


