how to setup pre-orders
Setting up pre-orders can be confusing, especially if you’re new to the process. Many online sellers face challenges like managing inventory, dealing with customer expectations, and ensuring a smooth checkout experience. But don’t worry, setting up pre-orders doesn’t have to be complicated. In this guide, we’ll walk you through the steps to easily set up pre-orders for your products, helping you boost sales and keep your customers happy. Let’s dive in!
How to generate a pre-order product page template
Pros and cons of pre-orders
In case you do not know, pre-orders give your customers permission to reserve a product from your store before it is ifficially back in stock. There are more and more retailers and suppliers seeing the advantages of running pre-order programs since they can give them an overview about the general demand level and get a guaranteed number of sales.
Additionally, if pre-orders are not run in a professional way, they might potentially damage the reputation of your store. Here are some good and not-good features that we would like to point out for you:
Pros
-
Pre-orders can be a guarantee for your certain amount of sales and revenue within an predicted time period.
-
Through running pre-order programs, you can have a detailed survey on demand in your target market and estimate the suitable quantify to fulfill the demand.
-
You can use pre-order as a marketing initiative. it is a great technique to market and promote the pre-leased products so it can grow in popularity and create hype.
-
Your suppliers do not have to be worried about unsold stock.
Cons
-
General speaking, pre-orders may not work well for sellers on online market such as eBay or Amazon. You migh have to maintain stock, and these platforms do have a very strict policy for quick shipping. If you get negative feedback or ratings due to delays caused unexpectedly, you may have to face the risk of losing your account.
-
Similar to many other promotion plans, pre-orders cannot the a complete strategy to run a business. The sales and quantity even they are guaranteed somehow that is not enough to maintain revenue.
-
The control over the turnaround time of the product may be in the hands of your manufacturer. Your business could be the one that might end up losing clients and credibility if there are any delays or cancellations from your suppliers. That’s why it is very neccessay for you to know the precise date of release and availability in your stock before setting the date in your store.
Generate a pre-order product page template
You have to create a new product template to edit the Add to cart button text for your pre-order items.
-
Step 1: From your Shopify Admin panel, click Online Store > Themes. or Find the theme you need to edit, then choose Actions > Edit codes.
-
Step 2: Click Add a new template in the Templates directory.
-
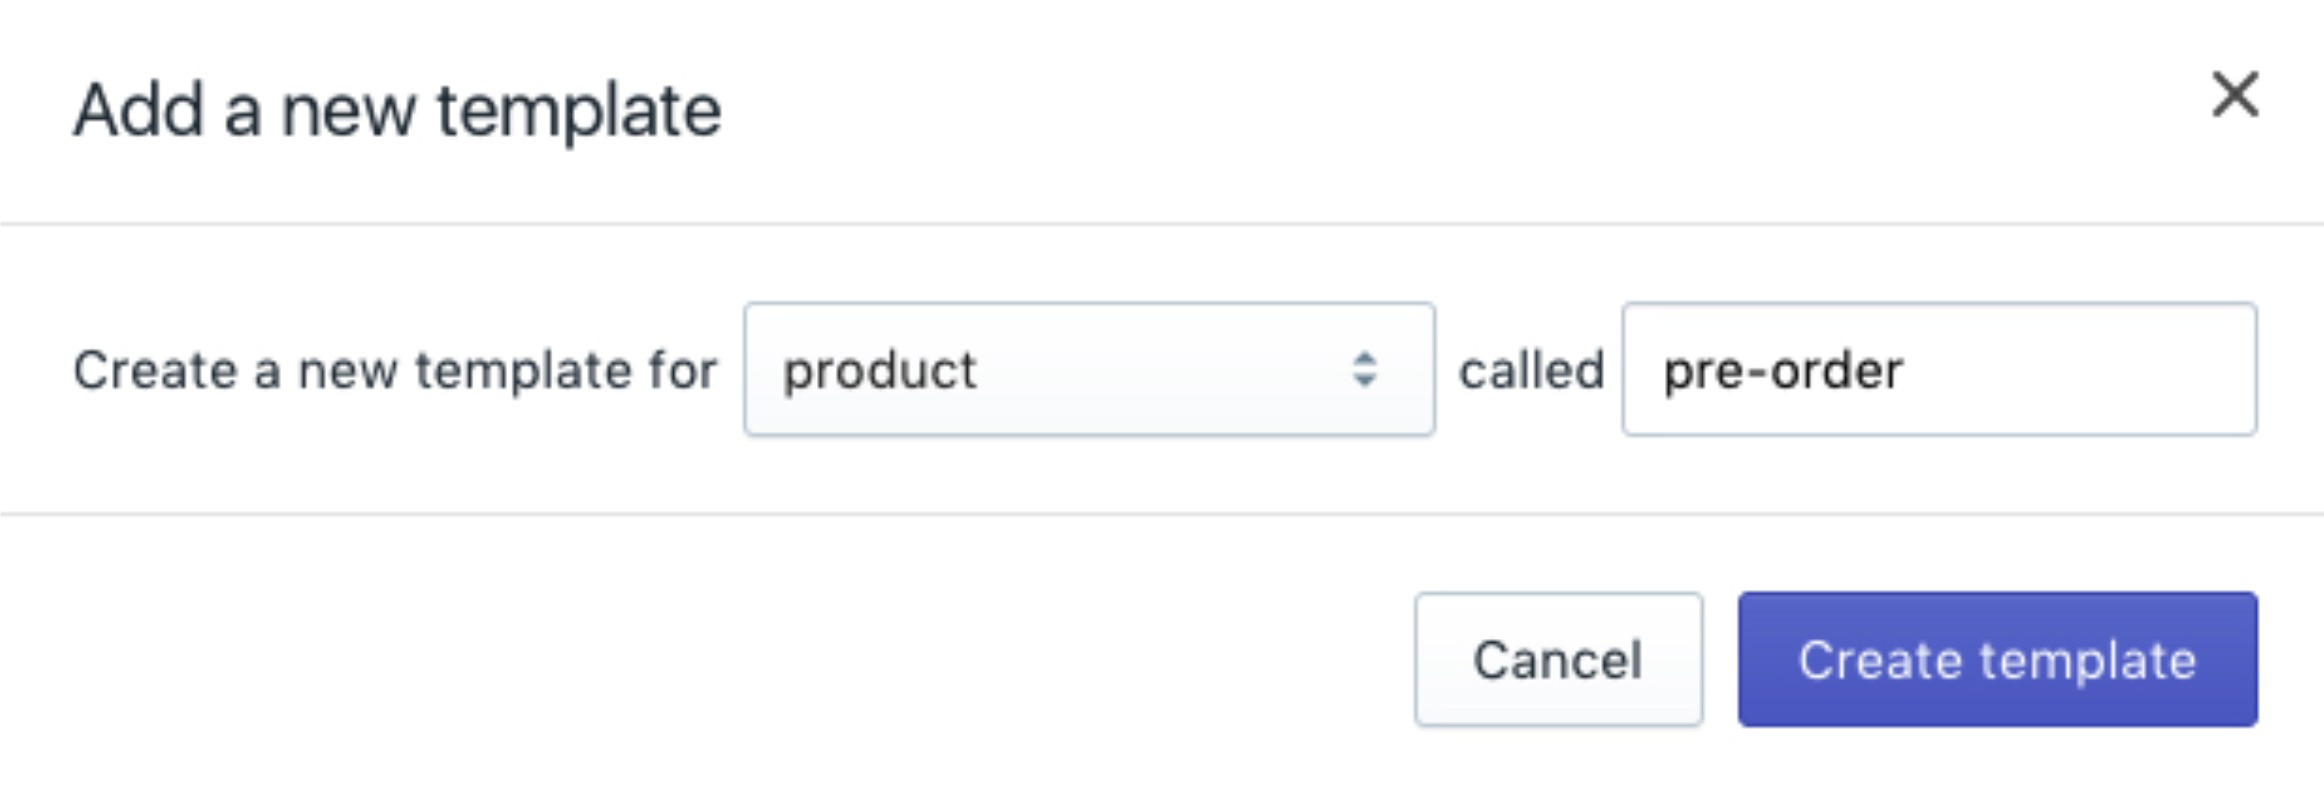
Step 3: Choose product from the frop-down menu and name the template
pre-order:

-
Step 4: Select Create template. Your new
product.pre-order.liquidtemplate will be openned in the code editor. -
Step 5: Search the code below:
{% section 'product-template' %}
Then replace it with:
{% section 'product-pre-order-template' %}
-
Step 6: Select Save.
-
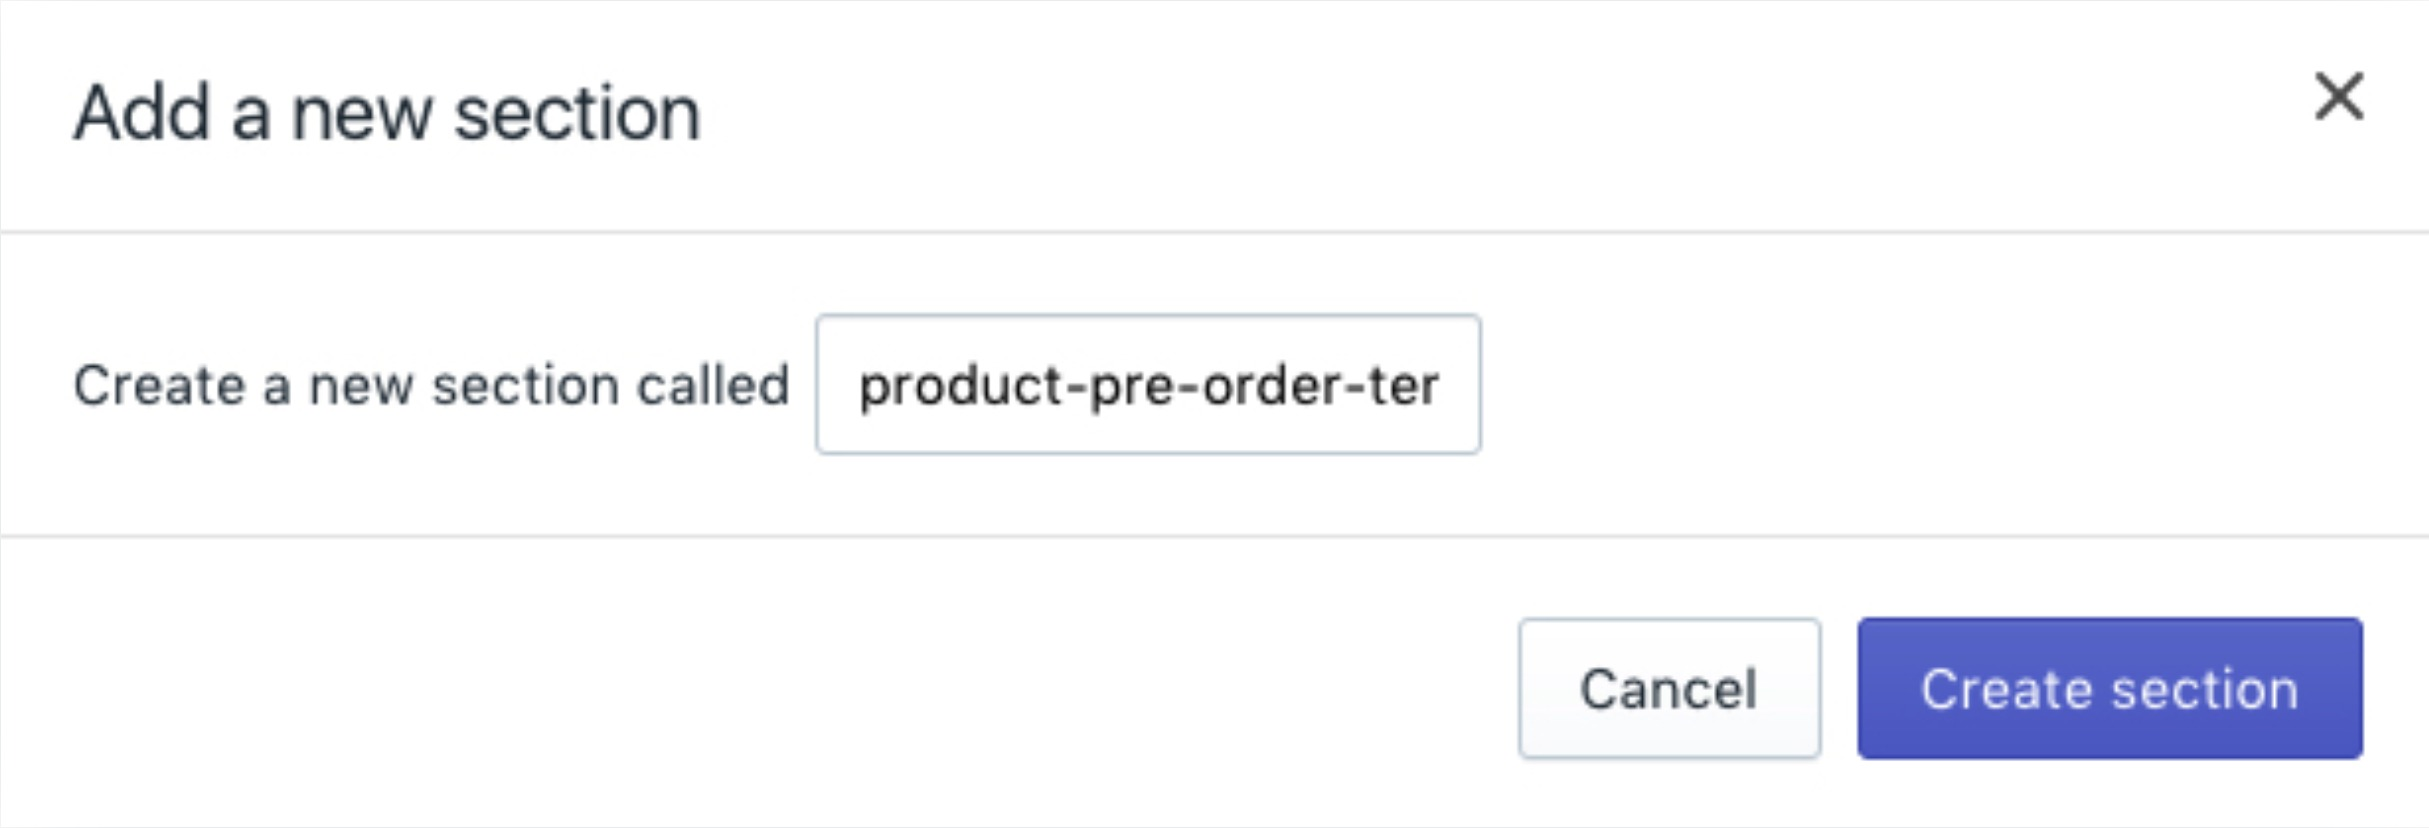
Step 7: Select Add a new section in the Sections directory. Nam your new section
product-pre-order-template:

-
Step 8: Choose Create section. The new
product-pre-order-template.liquidfile will open in the code editor. Remove all of the default codes to make the file empty. -
Step 9: Click
product-template.liquidin the Sections directory. Copy all the content available in this file and then paste it into the newproduct-pre-order-template.liquidfile. -
Step 10: Find and replace the Add to cart button text in your new
product-pre-order-template.liquidfile.
Please search for the code below:
<span id="AddToCartText">{{ 'products.product.add_to_cart' | t }}</span>
And replace it with:
<span id="AddToCartText">{{ 'Pre-order' | json | remove: '"' }}</span>
Look for a <script> tag in the same file that contains this line of code:
addToCart: {{ 'products.product.add_to_cart' | t | json }},
Replace it with:
addToCart: {{ 'Pre-order' | json }},
Each theme is completely different from the others so the code used for the Add to cart button text may vary. In case you replace instances of products.product.add_to_cart with Pre-order, your Add to cart button text should be changed to read Pre-order instead.
- Step 11: Click Save.
Generate a pre-order product page template on iPhone/Android (Click here)
-
Step 1: From the Shopify App, click Store.
-
Step 2: Tap Online store in the Sales channels section.
-
Step 3: Choose Manage themes.
or you can:
-
Step 1: Search for the theme you need to edit, then tap Actions > Edit code.
-
Step 2: Click Add a new template in the Templates directory.
-
Step 3: Choose product from the frop-down menu and name the template
pre-order:

-
Step 4: Select Create template. Your new
product.pre-order.liquidtemplate will be openned in the code editor. -
Step 5: Search the code below:
{% section 'product-template' %}
Then replace it with:
{% section 'product-pre-order-template' %}
-
Step 6: Select Save.
-
Step 7: Select Add a new section in the Sections directory. Nam your new section
product-pre-order-template:

-
Step 8: Choose Create section. The new
product-pre-order-template.liquidfile will open in the code editor. Remove all of the default codes to make the file empty. -
Step 9: Click
product-template.liquidin the Sections directory. Copy all the content available in this file and then paste it into the newproduct-pre-order-template.liquidfile. -
Step 10: Find and replace the Add to cart button text in your new
product-pre-order-template.liquidfile.
Please search for the code below:
<span id="AddToCartText">{{ 'products.product.add_to_cart' | t }}</span>
And replace it with:
<span id="AddToCartText">{{ 'Pre-order' | json | remove: '"' }}</span>
Look for a <script> tag in the same file that contains this line of code:
addToCart: {{ 'products.product.add_to_cart' | t | json }},
Replace it with:
addToCart: {{ 'Pre-order' | json }},
Each theme is completely different from the others so the code used for the Add to cart button text may vary. In case you replace instances of products.product.add_to_cart with Pre-order, your Add to cart button text should be changed to read Pre-order instead.
- Step 11: Click Save.
How to authorize the payment for pre-orders
Authorizing payment for pre-orders
To getting started, we would like to give you an advice that you should not capture payment immediately when selling products as pre-orders unless the customer understand that they are purchasing a product which is not currently available. Actually, you are able to authorize a payment without capturing the funds immediately instead. Moreover, authorizing a payment at the time of checkout give you parmission to capture the funds at a later date when the item is available and you feel ready to fulfill the order.
Please note that if you communicate to your customers who you are charging in advancee for a product that will be shipped at a later date, then you can capture funds immediately for a pre-order product.
-
Step 1: From your Shopify Admin panel, click Settings > Payment providers. or Scroll down to search for the Payment authorization section.
-
Step 2: Choose Manually capture payment for orders:

- Step 3: Tap Save.
Note Authorization periods expire after a specific period of time. After that, you might no longer legally capture payment for that order. To be clear, Shopify Payments has an authorization period of seven days so you have to use a third-party payment gateway to authorize payments for a longer period.
To edit an existing product for iPhone (Click here)
-
Step 1: Go to Store > Settings from your Shopify Admin panel.
-
Step 2: Tap the Payments button right under Store settings.
-
Step 3: Look for the Payment authorization section by scrolling down.
-
Step 4: Select Manually capture payment for orders.
-
Step 5: Tap the Save button.
Pre-order payment strategy
You may know that having an easy, obvious way to accept payments can help your pre-order program run more smoothly. In this instruction we would like to introduce to you 2 ways to collect money for pre-orders:
-
Authorize the credit card details and charge it automatically once the product ships.
-
Take the orders and require payment when the item is back in stock. There could be an issue with this method which is that the customer can change their decision and decide to cancel the order.
You can also ask for a full payment in advance, but actually this mothod’s popularity is not high since a lot of customers feel not comfortable to do so. However, you should carefully take it into consideration because it could work for those products which are considered unique, or high-end, valuable.
On top of that, pre-orders will work the best out of it if your customer does not have to wait for too long. As a suggestion, a week or up to 2 months can be considered a good timline for nearly every product. Please remember that once you start pushing 3 months to a year, your customers may run the risk of losing interests or forgetting about their order.
Conclusion
Now that you have a clear understanding of how to set up pre-orders, it’s time to take action. Start by implementing the steps we’ve outlined, and don’t hesitate to adjust your approach based on customer feedback and your business needs. Keep testing and refining your pre-order strategy to find what works best for your store. With careful planning and a proactive mindset, pre-orders can become a powerful tool to drive sales and keep your inventory in check. Stay consistent, and watch your business grow!


